Overlapping Maple Leaf Filet Table Runner Crochet Pattern
Beginner Friendly
Perfect for those just starting their crochet journey, with clear instructions and simple techniques
Single-Day Project
A satisfying project you can complete in a single afternoon or evening.
Handmade Gift
A beautiful keepsake — free forever. Read online or print at home.
About This Overlapping Maple Leaf Filet Table Runner Crochet Pattern
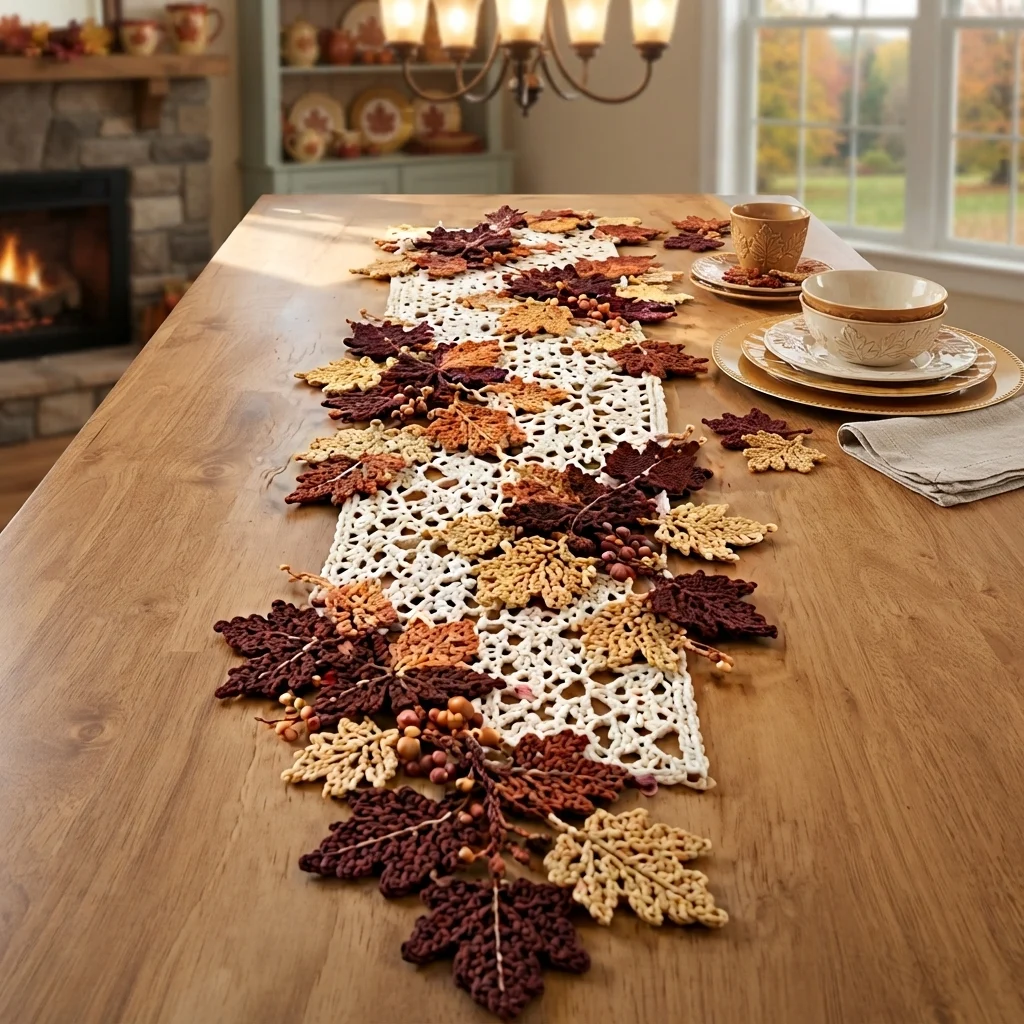
This crochet maple leaf table runner pattern keeps a narrow open filet mesh strip running down the very center, then buries both long sides under a dense, overlapping mass of large maple leaves in mustard gold, rust orange, and deep burgundy-brown, with small clustered berries tucked between them. Unlike a light leaf trim, this border is thick enough that the mesh peeks through only in a thin visible strip down the middle.
What makes this design distinctive is the sheer overlap density of the leaves themselves: rather than spacing motifs with visible gaps, each leaf overlaps 2-3 neighbors on multiple sides, layered at varying angles so the whole border reads as a tumbled pile of fallen leaves rather than a tidy row. The narrow strip of mesh left visible down the center is what keeps the piece from feeling too heavy, giving the eye a place to rest between the two leaf-covered sides. Expect to spend 22-26 hours total, with the vast majority of that time in the leaf motifs and their dense overlapping placement.
This is an advanced pattern, best suited to someone comfortable joining a very large number of overlapping motifs at varied angles and confident judging density by eye, rather than someone wanting an evenly spaced, predictable border.
Materials
- DK weight cotton yarn, cream ~80g, mesh center
- Worsted weight yarn, mustard gold ~90g, leaves
- Worsted weight yarn, rust orange ~90g, leaves
- Worsted weight yarn, deep burgundy-brown ~90g, leaves
- Worsted weight yarn, tan/brown ~20g, berry clusters
- Crochet hook, small 3.5 mm (US E/4), for mesh
- Crochet hook, larger 4.5 mm (US 7), for leaves
- Tapestry/yarn needle
- Steam iron and pressing cloth, or blocking mat and pins
- Sharp scissors
Abbreviations
chchainsl stslip stitchscsingle crochethdchalf double crochetdcdouble crochettrtreble/triple crochetch-spchain spaceMRmagic ringst(s)stitch(es)reprepeatFOfasten offNarrow Filet Mesh Center
- With cream and the smaller hook, ch 21. Row 1: dc in 6th ch from hook, *ch 1, skip 1 ch, dc in next ch; rep from * across. 6 mesh squares.
- Row 2: ch 4 (counts as dc + ch-1), turn, dc in next dc, *ch 1, dc in next dc; rep from * across, ending dc in top of turning ch. 6 squares maintained.
- Rep Row 2 until the strip measures approximately 105 cm long, keeping the narrow 6-square width consistent throughout.
- FO after the final row, leaving a long tail for the edging join.
Solid Edging Band
- With cream, join at one corner of the mesh strip. Round 1: sc evenly around the entire strip, working 3 sc in each corner st to keep it flat.
- Round 2: ch 1, sc in each st around, working 3 sc in each corner st. Join with sl st, FO leaving a long tail.
Large Maple Leaf Motif (make approximately 40: mix of gold, rust, and brown)
- Ch 4, sl st in first ch to form a small foundation ring.
- Lobe 1, top center: ch 12. Starting in 2nd ch from hook: sl st, sc 2, hdc 3, dc 3, tr 2 (10 sts). Sl st into ring.
- Lobe 2, upper right: ch 9. Starting in 2nd ch from hook: sl st, sc 2, hdc 3, dc 2 (8 sts). Sl st into ring.
- Lobe 3, lower right: ch 6. Starting in 2nd ch from hook: sl st, sc 3, hdc 1 (5 sts). Sl st into ring.
- Lobe 4, lower left: repeat Lobe 3 exactly. Sl st into ring.
- Lobe 5, upper left: repeat Lobe 2 exactly. Sl st into ring.
- Sl st into base of Lobe 1 to close. FO leaving a 15-20 cm tail for joining and veining. Repeat for approximately 40 leaves total, mixing all 3 colors evenly.
Embroidering the Veins
- Thread each leaf’s tail onto a tapestry needle.
- Work a straight or backstitch line from the center ring up the middle of the top lobe to its tip.
- Work a shorter straight stitch out toward the tip of each of the remaining 4 lobes.
- Weave in the tail on the wrong side, or leave a short length free if that leaf will be joined at that point.
Berry Clusters (make approximately 20, in tan/brown)
- 4 sc in MR. Do not join.
- Pull the MR tail tight to close, then sl st into the first sc to close the round into a small tight bobble.
- FO leaving a short tail for attaching. Repeat for approximately 20 total, grouped in small clusters of 3-4 tucked between leaves.
Blocking All Pieces
- Steam-block the mesh strip and its edging band flat, pinning the corners square.
- Steam and pin each leaf flat with all 5 lobes spread evenly. Let all pieces dry completely before assembly.
Attaching the Leaf Border
- Lay the blocked mesh strip flat and position leaves along one long edge, overlapping each leaf generously with its neighbors on 2-3 sides, mixing all 3 colors so no large block of one color forms in any section.
- Angle leaves at varied rotations, some pointing outward, some crossing at a diagonal, so the overlap looks tumbled rather than combed into a neat row, and let the outer edge of leaves extend well beyond the mesh strip’s edge while the inner edge just touches the solid band.
- Whipstitch each leaf’s base to the solid edging band, catching several stitches for a secure hold, then whipstitch overlapping leaves to each other at 2-3 contact points as you go.
- Tuck berry clusters into gaps between leaves throughout, rather than only at regular intervals.
- Repeat the entire process down the opposite long edge, checking periodically that both sides carry a similar density and color balance.
Finishing
Once both sides are fully covered, turn the runner over and check for any leaf held by only a single stitch; add a second point wherever something feels loose, since this dense a border takes real handling. Weave in all remaining tails. Give the whole runner a final light steam, keeping the visible strip of mesh flat while leaving the leaf border’s natural tumbled texture undisturbed rather than pressing it flat.
Tips for Success
- Make significantly more leaves than you think you’ll need before starting assembly; running short partway through a dense overlap border is much harder to fix than having a few extra.
- Work outward from the mesh strip toward the outer edge on each side, rather than starting at the outer edge, so the visible mesh strip stays a consistent width throughout.
- Mix all 3 leaf colors as you place them rather than grouping by color, checking every few leaves that no long run of one shade forms.
- Join each leaf to the band and to its overlapping neighbors at multiple points, since a leaf anchored at only one spot will flip or sag under the weight of the pieces around it.
- Check both long sides against each other periodically for density and color balance, since it’s easy to work one side more heavily than the other without noticing.
Common Mistakes to Avoid
- Leaving the mesh strip wider than needed makes the leaf border look sparse by comparison. Fix: keep the mesh center narrow, as instructed, so the leaves dominate the visual width.
- Spacing leaves with visible gaps between them breaks the dense, tumbled look this design depends on. Fix: overlap leaves generously on multiple sides rather than placing them edge to edge.
- Working one long side more densely than the other creates a lopsided finished piece. Fix: compare both sides against each other every few leaves rather than only checking at the end.
- Joining leaves only to the band and not to each other leaves the overlap prone to shifting with handling. Fix: whipstitch overlapping leaves together at their contact points, not just to the band underneath.
- Grouping same-colored leaves together in sections instead of mixing them throughout breaks the blended, natural color look. Fix: distribute all 3 colors evenly across both sides as you place leaves.
Ways to Customize This Pattern
- Reduce leaf density for a lighter, more open border if the full overlapping look feels like too much for your table.
- Swap the mustard, rust, and burgundy palette for greens and yellows for a spring or everyday version.
- Widen the mesh center slightly for a more balanced ratio between visible mesh and leaf border.
- Skip the berry clusters for a simpler leaves-only border.
- Scale individual leaves down slightly and increase the count for an even denser, finer-textured border.
Frequently asked questions
Around 40 leaves covers both sides of a runner this length at the density shown, but exact counts vary with your leaf size and gauge. Keep making and adding leaves until no gaps of bare mesh or band remain visible.
A wider mesh panel would compete visually with the dense leaf border and make the leaves look sparse by comparison. Keeping the visible mesh to a narrow strip lets the leaves read as the clear focal point.
Yes. Skip the mesh center entirely and build the leaf border on a plain solid fabric strip instead, or join leaves directly to each other down the center with no base fabric at all for a fully open, leaves-only runner.
This usually means leaves were placed at too uniform an angle. Vary rotation deliberately, letting some leaves cross diagonally over others rather than all pointing the same direction, for the layered, fallen-leaf look.
The finished Overlapping Maple Leaf Filet Table Runner Crochet Pattern

