Advanced
For experienced crocheters who enjoy complex shaping, fine detail, and ambitious construction
Weekend Project
A satisfying weekend make — start Friday, finish Sunday, enjoy forever.
Handmade Gift
A beautiful keepsake — free forever. Read online or print at home.
About This Pansy Granny Square Blanket
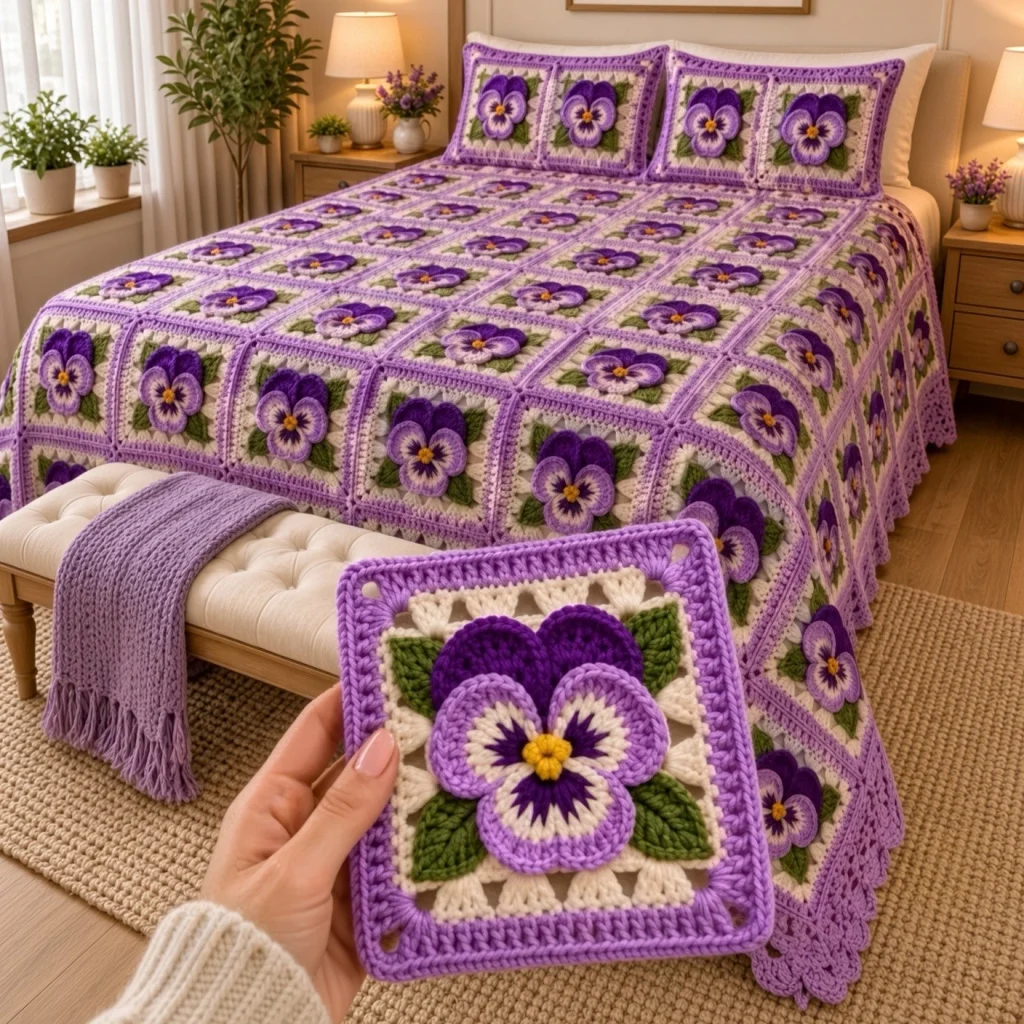
This pansy granny square blanket pattern builds a full bed-sized throw from forty-two squares, and every one of them carries a raised pansy made from six separate pieces. The flower is not embroidered on or worked flat into the square: three wide lower petals, two deep violet upper petals, a small golden centre and two sage leaves are each crocheted on their own and stitched down in layers, so the finished bloom sits up off the cream background the way a real pansy sits above its leaves. The square underneath is a classic five-round granny centre, finished with a cream shell round worked in front loops only and a lavender frame worked behind it in the back loops, which is what gives the motif that double-framed, almost quilted look.
It is a long project, and it helps to know that up front. Figure roughly 60 to 75 hours in total: about 45 minutes for a bare square, another 35 to 45 minutes for the petals, leaves and assembly of each flower, then joining and the border at the end. The good news is that it breaks into very portable pieces. Petals and leaves are tiny and travel well, and you can batch them — make all 126 lower petals over a few evenings, then all 84 upper petals, then sit down and assemble. Nothing in the pattern is difficult on its own; the challenge is stamina and consistency across forty-two motifs.
This one suits a confident crocheter who already reads stitch counts comfortably and wants a heirloom-scale piece rather than a weekend make. You will be working tr stitches into a short foundation chain, changing colour mid-round, working in front and back loops separately, and sewing curved pieces onto a flat background so they lie flat. If you have made granny squares before but never worked a layered applique flower, this is a good first one — the shapes are small and forgiving, and any single petal takes four minutes to redo.
Materials
- Worsted/aran cotton or cotton blend in cream approx. 850 g for 42 square centres
- Worsted/aran yarn in medium lavender approx. 900 g for frames, joining and border
- Worsted/aran yarn in deep violet approx. 200 g for the upper petals
- Worsted/aran yarn in sage green approx. 150 g for the leaves
- Worsted/aran yarn in golden yellow approx. 25 g for the flower centres
- 4.0 mm crochet hook for squares, petals and leaves
- 3.5 mm crochet hook optional, for tighter petal edges
- Blunt tapestry needle size 16-18, for assembly and joining
- Rust-proof pins at least 20, for pinning petals before sewing
- Stitch markers 4-6, to mark corner spaces
- Sharp scissors and a lint roller for trimming and cleaning up fibres
- Blocking mats and a spray bottle recommended for squaring up motifs
Abbreviations
MRmagic ringchchainsl stslip stitchscsingle crochethdchalf double crochetdcdouble crochettrtreble crochetst(s)stitch(es)spspaceFLOfront loop onlyBLOback loop onlyskskipreprepeatRSright sideGauge and Size
- Gauge: rounds 1-5 of the granny centre measure about 11.5 cm across with a 4.0 mm hook in worsted yarn.
- One finished, blocked square measures about 18 cm square.
- Blanket layout: 6 squares across by 7 squares down = 42 squares, approximately 108 x 126 cm before the border.
- With the four-round border added, the finished blanket measures approximately 120 x 140 cm.
- If your square comes out larger than 18 cm, drop to a 3.5 mm hook; if smaller, go up to 4.5 mm. Exact gauge matters less than making all 42 squares the same.
Square Background (make 42)
- Rnd 1 (cream): MR, ch 3 (counts as first dc), 2 dc in ring, ch 2, [3 dc in ring, ch 2] 3 times, sl st to top of beginning ch-3. (12 dc, 4 ch-2 corner sps)
- Rnd 2: sl st into next ch-2 sp, ch 3, (2 dc, ch 2, 3 dc) in same sp, ch 1, [(3 dc, ch 2, 3 dc) in next corner sp, ch 1] 3 times, sl st to top of beginning ch-3. (24 dc, 4 corner sps, 4 ch-1 sps)
- Rnd 3: sl st into next corner sp, ch 3, (2 dc, ch 2, 3 dc) in same sp, ch 1, *3 dc in next ch-1 sp, ch 1, (3 dc, ch 2, 3 dc) in next corner sp, ch 1; rep from * twice more, 3 dc in last ch-1 sp, ch 1, sl st to top of beginning ch-3. (36 dc, 8 ch-1 sps)
- Rnd 4: sl st into next corner sp, ch 3, (2 dc, ch 2, 3 dc) in same sp, ch 1, *[3 dc in next ch-1 sp, ch 1] twice, (3 dc, ch 2, 3 dc) in next corner sp, ch 1; rep from * twice more, [3 dc in next ch-1 sp, ch 1] twice, sl st to top of beginning ch-3. (48 dc, 12 ch-1 sps)
- Rnd 5: sl st into next corner sp, ch 3, (2 dc, ch 2, 3 dc) in same sp, ch 1, *[3 dc in next ch-1 sp, ch 1] 3 times, (3 dc, ch 2, 3 dc) in next corner sp, ch 1; rep from * twice more, [3 dc in next ch-1 sp, ch 1] 3 times, sl st to top of beginning ch-3. (60 dc, 16 ch-1 sps — 3 side groups and 4 ch-1 sps per side)
- Rnd 6 (still cream, solid round): sl st into next corner sp, ch 1, *(3 sc, ch 2, 3 sc) in corner sp, [sc in each of next 3 dc, sc in next ch-1 sp] 4 times, sc in each of next 3 dc; rep from * 3 more times, sl st to first sc. (100 sc; 25 sc along each side between corner sps)
- Rnd 7 (cream shell round, FLO): sl st into next corner ch-2 sp, ch 1, *(sc, ch 2, sc) in corner sp, then working in front loops only: sl st in next st, [sk 1 st, 5 dc in next st, sk 1 st, sl st in next st] 6 times; rep from * 3 more times, sl st to first sc. (24 shells, 6 per side) Fasten off cream.
- Rnd 8 (lavender, worked behind the shells in the back loops of Rnd 6): join lavender with a sl st in any Rnd 6 corner ch-2 sp, ch 1, *(2 sc, ch 2, 2 sc) in corner sp, sc in BLO of each of next 25 sts; rep from * 3 more times, sl st to first sc. (116 sc; 29 sc per side) Push the cream shells forward as you go so they stand proud on the right side.
- Rnd 9: sl st into next corner ch-2 sp, ch 3, (2 dc, ch 2, 3 dc) in same sp, *dc in each of next 29 sc, (3 dc, ch 2, 3 dc) in next corner sp; rep from * twice more, dc in each of next 29 sc, sl st to top of beginning ch-3. (140 dc; 35 dc per side between corner sps)
- Rnd 10: sl st into next corner ch-2 sp, ch 1, *(2 sc, ch 3, 2 sc) in corner sp, sc in each of next 35 dc; rep from * 3 more times, sl st to first sc. (156 sc, 4 ch-3 corner loops; 39 sc per side between corner loops) Fasten off, weave in ends.
- Make 42 squares in total. Block each one to 18 cm square before assembling the flowers.
Lower Petals (make 3 per square, 126 total)
- With lavender, ch 5.
- Rnd 1: hdc in 2nd ch from hook, 2 dc in next ch, 3 tr in next ch, 7 tr in last ch (this is the wide tip); working along the opposite side of the foundation chain: 3 tr in next ch, 2 dc in next ch, hdc in next ch, sl st to first hdc. (19 sts)
- Rnd 2 (change to cream): join cream in the first hdc, ch 1, sc in same st, sc in each of next 5 sts, 2 sc in each of next 7 tip sts, sc in each of last 6 sts, sl st to first sc. (26 sc)
- Fasten off cream, leaving a 30 cm tail for sewing. Weave in the short lavender tail only — keep the cream tail long.
- The petal should be a broad fan, wider than it is tall, with the straight base at the bottom. If it cups, your tension on the tr stitches is too tight; try one round with the hook held looser.
Upper Petals (make 2 per square, 84 total)
- With deep violet, ch 4.
- Rnd 1: hdc in 2nd ch from hook, 3 dc in next ch, 7 dc in last ch; working along the opposite side of the foundation chain: 3 dc in next ch, hdc in next ch, sl st to first hdc. (15 sts)
- Rnd 2 (change to lavender): join lavender in the first hdc, ch 1, sc in same st, sc in each of next 3 sts, 2 sc in each of next 7 tip sts, sc in each of last 4 sts, sl st to first sc. (22 sc)
- Fasten off lavender, leaving a 25 cm tail for sewing.
- These petals are deliberately smaller and rounder than the lower petals — they sit behind the flower as the two upright pansy “ears”, so do not substitute a lower petal here.
Flower Centre (make 1 per square, 42 total)
- With golden yellow, make a MR.
- Rnd 1: ch 1, 6 sc in MR, sl st to first sc. (6 sc)
- Pull the ring tight until the disc is a firm little button about 1.5 cm across.
- Fasten off, leaving a 20 cm tail. Do not weave in — this tail sews the centre down.
Leaves (make 2 per square, 84 total)
- With sage green, ch 9.
- Rnd 1: sc in 2nd ch from hook, hdc in next ch, dc in next 2 ch, hdc in next ch, sc in next 2 ch, 3 sc in last ch (tip); working along the opposite side of the foundation chain: sc in next 2 ch, hdc in next ch, dc in next 2 ch, hdc in next ch, sc in next ch, sl st to first sc. (17 sts)
- Fasten off, leaving a 25 cm tail for sewing.
- Thread a separate 20 cm strand of sage green and work a line of surface slip stitches up the centre of the leaf from base to tip, over the foundation chain, to form the central vein. Pull it snug but not tight enough to curl the leaf.
- Press each leaf flat under a damp cloth before assembly — leaves are the pieces most likely to curl.
Assembling One Pansy Square
- Lay a blocked square right side up with a corner at the top. The pansy sits on point in the centre of the cream area, filling it from shell round to shell round.
- Pin the two leaves first, one to the left and one to the right, tips pointing out toward the side edges of the cream field, bases meeting near the centre. Sew each leaf down with its sage tail using small whip stitches all around the outline, catching only the top loops of the cream background so the stitches disappear.
- Pin the two deep violet upper petals above the leaves, tips pointing to the top corner, bases overlapping at the centre and partly covering the leaf bases. Sew around each petal through the lavender edge round.
- Pin the three lower lavender petals: one pointing straight down to the bottom corner, and one to each side angled at roughly 45 degrees, bases all meeting at the centre and overlapping the bottom edges of the violet petals. Sew each one down around its cream edge. Sew the two side petals first and the bottom petal last, so the bottom petal lies over them.
- Place the yellow centre disc over the point where all five petal bases meet and sew it down with its tail, working around the outside of the 6 sc so it sits like a raised button.
- Embroider the pansy blotch: thread a long strand of deep violet and work 3 straight stitches radiating outward from under the yellow centre onto each of the three lower petals — 9 stitches in total, each 1.5 to 2 cm long, fanning slightly. Keep them short enough that the cream petal edge stays clear.
- Weave all tails into the back of the square, not into the petals, and trim.
- Repeat for all 42 squares. Check each finished motif against the first one so the flower sits at the same angle every time.
Joining the Squares
- Lay out all 42 squares, 6 across and 7 down, all with the pansy facing the same direction. Photograph the layout before you move anything.
- Join with lavender using a flat whip stitch: hold two squares with wrong sides together, right sides facing out.
- Insert the needle through the back loop only of the first square and the corresponding back loop of the second square, and whip stitch across all 39 side stitches, plus the 2 sc on either side of each corner loop at each end of the seam.
- At each corner, pass through the ch-3 corner loops of both squares once to lock them together before moving on.
- Join all seven rows horizontally first, then join the long rows to each other vertically, passing straight through the four-corner intersections without bunching them.
- Keep your joining tension slightly looser than your crochet tension. A tight seam puckers the blanket and will not block out.
- Weave in every seam tail along the back of a lavender frame round before starting the border.
Blanket Border
- Rnd 1 (lavender): join with a sl st in any outer corner ch-3 loop of the blanket. Ch 1, *(2 sc, ch 2, 2 sc) in corner loop, then work along the edge: sc in each of the 39 sts of each square, 1 sc in each ch-3 loop and 1 sc in each seam between squares; rep from * at each of the 4 blanket corners, sl st to first sc.
- Rnd 2: sl st into next corner ch-2 sp, ch 3, (2 dc, ch 2, 3 dc) in same sp, *dc in each sc to next corner sp, (3 dc, ch 2, 3 dc) in corner sp; rep from * around, ending dc in each sc to the start, sl st to top of beginning ch-3.
- Rnd 3: sl st into next corner ch-2 sp, ch 1, *(2 sc, ch 2, 2 sc) in corner sp, sc in each dc to next corner; rep from * around, sl st to first sc. As you work this round, count the sc between corner spaces on each edge and add or skip one stitch near the middle of the edge so the count on every edge is a multiple of 4 plus 1.
- Rnd 4 (scallop round): sl st into next corner ch-2 sp, ch 1, *(sc, ch 2, sc) in corner sp, sl st in next sc, [sk 1 sc, 5 dc in next sc, sk 1 sc, sl st in next sc] to the next corner; rep from * around, sl st to first sc. Fasten off.
- Weave in all remaining ends on the wrong side, running each tail through at least 8 cm of stitches in two directions.
Finishing
Block the finished blanket properly — it makes more difference here than on any other step. Lay it out flat on clean towels or interlocking mats, pin the four corners square, then pin each scallop of the border out so the edge sits in an even wave instead of pulling in. Spray the whole piece until it is evenly damp, pat the squares into true squares with your hands, and leave it to dry completely, which can take a full day for a blanket this size. Do not pin or press the pansies themselves; keep the iron away from them entirely so the petals keep their lift.
Once dry, go over the blanket petal by petal and check that every flower is anchored at the centre as well as the edges. A petal sewn only around its outline will flip up after the first wash; one extra stitch through the base of each petal, hidden under the yellow centre, prevents that. Give the whole surface a pass with a lint roller to lift stray fibres from the cream background, then wash by hand or on a wool cycle at 30 degrees and dry flat. Stored folded with the pansy side out, the raised flowers keep their shape for years.
Tips for Success
- Batch the pieces instead of finishing one square at a time. Make all 42 backgrounds, then all 126 lower petals, then all 84 upper petals, leaves and centres. Your tension stays far more consistent across 126 petals made in a row than across petals made weeks apart.
- Use the 3.5 mm hook for the petals and leaves even though the squares are worked at 4.0 mm. Firmer petals hold their curve, sit up off the background, and are much easier to pin down neatly.
- Mark the four corner spaces of each square with stitch markers on rounds 6 and 8. Those two rounds change the stitch pattern (solid sc, then front loop/back loop work) and are where a miscount is easiest to make and hardest to spot.
- Cut all your petal sewing tails to the same length, about 30 cm, before you start assembly. Short tails run out mid-petal and leave a visible join; longer tails tangle.
- Make a cardboard template of your first blocked square at 18 cm and lay each new square on it as you finish. Catching a stray square early is far quicker than easing it in at the joining stage.
Common Mistakes to Avoid
- Working Rnd 8 into both loops instead of the back loops of Rnd 6. If you do, the cream shells get trapped flat against the lavender frame and lose all their relief. Pull the shells forward with your thumb as you work each stitch and only pick up the back loop behind them.
- Sewing the lower petals before the upper petals. The layering only looks right if the two violet petals go down first and the three lavender ones overlap them. If you have already sewn the lower petals, unpick the two side ones rather than tucking the violet petals underneath — tucked petals will not lie flat.
- Embroidering the violet blotch lines too long. Stitches that reach the cream edge of the petal read as stripes, not a pansy face. Keep every straight stitch under 2 cm and let them fan out from under the yellow centre.
- Joining the squares with a tight whip stitch. Tight seams make the blanket buckle along every row and blocking will not correct it. Work the seam with a slightly loose hand and stop every few stitches to flatten the join over your knee.
- Skipping the block on individual squares and only blocking at the end. Forty-two unblocked squares will not match at the seams, and seam-by-seam easing distorts the pansies. Block each square as it comes off the hook.
Ways to Customize This Pattern
- Change the blanket size by changing the grid: 4 x 5 squares makes a 78 x 96 cm baby blanket, 5 x 6 makes a 96 x 114 cm throw, and 7 x 8 makes a 126 x 144 cm coverlet. The border rounds are written for any perimeter.
- Work a mixed-colour pansy bed: keep the cream background and sage leaves on every square but rotate the petals through deep violet, burgundy, deep gold and dusty rose so each flower is a different variety. Keep the lavender frame on all squares to hold the layout together.
- Swap the cream shell round for the same shell round in lavender and work the frame in cream instead. This reverses the contrast and makes the pansies read darker against a lighter ground.
- Turn a single square into a cushion front: make two squares, sew the flower onto one only, and join them around three sides with the whip stitch from the joining section before inserting a 20 cm pillow form and closing the fourth side.
- Make a table runner from 3 x 9 squares and finish it with only Rnds 1 and 4 of the border for a narrower scalloped edge.
Frequently asked questions
Pin all five petals in place before you sew anything. The cream field inside the shell round is about 12 cm across, and the pansy measures roughly 11 cm from the tip of the bottom petal to the tips of the upper petals, so it fits with a small margin — but only if the petal bases overlap tightly at the centre. If the flower looks too big, the usual cause is loose tr stitches in the lower petals; redo one petal with the 3.5 mm hook and compare.
Not with this construction. The petals are worked around a foundation chain and have their own edge rounds in a second colour, which is what gives the raised, layered look in the photo. If you want to avoid sewing, the closest option is to work the flower as a separate motif and attach it with a round of slip stitches through the petal edges, but you will still be joining the pieces by hand and the overlap between upper and lower petals will be lost.
Cotton or a cotton blend gives the crisp stitch definition you see in the shell round and holds the petal shape without blocking every time it is washed. Acrylic is softer and lighter for a bed-sized piece and uses less yarn by weight, but petals in acrylic flatten more over time, so work them at 3.5 mm and anchor each petal base under the yellow centre. Avoid anything fuzzy or halo-like; it buries the embroidered blotch lines.
Roughly 20 g of cream, 21 g of lavender, 4 g of deep violet, 3 g of sage green and half a gram of golden yellow per square, before joining and the border. Weigh your first completed square to get a number for your own tension, then multiply by 42 and add about 15 percent of lavender for seams and the four border rounds.
Yes. A flat slip stitch join through the back loops of Rnd 10 works well and is faster, but use a hook one size larger than you used for the squares or the seams will pull tight and the blanket will not lie flat. Join-as-you-go on Rnd 10 is also possible: replace the ch-3 corner loops and every third sc along the joining side with a slip stitch into the matching stitch of the neighbouring square.
The finished Pansy Granny Square Blanket

