Advanced
For experienced crocheters who enjoy complex shaping, fine detail, and ambitious construction
Single-Day Project
A satisfying project you can complete in a single afternoon or evening.
Handmade Gift
A beautiful keepsake — free forever. Read online or print at home.
About This Peach Blossom Crochet Bedspread
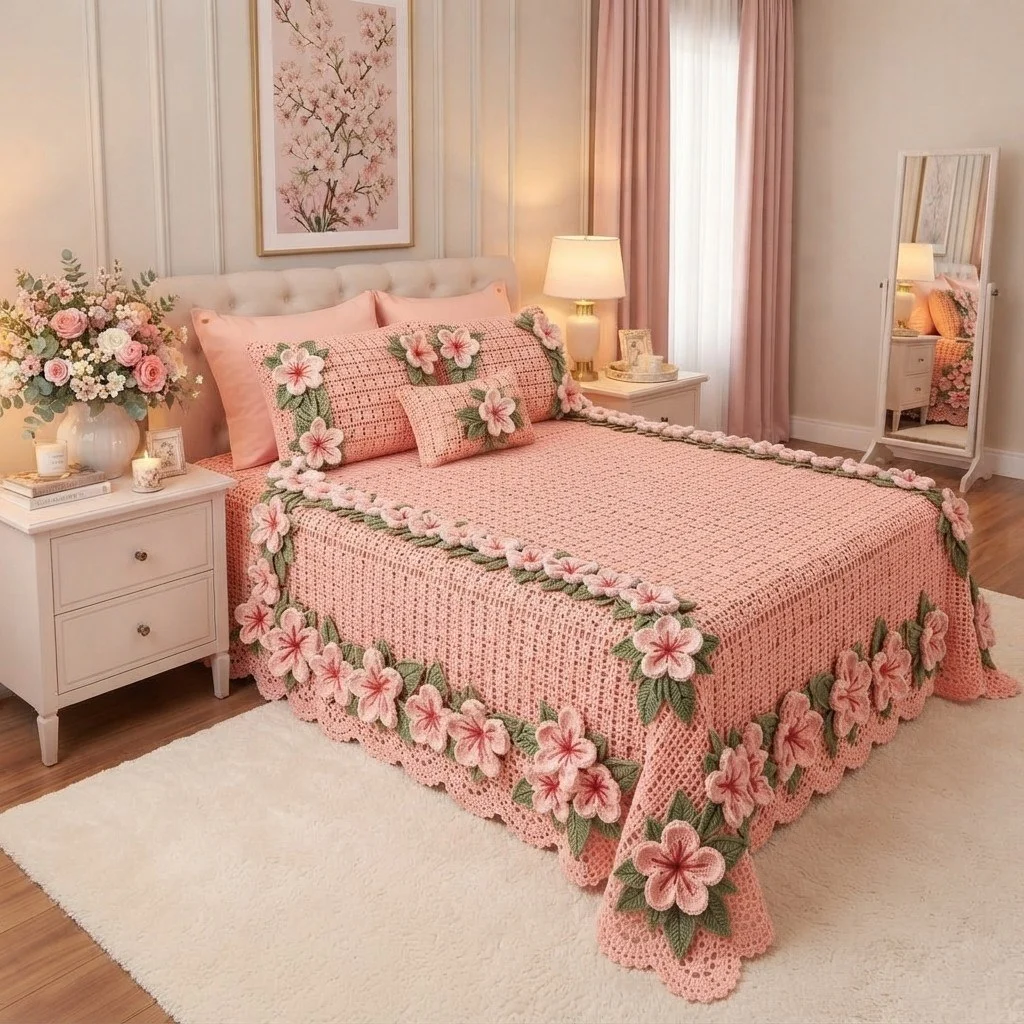
This crochet floral bedspread pattern turns a simple peach grid-stitch rectangle into a full queen-size cover with a deep open-mesh skirt and more than a hundred raised blossoms and leaves sewn around it. The body of the spread is a two-stitch repeat — single crochet, chain one — so the fabric is light, drapes well over a mattress, and shows a fine even grid of holes instead of a heavy solid sheet. The skirt is a chain-loop mesh worked straight off the border round, so there is no seam at the fold line and nothing to line up later.
The flowers are what make it worth the hours. Each large blossom is a two-layer flower: five front petals in blush, five slightly longer back petals in medium pink behind them, and a deep rose centre with straight-stitch rays embroidered out over the petals. The leaves are worked around a chain so they come out pointed at both ends, then given a surface slip-stitch vein down the middle. They are sewn on in two bands — a light scattering of small blossoms around the top of the mattress, and a dense garland along the lower part of the skirt where it catches the light.
Plan on 40 to 55 hours. The panel itself is straightforward television crochet; the appliqués and the sewing are where the time goes, and they are easy to do in short sittings. This one is for crocheters who are comfortable keeping a stitch count over 270 stitches wide, who have made appliqués before, and who do not mind a long project. If you have only ever made small items, make a cot-size version first using the resizing note in the customization section.
Materials
- Worsted weight cotton in peach approx. 2800 m / 3060 yd — main panel and skirt
- Worsted weight cotton in pale blush approx. 300 m / 330 yd — front petals
- Worsted weight cotton in medium pink approx. 300 m / 330 yd — back petals
- Worsted weight cotton in deep rose approx. 80 m / 88 yd — flower centres and embroidered rays
- Worsted weight cotton in sage green approx. 280 m / 306 yd — leaves
- Worsted weight cotton in deep green approx. 200 m / 219 yd — leaves and veins
- 4 mm hook for the panel, border and skirt
- 3.5 mm hook for the blossoms and leaves, so they sit firm and hold their shape
- Stitch markers at least 12 — for row counting and appliqué placement
- Blunt tapestry needle size 13 or similar
- Rust-proof pins 60+ for pinning appliqués before sewing
- Tape measure and sharp scissors
- Spray bottle and a large flat space for blocking
Abbreviations
chchainsl stslip stitchscsingle crochethdchalf double crochetdcdouble crochetMRmagic ringst(s)stitch(es)sp(s)space(s)skskipreprepeatrnd(s)round(s)RS / WSright side / wrong sidepicotch 3, sl st in 3rd ch from hookgrid stsc in sc, ch 1 over each ch-1 spGauge and Sizing
- Grid stitch with the 4 mm hook: 18 sts (9 sc plus 9 ch-1 sps) and 18 rows = 10 cm / 4 in, measured after a light steam block.
- Large blossom with the 3.5 mm hook: 11 cm / 4.25 in across. Small blossom: 7 cm / 2.75 in across. Leaf: 7 cm / 2.75 in long.
- Finished top panel: approx. 152 x 200 cm / 60 x 79 in, sized for a standard queen mattress top.
- Finished skirt drop: approx. 35 cm / 13.75 in, including the scalloped edging.
- Work a 15 cm square swatch in grid stitch before you cast on. One stitch of difference over 10 cm becomes 15 cm of difference over the full width.
Main Panel
- With peach and the 4 mm hook, ch 273.
- Row 1 (RS): Sc in 2nd ch from hook, *ch 1, sk next ch, sc in next ch; rep from * across. (137 sc and 136 ch-1 sps; 273 sts and sps total)
- Row 2: Ch 1, turn. Sc in first sc, *ch 1, sk next ch-1 sp, sc in next sc; rep from * across. (137 sc and 136 ch-1 sps)
- Rows 3–357: Rep Row 2. (137 sc and 136 ch-1 sps each row)
- After Row 357 the panel measures approx. 152 x 200 cm. Do not fasten off — the border is worked straight on.
- Count check before continuing: every row must have exactly 137 sc. Lay the panel out flat and measure the width at the bottom, middle and top; all three should match within 1 cm.
Border Round
- Rnd 1 (RS): Ch 1, do not turn. Work 1 sc in each sc and 1 sc in each ch-1 sp across the top edge. (273 sc)
- Work 3 sc in the corner, then work 1 sc in each row-end down the long side. (3 corner sc, 357 sc)
- Work 3 sc in the corner, then 1 sc in each ch and ch-sp of the foundation edge. (3 corner sc, 273 sc)
- Work 3 sc in the corner, then 1 sc in each row-end up the second long side. (3 corner sc, 357 sc)
- Work 3 sc in the last corner and join with sl st to the first sc. (1272 sc total)
- Check: 273 + 357 + 273 + 357 + (4 x 3) = 1272. This number must be exactly divisible by 3 for the skirt. If you are off by one or two, add or remove sc evenly along one long edge now.
- Do not fasten off.
Mesh Skirt
- Rnd 1: Sl st into the first sc. Ch 5, sk next 2 sc, sc in next sc, *ch 5, sk next 2 sc, sc in next sc; rep from * around, join with sl st to the base of the beginning ch-5. (424 ch-5 loops)
- Rnd 2: Sl st into the first ch-5 loop. Ch 5, sc in next ch-5 loop, *ch 5, sc in next ch-5 loop; rep from * around, join with sl st to the base of the beginning ch-5. (424 ch-5 loops)
- Rnds 3–20: Rep Rnd 2. (424 ch-5 loops each round)
- The skirt should now measure approx. 33 cm from the border round. If your drop needs to be deeper or shallower, add or remove whole rounds here — each round adds approx. 1.7 cm.
- Do not fasten off.
Scalloped Picot Edging
- Rnd 21: Sl st into the first ch-5 loop. In the same loop work (sc, 3 dc, picot, 3 dc, sc).
- *In the next ch-5 loop work (sc, 3 dc, picot, 3 dc, sc); rep from * around. (424 scallops)
- Join with sl st to the first sc. Fasten off and weave in the end along the top of a scallop, not along the picot.
- Spray the skirt lightly and let the scallops dry hanging over the edge of a table so they sit flat rather than curling inward.
Large Blossom (make 48)
- With deep rose and the 3.5 mm hook: Rnd 1: 10 sc in MR, join with sl st to first sc. Pull the ring tight. (10 sc) Fasten off deep rose.
- Rnd 2: Join pale blush in any sc. Ch 1, sc in same sc, *ch 3, sk next sc, sc in next sc; rep from * 3 more times, ch 3, sk last sc, join with sl st to first sc. (5 sc and 5 ch-3 loops)
- Rnd 3 (front petals): In each ch-3 loop work (sc, hdc, 3 dc, hdc, sc), joining with sl st to the first sc at the end. (5 petals) Fasten off pale blush.
- Rnd 4: Join medium pink in any sc of Rnd 2, working behind the front petals. Ch 1, *ch 4, sl st in next sc of Rnd 2 behind the petals; rep from * around, ending with a sl st in the starting sc. (5 ch-4 loops)
- Rnd 5 (back petals): In each ch-4 loop work (sc, hdc, 5 dc, hdc, sc), joining with sl st to the first sc. (5 petals)
- Fasten off medium pink, leaving a 40 cm tail for sewing. The back petals should sit offset between the front petals; nudge them into place with your fingers before blocking.
- Blocking: spray lightly, press flat under a towel, then lift the front petals so the flower keeps a shallow cupped shape.
Small Blossom (make 36)
- With deep rose and the 3.5 mm hook: Rnd 1: 10 sc in MR, join with sl st to first sc. Pull the ring tight. (10 sc) Fasten off deep rose.
- Rnd 2: Join pale blush (make 18) or medium pink (make 18) in any sc. Ch 1, sc in same sc, *ch 2, sk next sc, sc in next sc; rep from * 3 more times, ch 2, sk last sc, join with sl st to first sc. (5 sc and 5 ch-2 loops)
- Rnd 3 (petals): In each ch-2 loop work (sc, hdc, 2 dc, hdc, sc), joining with sl st to the first sc. (5 petals)
- Fasten off, leaving a 30 cm tail for sewing.
Leaf (make 84: 48 sage, 36 deep green)
- With the 3.5 mm hook and your chosen green, ch 10.
- Rnd 1: Sc in 2nd ch from hook, hdc in next ch, dc in next 3 ch, hdc in next 2 ch, sc in next ch. (8 sts worked along the first side)
- Work 3 sc in the last ch to turn the point. (3 sts)
- Working along the opposite side of the foundation chain: sc in next ch, hdc in next 2 ch, dc in next 3 ch, hdc in next ch, sc in next ch. (8 sts)
- Join with sl st to the first sc. (19 sts total)
- Rnd 2 (optional firm edge): Ch 1, sl st in each st around, join with sl st to the first sl st. (19 sl sts) This gives the leaf the crisp outline shown in the photo.
- Fasten off, leaving a 30 cm tail for sewing.
- Vein: with deep green and the tapestry needle, work a line of surface slip stitches along the centre of the leaf from base to tip. Fasten off on the back.
Embroidered Centres
- Thread the tapestry needle with a single strand of deep rose.
- On each large blossom, bring the needle up at the edge of the deep rose centre and take it down roughly two-thirds of the way along a front petal, making one straight stitch per petal.
- Add a second, slightly shorter straight stitch on each side of the first one, so each petal carries three rays fanning out from the centre.
- On each small blossom, work one straight ray per petal only — more than that crowds the smaller petals.
- Keep the stitches loose enough to lie on the surface. If they pull, the petal curls up at the tip.
- Secure the ends on the back of each flower with two tiny backstitches. Do not carry the thread from flower to flower.
Appliqué Placement
- Lay the bedspread out flat, right side up, with the skirt spread around it.
- Band A (mattress top): place a line of markers 6 cm inside the border round, all the way around the panel. Pin 30 small blossoms evenly along this line, roughly 23 cm apart, and tuck 36 leaves behind them in pairs at the corners and singly between flowers.
- Band B (skirt): pin the 48 large blossoms around the skirt over mesh Rnds 13–19, roughly 15 cm apart centre to centre, so the lowest petals sit just above the scalloped edging.
- Slip 48 leaves behind and between the large blossoms, alternating sage and deep green, angling the tips outward so they read as a garland rather than a straight line.
- Add the remaining 6 small blossoms in the four corner clusters of the skirt, where the photo shows the flowers bunching more heavily.
- Step back and look at the whole bed before you sew a single stitch. Shift anything that reads as a gap.
Finishing
Sew the leaves on first, so the flowers overlap them. Use the leaf tail and whipstitch around the outer edge, catching only the top loop of the mesh or panel so the stitches stay invisible from underneath. Leave the pointed tip of each leaf free for about 1.5 cm — that small unsewn tip is what makes the garland look three-dimensional instead of flat.
Then sew the blossoms. Anchor each one through the deep rose centre and through the base of each back petal only, six stitches per large flower. Do not stitch the petal tips down. On the skirt, pass the needle through the chain loops rather than around them so the flower cannot slide along the mesh. Work with the skirt lying flat and check after every few flowers that the mesh is not pulling in — if it is, your stitches are too tight.
When everything is attached, weave in all remaining ends on the wrong side, running them under the backs of the appliqués where they will never show. Block the whole piece by laying it flat on clean sheets, spraying it evenly with cool water, squaring the panel to 152 x 200 cm with a tape measure, and letting the skirt hang straight off the edge of the bed or a table. Leave it until it is completely dry, usually a full day. The grid stitch opens up and the scallops settle during this step, so do not skip it.
Tips for Success
- Join new balls of peach at the end of a row, never mid-row. A join in the middle of a 273-stitch row will show as a bump right across the open grid fabric.
- Make all 168 appliqués before you sew any of them on. It lets you lay them out, swap colours around, and balance the blush and medium pink flowers across the whole bed.
- Keep the chain-5 loops on the skirt consistent by counting each chain rather than eyeballing it. Loops that drift to ch-6 make the skirt flare and the drop uneven at the corners.
- Work the appliqués with the 3.5 mm hook even though the panel uses 4 mm. The tighter fabric is what keeps the petals cupped instead of floppy.
- Store the finished flowers flat in a shallow box, not in a bag — crushed petals are hard to block back into shape once they have set.
Common Mistakes to Avoid
- Letting the grid stitch count drift. The classic error is working an extra sc into the turning chain at the row end. Always end the row with a sc in the last sc, never in the ch-1 space beyond it, and recount every 50 rows.
- Ending the border round on a number that is not divisible by 3. Count the border before starting the skirt; adding or removing two sc along one long edge now is far easier than frogging 424 chain loops later.
- Sewing the flowers down flat around the whole petal edge. This flattens the garland and puckers the mesh. Anchor only the centre and the base of the back petals.
- Placing the skirt flowers too low. If a petal overlaps the picot edging, the scallops cannot lie flat and the hem waves. Keep the lowest petal at least 2 cm above the edging.
- Skipping the block. Unblocked grid stitch sits narrow and stiff, and the finished spread can come out 8 to 10 cm short of the mattress width.
Ways to Customize This Pattern
- Resize for another bed: adjust the foundation chain in multiples of 6 and the row count in multiples of 3, so the border round stays divisible by 3. For a single bed, try ch 177 and 327 rows; for a king, ch 321 and 357 rows.
- Change the palette: work the panel in cream with the same blush and medium pink flowers for a softer look, or swap the greens for two shades of dusty blue and the blossoms for white to get a cooler, more formal spread.
- Make the appliqués removable by sewing a small flat button to the panel and working the last round of each flower over a buttonhole loop. Handy if you want to wash the spread often.
- Deepen the skirt into a full floor drop by working 36 mesh rounds instead of 20, and add a second garland of large blossoms over Rnds 6–10 so the longer skirt is not left bare in the middle.
- Use the same blossoms, leaves and grid stitch to make matching cushion covers: two 45 cm squares in grid stitch, joined with a sc seam, with one large blossom cluster in the centre of the front.
Frequently asked questions
One piece is strongly recommended. Grid stitch has a visible vertical column structure, and a seam running through it reads as a stripe no matter how neatly you join. The row is long but the stitch is simple, so most people find it easier than keeping four strips identical in length.
Cold machine wash on a gentle cycle in a large front-loading machine, inside a mesh laundry bag if it fits. Never tumble dry — the weight of the wet cotton will stretch the mesh skirt. Lay it flat to dry, reshape the panel to size while damp, and finger-fluff the petals as it dries.
You can for the panel, and it will be lighter and cheaper, but the appliqués will suffer. Acrylic petals go limp and will not hold the cupped shape after washing. If you want to mix, work the panel and skirt in worsted acrylic and keep cotton for the blossoms and leaves.
Fewer works, but space them deliberately rather than just thinning the garland. A good reduced version uses 24 large blossoms, 18 small ones and 42 leaves, grouped in four heavy corner clusters on the skirt with nothing in between, and keeps the Band A line on the mattress top as a sparse scattering.
Almost always loop tension. Chain-5 loops that creep to six chains, or a sc pulled through two loops instead of one at the join, add width every round. Count a sample of ten loops: all ten should measure the same. A firm steam block over the hanging skirt will correct minor flare.
The finished Peach Blossom Crochet Bedspread

