Peacock Feather Lace Curtains Crochet Pattern
Advanced
For experienced crocheters who enjoy complex shaping, fine detail, and ambitious construction
Weekend Project
A satisfying weekend make — start Friday, finish Sunday, enjoy forever.
Handmade Gift
A beautiful keepsake — free forever. Read online or print at home.
About This Peacock Feather Lace Curtains Crochet Pattern
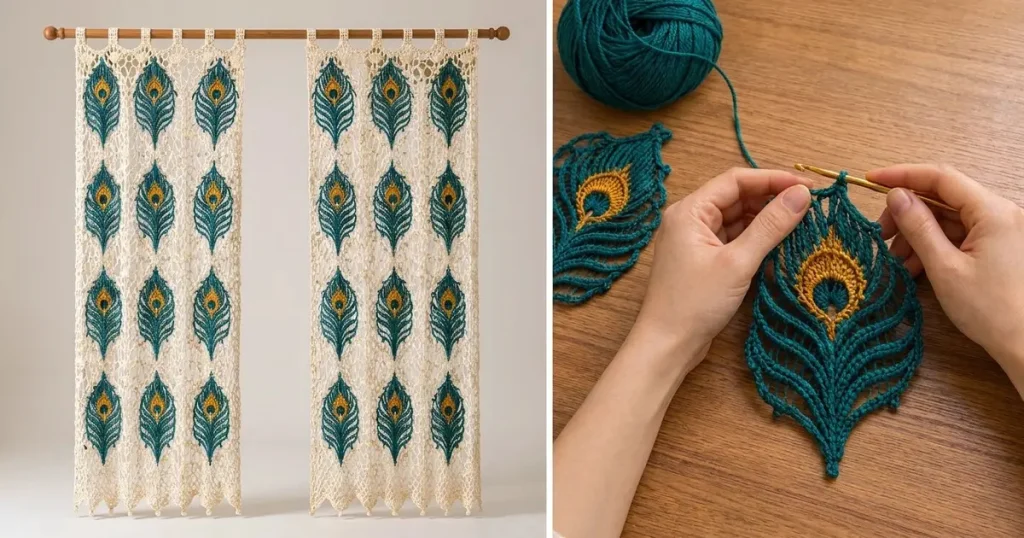
This peacock feather curtain crochet pattern pairs airy ivory mesh with deep teal feathers and small mustard-gold eyes. Inspired by the reference photograph, the design makes two narrow curtain panels, each carrying twelve separate feather motifs arranged in three columns and four rows. Pointed scallops finish the lower edges, and six ivory tabs suspend each panel from a curtain rod.
This is an advanced home décor project with shaped filet motifs, oval colorwork, surface embroidery, careful blocking, and extensive appliqué assembly. Allow approximately 60–85 hours for the pair. The construction suits experienced crocheters who enjoy making repeated motifs and adjusting lace precisely to a measured layout; the curtains remain light and unlined so daylight can pass through the mesh.
Materials
- Sport-weight mercerized cotton in ivory Approximately 1,200 m; purchase about 450 g at 270 m per 100 g.
- Matching cotton in deep teal Approximately 800 m; purchase about 300 g.
- Matching cotton in mustard gold Approximately 80 m; purchase one 50 g ball.
- 3.0 mm crochet hook Adjust as necessary to achieve the blocked mesh gauge.
- Tapestry needle and fine sewing needle For surface work, concealed joining, and securing ends.
- Matching teal sewing thread For attaching motifs without bulky stitches.
- Rustproof pins, blocking mats, ruler, and stitch markers Required for consistent feather dimensions and panel alignment.
- Curtain rod Approximately 18–22 mm diameter; finished tabs provide about 8 cm of internal circumference.
Abbreviations
chchainsl stslip stitchscsingle crochet, US terminologydcdouble crochet, US terminologyinc2 sc in the same stitchst / stsstitch / stitchesRS / WSright side / wrong sideGauge, Dimensions, and Construction
- Use US crochet terminology throughout. Work all flat pieces in turned rows. A beginning ch 3 counts as one dc; a beginning ch 1 never counts as a stitch.
- Blocked filet gauge: 10 mesh spaces across and 12.5 rows measure 10 × 10 cm. One mesh space consists of ch 2 between neighboring dc posts. Measure several spaces and rows together rather than measuring one opening.
- For a gauge sample, ch 35. Sc in the second ch from the hook and each remaining ch: 34 sc. Turn. Ch 3, then repeat ch 2, skip 2 sc, dc in the next sc eleven times: 12 dc and 11 spaces. Work another fourteen mesh rows by turning, making ch 3, and repeating ch 2, dc in the next dc eleven times. Block and measure the central ten spaces and twelve rows.
- Secondary blocked sc gauge: approximately 30 sc and 28 rows per 10 cm. Check this for the hanging tabs. Adjust their row count to the specified physical length if your sc row gauge differs.
- Each panel has a 36 × 96 cm mesh field. Borders bring its width to approximately 38 cm; scallops and hanging tabs bring the total hanging length to approximately 102 cm. Dimensions are approximate because lace relaxes when suspended.
- Make two mesh panels, twenty-four teal feather foundations, twenty-four oval eyes, and twelve hanging tabs. Embroider the feathers before attaching them to the panels. There is no stuffing, facial detail, or safety-eye hardware in this curtain design.
Ivory Mesh Panels — Make Two
- Foundation: with ivory, ch 110.
- Row 1: sc in the second ch from the hook and each remaining ch. Turn. Count: 109 sc.
- Row 2: ch 3, skip the first sc, then repeat ch 2, skip 2 sc, dc in the next sc thirty-six times. Turn. Count: 37 dc and 36 ch-2 spaces. The beginning ch 3 is the first dc.
- Rows 3–121: ch 3, then repeat ch 2, dc in the next dc thirty-six times, placing the final dc in the top of the previous turning ch 3. Turn after each row. Count on every row: 37 dc and 36 spaces.
- There are 120 mesh rows above the sc foundation. Mark every twelfth space across the width to identify three equal column zones. Fasten off after Row 121.
Panel Borders and Pointed Hem
- Place the panel RS facing. Join ivory in the first sc of the foundation row. Work down the foundation edge with one sc in each of its 109 sts. These 109 sc form the bottom border. Fasten off.
- With the RS facing, join ivory at the lower corner of one long side. Work 2 sc around the end of each of the 120 mesh rows, moving toward the top. Count: 240 sc. Fasten off. Repeat on the other long side. The foundation-row end is not included in these side counts.
- Top border Row 1: join ivory in the first dc of Row 121. Ch 1, sc in that dc; repeat 2 sc in the next ch-2 space, sc in the next dc thirty-six times. Turn. Count: 109 sc.
- Top border Rows 2–3: ch 1, sc in each st across. Turn after Row 2; fasten off after Row 3. Count: 109 sc on each row.
- Pointed hem: with the RS facing, join ivory in the first of the 109 bottom-border sc. Ch 1, sc in that same st. Repeat the following twelve times: skip 3 sts, work 4 dc in the next st, ch 3 and sl st in the third ch from the hook to make a picot, work 4 more dc in that same st, skip 4 sts, sc in the next st.
- Each scallop repeat uses the next 9 base sts, so twelve repeats use the remaining 108 sts exactly. The completed hem contains twelve shells of 8 dc, twelve picots, and thirteen sc anchors. Fasten off.
- Wet-block each panel so the mesh field measures 36 × 96 cm, keeping the columns square. Pin each picot separately. Allow the fabric to dry completely.
Shaped Teal Feather Foundations — Make Twenty-Four
- These pointed filet leaves are the feather bases. Their rows run across the feather, beginning at its lower tip and ending at its upper tip. With teal, ch 6.
- Row 1: dc in the sixth ch from the hook. Turn. The five skipped chains count as the first dc and one ch-2 space. Count: 2 dc and 1 space.
- Row 2: ch 5, dc in the first dc at the base of those chains; ch 2, dc in the next dc; ch 2, dc again in that same final dc. Turn. Count: 4 dc and 3 spaces. The beginning ch 5 counts as one dc and one space.
- Row 3: ch 5, dc in the first dc; repeat ch 2, dc in the next dc three times; ch 2, dc again in the final dc. Turn. Count: 6 dc and 5 spaces.
- Row 4: ch 5, dc in the first dc; repeat ch 2, dc in the next dc five times; ch 2, dc again in the final dc. Turn. Count: 8 dc and 7 spaces.
- Row 5: ch 5, dc in the first dc; repeat ch 2, dc in the next dc seven times; ch 2, dc again in the final dc. Turn. Count: 10 dc and 9 spaces.
- Rows 6–21: ch 3, then repeat ch 2, dc in the next dc nine times. Turn. Count on each row: 10 dc and 9 spaces.
- Row 22: ch 1 and turn if needed so you are ready to work back across Row 21. Sl st in each of the first 2 chains of the first space, then sl st in the next dc. Ch 3; repeat ch 2, dc in the next dc seven times. Leave the final space and its outer dc unworked. Turn. Count in the new row: 8 dc and 7 spaces. The positioning slip stitches are not counted.
- Row 23: ch 1, sl st in each of the first 2 chains of the first space, sl st in the next dc, ch 3; repeat ch 2, dc in the next dc five times. Leave the last space and outer dc unworked. Turn. Count: 6 dc and 5 spaces.
- Row 24: ch 1, sl st in each of the first 2 chains of the first space, sl st in the next dc, ch 3; repeat ch 2, dc in the next dc three times. Leave the last space and outer dc unworked. Turn. Count: 4 dc and 3 spaces.
- Row 25: ch 1, sl st in each of the first 2 chains of the first space, sl st in the next dc, ch 3, ch 2, dc in the next dc. Leave the last space and outer dc unworked. Count: 2 dc and 1 space. Fasten off.
- Rows 22–25 each remove one mesh space from each side. The resulting space counts are 7, 5, 3, and 1. Since Row 21 already ends with a turn, the extra turn mentioned in Row 22 is unnecessary when following the rows continuously.
- Block each foundation to 9 cm at its widest point and 20 cm long. Pull the center of the first and last spaces into gentle points. Pin the stepped shoulders into smooth transitions without stretching the central rows beyond gauge.
Teal Feather Outlines
- After the foundations dry, join teal at the center of the lower-tip space. Ch 1 and work 3 sc around that space. Place a marker in the middle sc; it is the lower point.
- Work up the first side, placing 2 sc around the exposed row-end segment of each of Rows 2–24. Count: 46 side sc. At each decrease shoulder, use the exposed horizontal chain segment as part of that row-end segment rather than edging it separately.
- Work 3 sc around the upper-tip space and mark its middle sc. Work down the other side with 2 sc around the exposed row-end segment of each of Rows 24–2. Count: another 46 side sc.
- Join with a sl st to the first sc and fasten off. Total: 98 sc. Keep the outline relaxed so it does not shorten the feather.
- Reblock lightly if necessary. The outline should follow a long leaf shape with small shoulders near the two ends.
Teal and Gold Feather Eyes — Make Twenty-Four
- With teal, ch 5. Work around both sides of this foundation chain in a continuous spiral. Mark the first st of every round.
- Round 1: sc in the second ch from the hook, sc in each of the next 2 ch, 3 sc in the final ch. Along the unused underside loops, sc in each of the next 2 ch, then 2 sc in the same foundation chain that holds the first sc. Count: 10 sc.
- Round 2: inc in the first st, sc in the next 2 sts, inc in each of the next 3 sts, sc in the next 2 sts, inc in each of the final 2 sts. Count: 16 sc. Change to gold on the final pull-through of the last sc.
- Round 3: work sc in the next st, inc in the next st; sc in the next 2 sts; repeat sc in the next st, inc in the next st three times; sc in the next 2 sts; repeat sc in the next st, inc in the next st twice. Count: 22 sc.
- Round 4: sc in each st around. Count: 22 sc. Sl st in the next st and fasten off, leaving a 30 cm gold tail for sewing.
- Flatten each oval. Its expected size is approximately 2.5 × 3.5 cm. The teal center remains visible inside the gold border. No stuffing is added.
Feather Shafts, Barbs, and Eye Placement
- Lay one feather RS up, lower point toward you. Mark a straight centerline between its two tips. On every row, this line passes through the midpoint of the central mesh space.
- Make the central shaft with two parallel lengths of teal yarn, running from the lower point to the upper point. Couch them to the mesh at every row boundary using a separate strand of teal yarn. Pass each small holding stitch around the adjacent chain bridge; do not pull the bridge inward. Secure both ends on the WS.
- For the left barbs, mark the left outline at the row boundaries above Rows 5, 7, 9, 11, 13, 15, 17, 19, 21, and 23. Pair each outer mark with the centerline boundary three rows lower: Rows 2, 4, 6, 8, 10, 12, 14, 16, 18, and 20, respectively.
- For each of the ten left barbs, lay a doubled teal strand in a gentle upward curve from its centerline mark to its outer mark. Couch it to every mesh bridge it crosses, spacing the holding stitches no farther than 1 cm apart. Keep the strand resting on the surface rather than spanning tightly across the openings.
- Mirror the same ten barbs on the right. Each feather now has twenty curved ribs and a doubled central shaft. Use separate short strands where needed and weave the ends into the outline or shaft.
- Place one oval eye vertically on the centerline, with its center approximately 14.5 cm above the lower point. Sew through the outer gold stitches and nearby teal mesh bridges. Leave the teal oval center unobstructed.
- With the remaining gold tail, embroider two lines from the lower sides of the oval to a shared point on the shaft 2 cm below its lower edge. Couch each line at its mesh crossings. This extends the eye into a narrow teardrop, echoing the reference motif.
- Secure all surface-work ends before attaching the feather to a curtain panel. Make all twenty-four feathers with the same eye height and rib spacing.
Hanging Tabs — Make Twelve
- With ivory, ch 7.
- Row 1: sc in the second ch from the hook and each remaining ch. Turn. Count: 6 sc.
- Rows 2–28: ch 1, sc in each st across. Turn after each row except the last. Count: 6 sc on every row. Fasten off with a 35 cm sewing tail.
- Block each strip to approximately 2 × 10 cm. If your sc row gauge differs, adjust the number of rows to reach 10 cm; retain the 6-st width.
- For each panel, mark six tab centers on the top border at 1.5, 8.1, 14.7, 21.3, 27.9, and 34.5 cm from the left edge of the 36 cm mesh field.
- At each mark, overlap one short tab end by 1 cm onto the front of the top border and sew it across its full width. Take the strip over the upper edge and sew the other end 1 cm down the back. Keep the loop untwisted.
- Each tab has approximately 8 cm of free strip forming the hanging loop. Reinforce both attachment lines with a second pass through the top border.
Feather Layout and Joining
- Lay a blocked panel flat with its RS facing. Use the lower-left corner of the rectangular mesh field as the origin; exclude the scallops and side borders from all measurements.
- Mark three vertical centerlines at 6, 18, and 30 cm from the left edge. These are the centers of the three feather columns.
- On each centerline, mark lower-tip positions at 2, 26, 50, and 74 cm above the bottom of the mesh field. Each 20 cm feather extends upward from its lower-tip mark, finishing at 22, 46, 70, or 94 cm.
- Pin twelve feathers in place. Their 9 cm widths leave approximately 3 cm between neighboring motifs and 1.5 cm between an outer feather and the mesh-field edge.
- With teal sewing thread, attach each feather outline to the ivory mesh wherever it crosses an ivory post or chain bridge. At unsupported outline sections, carry the thread through the back of the teal edging to the next crossing.
- Add concealed attachment stitches along the central shaft about every 3 cm and behind both ends of the eye. These support the appliqué when the curtain hangs.
- Keep the panel flat throughout sewing. Do not draw the ivory mesh toward a feather when a convenient attachment point is farther away. Repeat the same layout on the second panel.
Finishing
Weave all remaining yarn ends through several stitches on the wrong side, reversing direction once before trimming. Check every eye and feather edge for loose sections. Gently dampen and smooth the assembled panels to their blocked measurements without pulling on the gold embroidery.
Thread the curtain rod through all six tabs on each panel and hang the pair. Let the cotton settle for a day, then check that the lower scallops hang evenly. For washing, remove the rod, hand-wash the panels in cool water, and support their full weight when lifting them. Dry flat to the original measurements.
Tips for Success
- Use one paper template measuring 9 × 20 cm to block every feather. Consistent outlines matter more than correcting small differences by stretching during sewing.
- Mark the central mesh space before adding the shaft. Because every feather row has an odd number of spaces, the center remains easy to identify through both increases and decreases.
- Lay the feather on the blocking mat while couching the ribs. Pin the curve first so the doubled strands remain relaxed across the open mesh.
- Attach the eye before sewing the feather onto ivory. This conceals gold ends within the teal motif and keeps gold stitches off the pale background.
- Hang one completed panel briefly before finishing the second. Check tab length and the way the cotton settles under the appliqués.
Common Mistakes to Avoid
- Losing a mesh space at a panel edge: the final dc belongs in the top of the turning ch 3. Count 36 spaces after every few rows and correct an error before continuing.
- Working the feather increases into a chain space: the extra dc at each edge belongs in the outer dc itself. Each increase row adds exactly two spaces.
- Counting the positioning slip stitches as part of a decrease row: only the new ch 3, dc posts, and ch-2 spaces form the row. The four decreasing rows contain 7, 5, 3, and 1 spaces.
- Pulling the ribs tight enough to cup the feather: remove the affected couching stitches, flatten the foundation, and relay the strand with a little more length.
- Sewing motifs onto unblocked ivory mesh: block both pieces first. If the assembled fabric already puckers, release the tight joining stitches and resew while the panel lies flat.
Ways to Customize This Pattern
- Make a single narrow accent panel by working one panel, twelve feathers, twelve eyes, and six tabs.
- For a wider panel, add twelve mesh spaces and one feather column. The new foundation is ch 146 for 145 sc; work 48 spaces across, and place four feather columns at 6, 18, 30, and 42 cm.
- For a shorter three-tier curtain, work 90 mesh rows above the foundation instead of 120. Place feather lower tips at 2, 26, and 50 cm; make nine feathers per panel.
- Use a slightly lighter teal for the couched barbs while keeping the mesh foundations and outlines deep teal. This makes the rib structure more visible against the ivory.
- Choose antique gold or muted ochre for the eyes to coordinate with warm wood, retaining the small teal centers and elongated gold points.
Frequently asked questions
No. Each feather is a separate shaped teal filet motif with a crocheted outline, couched shaft and ribs, and a sewn oval eye. Sewing the finished motifs onto blocked ivory mesh gives the layered effect shown in the reference.
Measure 14.5 cm upward from each blocked feather’s lower point and mark the eye center. Use that measurement for all twenty-four motifs before sewing any eyes in place.
The standard tabs provide approximately 8 cm of free strip around the rod. For a larger rod, make each strip long enough for the rod circumference plus at least 1 cm of ease and another 2 cm for the two sewn overlaps. Test one tab on your rod before making the full set.
Shaped edges, surface embroidery, and the oval eye can change the way the teal fabric relaxes. Check the bare foundation first, then keep the outline and couching loose. The completed feather should block flat to approximately 9 × 20 cm without forcing the stitches.
The ivory filet ground is open lace, and the feather appliqués cover only part of it. These panels filter light and decorate a window. If you need privacy, hang them in front of a separate blind or plain curtain.
The finished Peacock Feather Lace Curtains Crochet Pattern

