Pearl Blossom Crochet Flower Bracelet Pattern
Beginner Friendly
Perfect for those just starting their crochet journey, with clear instructions and simple techniques
Single-Day Project
A satisfying project you can complete in a single afternoon or evening.
Handmade Gift
A beautiful keepsake — free forever. Read online or print at home.
About This Pearl Blossom Crochet Flower Bracelet Pattern
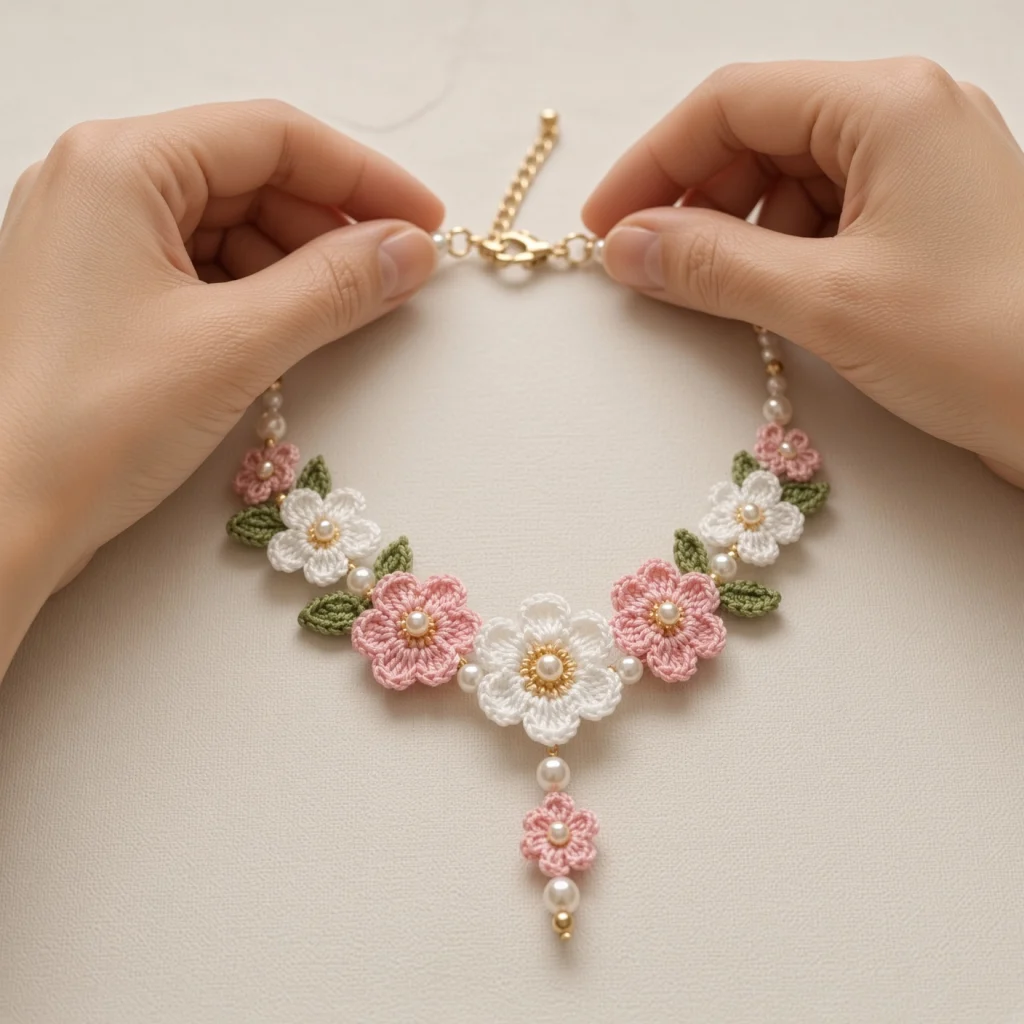
This crochet flower bracelet pattern turns fine cotton thread into a garland of tiny blossoms: a large white flower at the center, pink and white flowers stepping down in size on each side, sage green leaves tucked behind the petals, and pearls strung between them. A small pink flower hangs from the center on a pearl drop, and a gold clasp with an extender chain finishes the ends.
The design is built from eight separate flowers in four sizes and six leaves, each crocheted on its own and then finished with a pearl center and a ring of gold seed beads. Everything is strung together on beading thread that passes behind each flower, so the bracelet stays flexible and sits nicely around the wrist.
Expect to spend five to seven hours, including the beadwork and assembly. This is a good project for crocheters who are comfortable with thread and a small hook and enjoy detail work. It makes a lovely gift for a birthday, a bridesmaid, or a spring wedding.
Materials
- Size 10 crochet cotton thread in white about 10 m
- Size 10 crochet cotton thread in light pink about 15 m
- Size 10 crochet cotton thread in sage green about 8 m
- 1.5 mm steel crochet hook
- 6 mm ivory glass pearls 8 (between flowers, at the ends, and on the drop)
- 5 mm ivory glass pearls 3 (centers of the large and medium flowers)
- 4 mm ivory glass pearls 11 (small flower centers and the ends of the strand)
- Gold 11/0 seed beads about 60
- 3 mm gold round bead 1 (end of the drop)
- Nylon beading thread, 0.3 mm about 1 m
- Gold clamshell bead tips 2
- Gold jump rings, 5 mm 2
- Gold lobster clasp and 5 cm extender chain 1 set
- Beading needle and fine sewing needle
- Flat-nose jewelry pliers
- Clear jewelry glue and light fabric stiffener optional
Abbreviations
MRmagic ringchchainsl stslip stitchscsingle crochethdchalf double crochetdcdouble crochettrtreble crochetspspacest(s)stitch(es)Large Center Flower (White, Make 1)
- Round 1: Ch 1, 10 sc in MR, pull ring closed, sl st to first sc to join. (10)
- Round 2: Ch 1, (sc in next st, ch 3, skip next st) 5 times, sl st to first sc to join. (5 sc and 5 ch-3 sps)
- Round 3: Sl st into the first ch-3 sp. *(Sc, hdc, 2 dc, tr, 2 dc, hdc, sc) in the ch-3 sp, sl st in the next sc* 5 times. (5 petals of 9 sts each, 45 sts and 5 sl sts)
- Round 4: Ch 1. *Sc in next 4 sts, 2 sc in the tr, sc in next 4 sts, sl st in the sl st between petals* 5 times. (50 sc and 5 sl sts)
- Fasten off, leaving a long tail.
Medium Flowers (Pink, Make 2)
- Rounds 1-2: Work as Large Center Flower Rounds 1-2. (5 sc and 5 ch-3 sps)
- Round 3: Sl st into the first ch-3 sp. *(Sc, hdc, 2 dc, tr, 2 dc, hdc, sc) in the ch-3 sp, sl st in the next sc* 5 times. (45 sts and 5 sl sts)
- Fasten off, leaving a long tail. Do not work an edging round on these flowers.
Small Flowers (White, Make 2)
- Rounds 1-2: Work as Large Center Flower Rounds 1-2. (5 sc and 5 ch-3 sps)
- Round 3: Sl st into the first ch-3 sp. *(Sc, hdc, 3 dc, hdc, sc) in the ch-3 sp, sl st in the next sc* 5 times. (35 sts and 5 sl sts)
- Fasten off, leaving a long tail.
Tiny Flowers (Pink, Make 3)
- Round 1: Ch 1, 10 sc in MR, pull ring closed, sl st to first sc to join. (10)
- Round 2: *Sl st in next st, (hdc, dc, hdc) in next st* 5 times, sl st to the first sl st to join. (15 petal sts and 5 sl sts)
- Fasten off, leaving a long tail. Two of these go at the ends of the flower section and one becomes the drop.
Leaves (Green, Make 6)
- Ch 8.
- Starting in the 2nd ch from hook: sl st, sc, hdc, dc, dc, hdc in the next 6 chs, then 3 sc in the last ch. (9 sts)
- Working along the opposite side of the foundation chain: hdc, dc, dc, hdc, sc, sl st in the next 6 chs. (15 sts)
- Ch 2 and sl st into the skipped ch at the tip to form the point.
- Fasten off, leaving a long tail. The 3-sc end is the base of the leaf.
Bead Centers (Surface Detail)
- Large Center Flower: using a fine needle and white thread, sew a 5 mm pearl over the MR. Bring the needle up just outside the pearl, pick up 2 gold seed beads, and backstitch them down in a circle. Repeat until you have a ring of about 12 seed beads around the pearl.
- Medium Pink Flowers: sew a 5 mm pearl in the center and a ring of about 10 gold seed beads around it.
- Small White Flowers: sew a 4 mm pearl in the center and a ring of about 8 gold seed beads around it.
- Tiny Pink Flowers: sew a 4 mm pearl in the center only.
- Knot each thread on the back and add a tiny dot of glue to the knot.
Finishing
If you want the flowers to hold a crisp shape, dampen them with a light fabric stiffener, pin them flat with the petals opened evenly, and let them dry completely before adding any beads. Work the bead centers first, then sew the leaves to the backs of the flowers. On each side of the center, sew one leaf so it peeks out below the medium pink flower, one below the small white flower, and one between the small white flower and the tiny pink flower. Only the top half of each leaf should show.
Lay all the pieces out in order: tiny pink, small white, medium pink, large white, medium pink, small white, tiny pink. Thread a beading needle with about 60 cm of nylon beading thread, tie a double knot, and close a clamshell bead tip over it. Pick up three 4 mm pearls and one 6 mm pearl, then pass the needle through the back of the first tiny flower, catching the stitches of Round 1 behind the center so nothing shows on the front. Continue through the small white flower, then a 6 mm pearl, the medium pink flower, a 6 mm pearl, the large white flower, a 6 mm pearl, the medium pink flower, a 6 mm pearl, the small white flower, and the last tiny flower. Finish with one 6 mm pearl and three 4 mm pearls. Pull the strand snug so there are no gaps, but not so tight that it stiffens. Knot, close the second bead tip, and add a dot of glue.
For the drop, tie a 3 mm gold bead onto a 20 cm length of beading thread. Pick up a 6 mm pearl, pass through the back of the third tiny pink flower, pick up another 6 mm pearl, then stitch the thread firmly into the back of the bottom petal of the large white flower. Knot and glue. Attach a jump ring to each bead tip, adding the lobster clasp to one side and the extender chain to the other.
Tips for Success
- Work in good light and hold the thread with a little more tension than you would with yarn. Size 10 thread loosens quickly, and loose petals will not hold their shape.
- Count the stitches in each petal on Round 3 before moving on. With thread this fine, one missed dc changes the flower shape more than you would expect.
- Sew the gold seed beads two at a time with a backstitch. This keeps the ring round and stops single beads from tilting.
- Try the strand on your wrist before closing the second bead tip. Add or remove 4 mm pearls at the ends to fine-tune the length.
Common Mistakes to Avoid
- Skipping the wrong stitch in Round 2. If the ch-3 spaces are uneven, the petals come out lopsided. Place a marker in the first sc so you can see the 5 repeats clearly.
- Passing the beading thread through the front of the flower. It will show as a line across the petals. Always go through the Round 1 stitches from the back.
- Sewing leaves after stringing. The strand gets in the way and the leaves end up crooked. Attach all leaves first.
- Pulling the strand too tight. The flowers buckle and the bracelet will not curve. Leave enough slack that the strand drapes in a smooth arc on the table.
- Forgetting to glue the knots. Nylon thread knots can slip over time. A tiny dot of jewelry glue on each knot prevents that.
Ways to Customize This Pattern
- Make it a choker or necklace by adding more flowers to each side, alternating small white and tiny pink flowers, until the strand reaches the length you need.
- Swap the colors for lavender and cream, or all white with green leaves, for a bridal version.
- Leave off the drop and the end pearls, then sew the flower strand onto a satin ribbon for a hair band or headband.
- Use the large center flower alone with its drop on a gold chain for a simple pendant.
- Make a matching pair of earrings with two small white flowers, each on an ear wire with a 4 mm pearl.
Frequently asked questions
You can, but the flowers will get much bigger. With a sport weight cotton and a 2.5 mm hook, the flower section alone will be about twice as long, which works better as a necklace than a bracelet.
Add or remove 4 mm pearls at both ends of the strand, and use the extender chain for extra room. For a big change, add or remove a tiny pink flower on each side.
It is optional. Unstiffened flowers are soft and comfortable, but stiffened ones keep their petals flat and open much longer, especially on a piece that gets worn often.
Remove it before swimming or washing your hands. If it gets dirty, dab it gently with a damp cloth and let it dry flat. Do not soak it, since water can weaken the glue and dull the pearls.
The finished Pearl Blossom Crochet Flower Bracelet Pattern

