Petal Ring Crochet Cutlery Holder for Place Settings
Beginner Friendly
Perfect for those just starting their crochet journey, with clear instructions and simple techniques
Single-Day Project
A satisfying project you can complete in a single afternoon or evening.
Handmade Gift
A beautiful keepsake — free forever. Read online or print at home.
About This Petal Ring Crochet Cutlery Holder for Place Settings
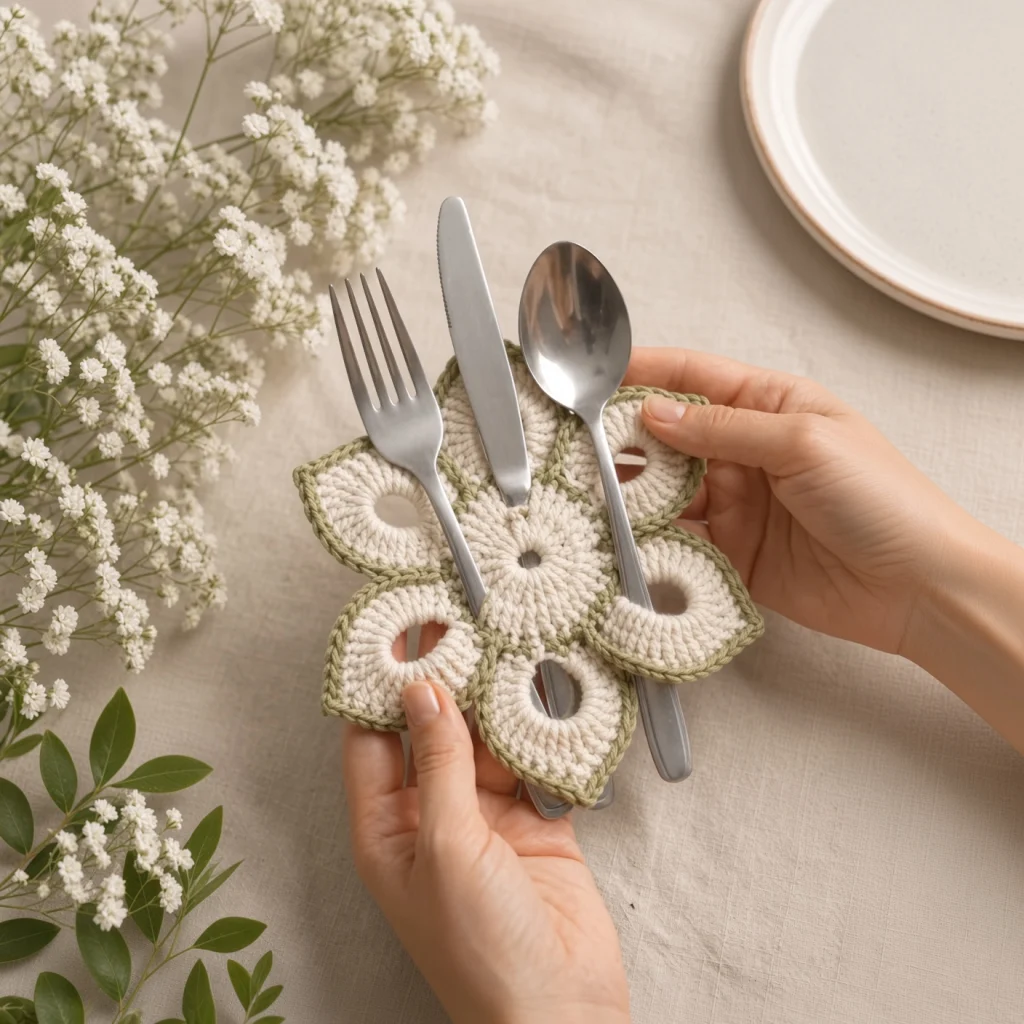
This crochet cutlery holder pattern is a six-petal flower where each petal is a ring rather than a solid shape, and those rings are what hold the cutlery. A fork, knife and spoon slide through the open centres and sit trapped against the fabric, so a place setting can be carried to the table in one hand and stays arranged when it gets there. The centre disc has its own opening, which makes seven holes in total across the piece.
The construction is what makes it work. Each petal starts as a small ring of sixteen single crochet, then grows outward through three rounds of shaped double crochet that turn a circle into a pointed petal with the hole still sitting in the middle of it. Six of those are joined to a central disc and the whole flower is finished with a sage green picot round that outlines every petal and stiffens the edge enough to keep the rings from stretching.
Each holder takes about eighty minutes, and a set of four is a weekend. The size of the petal hole is the one thing that has to be right: too tight and a fork handle will not pass through, too loose and the cutlery slides out when the piece is lifted. The pattern gives a 3 cm hole, which suits standard household cutlery, and a note on adjusting it for heavier handles. Written in US terms throughout.
Materials
- DK / light worsted cotton in cream approx. 30 g per holder
- DK / light worsted cotton in sage green approx. 12 g per holder
- 3.0 mm crochet hook one size down from the ball band, essential here for firm rings
- Tapestry needle blunt, large eye
- Stitch markers at least 6, one per petal
- Rust-proof pins and a blocking mat
- Spray bottle and a steam iron with a pressing cloth
- A piece of your own cutlery for testing the hole size before you make a set
- Tape measure and sharp scissors
Abbreviations
chchainscsingle crochethdchalf double crochetdcdouble crochettrtreble crochetsl stslip stitchincincrease (2 dc in the same stitch)dc2togdouble crochet 2 stitches togethersp / spsspace / spacesst / stsstitch / stitchesreprepeatRSright sideFOfasten offGauge and Working Notes
- Gauge: one finished petal measures about 6 cm long and 4.5 cm wide, with a hole about 3 cm across. The finished flower is about 16 cm from petal tip to petal tip.
- Use the 3.0 mm hook throughout. A larger hook gives a floppy ring that stretches around the cutlery and stops gripping after a few uses, which is the difference between a holder and a doily.
- Every petal is worked in the round with the RS facing and joined with a sl st. Do not turn.
- Do not pull the foundation ring closed at any point. The open centre is the entire function of this piece.
- Work firmly. This is one of the few patterns where slightly tight is better than slightly loose, because the rings have to hold their diameter under the weight of a spoon.
- Leave a 25 cm tail on each petal. You will use it to join the petal to the centre disc and to its neighbours, so one tail does all the assembly for that petal.
- Make all six petals and the centre disc before joining anything. The spacing only works if every petal is the same size.
Petal (make 6)
- With cream, ch 16 and sl st into the first ch to form a ring. Do not pull it tight.
- Round 1: ch 1, work 16 sc into the ring, sl st into the first sc (16 sc). This round sets the hole size, so keep the stitches even and do not crowd them.
- Round 2: ch 3 (counts as first dc), dc in the same st, 2 dc in each st around, sl st into the top of the ch-3 (32 dc).
- Round 3 (shaping the point): ch 3, dc in the next 11 sts, then work (2 dc in the next st) 3 times, dc in the next 11 sts, then work (2 dc in the next st) 5 times, sl st to join (40 dc). The two groups of increases push the circle out at opposite ends and start the petal shape.
- Round 4: ch 3, dc in the next 13 sts, hdc in the next 3 sts, sc in the next 4 sts, hdc in the next 3 sts, dc in the next 13 sts, then work (2 tr in the next st) 3 times to form the point, sl st to join (43 sts).
- The graduated stitch heights are what shape the petal: trebles at the tip push it out to a point, single crochets at the opposite end pull it in to a narrow base that will sit against the centre disc.
- FO leaving a 25 cm tail. Finished petal about 6 cm long.
- Make 6, checking each against the first before starting the next. Six petals that differ in size will not sit evenly around the disc.
Centre Disc (make 1)
- With cream, ch 14 and sl st into the first ch to form a ring. Do not pull it tight.
- Round 1: ch 1, work 14 sc into the ring, sl st into the first sc (14 sc).
- Round 2: ch 3 (counts as first dc), dc in the same st, 2 dc in each st around, sl st into the top of the ch-3 (28 dc).
- Round 3: ch 3, (dc in the next st, 2 dc in the next st) rep 13 times, dc in the last st, sl st to join (42 dc).
- Round 4: ch 1, sc in each st around, sl st into the first sc (42 sc).
- FO leaving a 30 cm tail. Finished disc about 6 cm across with a hole of about 2.5 cm.
- The disc hole is deliberately smaller than the petal holes. It sits in the middle of the setting where a knife blade rather than a handle passes through, and a larger hole here weakens the centre of the whole piece.
- Forty-two is not arbitrary: six petals join across 7 sc each, so every disc stitch is used once and the petals sit at even 60 degree intervals with nothing to fudge.
Joining the Petals
- Lay the disc flat with the RS facing and mark every 7th stitch of Round 4, giving 6 marked stitches.
- Position the first petal with its narrow base against the disc, RS up, so the 4 sc stitches at the narrow end sit across a marked stitch and the 3 stitches either side of it.
- Thread the petal tail and whip stitch the petal base to the disc through 7 stitches, working through the back loops of both pieces so the seam stays flat on the front.
- Repeat with the remaining 5 petals, advancing 7 disc stitches each time, so all 42 stitches are used and the petals radiate evenly.
- Join each petal to its neighbours along the 2 cm where their sides touch, using 4 or 5 whip stitches through the back loops. Do not join further up the petal than that, or the tips will pull inward and the flower will cup.
- Check the flower lies flat before weaving in any tails. If it domes, the side joins are too long. If the petals splay apart, they are too short.
Sage Picot Edging
- Join sage green at the base of any petal where two petals meet.
- Round 1: work sc evenly around the entire outline of the flower, following the curve up one side of each petal, around the tip and down the other side, with sc2tog in each valley between petals. Roughly 46 sc per petal and 6 valley decreases, about 282 sc in total.
- The exact number varies with your tension. What matters is that the edge lies flat: if it ruffles you have worked too many sc, and if the petals curl inward, too few.
- Round 2: ch 1, sc in each st around, working (ch 3, sl st into the 3rd ch from hook) after every 5th sc, and 3 sc into the treble group at each petal tip. Sl st to join and FO.
- Petal hole edging: join sage in any st of Round 1 of a petal, working on the inner edge of the ring, and work 16 sc around the hole, sl st to join and FO. Repeat for all 6 petals and once around the centre disc hole, 7 in total.
- These inner rounds are structural, not decorative. They are what stops the rings stretching out of shape once cutlery has been pushed through them fifty times.
- Keep the inner rounds firm. A loose ring edging defeats the purpose and the holder will start dropping forks within a month.
Finishing
Weave in every end on the back of a solid section, following the line of the stitches for at least 3 cm and splitting the yarn once along the way. Never weave a tail across a hole or around a ring edging, where it will catch on cutlery and eventually pull free. There are around 20 ends per holder, so do them before blocking while the piece is still easy to handle.
Block each holder flat. Damp it, lay it on the mat and pin each petal tip out to a point, then pin around each of the seven holes to hold them at their full diameter while they dry. This second part matters more than it sounds: a hole left to dry unpinned shrinks by two or three millimetres, which is enough to stop a fork handle passing through. Let it dry completely before testing.
Once dry, thread a fork, knife and spoon through and check the grip. The cutlery should need a small push to go in and should stay put when the holder is lifted and gently shaken. If it slides out freely, work one more round of sc inside each petal hole, which tightens the ring by about 3 mm. If the cutlery will not pass, block the holes larger with pins and steam them from 15 cm away, which will gain you a millimetre or two but not more.
Tips for Success
- Test the hole size against your actual cutlery after Round 1 of the first petal, before making anything else. Every other decision in this pattern follows from that measurement, and it is a two minute check.
- Work more firmly than you normally would. This is one of the few designs where the fabric has to do a mechanical job, and a relaxed gauge produces something pretty that does not hold anything.
- Make all six petals before joining, and lay them out in a circle to compare. A petal even 5 mm longer than its neighbours throws the whole flower off and is far easier to redo before it is sewn in.
- Join the petals to the disc first and to each other second. Doing it the other way round leaves you trying to fit a ring of six joined petals onto a disc that has already been decided.
- Pin every hole when blocking, not just the petal tips. The holes are the function and they shrink as they dry if left to themselves.
Common Mistakes to Avoid
- Pulling the foundation ring closed out of habit. It is the first thing most crocheters do and it destroys the entire piece, since the open centre is what holds the cutlery. Both the petals and the disc start from an open ring.
- Using a 3.5 mm or 4.0 mm hook. The rings stretch, the grip goes within a few uses, and there is no way to tighten them afterwards short of adding rounds inside every hole.
- Joining the petals too far up their sides. Two centimetres of side join lets the flower lie flat. Four centimetres pulls the tips inward and the piece cups into a bowl.
- Skipping the inner ring edging. It looks like a detail and it is the round that keeps the holes from deforming with use. All seven need it.
- Blocking without pinning the holes. A hole that dries unpinned comes out smaller than it was wet, which is usually just enough to stop a fork going through.
- Using acrylic. It will not hold a block and it stretches under repeated use, so the rings loosen progressively and never recover. Cotton is doing real work here.
Ways to Customize This Pattern
- Adjust the hole size for your own cutlery by changing the foundation chain only. Ch 14 gives about 2.5 cm for slim modern handles, ch 18 gives about 3.5 cm for heavy vintage or ornate sets. Round 1 stays at 16 sc either way.
- Make a set of four or six in different edging colours, one per guest, so each place setting is identifiable at a dinner.
- Work five petals instead of six for a smaller holder. Change the disc to 40 sc on Round 4 and join each petal across 8 stitches, giving a 13 cm flower for a side plate.
- Swap the palette for the season: rust and gold edging for autumn, or all cream with a cream edging for a wedding table where the texture does the work.
- Leave the holes closed and it becomes a coaster or a small trivet instead. Work 6 sc into a magic ring for Round 1 of each petal and the disc, and every other count follows as written.
- Add a chain loop at one petal tip and hang a name tag from it for place settings at a large table.
Frequently asked questions
Measure the widest part of the handle, not the fork tines or the spoon bowl, since those go through first but the handle is what sits in the ring. Most household cutlery handles are 1.5 to 2 cm wide, and a 3 cm hole holds them snugly. Ornate or weighted handles can reach 2.5 cm and need the ch 18 version. Measure the heaviest piece in your set and size for that one, because a hole that fits the knife will always fit the fork.
The petal-to-petal side joins are too long. Two centimetres of join lets the petals sit at the right angle, and anything beyond that pulls the tips toward each other and lifts the whole flower off the table. Undo the side joins, leave the petal-to-disc joins alone, and redo them shorter. If it still cups, the petals themselves are too big for a 42 stitch disc, which means your petal gauge is loose.
It holds properly if you work at the stated gauge and add the inner ring edgings. The test is to thread all three pieces, lift the holder by one petal and shake it gently. Nothing should move. What it will not do is survive being swung around or carried by a child, and it is not designed to hold a full knife blade under its own weight, which is why the middle hole is smaller.
About five to six hours, which is a weekend of evenings. Each holder is roughly eighty minutes: forty-five for the six petals, ten for the disc, fifteen for joining and fifteen for the edgings. Making them in stages across all four at once is faster than one complete holder at a time, since you stay in the rhythm of each step.
Hand wash in cool water with a mild detergent, since these will pick up food marks in normal use. Press the water out against the side of the basin and never wring, because twisting distorts the rings. Lay flat and re-pin all seven holes to their full diameter while damp, exactly as you did the first time. If you skip the re-pinning, the holes tighten and the holder gradually stops fitting your cutlery.
The finished Petal Ring Crochet Cutlery Holder for Place Settings

