Pineapple Lace Oval Table Runner Crochet Pattern
Beginner Friendly
Perfect for those just starting their crochet journey, with clear instructions and simple techniques
Single-Day Project
A satisfying project you can complete in a single afternoon or evening.
Handmade Gift
A beautiful keepsake — free forever. Read online or print at home.
About This Pineapple Lace Oval Table Runner Crochet Pattern
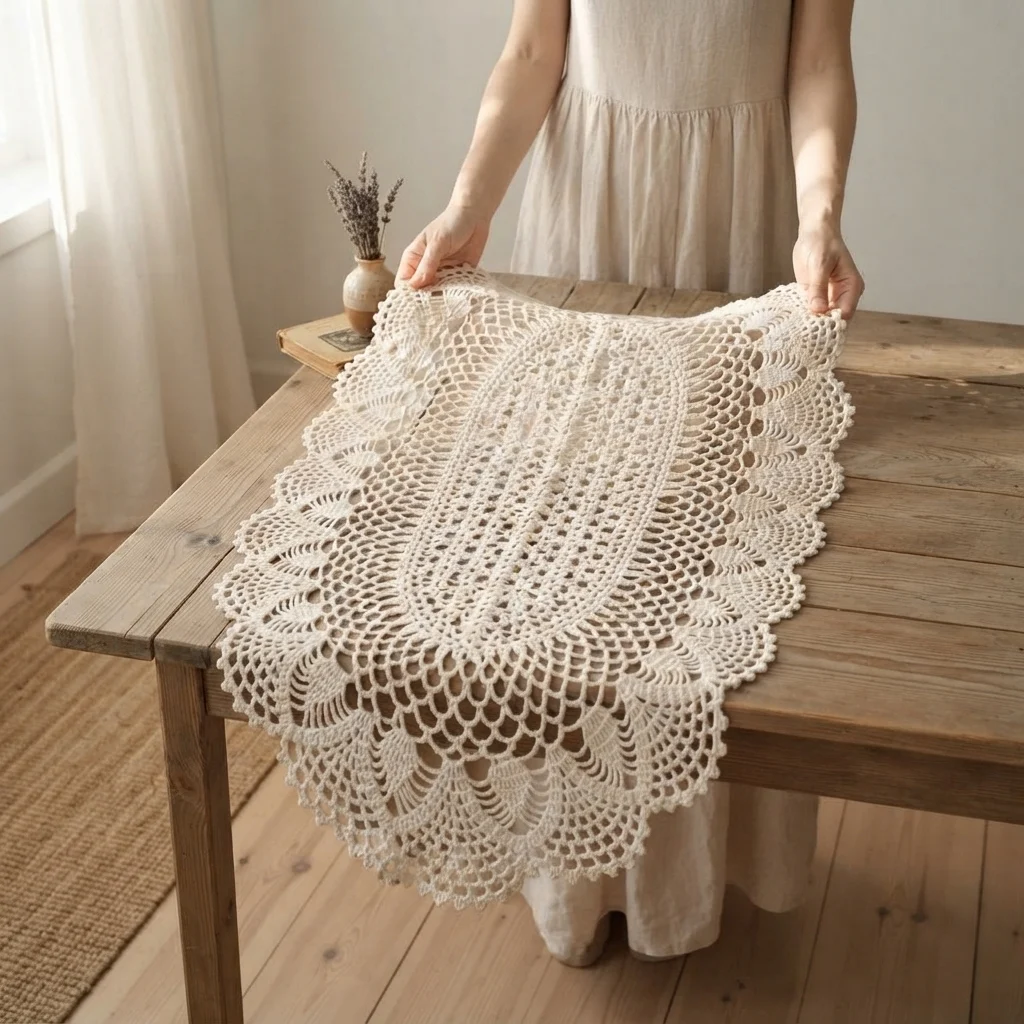
This crochet pineapple lace table runner pattern builds a full oval doily from the center outward, using the classic pineapple motif, a tapering column of decreasing shells that narrows to a point, repeated in radiating rows to fill the whole piece. Two rows of pineapples run down the runner’s spine, framed by wider fan-mesh sections, and the entire perimeter finishes in a deep, dramatic border of large scalloped pineapples.
What makes this design distinctive is the sheer scale of true pineapple lace worked at table-runner size rather than a small doily; every round builds outward with careful shell and chain-space placement so the pineapple columns taper cleanly and the whole oval grows symmetrically from center to edge. The deep pineapple border, worked as its own dramatic final feature rather than a simple trim, is what gives this piece its unmistakably heirloom, vintage-lace character. Expect to spend 24-30 hours total; this is a long, technically demanding project built up round by round.
This is an advanced pattern, best suited to someone experienced with pineapple lace and comfortable reading a round-by-round oval doily chart with real precision, rather than someone attempting their first lace project.
Materials
- DK weight cotton yarn, cream ~300g
- Crochet hook 3.5 mm (US E/4)
- Tapestry/yarn needle
- Steam iron and pressing cloth, or a large blocking mat and pins
- Sharp scissors
Abbreviations
chchainsl stslip stitchscsingle crochethdchalf double crochetdcdouble crochettrtreble/triple crochetshell(dc, ch 1) worked several times in same st/sp, or (3-5 dc) as notedpineapplea column of shells decreasing in stitch count each round, tapering to a pointch-spchain spacest(s)stitch(es)reprepeatFOfasten offFoundation Oval Base
- Ch 60. Round 1: dc in 4th ch from hook, dc in each ch to last ch, work 5 dc in last ch to turn the corner, then dc back down the opposite side of the foundation chain, working 2 dc in the first ch to close the round. This establishes the oval’s basic outline.
- Round 2: sc evenly around, working 3 sc at each of the 2 rounded ends to keep them curved rather than pointed.
- Round 3: *ch 3, skip 2 sts, dc in next st; rep from * evenly around, adding extra repeats at both rounded ends to maintain the oval’s curve. This begins the open mesh that pineapple columns will rise from.
Center Pineapple Columns (2 columns, running the length of the oval)
- Round 4: work fan-mesh shells (3 dc in ch-sp, ch 1, 3 dc in same sp) evenly across the oval’s width, but at 2 marked points running lengthwise down the center, begin the first pineapple base: a wide shell group of (5 dc, ch 2, 5 dc) worked into a single ch-sp at each marked point.
- Round 5: continue the fan mesh across the rest of the oval; at each pineapple base, work (4 dc, ch 2, 4 dc) into the ch-2 sp below, narrowing the pineapple’s width by 1 dc on each side.
- Rounds 6-8: continue narrowing each pineapple by 1 dc per side per round, (3 dc, ch 2, 3 dc), then (2 dc, ch 2, 2 dc), then (1 dc, ch 2, 1 dc), tapering each column toward a point, while the surrounding fan mesh continues evenly around the rest of the oval.
- Round 9: close each pineapple with a single dc into the ch-2 sp below, then ch 5 and sl st into the next round’s mesh to begin building the base of the next pineapple directly above, continuing the column upward.
- Repeat this pineapple sequence (Rounds 4-9) to build 2-3 full pineapples stacked down each of the 2 center columns, with fan mesh continuing evenly around the rest of the oval between rounds.
Fan Mesh Field
- Continue working (3 dc, ch 1, 3 dc) fan-mesh shells in every ch-sp evenly across the whole oval, round after round, expanding outward as the oval grows, while the 2 center pineapple columns continue their own tapering sequence independently within this field.
- Continue until the oval measures approximately 75 cm long and 35 cm wide, checking every few rounds that both rounded ends stay symmetrical.
Deep Pineapple Border
- Foundation round: work a row of evenly spaced shells around the entire oval perimeter, each marking the base of a new, larger pineapple; space these bases to result in approximately 20-24 pineapples total around the full oval.
- Round 1 of border pineapples: work a wide shell base, (7 dc, ch 2, 7 dc), into each marked point around the oval.
- Rounds 2-7: narrow each pineapple by 1 dc per side per round, exactly as in the center columns but starting from a wider base, so these border pineapples taper more dramatically and stand out as the doily’s largest feature.
- Final round: close each border pineapple to a point, then work a small picot or ch-3 loop between the tips of adjacent pineapples to finish the very outer edge.
- FO leaving a short tail. Weave in all ends.
Finishing
This piece needs a genuinely thorough block to show its full pattern. Pin the runner out on a large flat surface, right side up, stretching each border pineapple to its full length and each fan-mesh section to its full open width, checking symmetry between the two rounded ends and both long sides as you go. Steam generously and let it dry completely undisturbed; pineapple lace only shows its true drape and openness after a firm, patient block.
Tips for Success
- Keep a written or marked tally of which pineapple round you’re on for each of the many pineapples in progress; it’s easy to lose track when several are being worked across different rounds simultaneously.
- Practice the pineapple decrease rhythm on a swatch first; the 1-dc-per-side narrowing needs to feel automatic before managing 20+ pineapples in the border alone.
- Check both rounded ends of the oval for symmetry every few rounds during the fan mesh field, since an early imbalance compounds significantly by the time you reach the border.
- Use blocking pins liberally and work in sections if your blocking surface isn’t large enough for the whole piece at once.
- Cotton yarn or thread blocks far more crisply than acrylic for this style of lace; stick with cotton for the traditional pineapple lace look.
Common Mistakes to Avoid
- Narrowing pineapples at an inconsistent rate between different columns makes some finish shorter or longer than others. Fix: always decrease by exactly 1 dc per side per round, and count remaining dc before closing each pineapple.
- Letting the fan mesh field drift unevenly around the oval throws off overall symmetry. Fix: count ch-sp repeats between the 2 center columns and against both rounded ends periodically.
- Spacing border pineapple bases unevenly leaves some pineapples crowded and others gapped. Fix: mark all base points around the oval before starting Round 1 of the border, adjusting spacing to land evenly.
- Skipping a thorough block leaves the lace looking tight and cramped rather than open and full. Fix: block generously with pins and steam, stretching every pineapple and mesh section to its full size.
- Rushing the center columns without practicing the pineapple technique first often means discovering count errors only after several rounds are complete. Fix: always work a practice pineapple before starting the full piece.
Ways to Customize This Pattern
- Reduce the oval to doily size (30-40 cm) by working fewer fan-mesh rounds between the foundation and the border for a smaller matching piece.
- Use a finer crochet thread and smaller hook for a more delicate, traditional heirloom-lace finish.
- Work the border pineapples slightly smaller (starting from a 5-dc base instead of 7) for a subtler, less dramatic edge.
- Add a single row of contrast-color sc just inside the border for a soft color accent against the all-cream lace.
- Widen the oval further for a full tablecloth-style centerpiece using the same construction principles.
Frequently asked questions
Roughly 4-6 pineapples down the 2 center columns plus 20-24 around the deep border, so around 25-30 pineapples total. Exact counts depend on your gauge and final oval size.
Strongly recommended. If this is your first time with the technique, practice several individual pineapples on a small swatch before starting the full runner, since the whole piece depends on that decrease rhythm feeling automatic.
Yes, and it’s actually closer to how traditional pineapple lace is worked. Switch to a smaller steel hook to match your thread weight; the finished piece will be more delicate and may need a slightly different stitch count to reach the same overall size.
This usually means the extra repeats added at each rounded end during the mesh rounds weren’t matched between the two ends. Recount the stitches added at each curve every few rounds to keep both ends growing symmetrically.
The finished Pineapple Lace Oval Table Runner Crochet Pattern

