Pink and Green Flower Granny Square Bedspread Crochet Pattern
Beginner Friendly
Perfect for those just starting their crochet journey, with clear instructions and simple techniques
Single-Day Project
A satisfying project you can complete in a single afternoon or evening.
Handmade Gift
A beautiful keepsake — free forever. Read online or print at home.
About This Pink and Green Flower Granny Square Bedspread Crochet Pattern
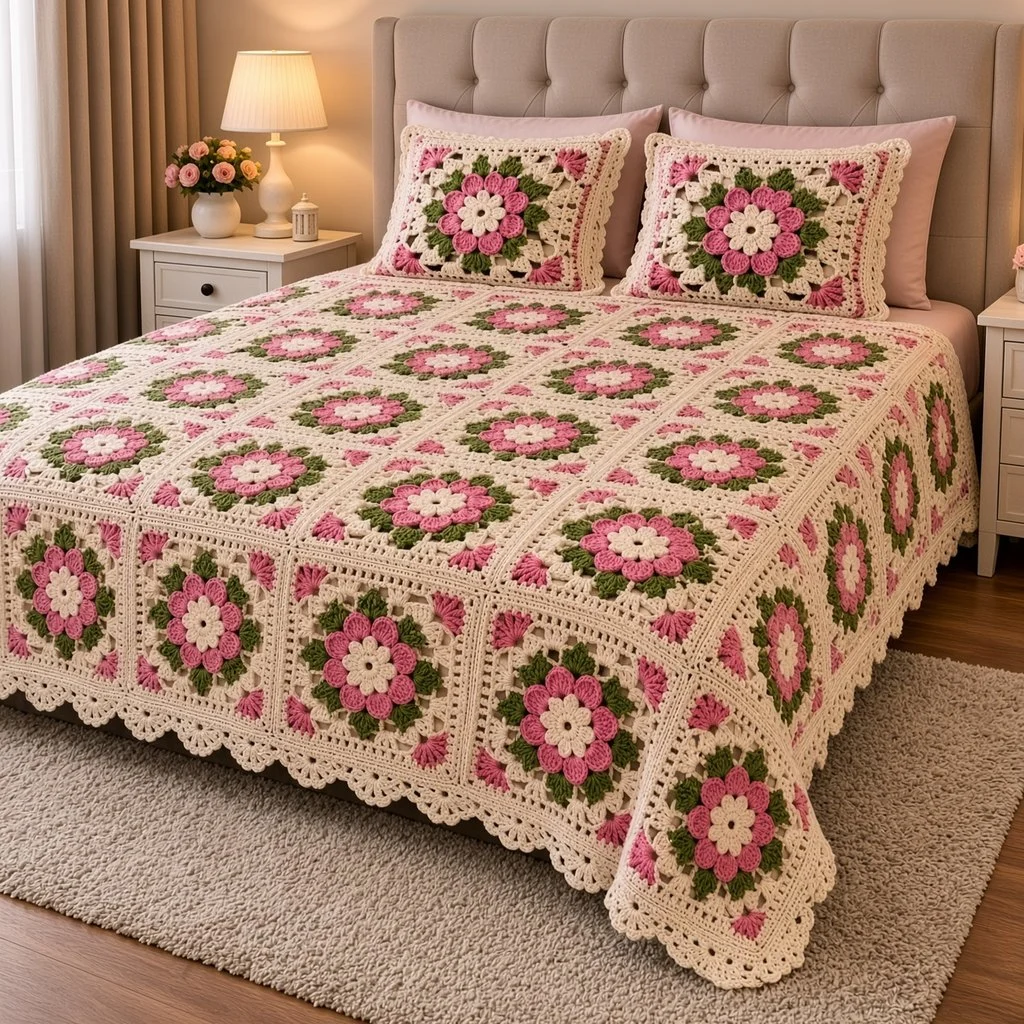
This pink and green flower granny square bedspread is pure cottage charm. Each of the 90 cream squares has a layered flower at its center: small cream petals, a ring of rounded pink petals and a ring of pointed green leaves behind them. The cream granny rounds around the flower end in a pink fan at every corner, so when the squares are joined, the corners meet in little pink stars across the bed. A cream scalloped border and two pillow shams finish the set.
The flower is worked right into the square, layer by layer. Each new layer starts with chain loops anchored around the back of the round before, so the pink petals sit behind the cream ones and the green leaves sit behind the pink. The cream granny rounds then grow from behind the leaves and turn the circle into a square, and short lengths of pink are used to work the corner fans in the last granny round.
The set takes about 140 to 160 hours, with each square taking just over an hour. It suits a crocheter who knows granny squares and is comfortable working around the back of stitches and changing colors.
Materials
- Worsted weight cotton blend, cream about 3,200 m (16 skeins of 100 g / 200 m)
- Worsted weight cotton blend, rose pink about 800 m (4 skeins)
- Worsted weight cotton blend, leaf green about 500 m (3 skeins)
- 5 mm crochet hook
- Yarn bobbins 4, for the corner fans
- Tapestry needle, stitch markers and scissors
- Two 50 x 70 cm pillows
Abbreviations
MRmagic ringchchainscsingle crochethdchalf double crochetdcdouble crochettrtreble crochetsl stslip stitchBLOback loop onlyskskipspspacest(s)stitch(es)rndroundreprepeatRS / WSright side / wrong sideCream Flower (Rnds 1-2)
- Rnd 1: with cream, MR, ch 1, 8 sc in ring, join with sl st to first sc. Pull the ring tight. (8 sts)
- Rnd 2: *(sl st, ch 2, 2 dc, ch 2, sl st) in next st; rep from * 7 more times. Fasten off cream. (8 small petals)
Pink Petals (Rnds 3-4)
- Rnd 3: working behind the cream petals, join pink with sc around the back of any sc of Rnd 1, *ch 4, sc around the back of the next sc of Rnd 1; rep from * 6 more times, ch 4, join to first sc. (8 ch-4 loops)
- Rnd 4: sl st in first loop, *(sc, hdc, 4 dc, hdc, sc) in loop; rep from * in each of the remaining 7 loops, join. Fasten off pink. (8 rounded petals)
Green Leaves (Rnds 5-6)
- Rnd 5: working behind the pink petals, join green with sc around the back of any sc of Rnd 3, *ch 5, sc around the back of the next sc of Rnd 3; rep from * 6 more times, ch 5, join. (8 ch-5 loops)
- Rnd 6: sl st in first loop, *(sc, hdc, dc, tr, ch 2, tr, dc, hdc, sc) in loop; rep from * in each of the remaining 7 loops, join. Fasten off green. (8 pointed leaves)
Cream Granny (Rnds 7-10)
- Rnd 7: working behind the leaves, join cream with sc around the back of any sc of Rnd 5, *ch 6, sc around the back of the next sc of Rnd 5; rep from * 6 more times, ch 6, join. (8 ch-6 loops)
- Rnd 8: sl st in first loop, ch 3 (counts as dc here and throughout), (2 dc, ch 2, 3 dc) in same loop, ch 1, (3 dc, ch 1, 3 dc) in next loop, ch 1, *(3 dc, ch 2, 3 dc) in next loop, ch 1, (3 dc, ch 1, 3 dc) in next loop, ch 1; rep from * 2 more times, join. (4 groups per side, 48 dc)
- Rnd 9: sl st in next 2 dc and in corner sp, ch 3, (2 dc, ch 2, 3 dc) in same sp, ch 1, *3 dc in each ch-1 sp to next corner with ch 1 between groups, (3 dc, ch 2, 3 dc) in corner sp, ch 1; rep from * 2 more times, 3 dc in each remaining ch-1 sp with ch 1 between groups, join. (5 groups per side, 60 dc)
- Rnd 10: rep Rnd 9. (6 groups per side, 72 dc)
Pink Corner Fans (Rnd 11)
- Wind four short lengths of pink, about 1 m each, onto bobbins.
- Rnd 11: with cream, sl st in next 2 dc and in the next ch-1 sp, ch 3, 2 dc in same sp, ch 1, 3 dc in each ch-1 sp to the corner with ch 1 between groups.
- At the corner: drop cream, join a pink bobbin, work (4 dc, ch 2, 4 dc) in the corner sp, then drop pink on the WS. Pick up cream, carrying it loosely behind the pink group, ch 1, and continue with 3 dc in each ch-1 sp along the next side.
- Work the other three corners the same way with the other bobbins, and join to the top of the first ch 3. Fasten off pink at each corner. (7 groups per side: 5 cream groups and a pink half-fan at each end)
Edge (Rnd 12)
- Rnd 12: with cream, sl st to the next corner sp, ch 1, (sc, ch 2, sc) in same sp, *sc in each dc and each ch-1 sp to next corner, (sc, ch 2, sc) in corner sp; rep from * 2 more times, sc in each remaining st and sp, join. Fasten off. (31 sc per side, 124 sc)
- The square measures about 23 cm. Make 90 for the bedspread and 12 for the shams.
Joining the Squares
- Lay out 90 squares, 9 across and 10 long.
- Join method: place two squares side by side, RS up. With cream, sl st through the BLO of the matching sts of both squares, starting and ending in the corner ch-2 sps. (33 sl st per side, including both corners)
- Join the squares into rows of 9, then join the rows along their long edges.
- Where four corners meet, work through all four corner sps so no gap is left. The four pink half-fans meet there in a little pink star.
- The joined bedspread measures about 207 x 230 cm.
Scalloped Border
- Rnd 1: with cream, RS facing, join in a corner sp. Work 1 sc in each bedspread corner sp, sc in each st along the edge of every square, and 1 sc in each point where two squares meet. Join. (319 sc along each long side, 287 along each short side and 4 at the corners: 1,216 sts)
- Rnd 2: ch 1, *sc in next st, sk next st, 5 dc in next st, sk next st; rep from * around, join. Fasten off. (304 scallops)
Pillow Shams (make 2)
- Front: join 6 squares, 3 across and 2 tall. (about 69 x 46 cm)
- Back pieces (make 2 per sham): with cream, ch 99. Row 1: hdc in 3rd ch from hook and in each ch across. (97 hdc) Rows 2-30: ch 2 (does not count as a st), turn, hdc in each st across. Fasten off. (about 69 x 27 cm)
Sham Assembly
- Lay a front WS up. Place one back piece on top, RS up, lined up with the top edge, and the other lined up with the bottom edge, overlapping by about 8 cm in the middle. Pin all edges.
- Rnd 1: turn so the front faces you. With cream, join in a corner sp through all layers. 3 sc in each corner sp, sc in each st of the front’s edge and 1 sc in each point where squares meet, easing the back to fit. Join. (95 sc along each long side, 63 along each short side and 12 at the corners: 328 sts)
- Rnd 2: ch 1, *sc in next st, sk next st, 5 dc in next st, sk next st; rep from * around, join. Fasten off. (82 scallops)
- Rep with the second sham.
Finishing
Weave in all ends on the WS. Hide the pink and green tails behind the flower and the pink corner ends inside the corner fans, so nothing colored shows through the cream granny clusters.
Lay the bedspread flat and steam it lightly, holding the iron above the flowers so the petals and leaves keep their shape. Pin out the scallops of the border, let it dry, then lift the petals with your fingers so each flower looks full.
Tips for Success
- Make the flowers (Rnds 1-6) for many squares first, then work all the cream rounds. Fewer color changes means faster work.
- Fold the previous layer forward before working each loop round, so you anchor behind the petals and not through them.
- Keep the cream carried behind the pink corner groups loose, so the corners lie flat.
- Use colorfast cotton and wash a test square, since pink and green can bleed onto cream.
- Block each square before joining so the pink corner stars line up neatly.
Common Mistakes to Avoid
- Anchoring a loop round to the wrong sts. Rnd 3 anchors around Rnd 1, Rnd 5 around Rnd 3 and Rnd 7 around Rnd 5. If you skip ahead, the layers won’t sit behind each other.
- Corners in the wrong loops in Rnd 8. Corners go in every second loop. Mark them before starting the round.
- A tight float behind the pink corners. If the corner puckers, the carried cream is too short. Leave it slightly loose.
- A cupped square. If the square bowls around the flower, the ch-6 loops in Rnd 7 are too short. Make them ch 7.
- A wavy border. Work exactly 1 sc at each corner and each joining point in Rnd 1 of the border.
Ways to Customize This Pattern
- Change the flower color: lilac, coral or sky blue petals all look lovely with green leaves and cream.
- Change the size: each square adds 23 cm. A throw of 5 by 6 squares is about 119 x 142 cm with the border.
- Leave out the pink corners and work Rnd 11 all in cream for a simpler square.
- Use a different pink for every few squares for a scrappy, vintage look.
- Make a matching table runner of 2 by 6 squares.
Frequently asked questions
Each layer starts with chain loops anchored around the back of the stitches two rounds earlier. The new petals or leaves are worked into those loops, so they grow from behind the previous layer and peek out around it.
Short lengths of pink are the neatest way, because only the corners are pink. You can also carry pink inside the cream stitches around the whole round, but it may show through the granny clusters.
Yes, on Rnd 12. Join each new square to its neighbors with a sl st in each matching st. It saves time on a bedspread of 90 squares.
Wash it on a gentle cold cycle inside a large laundry bag, or by hand, and dry it flat. Use a color catcher for the first few washes so the pink and green don’t tint the cream.
The finished Pink and Green Flower Granny Square Bedspread Crochet Pattern

