Pink Bow Crochet Blanket Pattern
Beginner Friendly
Perfect for those just starting their crochet journey, with clear instructions and simple techniques
Single-Day Project
A satisfying project you can complete in a single afternoon or evening.
Handmade Gift
A beautiful keepsake — free forever. Read online or print at home.
About This Pink Bow Crochet Blanket Pattern
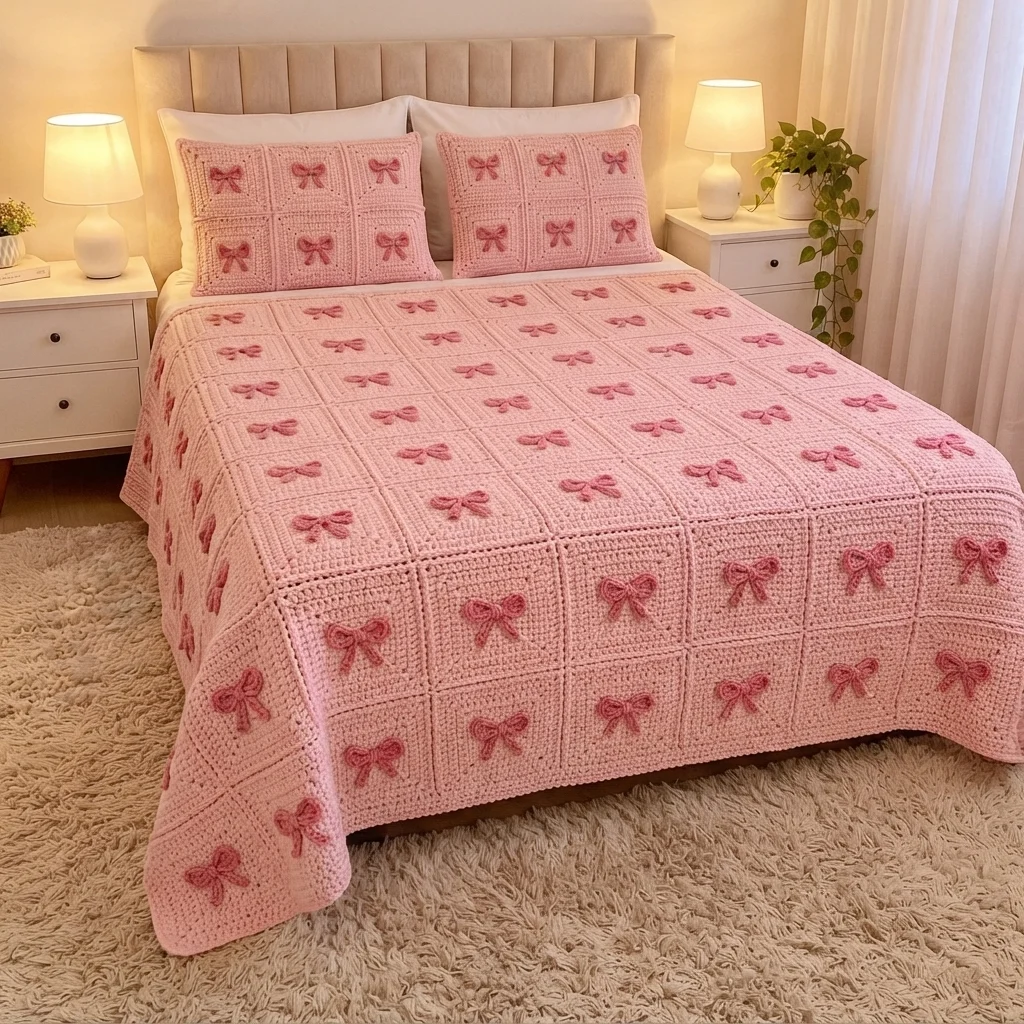
This bow crochet blanket pattern makes a soft, dense throw from pale pink squares, each with a small rose-pink bow sewn to the center. The squares are worked in the round in single crochet, so the fabric is thick and smooth, and the bows stand out from it like little ribbons.
It is an advanced project because of the volume. You will make 42 matching squares and 42 three-dimensional bows, each in several parts, then join everything with neat seams. Each square takes about 45 minutes and each bow about 15, so plan on 45 to 55 hours in total.
It suits crocheters who can keep their tension even over many identical pieces and who enjoy small finishing details. The finished throw is about 120 x 140 cm, and it is easy to resize by adding or removing squares.
Materials
- Chunky cotton-blend yarn, pale pink (A) about 2 kg, estimated
- Chunky cotton-blend yarn, rose pink (B) about 150 g, estimated
- Crochet hook 6.0 mm
- Yarn needle
- Stitch markers to mark the corners
- Flat surface and pins for blocking and layout
Abbreviations
MRmagic ringchchainscsingle crochetsl stslip stitchst(s)stitch(es)FOfasten offApale pink yarnBrose pink yarn( )xrepeat the stitches in brackets the number of times givenSquare (A)
- Work in continuous rounds without turning. At the end of each round, sl st to the first sc and place a marker in the middle stitch of every 3-sc corner group, moving the markers up each round.
- Round 1: 4 sc in MR (4)
- Round 2: 3 sc in each st around (12). Place a marker in the middle st of each group of 3. These are your 4 corners.
- Round 3: (3 sc in the marked st, sc in each of the next 2 sts)x4 (20)
- Round 4: (3 sc in the marked st, sc in each of the next 4 sts)x4 (28)
- Round 5: (3 sc in the marked st, sc in each of the next 6 sts)x4 (36)
- Round 6: (3 sc in the marked st, sc in each of the next 8 sts)x4 (44)
- Round 7: (3 sc in the marked st, sc in each of the next 10 sts)x4 (52)
- Round 8: (3 sc in the marked st, sc in each of the next 12 sts)x4 (60)
- Round 9: (3 sc in the marked st, sc in each of the next 14 sts)x4 (68)
- Round 10: (3 sc in the marked st, sc in each of the next 16 sts)x4 (76)
- Round 11: (3 sc in the marked st, sc in each of the next 18 sts)x4 (84)
- Round 12: (3 sc in the marked st, sc in each of the next 20 sts)x4 (92). Join with a sl st, FO and weave in the end.
- Check your square: each side has 22 stitches between the corner stitches, and the square should be about as wide as it is tall. Block flat with a damp cloth and pin to the size of your test square.
Bow Loops (B)
- Round 1: ch 24. Join with a sl st to the first ch, being careful not to twist the chain (24).
- Rounds 2-3: sc in each st around (24) for 2 rounds. Join with a sl st, FO leaving a long tail.
- Flatten the ring so it forms a long band about 10 cm wide. Pinch it in the middle to make two loops and tack the pinch with a few stitches.
Bow Tails (make 2, B)
- Row 1: ch 11. Sc in the 2nd ch from the hook and in each ch across (10)
- Rows 2-3: ch 1, turn, sc in each st across (10). FO leaving a long tail.
- Cut a small V into one short end of each tail if you want a ribbon look, or leave it straight.
Bow Knot (B)
- Row 1: ch 7. Sc in the 2nd ch from the hook and in each ch across (6)
- Rows 2-6: ch 1, turn, sc in each st across (6). FO leaving a long tail.
- Wrap the strip around the pinched center of the loops and sew the two short ends together at the back.
Bow Assembly
- Lay the two tails side by side with their top ends overlapping, angled slightly outward in a V.
- Place the loops over the tail tops and sew them together through the back of the pinched center.
- Add the knot over the pinch and tack it down.
- Center the finished bow on a square, about 2 rounds above the middle, and sew it on with small stitches through the bow back and the square’s stitches. Make 42.
Blanket Layout
- Lay out 6 squares across and 7 squares down (42 squares in all).
- Turn every square the same way, with the bow upright, so all the bows face the same direction as in the photo.
- Check the layout from a few steps back before you start joining.
Joining
- Join the squares into 7 strips of 6. Hold two squares with wrong sides together and sc through the back loops of both, using A. Match the stitches one for one along each side of 24 stitches, corner stitch to corner stitch.
- Join the strips in the same way, matching the corners so the seams make a clean cross.
- Work the horizontal seams last so the vertical and horizontal seams meet flat at each corner.
- Weave in all ends.
Blanket Edging (A)
- Round 1: join A in any corner. Ch 1 and sc evenly around the blanket, working 3 sc in each corner and one sc in each stitch along the edges. Join with a sl st.
- Round 2: ch 1, sc in each st around, working 3 sc in the middle st of each corner. Join with a sl st, FO and weave in the ends.
Finishing
Block the finished blanket by laying it flat on towels, pinning the corners and edges to the size you want, and misting it with water. Let it dry fully before moving it. Keep the bows out of the pins so they do not flatten.
Check each bow for loose stitches and secure any that move. Drape the blanket across the foot of the bed with a row of bows facing up, and it will look like the photo.
Tips for Success
- Make one test square and one test bow before you commit to all 42, and write down your hook size and measurements.
- Count the stitches at the end of every round. The total should be 8 times the round number, minus 4.
- Move the corner markers up every round so you never lose the four corners.
- Make the bows in batches of ten and keep them in a bag, so the assembly is quick.
- Block every square before joining, since squares in the round tend to cup slightly.
Common Mistakes to Avoid
- Working 3 sc into the wrong stitch moves the corner and makes the square lopsided. Check that the markers sit in the middle of each group.
- Twisting the chain when you join the bow loop gives a twisted bow. Lay the chain flat before you slip stitch.
- Squares in different sizes will not join flat. Block each one to the same measurements.
- Sewing the bows on off-center makes the rows look uneven. Pin all the bows and check them against the layout before stitching.
- Joining with a tight seam makes ridges. Use a loose stitch and match the seam tension to the squares.
Ways to Customize This Pattern
- Swap the pink for sage, cream or lavender and keep a darker shade of the same color for the bows.
- Make a baby blanket with 4 squares across and 5 down (20 squares), about 80 x 100 cm.
- Make matching pillow covers by joining 4 squares into a 2×2 panel and sewing it to a plain back.
- Work the bows in cream for a softer, tone-on-tone look.
- Add a small bow to only every second square for a lighter, more scattered pattern.
Frequently asked questions
The amounts above are estimates of about 45 g of pale pink per square plus extra for joining and edging, and about 3.5 g of rose pink per bow. Weigh your test square and bow, multiply by 42, and add about 10 percent.
Yes. Use a larger hook for bigger squares or a smaller hook for smaller ones, and keep the stitch counts the same. To change the size with the same hook, stop earlier or add more rounds, each adding 8 stitches.
For a faster blanket you can skip the bows on some squares, but they need to be sewn on to stay in place. If the blanket will be washed often, use a cotton yarn for the bows and stitch them firmly at the back.
Yes. One square with a bow works well on its own. Use a lighter yarn and a smaller hook for a coaster, or sew two squares together with a zipper or buttons for a small cushion cover.
The finished Pink Bow Crochet Blanket Pattern

