Pink Heirloom Floral Crochet Bedspread Pattern
Advanced
For experienced crocheters who enjoy complex shaping, fine detail, and ambitious construction
Single-Day Project
A satisfying project you can complete in a single afternoon or evening.
Handmade Gift
A beautiful keepsake — free forever. Read online or print at home.
About This Pink Heirloom Floral Crochet Bedspread Pattern
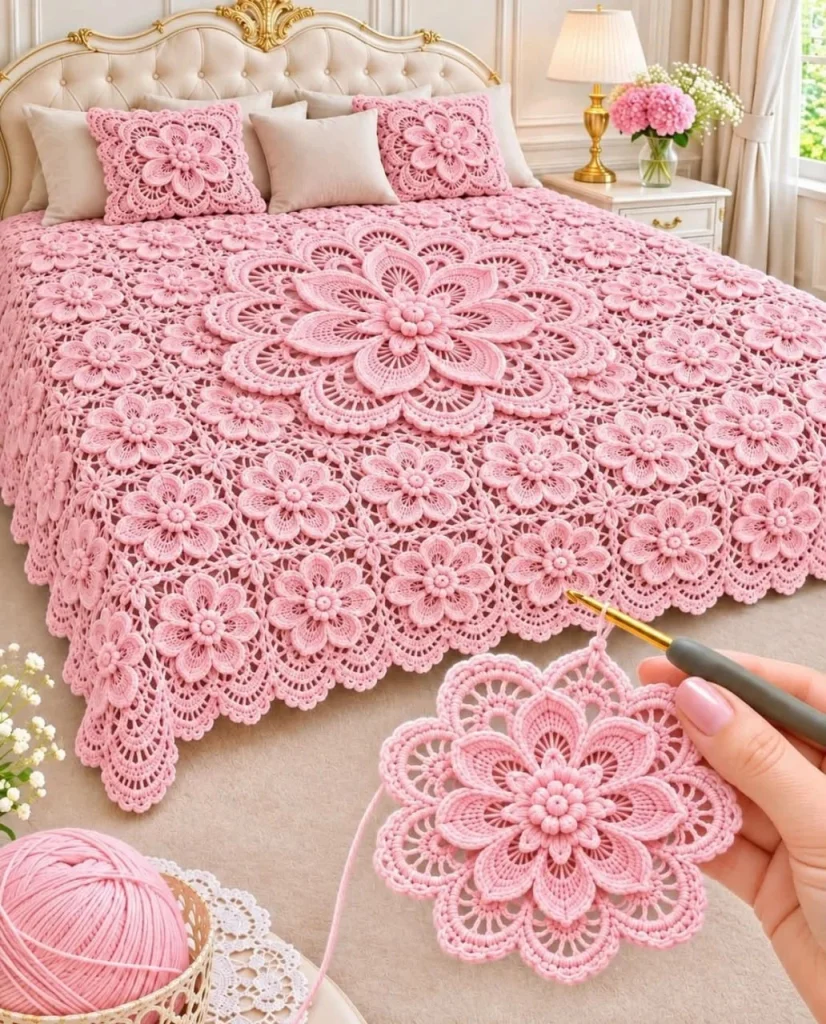
Pink floral crochet bedspread pattern details bring the reference image to life: soft rose-pink lace, raised teardrop petals, clustered flower centers, and a large layered medallion. This original design uses a square lace foundation with separately crocheted flowers, allowing the petals to sit above the fabric while the open background remains visible.
The finished coverlet measures approximately 82 inches square and takes an estimated 250–350 hours. It suits experienced crocheters who enjoy making repeated components, shaping decorative appliqués, and assembling large lace projects. Work one complete flower square first; it becomes your reference for blocking, petal placement, and the remaining motifs. The matching pillows in the photograph are styling references and are not included in this bedspread pattern.
Materials
- Rose-pink sport-weight cotton yarn Approximately 11,000–14,000 m / 12,030–15,310 yd; buy one dye lot. At 250 m per 100 g, this is approximately 4.4–5.6 kg.
- Crochet hook 3.5 mm, or size needed for the blocked square gauge.
- Tapestry needles A blunt needle for seams and a finer needle for securing flower details.
- Locking stitch markers At least 16, including four contrasting corner markers.
- Blocking mats, rustproof pins, and measuring tape Enough space to block several squares to identical dimensions.
- Smooth contrasting waste yarn For temporary placement guides and basting.
- Digital kitchen scale Useful for estimating the full yarn requirement from your completed sample.
Abbreviations
chchainsl stslip stitchscsingle crochethdchalf double crochetdcdouble crochettrtreble crochetMRmagic ringinc2 sc in the same stitchdecsingle crochet 2 stitches togetherBO5-dc bobble, defined belowRSright sideGauge, Construction, and Stitch Notes
- Use US crochet terminology. The controlling gauge is one completed, blocked 10-round foundation square measuring 20.3 × 20.3 cm / 8 × 8 in. Round 5 should measure approximately 10 cm / 4 in square. Adjust hook size and repeat the sample if necessary.
- Supporting gauge: approximately 24 sc and 26 rows per 10 cm / 4 in in a flat sc swatch. The lace-square measurement takes priority; petal dimensions are secondary checkpoints.
- Make 100 foundation squares, 96 small flowers, and one large central medallion. Arrange the squares in a 10 × 10 grid. Leave the middle four squares without small flowers so the medallion can span their intersection.
- All pieces use the same rose-pink yarn. Texture supplies the contrast; no color changes, stuffing, eyes, or facial details are used.
- For a BO: yarn over, insert hook into the indicated stitch, yarn over and pull up a loop, yarn over and draw through 2 loops; repeat this partial dc five times in the same stitch. Yarn over and draw through all 6 loops on the hook. The bobble counts as 1 stitch. Do not add a closing chain. Push each bobble toward the RS.
- A 3-dc group means 3 separate dc in the same space. Starting ch 3 counts as a dc in the foundation squares. Starting chains do not count in the petal edging, flower centers, lace fans, or border unless explicitly stated.
- For a picot: ch 3, sl st into the first of those chains. A picot is decorative and does not add a stitch to the underlying row count.
- Close every MR securely and weave its tail through the first round in two directions. Cotton lace receives considerable strain during blocking and handling.
Lace Foundation Squares — Make 100
- Round 1: In an MR, ch 3, 2 dc, ch 3; repeat 3 dc, ch 3 three more times. Join with a sl st to the top of the starting ch 3. Tighten the ring. Count: 12 dc in four groups, four corner ch-3 spaces.
- Round 2: Sl st across to the first corner space. In that corner work ch 3, 2 dc, ch 3, 3 dc, ch 1. In each remaining corner work 3 dc, ch 3, 3 dc, ch 1. Join to the starting ch 3. Count: 24 dc in eight groups, four corner spaces, four side ch-1 spaces.
- Round 3: Sl st to the first corner space. Work ch 3, 2 dc, ch 3, 3 dc in that corner. Ch 1, work 3 dc in the next side ch-1 space, ch 1. At each remaining corner work 3 dc, ch 3, 3 dc; between corners work ch 1, 3 dc in the side space, ch 1. Join. Count: 36 dc in 12 groups, four corners, eight side spaces.
- Round 4: Begin in a corner as before. Work a corner of 3 dc, ch 3, 3 dc in each corner space. Between corners, ch 1, work 3 dc in each of the two side spaces with ch 1 between groups, then ch 1 before the next corner. Join. Count: 48 dc in 16 groups, four corners, 12 side spaces.
- Round 5: Repeat the established corner construction, working 3 dc into each of the three side spaces per side and ch 1 between all neighboring groups along a side. Join. Count: 60 dc in 20 groups, four corners, 16 side spaces.
- Round 6: Continue in the same manner, with four side-space groups per side. Count: 72 dc in 24 groups, four corners, 20 side spaces.
- Round 7: Continue with five side-space groups per side. Count: 84 dc in 28 groups, four corners, 24 side spaces.
- Round 8: Continue with six side-space groups per side. Count: 96 dc in 32 groups, four corners, 28 side spaces.
- Round 9: Continue with seven side-space groups per side. Count: 108 dc in 36 groups, four corners, 32 side spaces.
- Round 10: Continue with eight side-space groups per side. Count: 120 dc in 40 groups, four corners, 36 side spaces. Fasten off and weave in ends.
- Block each square to 20.3 cm / 8 in. Along one side, excluding the corner spaces, there are 30 dc and nine ch-1 spaces. This includes the three dc leaving the first corner and the three dc approaching the next corner.
Small Flower Centers — Make 96
- Round 1: Work 6 sc in an MR. Continue in a spiral, marking the first stitch. Count: 6 sc.
- Round 2: Inc in every stitch. Count: 12 sc.
- Round 3: Repeat sc in next stitch, inc in next stitch six times. Count: 18 sc.
- Round 4: Repeat sc in next stitch, BO in next stitch, sc in next stitch six times. Count: 18 stitches, including six bobbles. Sl st in the next stitch and fasten off, leaving a 40 cm / 16 in sewing tail. Keep the disk flat and push the bobbles toward its RS.
- Mark the six bobbles as petal alignment points. Each petal base will sit behind one bobble, with the petal extending away from the center.
Small Raised Petals — Make 576, Six per Flower
- Foundation: Ch 14. Work Round 1 around both sides of this chain without turning.
- Round 1, first side: Sc in the second chain from the hook, hdc in the next 2 chains, dc in the next 3 chains, tr in the next 4 chains, dc in the next 2 chains, and 5 dc in the last chain. Mark the five stitches made in the last chain as the tip group.
- Round 1, return side: Rotate the piece and work into the unused loops along the underside of the foundation chain. Skip the chain containing the five tip dc because it has already been worked. Dc in the next 2 chains, tr in the next 4 chains, dc in the next 3 chains, hdc in the next 2 chains, and sc in the last chain. Join to the first sc. Count: 29 stitches around the petal.
- Round 2: Ch 1. Sc in each stitch around, working 2 sc into each of the five marked tip stitches. Join to the first sc. Count: 34 sc. Fasten off, leaving a 25 cm / 10 in tail.
- Block lightly into a narrow teardrop approximately 6–7 cm / 2½–2¾ in long. The beginning and ending sc form the narrow base. Keep the outer tip rounded.
- Pinch the two base corners together and secure with two small stitches through the edging. This creates a shallow fold at the base while leaving the rest of the petal open.
Raised Center Nodules — Make 97
- Round 1: Work 6 sc in an MR. Continue in a spiral. Count: 6 sc.
- Round 2: Sc in each stitch. Count: 6 sc.
- Round 3: Dec three times. Count: 3 sc. Fasten off with a 20 cm / 8 in tail. Pass the tail through the front loops of the final three stitches and draw closed.
- Leave unstuffed. Roll gently between your fingers to round the shape. Use one nodule for each small flower and one for the large medallion.
Assemble the 96 Small Flowers
- Place six petals RS up in a radial arrangement. Their narrow bases meet at the middle, and adjacent petals may overlap slightly near the base.
- Place one small center disk over the petal bases, aligning one petal with each bobble. Sew through the disk edge and petal bases at all six positions. Catch at least three edging stitches at each base.
- Sew one nodule over the MR at the middle of the disk. Pass the needle through the disk several times to secure it without flattening the surrounding bobbles.
- Center the assembled flower on a blocked foundation square. Sew the center to the square’s central groups, then tack each petal to a nearby dc group approximately halfway along its length. Keep the final third of each petal free.
- Make 96 decorated squares. Aim for a flower diameter of approximately 15–18 cm / 6–7 in, leaving the square edges accessible for seaming. Keep four foundation squares undecorated.
Large Medallion Center — Make One
- Round 1: Work 6 sc in an MR. Continue in a spiral. Count: 6 sc.
- Round 2: Inc in every stitch. Count: 12 sc.
- Round 3: Repeat sc in next stitch, inc six times. Count: 18 sc.
- Round 4: Repeat sc in next 2 stitches, inc six times. Count: 24 sc.
- Round 5: Repeat sc in next 3 stitches, inc six times. Count: 30 sc.
- Round 6: Repeat sc in next 4 stitches, inc six times. Count: 36 sc.
- Round 7: Repeat sc in next 5 stitches, inc six times. Count: 42 sc.
- Round 8: Repeat sc in next 6 stitches, inc six times. Count: 48 sc.
- Round 9: Repeat sc in next 2 stitches, BO in next stitch, sc in next 3 stitches eight times. Count: 48 stitches, including eight bobbles. Sl st in the next stitch and fasten off with an 80 cm / 32 in sewing tail.
- Mark the eight bobbles as equally spaced alignment points. The blocked disk should measure approximately 7–8 cm / 2¾–3¼ in across.
Large Medallion Petals — Make Eight
- Foundation: Ch 28. Work around both sides of the chain without turning.
- Round 1, first side: Sc in the second chain from the hook, hdc in the next 3 chains, dc in the next 6 chains, tr in the next 10 chains, dc in the next 6 chains, and 5 dc in the last chain. Mark those five tip stitches.
- Round 1, return side: Rotate the piece. Along the unused underside loops, dc in the next 6 chains, tr in the next 10 chains, dc in the next 6 chains, hdc in the next 3 chains, and sc in the last chain. Join to the first sc. Count: 57 stitches.
- Round 2: Ch 1. Sc around, working 2 sc in each of the five marked tip stitches and 1 sc in every other stitch. Join. Count: 62 sc.
- Round 3: Ch 1, sc in each stitch around, join. Count: 62 sc. Fasten off with a 45 cm / 18 in tail.
- Block each petal to approximately 14–16 cm / 5½–6¼ in long. Pinch and stitch the base corners together as for the small petals. Keep all eight petals the same length.
Inner Medallion Petals — Make Eight
- Foundation: Ch 9.
- Round 1, first side: Sc in the second chain from the hook, hdc in the next chain, dc in the next 2 chains, tr in the next 2 chains, dc in the next chain, and 5 dc in the last chain.
- Round 1, return side: Along the underside of the chain, dc in the next chain, tr in the next 2 chains, dc in the next 2 chains, hdc in the next chain, and sc in the last chain. Join to the first sc. Count: 19 stitches.
- Round 2: Ch 1. Sc in every stitch, working 2 sc in each of the five tip stitches. Join. Count: 24 sc. Fasten off with a 25 cm / 10 in tail.
- Block to approximately 4 cm / 1½ in long. Leave the base flat; these petals form a compact layer on top of the large center disk.
Medallion Lace Fans — Make Eight
- Foundation: Ch 5 and sl st to the first chain to form a ring. These fans are worked in turned rows to form open semicircular lobes.
- Row 1: Ch 3, counting as the first dc, and work 11 dc into the ring. Turn. Count: 12 dc.
- Row 2: Ch 3, counting as the first dc. Repeat ch 2, dc in the next dc eleven times. Turn. Count: 12 dc and eleven ch-2 spaces.
- Row 3: Ch 3, counting as the first dc. Repeat ch 3, dc in the next dc eleven times, skipping the intervening chain spaces. Turn. Count: 12 dc and eleven ch-3 spaces.
- Row 4: Ch 3, counting as the first dc, and dc in the same stitch. Repeat ch 3, 2 dc in the next dc eleven times. Turn. Count: 24 dc in 12 pairs and eleven ch-3 spaces.
- Row 5: Ch 1. Sc in every dc and work 3 sc in each ch-3 space. Turn. Count: 57 sc.
- Row 6: Ch 1. Repeat sc in the next 3 stitches, picot nineteen times. Count: 57 sc and 19 picots. Fasten off with a 50 cm / 20 in tail.
- Block each fan into a smooth semicircle approximately 12–14 cm / 4¾–5½ in across its straight base and 6–7 cm / 2½–2¾ in deep. Do not stretch the open rows into long, narrow strips.
Join the Bedspread Squares
- Lay out a 10 × 10 grid, RS up. Number rows from top to bottom and columns from left to right. Place the four undecorated squares at row 5, columns 5 and 6, and row 6, columns 5 and 6.
- Keep all flowers facing upward. Rotate individual squares if needed to balance petal placement, but keep their edges square and their corners aligned.
- Join neighboring squares with a flat mattress seam through the outer loops of corresponding edge dc. At each pair of corresponding ch-1 spaces, take one small stitch through both spaces without drawing them closed. Match all 30 dc and all nine side spaces along each joined edge.
- At each corner, secure the adjoining ch-3 spaces with two loose sewing passes. At four-square intersections, connect all four corner spaces in a small ring; keep the join flexible and avoid a bulky knot.
- Join the squares into ten rows, then join the rows together. The unbordered bedspread should measure approximately 203 × 203 cm / 80 × 80 in after a gentle settling block.
Assemble and Attach the Central Medallion
- Baste a circle approximately 46–48 cm / 18–19 in across, centered on the intersection of the four undecorated squares. Use this as an outer placement guide; remove the basting after assembly.
- Arrange the eight large petals evenly around the large center disk, placing their narrow bases beneath its edge. Align each petal with one marked bobble. Sew each base securely to the underside of the disk.
- Place one lace fan behind the outer half of each large petal. Point the fan’s curved picot edge outward, allowing approximately 3–4 cm / 1¼–1½ in to show beyond the petal tip. Hide the fan’s straight base beneath the petal.
- On each fan, sew the midpoint of its straight base and its two base corners to the underside of the corresponding petal. Where adjacent fan edges overlap, connect them with two or three loose stitches. Check that the assembled medallion lies within the basted circle.
- Arrange the eight inner petals on top of the center disk, pointing outward between the bobbles. Their bases meet near the middle. Sew the base and one short section of each side to the disk; leave the tips free.
- Sew the final nodule over the middle of the inner petal bases. Secure it through the center disk.
- Center the medallion over the four blank squares. Sew the center disk to several underlying dc groups. Tack each large petal at its base and midpoint, and secure each lace fan at its two base corners and one point just inside its curved edge. Catch solid dc groups rather than isolated chain strands wherever possible.
- Lift each free petal tip to check that the attachment stitches have not flattened the layers. Remove the circular basting guide.
Continuous Scalloped Border
- Preparation: Along each outside square edge, identify its 30 dc and nine ch-1 spaces, excluding the two corner spaces. Count the ten 3-dc groups along that edge from left to right as you work.
- Round 1: Join yarn at an outside corner ch-3 space. Ch 1 and work 3 sc in that space; mark the middle sc. Along each square edge, work 1 sc in every dc and 2 sc in every ch-1 space, adding 1 extra sc in the middle dc of the fifth 3-dc group. This gives 49 sc per square edge.
- Round 1, joins and corners: Between neighboring squares along the outside boundary, work 1 sc through their paired corner spaces at the seam. There are nine such seam stitches per side. At each of the remaining three outside corners, work 3 sc in the corner space and mark the middle sc. Join to the first sc. Count: 499 side stitches between corner groups, four 3-sc corner groups, 2,008 sc total.
- Round 2: Ch 1, sc in every stitch around, working 3 sc in each marked middle corner stitch. Move each corner marker to the middle stitch of its new 3-sc group. Join. Count: 2,016 sc total. There are 503 stitches strictly between neighboring marked corner stitches, or 504 stitches from immediately after one marked corner through the next marked corner.
- Round 3: Sl st to the first marked corner stitch. Repeat skip 2 stitches, 5 dc in the next stitch, skip 2 stitches, sl st in the next stitch sixty-six times to reach the next marked corner. Repeat the same sixty-six scallops along each remaining side. The final sl st lands in the starting corner stitch. Count: 264 scallops, each containing 5 dc. Fasten off.
- The scallops turn around the corners because each corner falls at the valley between two shells. If the edge draws inward, remake Round 3 with a slightly larger hook; keep the stitch sequence unchanged.
Finishing
Weave in every remaining tail through several solid stitch groups, changing direction before trimming. Check the backs of the flower centers and the medallion for loose sewing loops. Spread the coverlet flat and gently tug each attached component to find any areas that need another securing stitch.
Wash according to the yarn label and support the full weight of the wet fabric when lifting it. Press out water in towels, then dry flat with the square seams aligned. Shape the scallops and lace fans with your fingers and lift the free petal tips before the cotton dries. The finished bedspread should measure approximately 208 cm / 82 in square, with a central medallion approximately 46–48 cm / 18–19 in across.
Tips for Success
- Keep one blocked square beside your work and measure every batch against it. Small differences become noticeable across ten joined squares.
- Make petals in sets of six for small flowers and sets of eight for the medallion. Compare each set before sewing so one tight petal does not distort the flower.
- Use loose basting stitches to position the central medallion before permanent sewing. Its center should cover the four-square intersection while its outer fans remain inside the surrounding flowers.
- Weigh a finished decorated sample and a blank square. Estimate the main fabric from 96 decorated squares plus four blank squares, then add the medallion, border, and a 15–20 percent reserve.
- Support the coverlet on a table while attaching the medallion. Hanging fabric can stretch the mesh and shift the placement.
Common Mistakes to Avoid
- Adding chains between the three dc within a group changes the square gauge. Chain only between groups and at the corners as directed.
- Working the underside of a petal into the same top loops used on the first side twists the piece. Rotate the chain and use its remaining underside loops.
- Sewing around the entire petal edge removes its raised shape. Attach the base and midpoint, then leave the outer portion free.
- Pulling mattress seams tight makes ridges and shortens the bedspread. Relax each seam after several stitches and compare its length with an unjoined edge.
- Missing the extra pickup stitch on an outside square edge disrupts the scallop count. Verify 49 stitches per square edge and 2,016 stitches after Border Round 2 before making the shells.
Ways to Customize This Pattern
- Use pale blush for the foundation and a slightly deeper rose for the flowers. Keep all structural stitch counts unchanged.
- Make the center nodules one shade darker than the petals to emphasize the clustered centers without changing the floral design.
- For a flatter coverlet, add a second discreet tack near each petal tip. Leave enough slack for the petal to settle naturally during washing.
- For a larger matching bedspread, use a 16 × 16 grid with four central blank squares and 252 decorated squares. At the same gauge it finishes approximately 330 cm / 130 in square. The same border method gives 3,208 stitches in Round 1, 3,216 in Round 2, and 134 scallops per side; yarn and time increase substantially.
Frequently asked questions
The large medallion needs an even foundation. Small flowers underneath it would create bulky lumps and prevent the large petals and lace fans from settling into clear layers.
Yes, but the same stitch counts will produce a smaller coverlet. Make and block a complete square first. The unbordered width is ten times that square’s width; the flower and medallion dimensions will also change. Use the square measurement to decide whether the resulting coverlet suits your bed.
Attach the 96 small flowers before joining so the work stays manageable. Attach the large medallion after joining, when you can center it accurately over the four blank squares.
Secure its disk to several underlying dc groups, tack every large petal at its midpoint, and anchor each fan at three points. Spread those attachments across the four central squares so the weight is supported by multiple stitch groups.
An 82-inch square coverlet gives approximately 11 inches of drop on each side of a standard 60-inch-wide queen mattress. It provides a decorative top layer with a modest side drop. Measure your mattress and desired drop before choosing the final grid size.
The finished Pink Heirloom Floral Crochet Bedspread Pattern

