Pink Lotus Granny Square Bedspread Pattern
Beginner Friendly
Perfect for those just starting their crochet journey, with clear instructions and simple techniques
Single-Day Project
A satisfying project you can complete in a single afternoon or evening.
Handmade Gift
A beautiful keepsake — free forever. Read online or print at home.
About This Pink Lotus Granny Square Bedspread Pattern
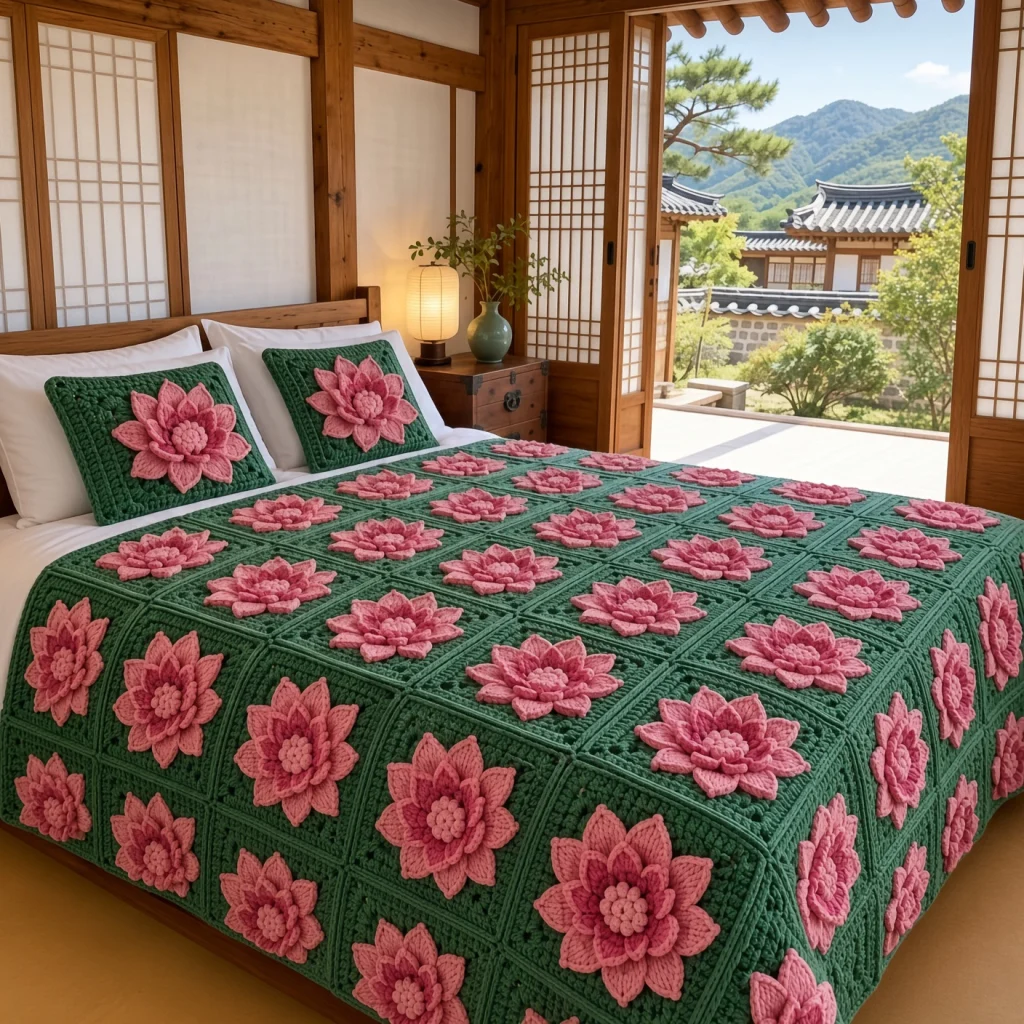
This lotus flower crochet blanket pattern places a layered, three-dimensional pink lotus on every green granny square. Each flower has a ring of bobble stitches at its center and three layers of pointed petals: a deep rose inner layer, then two coral pink layers that open out wider and taller. The petals stand away from the background, so the flowers look as if they are floating on the green squares, like lotuses on a pond.
The flowers are crocheted separately and sewn on after the squares are made. Each petal layer is worked into the back loops of a base round behind the layer before it, which is what lets the petals stack instead of lying flat. The 63 squares are joined into a bedspread and finished with a simple green border. Two pillow covers use a larger lotus, worked with the yarn held double, on a bigger granny square.
Plan on 90 to 100 hours. Each square and flower together take a little over an hour. The pattern suits a crocheter who is comfortable with bobbles, tall stitches and working into front and back loops. The granny squares are restful to make, and the flowers are quick and satisfying, so it is easy to alternate between the two.
Materials
- Worsted weight (#4) yarn, color A, forest green about 3,600 m / 3,940 yd (roughly 20 skeins of 100 g / 180 m)
- Worsted weight (#4) yarn, color B, coral pink about 1,150 m / 1,260 yd (roughly 7 skeins of 100 g / 180 m)
- Worsted weight (#4) yarn, color C, deep rose about 310 m / 340 yd (roughly 2 skeins of 100 g / 180 m)
- 5 mm (H-8) crochet hook
- 6.5 mm (K-10.5) crochet hook for the pillow flowers
- 2 pillow inserts 35 x 35 cm (14 x 14 in)
- Tapestry needle
- Pins and stitch markers
- Blocking mats and a spray bottle
Abbreviations
A / B / Ccolor A (green) / color B (coral pink) / color C (deep rose)MRmagic ringchchainsl stslip stitchscsingle crochetdcdouble crochettrtreble crochet (yo twice)dtrdouble treble crochet (yo 3 times)trtrtriple treble crochet (yo 4 times)bobble5-dc bobble: (yo, insert hook in st, pull up a loop, yo and pull through 2 loops) 5 times in the same st, yo and pull through all 6 loopsFLO / BLOfront loop only / back loop onlyrev screverse single crochet (crab stitch)spspacest(s)stitch(es)Granny Square (make 63)
- Rnd 1: With A, make a MR. Ch 3 (counts as dc), 2 dc in ring, ch 2, *3 dc in ring, ch 2* 3 times. Sl st to top of ch-3. (12 dc: 3 per side)
- Rnd 2: Sl st in next 2 dc and into ch-2 sp. Ch 3 (counts as dc), (2 dc, ch 2, 3 dc) in same sp, ch 1. *(3 dc, ch 2, 3 dc) in next corner sp, ch 1* 3 times. Sl st to top of ch-3. (24 dc: 6 per side, 1 ch-1 sp per side)
- Rnds 3-10: Sl st in next 2 dc and into corner ch-2 sp. Ch 3 (counts as dc), (2 dc, ch 2, 3 dc) in same sp, ch 1. *[3 dc in next ch-1 sp, ch 1] across to the next corner, (3 dc, ch 2, 3 dc) in corner sp, ch 1* around, ending with the last ch-1 sp before the first corner. Sl st to top of ch-3. Each round adds one 3-dc group per side. (At the end of Rnd 10: 30 dc and 9 ch-1 sps per side)
- Rnd 11: Sl st in next 2 dc and into corner ch-2 sp. Ch 1, (sc, ch 2, sc) in same sp. Sc in each dc and each ch-1 sp across, with (sc, ch 2, sc) in each corner sp. Sl st to first sc. (41 sc per side) Fasten off and weave in ends.
- Block to 25 cm (10 in) square.
Lotus Flower (make 63)
- Rnd 1: With B, make a MR. Ch 1, 12 sc in ring, sl st to first sc. Pull the ring tightly closed. (12 sc)
- Rnd 2 (bobble center): Working in FLO only, ch 1, *bobble in next st, sl st in next st* 6 times. Sl st to first bobble. (6 bobbles) Fasten off B.
- Rnd 3 (inner base): Fold the bobbles toward you. Join C in the unused back loop of any st of Rnd 1. Ch 1, then work 2 sc in the BLO of each st of Rnd 1. Sl st to first sc. (24 sc)
- Rnd 4 (inner petals): Working in FLO only, *sl st in next st, then in next st work (dc, tr, ch 3, sl st in 3rd ch from hook, tr, dc), sl st in next st* 8 times. Sl st to first sl st. (8 deep rose petals) Fasten off C.
- Rnd 5 (middle base): Fold the inner petals toward you. Join B in the unused back loop of any st of Rnd 3. Ch 1, then in BLO, *2 sc in next st, sc in next 2 sts* 8 times. Sl st to first sc. (32 sc)
- Rnd 6 (middle petals): Working in FLO only, *sl st in next st, (dc, tr, dtr) in next st, ch 3, sl st in 3rd ch from hook, (dtr, tr, dc) in next st, sl st in next st* 8 times. Sl st to first sl st. (8 petals)
- Rnd 7 (outer base): Fold the middle petals toward you. With B, join in the unused back loop of a st of Rnd 5 that sits directly behind the gap between two middle petals. Ch 1, then in BLO, *2 sc in next st, sc in next 3 sts* 8 times. Sl st to first sc. (40 sc)
- Rnd 8 (outer petals): Working in FLO only, *sl st in next st, (tr, dtr) in next st, (trtr, ch 3, sl st in 3rd ch from hook, trtr) in next st, (dtr, tr) in next st, sl st in next st* 8 times. Sl st to first sl st. (8 outer petals, set between the middle petals) Fasten off, leaving a 40 cm tail for sewing.
- Shape the petals with your fingers so the inner layer stands upright and the outer layers open out. Each flower should measure about 13 cm (5 in) across.
Attaching the Flowers
- Center a lotus on a blocked square, with one outer petal pointing straight at a corner. Pin it through the outer base round (Rnd 7).
- Using the B tail, sew around the unused back loops of Rnd 7 to the green square, catching the top of the square’s stitches. Space the stitches about 1 cm apart and keep them hidden behind the outer petals.
- Make 3 or 4 stitches up through the flower center and back down, between the bobbles, so the center cannot lift away from the square.
- Leave all the petals free so they stand up in 3D. Fasten off on the back of the square and weave in the tail.
- Turn every flower the same way on every square, so the petals line up across the bedspread.
Joining the Squares
- Lay out the squares 7 across and 9 down.
- Hold two neighboring squares with wrong sides together and right sides facing out. With A, join yarn through both corner ch-2 sps, ch 1, and sc in the same sps. Sc through both loops of both layers in each of the 41 sc, then sc in the next pair of corner sps. (43 sc per edge)
- Without fastening off, continue onto the next pair in the same line. Join all 6 lengthwise seams (9 squares each), then all 8 widthwise seams (7 squares each).
- Fold the petals out of the way while you join, so they are not caught in the seam. Where seams cross, ch 1 over the existing ridge instead of working into it.
Border
- Rnd 1: With the right side facing, join A in any bedspread corner ch-2 sp. Ch 3 (counts as dc), (dc, ch 2, 2 dc) in same sp. Dc in each sc along each square edge, plus 1 dc in each square corner sp on either side of every seam. Work (2 dc, ch 2, 2 dc) in each bedspread corner, then sl st to top of ch-3. (303 sts on each short side and 389 on each long side, counted between corner sps)
- Rnd 2: Sl st in next dc and into corner ch-2 sp. Ch 3, (dc, ch 2, 2 dc) in same sp. Dc in each st around, with (2 dc, ch 2, 2 dc) in each corner sp. Sl st to top of ch-3.
- Rnd 3: Sl st in next dc and into corner ch-2 sp. Ch 1, (sc, ch 2, sc) in same sp. Sc in each st around, with (sc, ch 2, sc) in each corner sp. Sl st to first sc.
- Rnd 4: Ch 1, rev sc in each st around, sl st to first st. Fasten off and weave in ends.
Large Pillow Lotus (make 2)
- Holding 2 strands of each color together throughout and using the 6.5 mm hook, work Lotus Flower Rnds 1-8. Work Rnd 8 in FLO only, so the back loops of Rnd 7 stay free.
- Rnd 9 (extra base): Fold the outer petals toward you. With 2 strands of B, join in the unused back loop of any st of Rnd 7. Ch 1, then in BLO, *2 sc in next st, sc in next 4 sts* 8 times. Sl st to first sc. (48 sc)
- Rnd 10 (extra petals): *Sl st in next st, (dc, tr) in next st, (dtr, trtr) in next st, ch 4, sl st in 3rd ch from hook, ch 1, (trtr, dtr) in next st, (tr, dc) in next st, sl st in next st* 8 times. Sl st to first sl st. (8 extra petals) Fasten off, leaving a 50 cm tail for sewing.
- The finished flower should measure about 20 cm (8 in) across.
Pillow Front and Back (make 2 of each)
- Rnds 1-10: Work as Granny Square Rnds 1-10 with A.
- Rnds 11-13: Continue working as Rnds 3-10, adding one 3-dc group per side in each round. (39 dc and 12 ch-1 sps per side at the end of Rnd 13)
- Rnd 14: Sl st in next 2 dc and into corner ch-2 sp. Ch 1, (sc, ch 2, sc) in same sp. Sc in each dc and each ch-1 sp across, with (sc, ch 2, sc) in each corner sp. Sl st to first sc. (53 sc per side) Fasten off and block to 33 cm (13 in).
- On each front, sew a Large Pillow Lotus in the center, following the steps for Attaching the Flowers and sewing through the back loops of Rnd 9. Leave the backs plain.
Pillow Assembly (make 2)
- Hold one front and one back with wrong sides together and the stitches matched.
- With A, join yarn through both corner sps. Ch 1, then sc through both layers in each st along three sides, with (sc, ch 2, sc) in each corner.
- Push the 35 cm insert in through the open side. The cover is slightly smaller than the insert, so it stays plump.
- Sc the fourth side closed, sl st to the first sc, fasten off, and hide the tail inside the cover.
Finishing
When the border is done, lay the bedspread flat and go over each flower. Lift the petals and fluff them gently with your fingers, so the inner layer stands up and the outer layers open out evenly. Mist only the green background if it needs straightening, and keep the flowers dry so the petals hold their shape.
Wash the bedspread by hand or on a gentle cycle inside a large laundry bag, and dry it flat. While it is still damp, shape each lotus again with your fingers. Wash a scrap of all three colors together before you start, to make sure the green and rose do not bleed into the coral pink.
Tips for Success
- Use a stitch marker to note which loops are free before starting each base round. Rounds 3, 5 and 7 must go into the back loops left over from the round before.
- Make all 63 squares first, then all the flowers. Working them in batches makes your tension more even and the flowers more alike.
- Keep the trtr in Round 8 the same height by pulling the first loop up to the same length each time. Uneven outer petals make a flower look lopsided.
- Leave a long tail at the end of every flower. Sewing with the flower’s own tail is much quicker than threading new yarn, and the color matches.
- Turn every flower so an outer petal points straight at a corner of its square. Consistent orientation is what makes the bedspread look orderly instead of random.
Common Mistakes to Avoid
- No loops left for the next layer: a petal round was worked through both loops. Rip it back and rework it in the front loops only.
- Petal layers that line up instead of staggering: the outer base round was started in the wrong place. Start Round 7 behind the gap between two middle petals.
- Flowers that curl up off the square: they were sewn only at the center. Sew all the way around Round 7 so the flower lies flat at the base.
- Wavy squares: the ch-1 between granny groups is too long or too tight. Keep it the same size as the space a stitch would occupy.
- Petals squashed during joining: they were caught in the seam. Fold them toward the center before joining each edge.
Ways to Customize This Pattern
- Work the lotuses in white and pale blush for a softer, wedding-style bedspread on cream squares.
- Make the flower centers in mustard yellow for a more realistic lotus.
- Alternate flowered squares with plain green squares in a checkerboard. This halves the number of flowers and gives the design more breathing room.
- Make a throw with 5 x 6 squares, about 135 x 160 cm with the border.
- Use a single lotus as a brooch or bag charm by stopping after Round 8 and sewing a pin back to the base.
Frequently asked questions
Separate flowers can have three full petal layers that stand up in 3D without distorting the square. They are also quicker to make in batches, and you can replace a damaged flower later without unraveling a square.
About 30 minutes for a standard flower, plus about 10 minutes to sew it on. The large pillow lotus takes about 45 minutes, because it has an extra round of petals and is worked with doubled yarn.
They will flatten a little with use, but the tall stitches and pointed tips spring back. Fluff the petals with your fingers after washing, or every few weeks, and they will hold their shape well.
Yes. Work Round 2 as a plain sc round in the front loops instead. The center will be flatter, but the petal layers will build in exactly the same way.
The finished Pink Lotus Granny Square Bedspread Pattern

