Pink Lotus Tassel Hanging Crochet Pattern
Advanced
For experienced crocheters who enjoy complex shaping, fine detail, and ambitious construction
Multi-Day Project
A rewarding 12+ hour journey — perfect for dedicated crafters who love detailed work.
Handmade Gift
A beautiful keepsake — free forever. Read online or print at home.
About This Pink Lotus Tassel Hanging Crochet Pattern
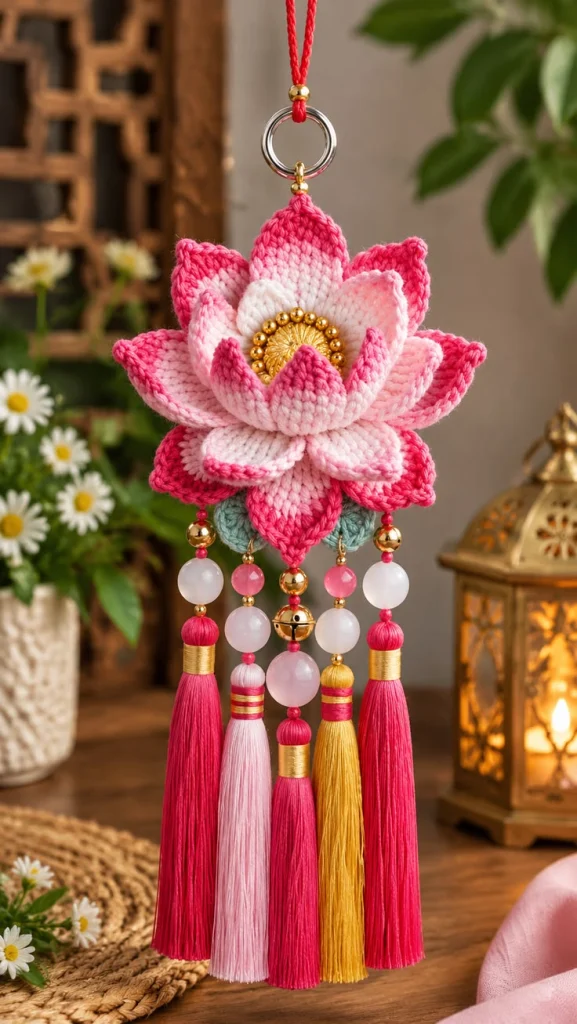
This lotus wall hanging crochet pattern creates a dimensional pink flower with a golden center, pale green leaves, and five long beaded tassels. The reference’s distinctive features are its pointed, overlapping petals, deep pink edges, and a silver hanging ring above the bloom. This version builds those details from separately shaped crochet pieces and carefully secured decorative strands.
Allow approximately 12–16 hours for crocheting, blocking, assembling, and making the tassels. This advanced project suits crocheters comfortable with small stitches, shaped rows, precise sewing, and jewelry findings. The finished piece is a decorative hanging, with a flower approximately 17 cm wide and an overall length of about 48 cm; its final length depends on the selected beads and hanging loop.
Materials
- Sport-weight mercerized cotton Approximately 125 m pale pink, 100 m hot pink, 35 m ivory, 30 m muted sage, and 15 m golden yellow; choose yarn approximately 125 m per 50 g
- Fine rayon or polyester tassel thread Approximately 230 m hot pink, 70 m pale pink, and 65 m gold, including wrapping allowance
- 2.5 mm crochet hook Adjust to obtain the stated gauge
- Silver split ring One, approximately 30 mm outside diameter
- Gold split rings Seven, approximately 6–8 mm; one upper connector, five tassel anchors, and one center-bell connector
- Red braided hanging cord 50 cm of 2 mm cord
- Gold spacer beads Approximately 30, 4–6 mm, including 18 for the flower center
- Decorative beads Four translucent milky beads, 18–20 mm; two pink beads, 12–14 mm; one pale pink center bead, 22–25 mm; ten hot pink beads, 5–6 mm
- Gold round beads and bell Three 12–14 mm round beads and one 16–18 mm bell
- Gold decorative center button One approximately 25 mm shank button or sew-through floral medallion
- Strong beading cord 2 m of 0.5–0.8 mm braided cord that fits every bead hole when doubled
- Polyester sewing thread and tapestry needle Include a fine beading needle and matching pink sewing thread
- Flexible plastic canvas and felt One 5.5 cm plastic canvas circle and one matching felt circle
- Blocking equipment and scissors Rustproof pins, ruler, removable markers, and a 23 cm tall tassel-winding card
Abbreviations
chchainscsingle crochet, US terminologyinc2 sc in the same stitchdecsingle crochet 2 stitches togethersl stslip stitchMRmagic ringststitchGauge, Dimensions, and Working Notes
- Gauge: 26 sc and 28 rows measure 10 × 10 cm in flat single crochet after light blocking. Make a swatch of 21 sc for 22 rows and measure the central 16 stitches and 16 rows. Adjust the hook if necessary.
- Expected blocked sizes before pleating: outer petal approximately 4.6 × 5.7 cm, middle petal 3.8 × 5 cm, inner petal 3.1 × 4.3 cm, and backing approximately 6–6.5 cm across. Petal widths exclude edging.
- Work petals and leaves in turned rows. Ch 1 and turn after every row except the final row; this turning chain never counts as a stitch. Work the first sc into the first stitch.
- Work circular pieces in continuous rounds, marking the first stitch. Parenthesized totals give the completed row or round count. Repeated instructions consume consecutive stitches.
- Change color on the final pull-through of the stitch before the new color begins. Cut the old color with a 10 cm tail and weave it in on the back. Do not carry dark pink behind the ivory section.
- The piece has no face, safety eyes, or stuffing. Its structure comes from pleated petals, layered sewing, and a reinforced backing.
Outer Petals — Make 8
- Row 1: With pale pink, ch 5. Beginning in the second chain from the hook, sc in each chain. (4)
- Row 2: Inc, sc 2, inc. (6)
- Row 3: Inc, sc 4, inc. (8)
- Row 4: Inc, sc 6, inc. (10)
- Row 5: Inc, sc 8, inc. (12)
- Row 6: Sc 12. (12)
- Row 7: Sc 12. (12)
- Row 8: Sc 12. (12)
- Row 9: Sc 12. (12)
- Row 10: Sc 12; change to hot pink at the end. (12)
- Row 11: Dec, sc 8, dec. (10)
- Row 12: Dec, sc 6, dec. (8)
- Row 13: Dec, sc 4, dec. (6)
- Row 14: Dec, sc 2, dec. (4)
- Row 15: Dec twice. (2)
- Row 16: Dec. (1)
- Edging: Without turning, ch 1. Work 1 loose sl st in each of the 16 row ends down the first side, 1 sl st in each of the 4 foundation chains, and 1 loose sl st in each of the 16 row ends up the second side. Sl st into the final-row stitch. This gives 37 edging sl sts; the ch 1 does not count. Fasten off, leaving a 35 cm sewing tail.
- Block flat. Fold the 4-stitch foundation edge so its first and fourth stitches meet. Stitch through those two corners, then secure the fold through the center of Row 2. Keep the upper petal open; the small base pleat should make the front concave.
Middle Petals — Make 6
- Row 1: With ivory, ch 5. Beginning in the second chain from the hook, sc in each chain. (4)
- Row 2: Inc, sc 2, inc. (6)
- Row 3: Inc, sc 4, inc. (8)
- Row 4: Inc, sc 6, inc. (10)
- Row 5: Sc 10; change to pale pink at the end. (10)
- Row 6: Sc 10. (10)
- Row 7: Sc 10. (10)
- Row 8: Sc 10. (10)
- Row 9: Sc 10. (10)
- Row 10: Dec, sc 6, dec. (8)
- Row 11: Dec, sc 4, dec; change to hot pink at the end. (6)
- Row 12: Dec, sc 2, dec. (4)
- Row 13: Dec twice. (2)
- Row 14: Dec. (1)
- Edging: With hot pink, ch 1 without turning. Work 1 loose sl st in each of 14 row ends down the first side, 1 sl st in each of the 4 foundation chains, and 1 loose sl st in each of 14 row ends up the second side. Sl st into the final-row stitch. (33 edging sl sts) Fasten off with a 30 cm tail.
- Block, then pleat the foundation edge as for the outer petals. Make a second small securing stitch through the center of Row 3 so these petals cup slightly more deeply.
Inner Petals — Make 5
- Row 1: With ivory, ch 5. Beginning in the second chain from the hook, sc in each chain. (4)
- Row 2: Inc, sc 2, inc. (6)
- Row 3: Inc, sc 4, inc. (8)
- Row 4: Sc 8; change to pale pink at the end. (8)
- Row 5: Sc 8. (8)
- Row 6: Sc 8. (8)
- Row 7: Sc 8. (8)
- Row 8: Sc 8; change to hot pink at the end. (8)
- Row 9: Dec, sc 4, dec. (6)
- Row 10: Dec, sc 2, dec. (4)
- Row 11: Dec twice. (2)
- Row 12: Dec. (1)
- Edging: With hot pink, ch 1 without turning. Work 1 loose sl st in each of 12 row ends down the first side, 1 sl st in each of the 4 foundation chains, and 1 loose sl st in each of 12 row ends up the second side. Sl st into the final-row stitch. (29 edging sl sts) Fasten off with a 30 cm tail.
- Block and pleat as for the middle petals. Curve each petal around a finger while sewing its base; leave the upper half unstitched so it stands around the center.
Reinforced Backing — Make 2 Discs
- Round 1: With pale pink, work 6 sc in MR. (6)
- Round 2: Inc in each stitch. (12)
- Round 3: Repeat (sc 1, inc) 6 times. (18)
- Round 4: Repeat (sc 2, inc) 6 times. (24)
- Round 5: Repeat (sc 3, inc) 6 times. (30)
- Round 6: Repeat (sc 4, inc) 6 times. (36)
- Round 7: Repeat (sc 5, inc) 6 times. (42)
- Round 8: Repeat (sc 6, inc) 6 times. (48)
- Sl st in the next stitch and fasten off. Leave a 60 cm tail on the second disc. Mark the first disc as the front mounting disc; do not join the discs yet.
- Mark the top and bottom of the front disc, exactly 24 outer-round stitches apart. Round numbering refers to the crochet rounds themselves; later attachment stitches may pass around stitch posts.
Sage Leaves — Make 2
- Row 1: With sage, ch 4. Beginning in the second chain from the hook, sc in each chain. (3)
- Row 2: Inc, sc 1, inc. (5)
- Row 3: Inc, sc 3, inc. (7)
- Row 4: Sc 7. (7)
- Row 5: Sc 7. (7)
- Row 6: Dec, sc 3, dec. (5)
- Row 7: Dec, sc 1, dec. (3)
- Row 8: Sc 3 together: insert the hook into each of the next 3 stitches, drawing up a loop each time; yarn over and pull through all 4 loops. (1)
- Edging: Ch 1 without turning. Work 1 loose sl st in each of 8 row ends down the first side, 1 sl st in each of the 3 foundation chains, and 1 loose sl st in each of 8 row ends up the second side. Sl st into the final-row stitch. (20 edging sl sts) Fasten off with a 25 cm tail.
- Using a separate length of sage yarn, embroider a straight central vein from the foundation to the tip, taking short backstitches between rows. Block each leaf to approximately 2.7 × 2.9 cm.
Golden Flower Center
- Round 1: With golden yellow cotton, work 6 sc in MR. (6)
- Round 2: Inc in each stitch. (12)
- Round 3: Repeat (sc 1, inc) 6 times. (18)
- Round 4: Repeat (sc 2, inc) 6 times. (24)
- Round 5: Repeat (sc 3, inc) 6 times. (30)
- Round 6: Repeat (sc 4, inc) 6 times. (36)
- Sl st in the next stitch and fasten off with a 45 cm tail. Block to approximately 4.5 cm across.
- Sew the 25 mm gold button or medallion at the center with strong sewing thread. For a shank button, pass the thread through the shank and different center stitches at least 6 times, drawing it down snugly.
- Sew 18 small gold beads around the perimeter, placing one bead over each pair of Round 6 stitches. Pass through each bead twice and knot the thread on the reverse after every third bead. Keep the outer crochet loops available for joining.
Layer and Secure the Lotus
- Place the front backing disc face up. On Round 8, mark stitches 1, 7, 13, 19, 25, 31, 37, and 43, with stitch 1 at the top. These are the eight outer-petal attachment centers.
- Place each outer petal with its pleated base centered on a marker and its tip pointing away from the disc. Keep the concave face toward you. Sew each base across 4 backing stitches centered around its marker, then tack Row 3 of the petal to the disc just inside that seam. Use at least two passes per attachment. The petals should overlap slightly at their widest points.
- On Round 6, mark 6 positions, each separated by 6 stitches. Rotate this set so one middle petal points into the upper-right gap between two outer petals. Sew the six middle-petal bases to these markers, each across 4 backing stitches. Tack Row 3 of each petal to the backing immediately inward from its base seam.
- On Round 4, mark stitches 1, 6, 11, 16, and 21. The successive gaps are 5, 5, 5, 5, and 4 stitches. Rotate this set so one inner petal points straight down. Sew the five inner-petal bases across 3 backing stitches each, keeping their tips lifted.
- Join the adjacent side edges of the inner petals only beside Rows 2–3, using two small stitches per join. Let each petal overlap its neighbor in the same direction. The tips remain free and form an open cup.
- Set the decorated golden center over the attachment seams. Sew its perimeter through the inner-petal bases and front backing with small stitches. Work around all 36 edge stitches, keeping the center visible inside the petal cup.
- Turn the flower over. Sew the two sage leaf foundations to the lower back edge at approximately the 5 and 7 o’clock positions, with their tips extending downward and outward. Catch each leaf again at Row 3 to prevent twisting.
Hanging Ring and Five Lower Anchors
- Place the plastic canvas circle against the reverse of the front mounting disc. Stitch it to the disc at 8 evenly spaced points, passing through canvas openings and crochet stitches. Cover its reverse with the felt circle.
- At the top of the backing, sew one gold split ring through the crochet and at least two adjacent canvas openings. Make 8 passes of doubled strong sewing thread. The ring must project above the backing and remain behind the top petal.
- Along the lower edge, mark backing stitches 17, 21, 25, 29, and 33, with stitch 25 at the bottom center. Secure one gold split ring at each position with 8 passes of doubled thread through crochet and canvas. Keep all five rings accessible below or behind the petals.
- Attach the silver split ring to the top gold ring. Fold the 50 cm red cord in half and pass the folded end through the silver ring. Pull both free ends through the fold to make a lark’s head knot.
- Thread a gold spacer over both cord ends and slide it down toward the silver ring. Knot the free ends together to form a hanging loop projecting approximately 8 cm above the silver ring; trim the excess.
- Place the second backing disc over the felt with its neat face outward. Whipstitch through corresponding outer-round stitches of both discs, making 48 joining stitches. Work around the anchor rings so they remain free. Secure and bury all thread and yarn ends.
Five Silky Tassels
- Make two outer hot pink tassels, one pale pink tassel, one gold tassel, and one center hot pink tassel. The center tassel is shorter, allowing the larger central bead and bell to sit above it.
- For each outer hot pink tassel, wind tassel thread 120 complete turns around the 23 cm card. Slide a 30 cm length of strong beading cord under the loops at one end and tie tightly with a surgeon’s knot followed by two overhand knots. Keep both cord tails for attaching the beads.
- Remove the bundle and cut the loops at the opposite end. Fold the strands downward around the tied top. Tie matching tassel thread firmly around the bundle 1.2 cm below the top to form the rounded head.
- Wrap a 2 cm length of the neck directly below that tie with gold thread, using close, even turns. Secure the wrapping by pulling its final end under the last 10 turns with a needle. Trim the tassel to 22 cm from its tied top.
- For the pale pink and gold tassels, wind 120 turns on the same card. Tie and form each head as above, then trim each tassel to 21 cm. Wrap a 1.5 cm neck using alternating bands: 0.5 cm hot pink, 0.5 cm gold, and 0.5 cm hot pink.
- For the center hot pink tassel, use 120 turns around a 19 cm card, or reduce the card height with a firm folded insert. Form its head as above, add a 2 cm gold neck wrap, and trim to 18 cm.
- Comb the strands gently with your fingers and trim the bottoms in several small passes. Keep the two outer tassels equal before adding their beads.
Beaded Drops — Assemble from Bottom to Top
- For each drop, thread beads over both strong cord tails rising from its tassel head. Use spacer beads with holes small enough to cover the knots. The sequences below begin immediately above the tassel.
- Left outer drop: hot pink bead, gold spacer, milky bead, hot pink bead, 12–14 mm gold round bead. Add small gold spacers at the top until the distance from tassel head to anchor ring is approximately 6 cm.
- Right outer drop: repeat the left outer sequence, matching the total beaded length to 6 cm.
- Left inner drop: hot pink bead, gold spacer, milky bead, gold spacer, 12–14 mm pink bead, gold spacer. Aim for approximately 6 cm between tassel head and anchor.
- Right inner drop: repeat the left inner sequence above the gold tassel, again aiming for 6 cm.
- Center drop: hot pink bead, large pale pink bead, hot pink bead, gold bell, hot pink bead, 12–14 mm gold round bead. If the bell has only a top loop, attach the separate seventh gold split ring through that loop and run the doubled cord through this connector, leaving the bell hanging beside the cord. Add spacers above it to make a drop approximately 9 cm long.
- Attach the strands to the five lower rings in this left-to-right order: hot pink outer tassel, pale pink tassel, short hot pink center tassel, gold tassel, hot pink outer tassel. Pass both cord tails through the appropriate anchor ring, tie a surgeon’s knot followed by two overhand knots, and feed each tail back through at least 3 cm of beads.
- Hang the piece before cutting any cord tails. Adjust spacer placement and knot position so the two outer ends match and the inner tassels form a gentle stagger. Once secure, trim the hidden tails.
Finishing
Hang the lotus upright and arrange the petals with your fingers. The outer tier should spread into a pointed star, the middle tier should curve forward, and the inner petals should cradle the gold center. If one petal falls outward, add a small hidden tack between its lower side edge and the petal behind it. Keep the pointed ends free.
Check every ring, bead strand, and tassel tie with a firm hand tug while supporting the backing. Trim the tassels only after the hanging has settled overnight. Display it indoors from a secure hook, where its long threads can hang freely. This beaded decoration belongs out of reach of young children and pets.
Tips for Success
- Keep the hot pink slip-stitch edging loose. A tight border shortens the sides and can twist the pointed tips.
- Block every petal before pleating. Once its base is sewn, flattening it changes the cup shape and makes matching the tiers harder.
- Pin all eight outer petals before sewing any of them permanently. Check the flower from the front and side so the top and bottom points line up.
- Support the bead strands through the plastic canvas. The crochet backing alone can stretch under five dense tassels.
- Use matching pale pink thread for hidden petal tacks and separate strong thread for hardware. This keeps the structural stitching discreet.
Common Mistakes to Avoid
- Attaching the pointed end as the petal base reverses the shape. The 4-stitch foundation always faces the golden center.
- Sewing every petal flat removes the layered lotus effect. Attach the lower rows firmly and leave the upper halves free.
- Letting the edging add stitches to later rows changes the petal math. Complete every shaped row before adding its separate slip-stitch border.
- Closing the backing before fitting the anchors makes reinforcement difficult. Secure the canvas, top connector, and five lower rings before joining the second disc.
- Trimming all five tassels to the same length creates an uneven lower edge once the beads are added. Use the specified lengths and make final adjustments while the finished piece hangs.
Ways to Customize This Pattern
- Use ivory in place of pale pink and blush in place of hot pink for a softer lotus, retaining the gold center and sage leaves.
- Replace the bell with a similarly sized gold bead for a silent hanging; keep the central beaded section approximately 9 cm long.
- Make a shorter display by reducing every tassel’s finished length by 5 cm while retaining the original bead arrangements.
- Choose pale green glass beads for the two smaller inner accent beads to echo the leaves.
- Embroider short golden rays on the crochet center instead of using a medallion, while retaining the 18-bead perimeter.
Frequently asked questions
Join the inner petals only beside Rows 2–3. If their tips lean too far inward, move the small side joins slightly lower and ease the tips outward with your fingers. Avoid stitching their upper edges to the gold disc.
Yes, but the result will be thicker and less fluid. Start with 45 complete turns per tassel instead of 120, then compare the bundle diameter with your first tassel. The material quantities given are for fine rayon or polyester thread.
The lower anchors may be attached only to the crochet fabric, or the internal canvas may be too small to reach their attachment points. Open the rear seam and resew each anchor through the canvas as well as the front disc. Check that the upper ring is reinforced in the same way.
Dust it with a soft brush and spot-clean the crochet with a barely damp cloth. Soaking can tarnish findings, stain pale petals, and tangle the tassels. Test the hot pink yarn for color transfer before blocking the separate pieces.
The finished Pink Lotus Tassel Hanging Crochet Pattern

