Pixel Flower C2C Bedspread and Cushion Crochet Pattern
Beginner Friendly
Perfect for those just starting their crochet journey, with clear instructions and simple techniques
Single-Day Project
A satisfying project you can complete in a single afternoon or evening.
Handmade Gift
A beautiful keepsake — free forever. Read online or print at home.
About This Pixel Flower C2C Bedspread and Cushion Crochet Pattern
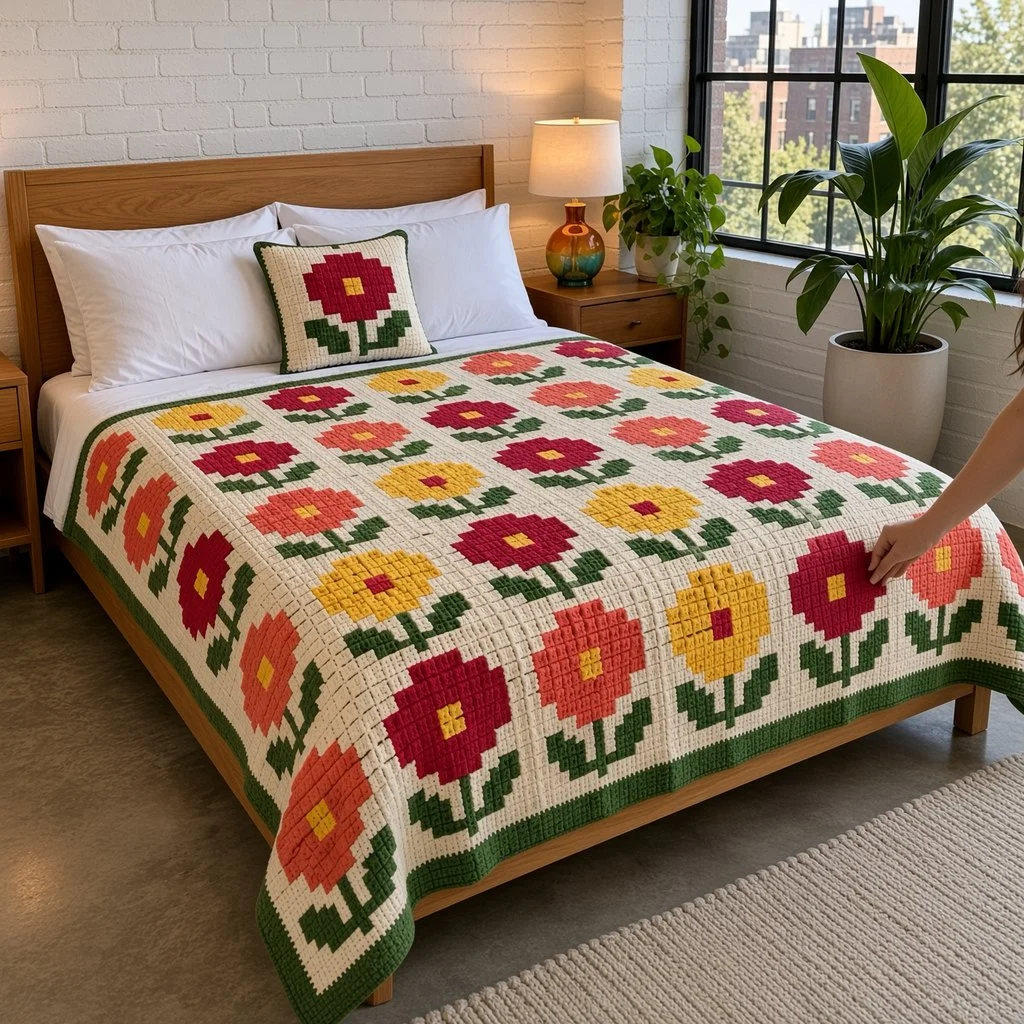
This C2C flower bedspread is made of 56 corner-to-corner blocks, each one a cheerful pixel flower on a cream background. The flowers come in three color combinations, crimson with a yellow center, coral with a yellow center and yellow with a crimson center, and they’re set in diagonal stripes across the bed. Every flower has a green stem with two leaves, and a wide green border frames the whole bedspread.
Corner-to-corner crochet builds the fabric out of little square tiles worked diagonally, so each tile acts like one pixel of the picture. That’s what gives the flowers their crisp, mosaic look. Instead of working one huge graph, the bedspread is split into separate blocks with one flower each, which keeps the chart small, the color changes manageable and the work easy to carry around.
The bedspread takes about 120 to 145 hours, around two hours per block. It suits a crocheter who knows the basic C2C method and is ready to manage several colors at once with bobbins.
Materials
- Worsted weight acrylic or cotton blend, cream about 3,000 m (15 skeins of 100 g / 200 m)
- Worsted weight acrylic or cotton blend, green about 800 m (4 skeins)
- Worsted weight acrylic or cotton blend, crimson about 500 m (3 skeins)
- Worsted weight acrylic or cotton blend, coral about 400 m (2 skeins)
- Worsted weight acrylic or cotton blend, sunflower yellow about 500 m (3 skeins)
- 5 mm crochet hook
- Yarn bobbins about 8, for the color sections
- Graph paper or a printed copy of the chart and a pencil
- Tapestry needle, stitch markers and scissors
- One 35 cm square cushion form
Abbreviations
C2Ccorner to cornertileone C2C block: a ch-3 and 3 dc, which counts as one square on the chartchchainscsingle crochethdchalf double crochetdcdouble crochetsl stslip stitchrev screverse single crochet (crab stitch), worked left to rightBLOback loop onlyspspacest(s)stitch(es)rndroundreprepeatRS / WSright side / wrong sideFlower Chart (16 x 16 tiles)
- Key:
.cream,Ppetal color,Ycenter color,Ggreen. Each letter is one tile. Row 1 is the top of the block. - Row 1:
................ - Row 2:
......PPPP...... - Row 3:
....PPPPPPPP.... - Row 4:
...PPPPPPPPPP... - Row 5:
...PPPPPPPPPP... - Row 6:
...PPPPYYPPPP... - Row 7:
...PPPPYYPPPP... - Row 8:
...PPPPPPPPPP... - Row 9:
....PPPPPPPP.... - Row 10:
......PPPP...... - Row 11:
.......GG....... - Row 12:
..GGG..GG..GGG.. - Row 13:
...GGG.GG.GGG... - Row 14:
....GGGGGGGG.... - Row 15:
.......GG....... - Row 16:
................ - Each block has 70 petal tiles, 4 center tiles, 28 green tiles and 154 cream tiles. The chart is the same on the left and right, which makes it easier to follow.
Color Combinations
- Combination A (make 19): crimson petals, yellow center.
- Combination B (make 19): coral petals, yellow center.
- Combination C (make 18): yellow petals, crimson center.
- Make one more Combination A block for the cushion front, and one all-cream block for the cushion back.
C2C Block: Increase Rows (Rows 1-16)
- Row 1: ch 6, dc in 4th ch from hook and in next 2 ch. (1 tile)
- Row 2: ch 6, turn, dc in 4th ch from hook and in next 2 ch, sl st in the ch-3 sp of the tile in the row below, ch 3, 3 dc in same sp. (2 tiles)
- Rows 3-16: ch 6, turn, dc in 4th ch from hook and in next 2 ch, *sl st in next ch-3 sp of the row below, ch 3, 3 dc in same sp; rep from * across. (Each row has one more tile than the row before: Row 16 has 16 tiles)
- After Row 16, the block is a triangle with two finished edges of 16 tiles each.
C2C Block: Decrease Rows (Rows 17-31)
- Rows 17-31: turn, sl st in each of the next 3 dc and in the ch-3 sp, ch 3, 3 dc in same sp, *sl st in next ch-3 sp of the row below, ch 3, 3 dc in same sp; rep from * across to the last tile, sl st in the last ch-3 sp without adding a new tile. (Each row has one tile fewer: Row 17 has 15 tiles, and Row 31 has 1 tile)
- Fasten off. The block is now a square of 16 x 16 tiles, about 27 cm.
Reading the Chart and Changing Colors
- Row 1 of the C2C block is the bottom right square of the chart (Row 16, last tile). Each C2C row covers the next diagonal of the chart: C2C Row 2 covers the 2 squares touching it, Row 3 the next 3, and so on.
- Hold the work so the first tile is at the bottom right. Work odd-numbered C2C rows from the bottom left end of the diagonal toward the top right, and even-numbered rows from the top right end toward the bottom left.
- Check your block against the chart after C2C Row 4 and again after Row 10. If the green appears in the wrong place, you’re reading the diagonals in the opposite direction; turn the chart a quarter turn and continue.
- To change color, work the last yarn over of the previous tile with the new color. Wind each color section onto its own bobbin and leave the unused colors hanging on the WS; don’t carry them across the back.
- Cross off each diagonal on your printed chart as you finish it. With 31 C2C rows per block, it’s easy to lose your place.
Block Edging (all blocks)
- Rnd 1: with cream, RS facing, join in any corner. Work 2 sc along the edge of each tile, and (sc, ch 2, sc) in each corner. Join. Fasten off. (34 sc per side, 136 sc)
- Block each finished block to 28 cm square, pinning the corners square.
Layout and Joining
- Lay out 56 blocks, 7 across and 8 long, with every stem pointing toward the foot of the bed.
- Number the block columns 0-6 from left to right and the block rows 0-7 from the foot. Add the two numbers and divide by 3: a remainder of 0 is Combination A, 1 is Combination B and 2 is Combination C. This sets the colors in diagonal stripes.
- Join method: place two blocks side by side, RS up. With cream, sl st through the BLO of the matching sts of both blocks, starting and ending in the corner ch-2 sps. (36 sl st per side, including both corners)
- Join the blocks into rows of 7, then join the rows along their long edges.
- The joined bedspread measures about 196 x 224 cm.
Green Border
- Rnd 1: with green, RS facing, join in a corner sp. Work 3 sc in each bedspread corner sp, sc in each st along the edge of every block, and 1 sc in each point where two blocks meet. Join. (279 sc along each long side, 244 along each short side and 12 at the corners: 1,058 sts)
- Rnd 2: ch 2 (does not count as a st), hdc in each st around, working 3 hdc in the center st of each corner. Join. (1,066 sts)
- Rnds 3-5: rep Rnd 2, adding 8 sts each rnd. (Rnd 3: 1,074 sts, Rnd 4: 1,082, Rnd 5: 1,090)
- Rnd 6: ch 1, rev sc in each st around. Join and fasten off. (1,090 sts)
- The border is about 5 cm wide.
Cushion
- Front: make one Combination A block and work the block edging. (34 sc per side)
- Rnds 2-4: with cream, ch 3 (counts as dc), dc in each st to the corner, (2 dc, ch 2, 2 dc) in each corner sp, dc in each remaining st, join. (Rnd 2: 38 sts per side, Rnd 3: 42, Rnd 4: 46 sts per side, 184 sts)
- Back: make an all-cream block, work the block edging and Rnds 2-4 the same way.
- Each piece measures about 35 cm square.
Cushion Assembly
- Hold the front and back WS together, with the front facing you and the corners matched.
- Rnd 1: with green, join in a corner sp through both layers. Working through both layers, 3 sc in each corner sp and sc in each st along the sides. Insert the cushion form before closing the last side. Join. (196 sts: 49 per side including corners)
- Rnd 2: ch 1, rev sc in each st around. Join and fasten off. (196 sts)
Finishing
Weave in all ends on the WS. C2C with bobbins leaves many ends, so weave each one into a tile of the same color, so it can’t show through on the RS. Weaving them in as you finish each block saves a lot of work at the end.
Wet block the bedspread on a large flat surface, pinning the border straight and the corners square. The tiles will settle and the pixel flowers will look sharper once it’s dry.
Tips for Success
- Use bobbins for every color section, even small ones like the flower center. Carrying yarn across the back of C2C shows through the gaps between tiles.
- Keep your tile size even. A tight tile here and a loose one there makes the flower lean, and the blocks won’t line up at the seams.
- Make all the blocks of one color combination at once. You’ll memorize the color order and work faster.
- Untangle the bobbins at the end of every row. Turning the work always twists them, and it’s much easier to fix each row than a big knot later.
- Use the same brand of yarn for all colors. Different brands of the same weight can still give different tile sizes.
Common Mistakes to Avoid
- Adding a tile on a decrease row. From Row 17 on, every row should have one tile fewer. If your block isn’t square, check that you didn’t start a decrease row with a ch 6.
- Reading the diagonal backward. This mirrors the flower across the corner, so the stem comes out on the side. Check against the chart after Row 4.
- Colors bleeding into the next tile. Change color on the last yarn over of the previous tile, not at the start of the new one, or the old color shows at the corner.
- Blocks that aren’t square. C2C stretches on the diagonal. Block each piece and pin the corners square before joining.
- A wavy border. If the green border ruffles, Rnd 1 has too many sts. Work exactly 1 sc at each point where blocks meet.
Ways to Customize This Pattern
- Change the flower colors: pinks and purples, or blues and white, all work with the same chart.
- Change the size: each block adds 28 cm. A throw of 4 by 5 blocks is about 122 x 150 cm with the border.
- Swap the cream background for a pale sky blue to make the flowers stand out even more.
- Work some blocks with the chart turned upside down for a playful scattered look.
- Graph your own flower on a 16 x 16 grid, such as a tulip or a daisy, and mix it in with these blocks.
Frequently asked questions
A full bedspread graph would have over 14,000 tiles and dozens of bobbins at once. Separate blocks keep each chart small, are much easier to carry and let you fix one block without undoing the whole bedspread.
For the larger areas, yes. You can carry very short runs, such as the two center tiles, inside the stitches, but carried yarn often shows between C2C tiles, so bobbins give a cleaner result.
If you spot it right away, undo back to that tile. If you find it later, you can embroider over it with duplicate stitch in the correct color, which is very hard to notice once done neatly.
Wash it on a gentle cold cycle inside a large laundry bag and dry it flat. Wash a test swatch first to make sure the crimson and coral don’t bleed into the cream.
The finished Pixel Flower C2C Bedspread and Cushion Crochet Pattern

