Plum Garden Floral Crochet Table Runner Pattern
Beginner Friendly
Perfect for those just starting their crochet journey, with clear instructions and simple techniques
Single-Day Project
A satisfying project you can complete in a single afternoon or evening.
Handmade Gift
A beautiful keepsake — free forever. Read online or print at home.
About This Plum Garden Floral Crochet Table Runner Pattern
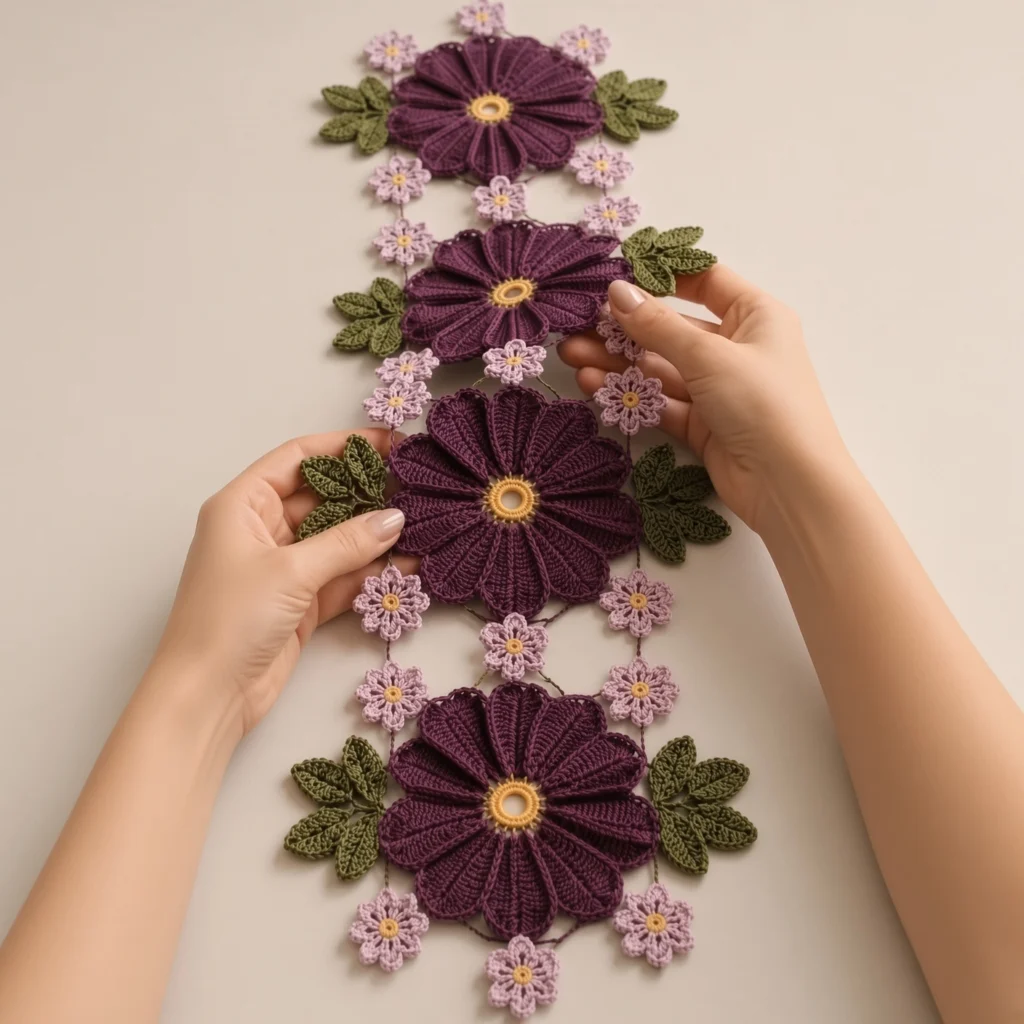
This floral crochet table runner pattern turns four oversized plum blossoms, a scatter of lilac five-petal flowers and sprays of olive leaves into one long, lace-like piece of table decor. Instead of a solid fabric, the motifs are joined with fine chain bars, so the runner keeps the open look of Irish crochet and lets the table show through between the flowers. The large flowers are the heart of the design: each petal is worked in rows of double crochet from a narrow base to a wide, picot-trimmed top, so the stitches fan out like the veins of a real petal, and every flower sits around a raised gold ring.
Expect 18 to 24 hours of work for a runner about 95 cm long. The large flowers take roughly two hours each, the small flowers and leaves are quick but there are a lot of them, and joining and blocking takes an evening on its own. This is an advanced pattern, not because any single stitch is hard, but because it asks you to work petals in rows off a round, keep even tension across four identical flowers, and assemble a piece that has no backing to hold it in shape. If you already make Irish crochet motifs or appliqué flowers and want a showpiece for a dining table, sideboard or dresser, this is a good next step.
Mercerised cotton is the right yarn here. It gives crisp picots, holds a block, and washes well. The colours in this design, deep plum, dusty lilac, mustard gold and olive, read like a late-summer garden, but the construction works in any palette you like.
Materials
- DK / light worsted mercerised cotton, deep plum 100 g, colour A (large petals)
- DK / light worsted mercerised cotton, mustard gold 25 g, colour B (flower centres)
- DK / light worsted mercerised cotton, dusty lilac 50 g, colour C (small flowers)
- DK / light worsted mercerised cotton, olive green 50 g, colour D (leaves and chain bars)
- 3.0 mm crochet hook all motifs
- 2.5 mm crochet hook chain bars and joining
- 20 mm plastic craft rings 4, one per large flower (see alternative in the Large Flower Centre section)
- Tapestry needle for weaving ends and sewing leaf sprays
- Blocking mats, rustproof pins and spray starch essential for a flat, crisp finish
- Stitch markers optional, useful for marking petal bases
Abbreviations
chchainsl stslip stitchscsingle crochet (US)hdchalf double crochet (US)dcdouble crochet (US)BLOthrough the back loop onlyFLOthrough the front loop onlyMRmagic ringpicotch 3, sl st in 3rd ch from hookskskipst(s)stitch(es)spspacereprepeatrndroundRS / WSright side / wrong sideLarge Flower Centre (make 4)
- With colour B and the 3.0 mm hook, work 24 sc over a 20 mm plastic ring, covering it completely. Join with sl st in the first sc. (24 sc) No ring? Ch 10, sl st in first ch to form a ring, then work 24 sc into the ring and join.
- Rnd 2 (raised rim): Ch 1, working in FLO, sc in each sc around. Join with sl st in the first sc. Fasten off B and weave in the end. (24 sc) The unused back loops of Rnd 1 are now sitting behind this rim; the petals will be worked into them.
- Rnd 3 (petal bases, colour A): Join A with sl st in the back loop of any Rnd 1 sc. Ch 3 (counts as dc), dc in the same back loop, 2 dc in BLO of each of the next 2 sc, ch 1, *2 dc in BLO of each of the next 3 sc, ch 1; rep from * 6 more times. Join with sl st in the top of the beginning ch-3. (48 dc, 8 ch-1 sps: eight 6-dc petal bases). Do not fasten off.
Large Flower Petals (8 per flower, worked one after another)
- Row 1 (RS, do not turn): Ch 3 (counts as dc), dc in the same st, dc in the next 4 dc, 2 dc in the last dc of this petal base. Turn. (8 dc)
- Row 2 (WS): Ch 3 (counts as dc), dc in the same st, dc in the next 6 dc, 2 dc in the last dc. Turn. (10 dc)
- Row 3 (RS): Ch 3, dc in the same st, dc in the next 8 dc, 2 dc in the last dc. Turn. (12 dc)
- Row 4 (WS): Ch 3, dc in the same st, dc in the next 10 dc, 2 dc in the last dc. Turn. (14 dc)
- Row 5 (RS): Ch 3, dc in the same st, dc in the next 12 dc, 2 dc in the last dc. Turn. (16 dc)
- Row 6 (WS): Ch 3, dc in each dc across. Turn. (16 dc)
- Row 7 (RS, picot edge): Ch 1, sc in the first dc, *picot, sk the next dc, sc in the next dc; rep from * 6 more times, picot, sc in the last dc. Do not turn. (9 sc, 8 picots)
- Return to the base: With RS still facing, sl st evenly down the side edge of the petal you just finished, one sl st into the end of each row (7 sl st), until you reach the ch-1 sp at the base. Sl st in that ch-1 sp, then sl st in the first dc of the next 6-dc petal base. You are now in position for Row 1 of the next petal.
- Rep Rows 1 to 7 and the return step for each of the remaining petal bases. After the eighth petal, sl st down its side edge to the ch-1 sp at the base, fasten off, and weave in the end. (8 petals)
Small Flower (make 20)
- Rnd 1 (centre, colour B): With the 3.0 mm hook, make a MR and work 10 sc into the ring. Pull the ring tight and join with sl st in the first sc. Fasten off B. (10 sc)
- Rnd 2 (petals, colour C): Join C with sl st in any sc. *In the same sc work (sc, hdc, dc), picot, in the next sc work (dc, hdc, sc); sl st in the next sc to start the next petal; rep from * 4 more times, working the first (sc, hdc, dc) of each new petal into the sc you just slip-stitched into. Join with sl st in the first sc. Fasten off, leaving a 20 cm tail for joining. (5 petals, 30 sts, 5 picots)
- Flatten the flower with your fingers so the five picot tips point outward evenly. The picots are your anchor points for the chain bars, so make sure they are all worked to the same height.
Leaf (make 24)
- Foundation: With colour D and the 3.0 mm hook, ch 10.
- Row 1, first side (RS): Sc in the 2nd ch from hook, hdc in the next ch, dc in the next 5 ch, hdc in the next ch, sc in the last ch. (9 sts)
- Tip: Ch 3, sl st in the 3rd ch from hook (picot tip). Rotate the leaf to work along the unused loops on the other side of the foundation chain.
- Row 1, second side: Sc in the first ch, hdc in the next ch, dc in the next 5 ch, hdc in the next ch, sc in the last ch. Join with sl st in the first sc of the first side. (9 sts; 18 sts plus picot tip in total)
- Rnd 2 (ridged edge): Ch 1, working in BLO throughout, sc in each of the next 9 sts, then in the picot tip work (sc, picot, sc), then sc BLO in each of the last 9 sts. Join with sl st in the first sc. (20 sc, 1 picot) The unworked front loops of Row 1 form a raised vein line around the leaf.
- Stem: Ch 6, fasten off, leaving a 25 cm tail. Pull the tail through the last ch to secure. Keep the tail long: it is used to bind three leaves into a spray and sew the spray onto the runner.
Finishing
Weave in every end on the motifs before assembly, except the long tails left on the small flowers and leaves. Wet-block all the pieces first: soak them, squeeze out the water in a towel, pin each large flower into a true circle with the petals fanned evenly and every picot pulled out, pin the small flowers flat, and pin the leaves with their tips pointing straight. Let them dry completely. Blocking the motifs individually is what makes the finished runner look sharp; it is much harder to block a joined piece.
Lay out the runner on a large towel or blocking mats. Place the four large flowers in a straight line with their centres about 24 cm apart, which leaves a gap of roughly 6 cm between the petal tips of neighbouring flowers. In each gap, place one small flower on the centre line and two more on each side, level with the outer petals, so the five small flowers form a shallow diamond around the meeting point. Place three small flowers at each end of the runner in a small arc. Pin everything in position, then step back and check that the line of large flowers is straight and the small flowers mirror each other on the left and right.
Join with chain bars: with colour D and the 2.5 mm hook, attach the yarn with sl st to a picot on one motif, ch 6 to 12 until the chain reaches the picot of the neighbouring motif without pulling, sl st into that picot, and either ch back to the starting point and fasten off, or continue to the next picot in the chain of flowers. Give every small flower at least three bars so it cannot swing, and connect each large flower to its neighbours through the small flowers rather than directly. Work the bars with the runner still pinned to the mat so the spacing stays true. Use the small-flower tails to add a stitch or two by hand wherever a bar meets a picot and feels loose.
Bind the leaves into sprays of three: hold three stems together, wrap the longest tail around the base of the stems five or six times and knot it. Sew one spray to the left of each large flower and one to the right, tucking the stem base just behind the edge of a petal so only the leaves show, and letting the leaves fan outward over the small flowers beside them. A small spray at each end of the runner finishes the shape. Give the whole runner a final light spray of starch, pin it flat once more, and leave it overnight before you put it on the table.
Tips for Success
- The raised gold rim on the large flowers works because Rnd 2 is in FLO and the petals go into the back loops behind it. Tilt the rim forward with your thumb while you work Rnd 3 so you can see the back loops clearly; missing one throws off the petal count.
- Count the row-end slip stitches when you return down each petal. Seven slip stitches, one per row, keeps the petal edge smooth. Adding extra ones makes the edge ripple and the petal lean.
- Work the picot edge (Row 7) with slightly looser tension than the dc rows. A tight picot row pulls the top of the petal inward and the fan shape disappears.
- Wind off colour A into four equal balls before you begin so all four large flowers come from the same dye lot section and you do not run short on the last one.
- Make the leaves in one sitting with the same hook and a consistent grip. Twenty-four leaves in matching sizes look intentional; a mix of slightly larger and smaller leaves looks like a mistake once they are grouped in threes.
Common Mistakes to Avoid
- Cupped or ruffled large flowers. If the flower will not lie flat after blocking, the petals are too wide for your yarn. Fix: stop increasing one row earlier (skip the 16-dc row and work Row 6 even on 14 dc), then adjust the picot edge to 8 sc and 7 picots.
- Petals with a gap or a twist at the base. This happens when the ch-1 between petal bases is skipped or worked into. Always leave the ch-1 unworked and start each petal in the first dc after it.
- Small flowers with only four visible petals. The sl st between petals must go into its own sc; if you slip stitch into the same st as the last sc, you use up only nine of the ten centre stitches. Recount after the first two petals.
- Chain bars that pucker the runner. A bar is the right length when it lies flat with the motifs pinned in place. If a bar has to stretch to reach, add two more chains; if it sags, remove two.
- Skipping the pre-assembly block. Joining unblocked motifs locks in uneven petals and curled leaves, and the finished runner never sits flat. Block first, join second, starch last.
Ways to Customize This Pattern
- Change the length by changing the number of large flowers: three flowers give a 70 cm runner for a small table, six give about 145 cm for a long dining table. Add five small flowers per extra gap and one leaf spray per side per flower.
- Make a round centrepiece instead: place one large flower in the middle, ring it with six small flowers and six leaf sprays, and join with short bars.
- Swap the palette by season. Ivory petals with sage leaves and pale yellow centres read as spring; rust petals with mustard centres and brown leaves read as autumn.
- Work the whole design in size 10 crochet thread with a 1.5 mm hook for a fine, heirloom-scale version about half the size, ideal for a dresser or a tray.
- Add a scalloped outer edge: once the runner is joined, work a round of (sc, ch 5) along the outermost picots in colour D to give the piece a defined border.
Frequently asked questions
Working each petal in rows off the 6-dc base lets the stitches stack in straight columns, which is what gives the petals their veined, fan-like texture. A petal worked in the round would be smooth and much harder to shape into a wide top with a narrow base. Slipping down the side edge after each petal means you only fasten off once per flower.
Yes. Replace the ring with a ch-10 ring and work the 24 sc into it. The centre will be a little softer and the hole a little smaller, but the FLO rim in Rnd 2 still stands up and gives the raised gold look. Rings are worth using if you can, because they keep the centre perfectly round through washing.
Hand wash it in cool water with a mild detergent, do not wring, and roll it in a towel to remove the water. Then pin it out on mats exactly as you did when you finished it and let it dry flat. Never put it in a machine or tumble dryer; the bars will tangle and the flowers can distort.
For four large flowers the layout uses 20 small flowers (five in each of the three gaps, three at each end, minus one shared at each end if you prefer a tighter finish) and 24 leaves in eight sprays. Make two spare small flowers; once the pieces are pinned out you may find a spot that wants one more.
The finished Plum Garden Floral Crochet Table Runner Pattern

