Plum Hellebore Granny Square Bedspread and Cushions Crochet Pattern
Beginner Friendly
Perfect for those just starting their crochet journey, with clear instructions and simple techniques
Single-Day Project
A satisfying project you can complete in a single afternoon or evening.
Handmade Gift
A beautiful keepsake — free forever. Read online or print at home.
About This Plum Hellebore Granny Square Bedspread and Cushions Crochet Pattern
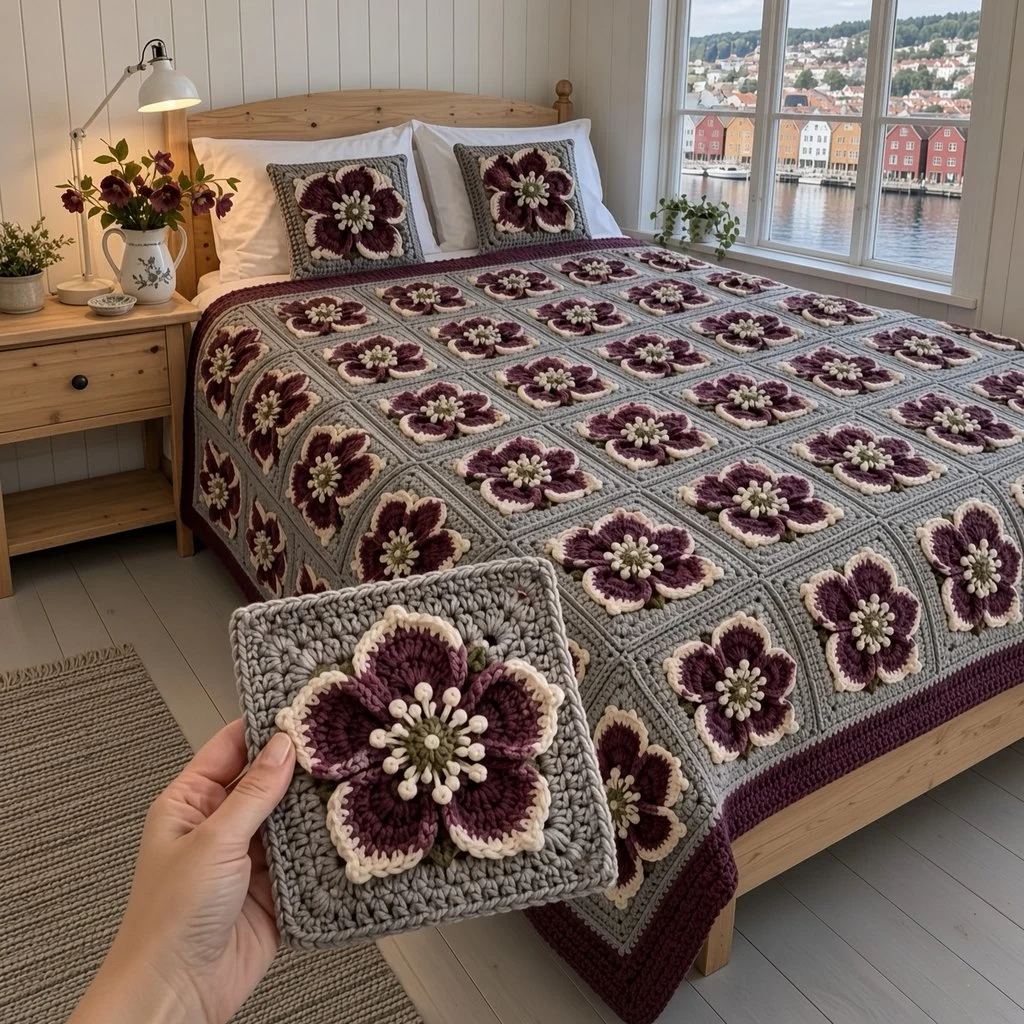
This hellebore flower crochet bedspread brings the quiet beauty of winter roses to the bedroom. Each of the 72 soft gray granny squares carries a large plum flower with five broad petals edged in cream, a moss green center and a ring of cream stamens tipped with tiny bobbles. Small olive leaves peek out between the petals, and a wide plum border frames the bed. Two cushions repeat the flower in a larger size.
The flowers are made separately and sewn onto the squares, which keeps each piece simple. The center is worked in the back loops so the stamens can be crocheted into the free front loops, standing up in a ring. The petals grow from chain loops around the center, and a cream outline round worked in the back loops gives each petal its pale, raised edge.
The set takes about 120 to 140 hours, with each square and flower taking around an hour and a half. It suits a crocheter who knows granny squares and is comfortable with clusters and small detailed pieces.
Materials
- Worsted weight cotton blend, heather gray about 2,600 m (13 skeins of 100 g / 200 m)
- Worsted weight cotton blend, plum about 700 m (4 skeins)
- Worsted weight cotton blend, cream about 500 m (3 skeins)
- Worsted weight cotton blend, olive green about 400 m (2 skeins)
- 5 mm crochet hook
- Tapestry needle, stitch markers and scissors
- Two 40 cm square cushion forms
Abbreviations
MRmagic ringchchainscsingle crochethdchalf double crochetdcdouble crochettrtreble crochetsl stslip stitchcluster(yarn over, insert hook in st, pull up a loop, yarn over, pull through 2 loops) 3 times in the same st, yarn over, pull through all 4 loopsBLO / FLOback loop only / front loop onlyrev screverse single crochet (crab stitch), worked left to rightskskipspspacest(s)stitch(es)rndroundreprepeatRS / WSright side / wrong sideGray Granny Square (make 72)
- Rnd 1: with gray, MR, ch 3 (counts as dc here and throughout), 2 dc in ring, ch 2, *3 dc in ring, ch 2; rep from * 2 more times, join with sl st to top of ch 3. Pull the ring tight. (12 dc, 4 corner ch-2 sps)
- Rnd 2: sl st in next 2 dc and in corner sp, ch 3, (2 dc, ch 2, 3 dc) in same sp, ch 1, *(3 dc, ch 2, 3 dc) in next corner sp, ch 1; rep from * 2 more times, join. (2 groups per side, 24 dc)
- Rnd 3: sl st in next 2 dc and in corner sp, ch 3, (2 dc, ch 2, 3 dc) in same sp, ch 1, *3 dc in each ch-1 sp to next corner with ch 1 between groups, (3 dc, ch 2, 3 dc) in corner sp, ch 1; rep from * 2 more times, 3 dc in each remaining ch-1 sp with ch 1 between groups, join. (3 groups per side, 36 dc)
- Rnds 4-8: rep Rnd 3, adding 1 group per side each rnd. (Rnd 8: 8 groups per side, 96 dc)
- Rnd 9: sl st in next 2 dc and in corner sp, ch 1, (sc, ch 2, sc) in same sp, *sc in each dc and each ch-1 sp to next corner, (sc, ch 2, sc) in corner sp; rep from * 2 more times, sc in each remaining dc and ch-1 sp, join. Fasten off. (33 sc per side, 132 sc)
Flower Center and Stamens (make 72)
- Rnd 1: with olive, MR, ch 1, 10 sc in ring, join with sl st to first sc. Pull the ring tight. (10 sts)
- Rnd 2: ch 1, working in BLO, 2 sc in each st around, join. Fasten off olive. (20 sts)
- Stamens: join cream in any free front loop of Rnd 1. *Ch 5, cluster in 4th ch from hook, sl st in next ch, sl st in next free front loop of Rnd 1; rep from * 9 more times. Fasten off. (10 stamens, each with a small bobble tip)
- Push the stamens up so they stand in a ring around the center.
Petals
- Rnd 3: join plum in any st of Rnd 2, ch 1, *sc in next st, ch 7, sk next 3 sts; rep from * 4 more times, join to first sc. (5 ch-7 loops)
- Rnd 4: sl st in first loop, *(sc, hdc, 2 dc, 5 tr, 2 dc, hdc, sc) in loop; rep from * in each remaining loop, join. Fasten off plum. (5 petals, 13 sts each)
- Rnd 5: join cream in the first st of any petal. Working in BLO, *sc in each of the next 6 sts, 3 sc in the center tr, sc in each of the next 6 sts, sl st between this petal and the next; rep from * 4 more times, join. Fasten off leaving a 50 cm tail. (15 sc per petal)
- The plum front loops left behind make a dark ridge just inside the cream edge.
Small Leaves (make 5 per flower)
- With olive, ch 8.
- Side 1: sl st in 2nd ch from hook, sc in next ch, hdc in next ch, dc in next 2 ch, hdc in next ch, sc in last ch.
- Side 2: working in the free loops on the other side of the chain, sc in next ch, hdc in next ch, dc in next 2 ch, hdc in next ch, sc in next ch, sl st in next ch.
- Tip: ch 2, sl st in the first sl st. Fasten off leaving a 20 cm tail. (about 4 cm long)
Assembling Each Square
- Sew a leaf behind the flower between each pair of petals, so only the tip shows.
- Center the flower on a gray square, with one petal pointing toward the top.
- With the cream tail, sew the flower down around the outer edge of each petal, leaving the tips of the petals slightly free so they lift. Sew a few stitches through the center as well.
Joining the Squares
- Lay out 72 squares, 8 across and 9 long, all with the top petal toward the head of the bed.
- Join method: place two squares side by side, RS up. With gray, sl st through the BLO of the matching sts of both squares, starting and ending in the corner ch-2 sps. (35 sl st per side, including both corners)
- Join the squares into rows of 8, then join the rows along their long edges.
- Where four corners meet, work through all four corner sps so no gap is left.
- The joined bedspread measures about 208 x 234 cm.
Plum Border
- Rnd 1: with plum, RS facing, join in a corner sp. Work 3 sc in each bedspread corner sp, sc in each st along the edge of every square, and 1 sc in each point where two squares meet. Join. (305 sc along each long side, 271 along each short side and 12 at the corners: 1,164 sts)
- Rnd 2: ch 2 (does not count as a st), hdc in each st around, working 3 hdc in the center st of each corner. Join. (1,172 sts)
- Rnds 3-5: rep Rnd 2, adding 8 sts each rnd. (Rnd 3: 1,180 sts, Rnd 4: 1,188, Rnd 5: 1,196)
- Rnd 6: ch 1, rev sc in each st around. Join and fasten off. (1,196 sts)
- The border is about 5 cm wide.
Cushions (make 2)
- Large squares (make 4): work Rnds 1-8 of the gray granny square, then rep Rnd 3 four more times. (Rnd 12: 12 groups per side, 144 dc) Rnd 13: work as Rnd 9. Fasten off. (49 sc per side, 196 sc; about 39 cm)
- Large flower (make 2): work the center and stamens as for the bedspread. For the petals, work Rnd 3 with ch-9 loops, and in Rnd 4 work (sc, hdc, 3 dc, 7 tr, 3 dc, hdc, sc) in each loop. In Rnd 5, work sc in each of the first 8 sts, 3 sc in the center tr and sc in each of the last 8 sts of each petal.
- Make 5 leaves for each flower and sew everything onto two of the large squares, as for the bedspread.
Cushion Assembly
- Hold a flower square and a plain square WS together, with the flower facing you and the corners matched.
- Rnd 1: with plum, join in a corner sp through both layers. Working through both layers, 3 sc in each corner sp and sc in each st along the sides. Insert the cushion form before closing the last side. Join. (208 sts: 52 per side including corners)
- Rnd 2: ch 1, rev sc in each st around. Join and fasten off. (208 sts)
- Rep with the second cushion.
Finishing
Weave in all ends on the WS. Hide the plum, cream and olive tails behind the flower so nothing shows through the gray granny clusters.
Lay the bedspread flat and steam it lightly, holding the iron well above the flowers. Straighten the squares and the plum border, then fluff the stamens and lift the petal tips with your fingers so each flower looks open and full.
Tips for Success
- Make the gray squares in batches while you work on flowers in between. Alternating keeps the project from feeling repetitive.
- Work Rnd 2 of the center strictly in the back loops, so there are 10 front loops left for the stamens.
- Pull each stamen cluster closed tightly so the bobble tip is round.
- Keep the ch-7 loops of Rnd 3 the same size on every petal so the flowers are symmetrical.
- Use colorfast yarn and wash a test square, since plum can bleed onto cream and gray.
Common Mistakes to Avoid
- No loops left for stamens. If Rnd 2 is worked in both loops, there’s nowhere to attach the stamens. Undo and rework it in the BLO.
- Petals of different sizes. Each petal loop must skip exactly 3 sts of Rnd 2. Count the 20 sts before starting Rnd 3.
- A cream edge that ruffles. Work exactly 3 sc in the center tr only; extra increases make the petal edge wavy.
- Flowers that pucker the square. Sewing too tightly pulls the granny clusters in. Keep the stitches relaxed.
- A wavy border. Work exactly 1 sc at each point where squares meet in Rnd 1.
Ways to Customize This Pattern
- Make the flowers in dusty pink or white, like other hellebore varieties, keeping the same green centers.
- Use cream instead of gray for the squares for a lighter, cottage-style bedspread.
- Change the size: each square adds 26 cm. A throw of 5 by 6 squares is about 140 x 166 cm with the border.
- Leave the flowers off every other square for a checkerboard of flowers and plain granny squares.
- Use single flowers as brooches, hair clips or gift toppers.
Frequently asked questions
A five-petal flower doesn’t divide evenly into a four-sided square, so working it separately and sewing it onto a classic granny square keeps both parts simple and lets the flower sit in full relief.
Yes, on Rnd 9. Sew the flowers on first, though, because it’s much easier to reach the back of a single square.
The bobble tips are firm and spring back. If they flatten, lift them with your fingers or steam them lightly.
Wash it on a gentle cold cycle inside a large laundry bag, or by hand, and dry it flat. Fluff the flowers while they’re still damp.
The finished Plum Hellebore Granny Square Bedspread and Cushions Crochet Pattern

