Plum Sunburst Granny Square Throw Pattern
Beginner Friendly
Perfect for those just starting their crochet journey, with clear instructions and simple techniques
Single-Day Project
A satisfying project you can complete in a single afternoon or evening.
Handmade Gift
A beautiful keepsake — free forever. Read online or print at home.
About This Plum Sunburst Granny Square Throw Pattern
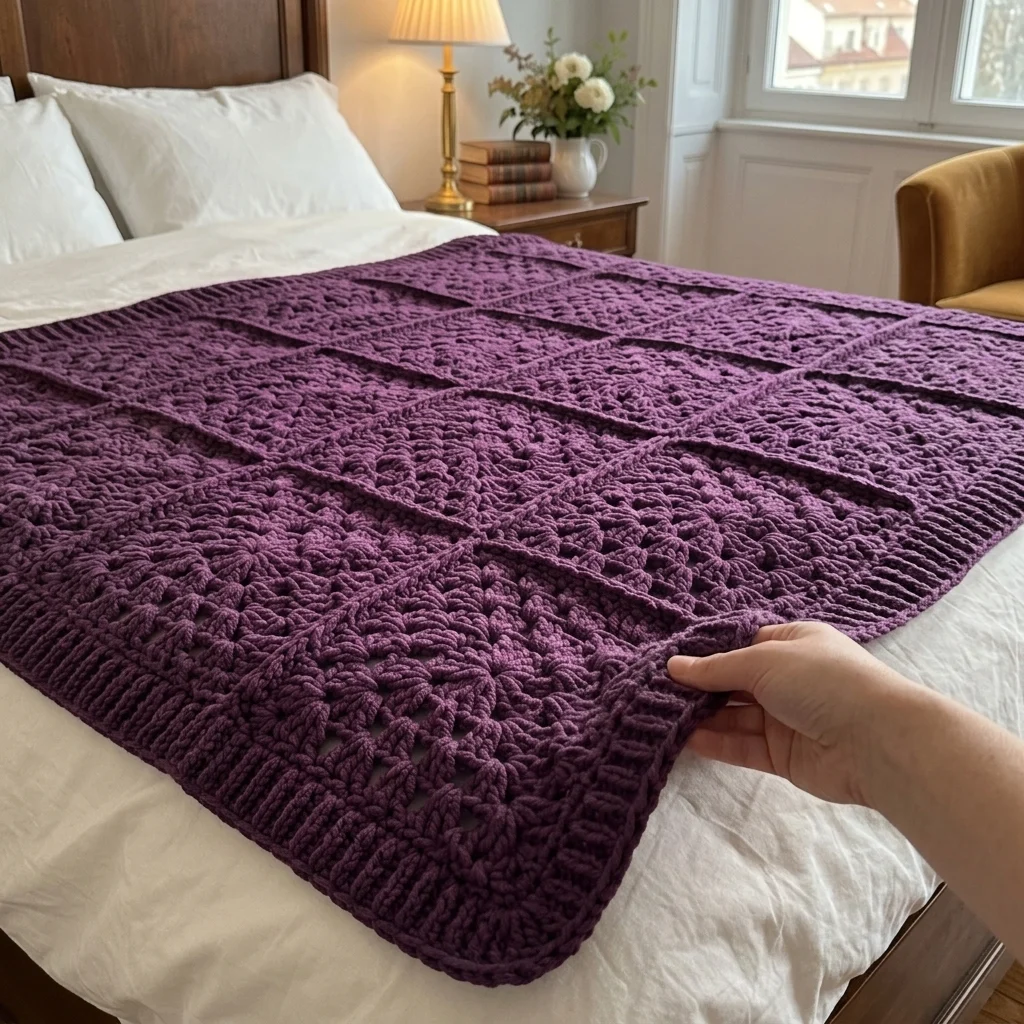
This sunburst granny square blanket pattern uses chunky plum yarn to make a soft, heavy throw sized to lie across the foot of a bed or over a sofa. Each square starts with a ring of twelve cluster stitches that open out like a sunburst. Two lacy granny rounds follow, then a solid frame that squares everything off. In a single deep color, the design relies entirely on texture, and the clusters, holes and solid rounds catch the light in different ways.
The 30 squares are joined on the right side with single crochet, which leaves a raised ridge between them and gives the throw its clean, tailored grid. A deep post-stitch ribbing is worked around all four edges. It adds weight, keeps the throw from curling, and gives it the finished edge of a store-bought blanket. Bulky yarn means each square works up quickly, so the whole throw comes together faster than most granny square blankets.
Plan on 25 to 32 hours, with each square taking about 40 minutes. The pattern suits a crocheter who is comfortable with clusters, treble stitches and post stitches. It also makes a good first large project for anyone ready to move beyond plain granny squares, with enough variety in each square to stay interesting.
Materials
- Bulky weight (#5) yarn in plum about 1,900 m / 2,080 yd (roughly 16 skeins of 100 g / 120 m)
- 6.5 mm (K-10.5) crochet hook
- 7 mm crochet hook optional, for joining if your seams pull tight
- Tapestry needle with a large eye
- Stitch markers
- Blocking mats, pins and a spray bottle
- A 25 cm (10 in) cardboard square as a blocking template
Abbreviations
MRmagic ringchchainsl stslip stitchscsingle crochetdcdouble crochettrtreble crochetbeg clbeginning cluster: ch 2, then (yo, insert hook in st, pull up a loop, yo and pull through 2 loops) twice, yo and pull through all 3 loopscl3-dc cluster: (yo, insert hook in st, pull up a loop, yo and pull through 2 loops) 3 times, yo and pull through all 4 loopsfpdcfront post double crochetbpdcback post double crochetspspacest(s)stitch(es)Sunburst Square (make 30)
- Rnd 1: Make a MR. Ch 3 (counts as dc), 11 dc in ring, sl st to top of ch-3. Pull the ring tightly closed. (12 dc)
- Rnd 2 (sunburst): Beg cl in same st as join, ch 2. *Cl in next st, ch 2* 11 times. Sl st to top of beg cl. (12 clusters, 12 ch-2 sps)
- Rnd 3: Sl st into first ch-2 sp. Ch 3 (counts as dc), 2 dc in same sp, ch 1. *3 dc in next ch-2 sp, ch 1* 11 times. Sl st to top of ch-3. (36 dc, 12 ch-1 sps)
- Rnd 4 (squaring): Sl st in next 2 dc and into ch-1 sp. Ch 4 (counts as tr), (2 tr, ch 2, 3 tr) in same sp for the first corner, then ch 1. *[3 dc in next ch-1 sp, ch 1] twice, (3 tr, ch 2, 3 tr) in next ch-1 sp, ch 1* 3 times. [3 dc in next ch-1 sp, ch 1] twice, then sl st to top of ch-4. (48 sts: 12 per side between corners, with 3 ch-1 sps per side)
- Rnd 5: Sl st in next 2 tr and into corner ch-2 sp. Ch 3 (counts as dc), (2 dc, ch 2, 3 dc) in same sp, ch 1. *[3 dc in next ch-1 sp, ch 1] 3 times, (3 dc, ch 2, 3 dc) in next corner sp, ch 1* 3 times. [3 dc in next ch-1 sp, ch 1] 3 times, then sl st to top of ch-3. (60 dc: 15 per side, with 4 ch-1 sps per side)
- Rnd 6: Sl st in next 2 dc and into corner ch-2 sp. Work as Rnd 5, but repeat [3 dc in next ch-1 sp, ch 1] 4 times along each side. (72 dc: 18 per side, with 5 ch-1 sps per side)
- Rnd 7 (solid frame): Sl st in next 2 dc and into corner ch-2 sp. Ch 3 (counts as dc), (dc, ch 2, 2 dc) in same sp. *Dc in each dc and each ch-1 sp across to the next corner, (2 dc, ch 2, 2 dc) in corner sp* 3 times. Dc in each dc and ch-1 sp across, sl st to top of ch-3. (108 dc: 27 per side)
- Rnd 8: Sl st in next dc and into corner ch-2 sp. Ch 1, (sc, ch 2, sc) in same sp. Sc in each st across, with (sc, ch 2, sc) in each corner sp. Sl st to first sc. (116 sc: 29 per side) Fasten off and weave in ends.
- Block each square to 25 cm (10 in) on your template. Pin the cluster ring so all 12 clusters are evenly spaced, mist, and let dry.
Joining the Squares
- Lay out the squares 5 across and 6 down, all turned the same way.
- Hold two neighboring squares with wrong sides together and right sides facing out. Join yarn through both corner ch-2 sps, ch 1, and sc in the same sps. Sc through both loops of both layers in each of the 29 sc, then sc in the next pair of corner sps. (31 sc per edge)
- Without fastening off, continue onto the next pair of squares in the same line. Join all 4 lengthwise seams (6 squares each) first, then all 5 widthwise seams (5 squares each).
- Where seams cross, ch 1 over the existing ridge instead of working into it. This keeps the intersections flat and the ridges continuous.
- Check that each seam is the same length as a square edge. If the seams pucker, rework them with the 7 mm hook.
Ribbed Border
- Rnd 1: With the right side facing, join yarn in any throw corner ch-2 sp. Ch 3 (counts as dc), (dc, ch 2, 2 dc) in same sp. Dc in each sc along each square edge, plus 1 dc in each square corner sp on either side of every seam. On each long side, work just 1 dc into the pair of corner sps at the center seam, to keep the count odd. Work (2 dc, ch 2, 2 dc) in each throw corner, then sl st to top of ch-3. (157 sts on each short side and 187 on each long side, counted between throw corner sps)
- Rnd 2: Sl st in next dc and into corner ch-2 sp. Ch 3 (counts as dc), (dc, ch 2, 2 dc) in same sp. *Fpdc around next st, then [bpdc around next st, fpdc around next st] across to the next corner, (2 dc, ch 2, 2 dc) in corner sp* around. Sl st to top of ch-3. Each side starts and ends with fpdc. (161 sts on short sides, 191 on long sides)
- Rnds 3-6: Sl st in next dc and into corner ch-2 sp. Ch 3, (dc, ch 2, 2 dc) in same sp. *Starting with fpdc, alternate fpdc and bpdc across all sts to the next corner, including the new corner dc, (2 dc, ch 2, 2 dc) in corner sp* around. Sl st to top of ch-3. Each round adds 4 sts per side and keeps every count odd, so the ribs stay lined up.
- Rnd 7: Sl st in next dc and into corner ch-2 sp. Ch 1, 3 sc in corner sp. Sc in each st around, with 3 sc in each corner sp. Sl st to first sc. Fasten off and weave in ends.
Finishing
When the border is complete, lay the throw flat and check that the ribbing lies straight along all four edges, without flaring or pulling in at the corners. Weave any remaining tails along the seam ridges, where bulky yarn hides most easily. Mist the whole throw lightly and smooth the squares into straight rows, then let it dry flat.
Chunky yarn holds a lot of water, so wash the throw on a gentle cycle and dry it flat, supporting its weight while it is wet. If you used a wool blend, check the label before machine washing, because some bulky wools felt easily.
Tips for Success
- Keep the clusters in Round 2 the same height by pulling every loop up to match. Uneven clusters make the sunburst look lopsided after blocking.
- Count the 12 sts per side at the end of Round 4 before continuing. The rest of the square builds on this round, and a miscount here makes the square skew.
- Weave in the tails of each square as soon as it is done. Chunky tails are bulky and much easier to hide in a single square than in a joined throw.
- Use a large-eye tapestry needle made for bulky yarn. Forcing chunky yarn through a small eye splits the plies and leaves fuzzy, visible ends.
- Work the ribbing with relaxed tension. Post stitches in bulky yarn pull in noticeably, and a tight border will cup the edges.
Common Mistakes to Avoid
- A cupped center: the clusters in Round 2 are too tight, or the ch-2 between them is too short. Loosen the chains and make sure every cluster is pulled to full height.
- Squares that turn into rounded shapes: the corners in Round 4 were made with dc instead of tr. The trebles give the corners the extra height they need, so do not substitute them.
- Squares of different sizes: this usually comes from tension changing over several sessions. Block every square on the same template, and set aside any that are clearly larger or smaller.
- A rib that does not line up: one side has an even count. Check that each side starts and ends with fpdc; if it does not, add or skip one stitch on that side in Round 1.
- Ridges that look uneven: the seam was worked through the back loops only. Work through both loops of both layers so the ridge stands up evenly.
Ways to Customize This Pattern
- Work Rounds 1-2 in a contrasting color, such as mustard or blush, to make the sunburst centers stand out.
- Make it bed-size: 8 x 9 squares gives about 220 x 245 cm with the border. Plan on about 4,300 m of bulky yarn.
- Make a matching pillow cover from 4 squares joined in a 2 x 2 front, with a plain dc square back. Each cover takes about 50 cm square of fabric.
- Turn the seams to the back by joining with right sides together, if you prefer a smoother surface without ridges.
- Work in a soft cotton or cotton blend for a lighter throw, which shows the lace rounds more clearly.
Frequently asked questions
Yes. With a 5 mm hook, each square will be about 18 cm (7 in), so you will need about 8 x 9 squares for a throw of a similar size. The texture will look finer and lacier than in bulky yarn.
About 40 minutes once you know the rounds. The first few take longer while you learn the cluster ring and the squaring round, but the last 20 squares go quickly.
Joining with wrong sides together pushes the seam up as a raised ridge on the front. In bulky yarn, that ridge is deep and frames each square clearly, which is what gives the throw its grid look.
Yes. It weighs about 1.6 kg in acrylic and more in wool. That weight helps it drape well over the end of a bed, but it also means it should be dried flat and never hung while wet.
The finished Plum Sunburst Granny Square Throw Pattern

