Poinsettia and Bells Christmas Wreath Crochet Pattern
Beginner Friendly
Perfect for those just starting their crochet journey, with clear instructions and simple techniques
Single-Day Project
A satisfying project you can complete in a single afternoon or evening.
Handmade Gift
A beautiful keepsake — free forever. Read online or print at home.
About This Poinsettia and Bells Christmas Wreath Crochet Pattern
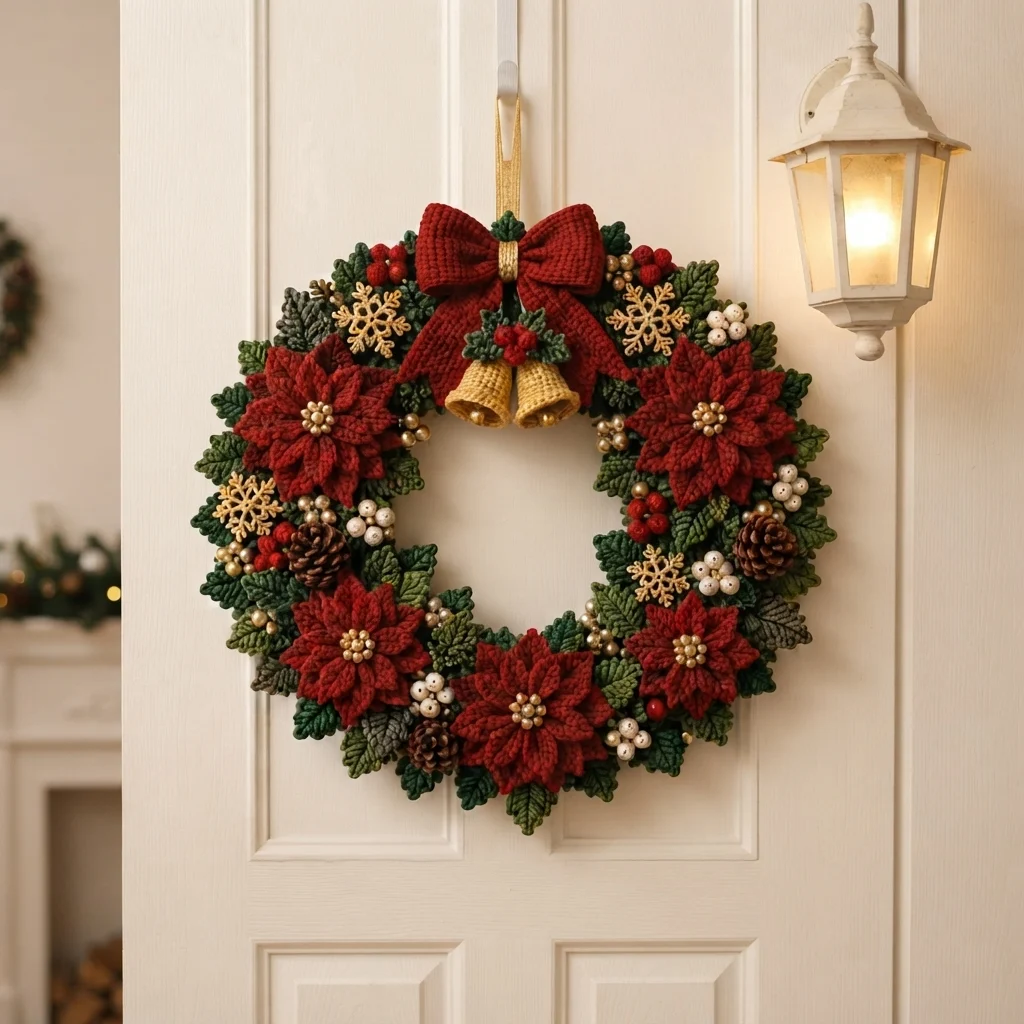
This crochet Christmas wreath pattern builds a full door wreath from dozens of individually made pieces: 6 large layered poinsettias in deep brick red with gold bead-like centers, a dense base of holly-shaped leaves in two shades of green, gold metallic snowflakes, clustered berries in red and cream-gold, a pair of crocheted bells, and a substantial ribbed bow, all wired or sewn onto a sturdy foam or wire wreath base.
What makes this design distinctive is the density and variety of separately made elements covering the base ring completely; nothing of the underlying wreath form shows through anywhere. The poinsettias use pointed, layered petals worked in two rounds for real dimension, the holly leaves carry sharp corner points typical of real holly, and the metallic gold snowflakes and berry clusters fill every remaining gap so the finished piece reads as a lush, fully dressed wreath rather than a base with a few decorations attached. Expect to spend 20-24 hours total across the poinsettias, leaves, snowflakes, berries, bells, and bow.
This is an advanced pattern, best suited to someone comfortable managing a large number of varied motifs and confident wiring or sewing them densely onto a wreath form, rather than someone wanting a simple, lightly decorated base.
Materials
- Worsted weight yarn, deep brick red ~120g, poinsettias
- Worsted weight yarn, gold metallic or gold worsted ~40g, poinsettia centers and snowflakes
- Worsted weight yarn, forest green ~150g, holly leaves
- Worsted weight yarn, sage/olive green ~80g, holly leaves
- Worsted weight yarn, cream/white ~30g, berry clusters
- Worsted weight yarn, red ~20g, small berry clusters
- Worsted weight yarn, gold ~40g, bells
- Wide ribbed ribbon-style yarn or thick worsted, deep red ~40g, bow
- 14-16 inch (35-40 cm) foam or wire wreath form
- Floral wire or strong thread, for attaching pieces securely
- 2 small pinecones (real or crocheted), optional
- Wide gold ribbon ~50 cm, for hanging loop
- Crochet hook 4.5 mm (US 7)
- Tapestry/yarn needle
- Hot glue gun or strong fabric glue, for securing small accents
- Sharp scissors
Abbreviations
chchainsl stslip stitchscsingle crochethdchalf double crochetdcdouble crochettrtreble/triple crochetMRmagic ringincincrease (2 sc in one st)decdecrease (sc2tog)st(s)stitch(es)reprepeatFOfasten offPoinsettia Motif (make 6)
- With gold, 8 sc in MR, inc around (16 sts), sl st to join, FO leaving a short tail. This is the small textured center.
- With brick red, join in any st of the center. Round 1 (inner petals): *ch 3, sl st in 2nd ch from hook, sc in next ch, sl st in same base st; rep from * around all 16 sts. 16 pointed petals.
- Round 2 (outer petals): join brick red behind Round 1, in the base sts between inner petals. *ch 5, sl st in 2nd ch from hook, sc 2, hdc 1, sl st in same base st; rep from * around. 16 larger, sharply pointed petals layered behind the first.
- FO leaving a long tail for attaching. Fold outer petals slightly back so the two rounds separate visually into distinct layers. Repeat for 6 poinsettias total.
Holly Leaf Motif (make approximately 60: mix of forest green and sage green)
- Ch 4, sl st in first ch to form a small foundation ring.
- Point 1, top: ch 8. Starting in 2nd ch from hook: sl st, sc 1, hdc 1, dc 1, 3 dc in last ch to form a sharp point. Sl st into ring.
- Point 2, upper right: ch 6. Repeat the same sharp-point construction at a smaller scale. Sl st into ring.
- Point 3, lower right: ch 5, repeat at an even smaller scale. Sl st into ring.
- Point 4, lower left: repeat Point 3 exactly. Sl st into ring.
- Point 5, upper left: repeat Point 2 exactly. Sl st into ring.
- Sl st into base of Point 1 to close. FO leaving a 10-15 cm tail for attaching. Repeat for approximately 60 holly leaves total, mixing the two greens.
Gold Snowflake Motif (make 4-5)
- With gold, ch 6, sl st in first ch to form a ring.
- Round 1: *ch 5, sl st in 2nd ch from hook, sc 2, sl st into ring; rep from * 6 times to form 6 pointed arms radiating from the center.
- Round 2: work a small side branch partway up each arm: join gold at the midpoint of each arm, ch 3, sl st back into the same point, to add the small angled branches typical of a snowflake shape.
- FO leaving a short tail for attaching. Repeat for 4-5 snowflakes total.
Berry Clusters (make approximately 30: mix of cream/white and red)
- 4 sc in MR. Do not join.
- Pull the MR tail tight to close, then sl st into the first sc to close the round into a small tight bobble.
- FO leaving a short tail for attaching. Repeat for approximately 30 total, mostly grouped in small clusters of 3-5 in cream/white, with fewer smaller red clusters mixed in.
Bells (make 2, in gold)
- Round 1: 6 sc in MR. (6 sts)
- Round 2: inc in each st around. (12 sts)
- Round 3: *sc 1, inc; rep from * around. (18 sts)
- Rounds 4-6: sc around even. (18 sts)
- Round 7 (flare the bell’s mouth): *sc 2, inc; rep from * around. (24 sts)
- Round 8: sc around even, working through back loop only for a defined rim. (24 sts)
- FO leaving a long tail. Attach a small bead or bobble inside each bell to suggest a clapper, and add a small cord loop at the top for hanging. Repeat for 2 bells total.
Ribbed Bow
- With the ribbon-style yarn, ch 16. Row 1: hdc in 3rd ch from hook and in each ch across.
- Rows 2-10: ch 2, turn, hdc in each st across, working in back loop only every row to build a ribbed texture.
- FO leaving a long tail. Cinch the strip tightly at its center point and wrap a separate strand around the cinch point several times to form the classic bow shape with two looped sides.
- Make a small separate strip for the bow’s center wrap and center streamer detail, attaching it over the cinch point.
Assembly, Covering the Wreath Base
- Begin by densely wiring or sewing holly leaves around the entire wreath form, overlapping generously so no foam or wire shows through anywhere, working in one direction around the ring for a consistent flow.
- Position the 6 poinsettias evenly spaced around the wreath, roughly every 60 degrees, and sew or wire each one securely into the leaf base.
- Tuck berry clusters into the gaps between poinsettias, alongside small pinecones if using.
- Attach the gold snowflakes in the gaps between poinsettias as well, spacing them so they don’t sit directly beside each other.
Assembly, Top Focal Point
- Attach the finished ribbed bow to the top center of the wreath, securing it firmly to the base through the leaf layer beneath it.
- Attach the two crocheted bells just below the bow’s center, with a small cluster of extra leaves and a few berries tucked around their hanging point.
- Attach the gold ribbon hanging loop at the very top, behind the bow, so the wreath hangs securely once in place.
Finishing
Once every element is attached, turn the wreath to check the back and sides for any piece held by only a single point; reinforce anything that feels loose, since a hanging wreath shifts and gets bumped often. Fluff and adjust leaves and poinsettia petals by hand so the surface has natural dimension rather than lying flat. Hang the finished wreath and step back to check overall balance before making it a permanent display.
Tips for Success
- Work leaves onto the base first, before any poinsettias, so you have a full green foundation to nestle the larger flowers into.
- Mix the two leaf greens throughout rather than grouping them, so the base reads as a blended, natural foliage color rather than two distinct zones.
- Space the 6 poinsettias as evenly as possible around the ring before securing any of them permanently, stepping back to check symmetry.
- Fold poinsettia outer petals back deliberately after attaching; this is what gives them real dimension rather than a flat, pressed look.
- Use floral wire rather than only sewing for the heaviest elements, like the poinsettias and bells, since wire holds up better to a wreath’s regular handling and any outdoor exposure.
Common Mistakes to Avoid
- Leaving gaps of visible wreath base between leaves breaks the dense, fully dressed look. Fix: overlap holly leaves generously and add extras wherever the base still shows.
- Spacing poinsettias unevenly around the ring makes the wreath look lopsided when hung. Fix: measure or eyeball even spacing before attaching any of them permanently.
- Attaching heavy elements with only thread instead of wire risks them sagging or falling off over time. Fix: use floral wire for poinsettias, bells, and the bow.
- Clustering all snowflakes and berries on one side of the wreath unbalances the overall look. Fix: distribute accent pieces evenly around the full ring.
- Skipping the fold-back step on poinsettia petals leaves them looking flat rather than dimensional. Fix: fold and shape the outer petal round after attaching each flower.
Ways to Customize This Pattern
- Reduce to 4 poinsettias for a lighter, less dense wreath.
- Swap the red poinsettias for white or cream for a winter-white theme instead of classic Christmas red.
- Skip the bells and use a single larger bow as the sole top focal point.
- Use silver instead of gold for the snowflakes and bell accents for a cooler color story.
- Add small crocheted pinecones alongside or instead of real ones for an entirely handmade wreath.
Frequently asked questions
Around 60 leaves covers a 35-40 cm wreath form densely, but exact counts depend on leaf size and your specific base diameter. Keep making and adding leaves until no foam or wire shows through anywhere.
Yes, straw forms work well and hold wire securely. Just make sure your attachment method, wire or strong thread, can grip the straw firmly since it has a slightly different texture than foam.
Acrylic or acrylic-blend yarn holds up reasonably well outdoors short-term, but prolonged sun and moisture exposure will fade colors and may loosen glued accents over time. For long-term outdoor display, consider a covered porch area and check the wreath periodically for wear.
This usually means the outer petal round wasn’t folded back after attaching, or the petal chain lengths weren’t graduated. Recheck that Round 2’s petals are noticeably longer than Round 1’s, and fold the outer layer back and slightly down once sewn on.
The finished Poinsettia and Bells Christmas Wreath Crochet Pattern

