Poinsettia Filet Table Topper Crochet Pattern
Beginner Friendly
Perfect for those just starting their crochet journey, with clear instructions and simple techniques
Single-Day Project
A satisfying project you can complete in a single afternoon or evening.
Handmade Gift
A beautiful keepsake — free forever. Read online or print at home.
About This Poinsettia Filet Table Topper Crochet Pattern
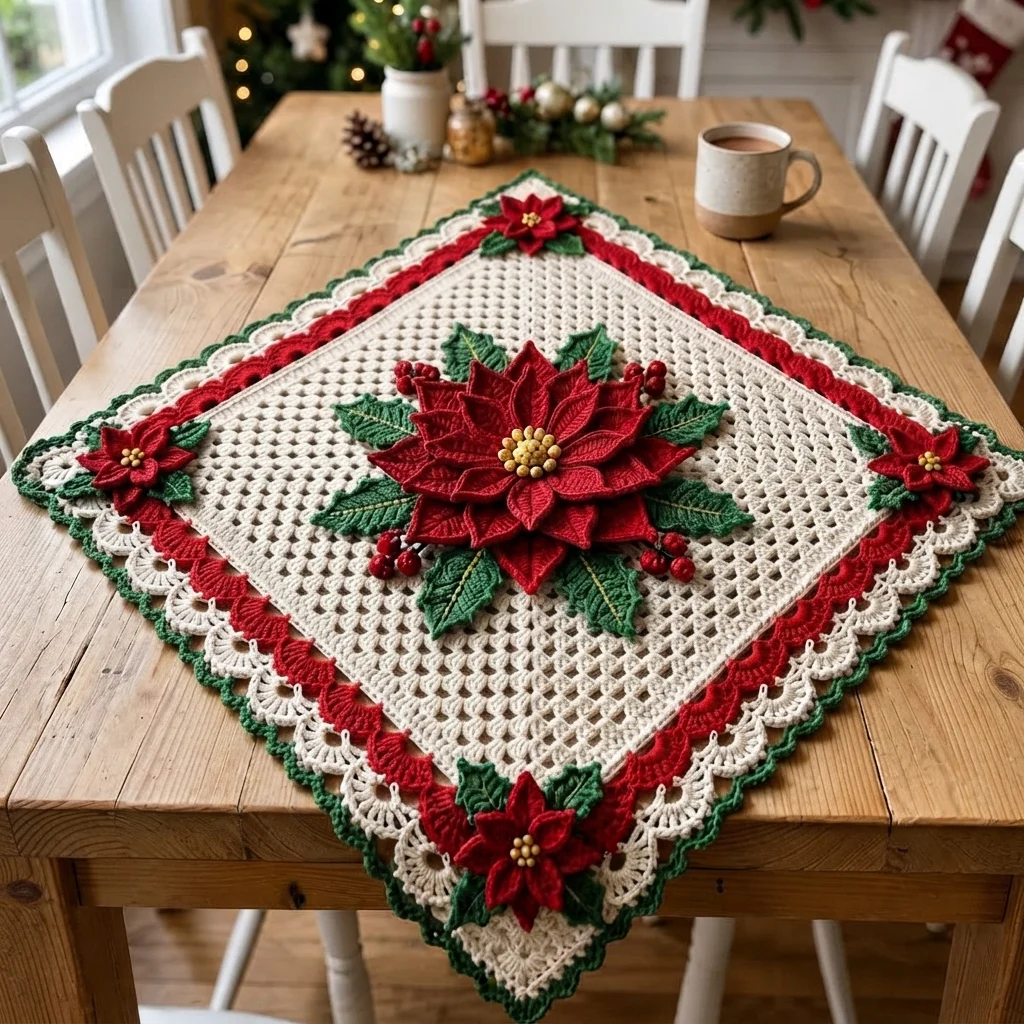
This crochet poinsettia table topper pattern builds a square cream filet mesh base, framed by a red scalloped border and a green picot edge, then centers one large, fully layered 3D poinsettia in the middle with 4 smaller matching poinsettias tucked into each corner. Displayed turned diamond-style on the table, the piece reads as a single bold holiday centerpiece rather than a plain mesh square.
What makes this design distinctive is the poinsettia construction: the large center bloom builds up from a golden bead-cluster center through two full rounds of sharply pointed petals, then gets its own set of separately made holly leaves and berry clusters arranged underneath, so it sits raised and dimensional against the flat mesh rather than lying appliquéd flat. The 4 smaller corner poinsettias repeat the same construction at a reduced scale, tying the whole piece together. Expect to spend 18-22 hours total across the mesh base, borders, and all 5 poinsettias with their leaves and berries.
This is an advanced pattern, best suited to someone comfortable maintaining a square filet mesh with mitered corners and confident building multiple dimensional poinsettias with leaves and berry accents, rather than someone wanting a single flat motif design.
Materials
- DK weight cotton yarn, cream ~180g, mesh base and edging
- Worsted weight yarn, deep red ~90g, poinsettia petals
- Worsted weight yarn, gold ~20g, poinsettia centers
- Worsted weight yarn, forest green ~50g, holly leaves
- Worsted weight yarn, red (for berries) ~15g, berry clusters
- Crochet hook, small 3.25 mm (US D/3), for mesh
- Crochet hook, larger 4 mm (US G/6), for poinsettias and leaves
- Tapestry/yarn needle
- Steam iron and pressing cloth, or blocking mat and pins
- Straight pins, for positioning poinsettias before sewing
- Sharp scissors
Abbreviations
chchainsl stslip stitchscsingle crochethdchalf double crochetdcdouble crochetMRmagic ringpicotch 2, sl st in first ch of the 2ch-spchain spacest(s)stitch(es)reprepeatFOfasten offSquare Filet Mesh Base
- With cream and the smaller hook, ch 66. Row 1: dc in 6th ch from hook, *ch 1, skip 1 ch, dc in next ch; rep from * across. 20 mesh squares.
- Row 2: ch 4 (counts as dc + ch-1), turn, dc in next dc, *ch 1, dc in next dc; rep from * across, ending dc in top of turning ch. 20 squares maintained.
- Rep Row 2 until the piece measures a true square, approximately 55 cm x 55 cm, keeping the 20-square width consistent throughout.
- FO after the final row, leaving a long tail for the edging join.
Red Scalloped Border
- With deep red, join at any corner of the mesh square. Round 1: sc evenly around all 4 sides, working 3 sc at each corner to keep it flat and square.
- Round 2 (scallop round): *sk 1 st, 3 dc in next st, sk 1 st, sl st in next st; rep from * evenly around all 4 sides, working extra repeats at each corner so scallops stay even and the corners remain pointed.
- Join with sl st to first st and FO.
Green Picot Outer Edge
- With forest green, join at any corner, just outside the red border. Round 3: sc evenly around, working 3 sc at each corner.
- Round 4 (picot trim): *sc in next st, picot, sc in same st; rep from * evenly around all 4 sides, working extra picot repeats at each corner to keep them sharply pointed.
- Join with sl st and FO. Weave in all ends.
Large Poinsettia Motif (make 1, for the center)
- With gold, 10 sc in MR, work a second textured round in BLO to raise the center slightly. Sl st to join, FO leaving a short tail.
- With deep red, join in any st of the center. Round 1 (inner petals): *ch 3, sl st in 2nd ch from hook, sc in next ch, sl st in same base st; rep from * around all 10 sts. 10 petals.
- Round 2 (outer petals): join red behind Round 1, in the base sts between inner petals. *ch 5, sl st in 2nd ch from hook, sc 2, hdc 1, sl st in same base st; rep from * around. 10 larger, sharply pointed petals layered behind the first.
- FO leaving a long tail for attaching. Fold outer petals slightly back so the two rounds separate into visible layers.
Small Corner Poinsettia Motif (make 4)
- With gold, 6 sc in MR. Sl st to join, FO leaving a short tail.
- With deep red, join in any st of the center. Round 1 (petals): *ch 3, sl st in 2nd ch from hook, sc in next ch, sl st in same base st; rep from * around all 6 sts. 6 pointed petals.
- FO leaving a long tail for attaching. Repeat for 4 small poinsettias total.
Holly Leaves (make approximately 16: 8 large for the center, 8 small for the corners)
- Ch 4, sl st in first ch to form a small foundation ring.
- Point 1, top: ch 8 (large) or ch 6 (small). Starting in 2nd ch from hook: sl st, sc 1, hdc 1, dc 1, 3 dc in last ch. Sl st into ring.
- Point 2, upper right: ch 6 (large) or ch 4 (small), repeat the sharp-point construction at a smaller scale. Sl st into ring.
- Point 3, lower right: ch 5 (large) or ch 3 (small), repeat at an even smaller scale. Sl st into ring.
- Point 4, lower left: repeat Point 3 exactly. Sl st into ring.
- Point 5, upper left: repeat Point 2 exactly. Sl st into ring.
- Sl st into base of Point 1 to close. FO leaving a short tail for attaching. Repeat for 8 large leaves and 8 small leaves total.
Berry Clusters (make approximately 12, in red)
- 4 sc in MR. Do not join.
- Pull the MR tail tight to close, then sl st into the first sc to close into a small tight bobble.
- FO leaving a short tail for attaching. Repeat for approximately 12 total, grouped in small clusters near each poinsettia.
Assembly
- Position the large poinsettia at the center of the blocked mesh square and pin.
- Tuck 8 large holly leaves and a few berry clusters underneath and around the large poinsettia, angling leaves outward in different directions, and pin.
- Sew the large poinsettia down firmly through its center into the mesh below, then tack the surrounding leaves and berries at their bases.
- Position the 4 small poinsettias at each corner of the mesh, inside the border, and repeat the same leaf and berry arrangement at a smaller scale around each one.
- Sew each small poinsettia and its leaves and berries down firmly.
Finishing
Once every poinsettia, leaf, and berry cluster is attached, turn the topper over and check for any piece held by only a single stitch; add a second point wherever something feels loose. Weave in all remaining tails. Steam-block gently, keeping the poinsettia petal layers separated and slightly raised rather than pressed flat, and let the piece dry completely. Display the finished topper turned diamond-style on the table, as shown in the photo, for the most dramatic presentation.
Tips for Success
- Block the plain mesh square and both border rounds before attaching any poinsettias, so the base sits flat and perfectly square underneath everything else.
- Fold poinsettia outer petals back deliberately after attaching; this is what gives them real dimension rather than a flat, pressed look.
- Keep the red border’s scallop repeats and the green picot trim consistent at all 4 corners, since any unevenness is very visible on a piece displayed diamond-style.
- Position the 4 small corner poinsettias at matching distances from each corner point, checking measurements rather than placing entirely by eye.
- Angle holly leaves in varied directions around each poinsettia rather than in a perfectly even ring, for a more natural look.
Common Mistakes to Avoid
- Attaching poinsettias before blocking the mesh and borders causes the base to distort once steamed later. Fix: block the plain square and both borders first, then appliqué the flowers.
- Working the border’s corner repeats inconsistently rounds off what should be sharp, pointed corners. Fix: add the extra scallop and picot repeats at each corner as instructed.
- Sewing poinsettia petals down flat instead of folding the outer round back flattens their dimension. Fix: fold and tack the outer petal layer back and slightly down after attaching.
- Placing the 4 corner poinsettias at uneven distances from their corners looks lopsided once displayed. Fix: measure consistent placement from each corner point rather than eyeballing it.
- Skipping the BLO texture round on the large center makes it look flatter than the corner poinsettias’ simpler centers. Fix: work the raised BLO round on the large poinsettia as instructed.
Ways to Customize This Pattern
- Skip the 4 corner poinsettias for a simpler topper with just the single large centerpiece.
- Swap the red poinsettias for white or cream for a winter-white theme instead of classic Christmas red.
- Reduce the mesh size for a smaller matching centerpiece doily instead of a full topper.
- Add a gold metallic trim round between the red and green borders for extra sparkle.
- Use the same poinsettia and leaf motifs at a larger scale for a coordinating wreath or centerpiece ring.
Frequently asked questions
Turning a square topper 45 degrees so it displays as a diamond is a styling choice that shows off the corner poinsettias more prominently and creates a more dynamic look against a rectangular table; the topper itself is worked as a plain square.
Yes. The large poinsettia with its leaves and berries works well on its own as a pin, hair accessory, or gift topper if you skip the mesh base and border entirely.
Work extra scallop or picot repeats specifically at each of the 4 corner points, rather than spacing repeats evenly around the whole perimeter. This concentration of stitches at the corners is what keeps them pointed.
This usually means the outer petal round wasn’t folded back after attaching, or the petal chain lengths weren’t graduated between rounds. Recheck that Round 2 is noticeably longer than Round 1, and fold the outer layer back after sewing it on.
The finished Poinsettia Filet Table Topper Crochet Pattern

