Poinsettia Puff Stitch Granny Square Crochet Pattern
Beginner Friendly
Perfect for those just starting their crochet journey, with clear instructions and simple techniques
Single-Day Project
A satisfying project you can complete in a single afternoon or evening.
Handmade Gift
A beautiful keepsake — free forever. Read online or print at home.
About This Poinsettia Puff Stitch Granny Square Crochet Pattern
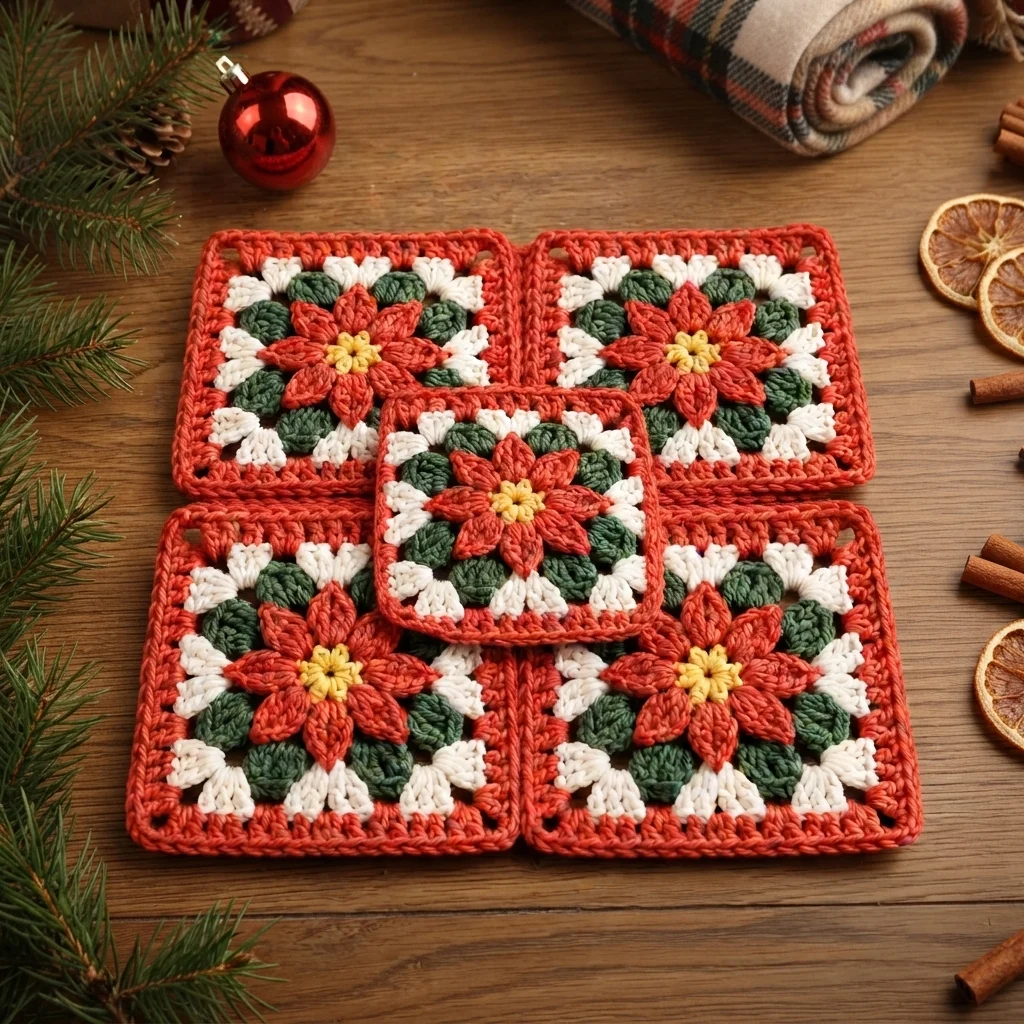
This crochet poinsettia granny square pattern centers a fully layered red poinsettia, 8 sharply pointed petals radiating from a small yellow bobble cluster, over a ring of puffed green and white petal-shaped stitches, all framed by a solid red outer border. Unlike a flat appliqué flower, the poinsettia’s petals and the surrounding puff rounds both carry real dimension, giving the whole square a raised, textured surface rather than a flat printed look.
What makes this design distinctive is the layering of two different dimensional techniques within one small square: the poinsettia petals are worked as individual pointed shapes anchored back to a center ring, while the green and white rounds use puff stitches clustered into rounded, petal-like shapes that read as a secondary ring of foliage behind the flower. That combination of sharp points up front and soft puffed shapes behind is what gives the square its rich, layered holiday look. Expect to spend 2-3 hours per square.
This is an advanced pattern, best suited to someone comfortable with both individually anchored pointed petals and puff stitch clusters within the same small motif, rather than someone wanting a single flat flower square.
Materials
- Worsted weight yarn, deep red ~20g per square, poinsettia petals and border
- Worsted weight yarn, golden yellow ~5g per square, center cluster
- Worsted weight yarn, forest green ~10g per square, puff round
- Worsted weight yarn, cream/white ~10g per square, puff round
- Crochet hook 4.5 mm (US 7)
- Tapestry/yarn needle
- Steam iron and pressing cloth, or blocking mat and pins
- Sharp scissors
Abbreviations
chchainsl stslip stitchscsingle crochethdchalf double crochetdcdouble crochetpuff(yo, insert hook, pull up a loop) 3 times in same st, yo and pull through all 7 loopsMRmagic ringch-spchain spacest(s)stitch(es)reprepeatFOfasten offYellow Center Cluster
- With golden yellow, ch 2. Round 1: 8 sc in 2nd ch from hook, do not join, work in a continuous spiral. (8 sts)
- Round 2: *ch 2, sl st in same st, sl st in next st; rep from * around all 8 sts to form 8 tiny bobble-like points.
- FO leaving a short tail.
Poinsettia Petals
- With deep red, join in any st along the base of the yellow center cluster. Work each of 8 petals individually: ch 6, starting in 2nd ch from hook, sl st, sc 1, hdc 1, dc 1, 2 dc in last ch, then sl st back into the same base point on the yellow center to anchor the petal.
- Repeat this individual petal 8 times total, evenly spaced around the yellow center, sl st between each to keep spacing even.
- FO leaving a short tail. Do not attach to anything yet; this poinsettia unit will be sewn onto the puff rounds after they’re complete.
Green Puff Round
- With forest green, ch 4, sl st in first ch to form a ring. Round 1: *puff in ring, ch 2; rep from * 4 times total (4 puffs). Sl st to join.
- FO leaving a short tail. This small ring of 4 green puffs sits directly behind the poinsettia, in the gaps between the white puffs added next.
White Puff Round
- With cream/white, join in the ch-2 sp between two green puffs from the round above. Round 2: *(puff, ch 1, puff) in next ch-2 sp, ch 1; rep from * around all 4 sps, placing a white puff pair in each gap between green puffs to fill out an 8-puff ring total around the green puffs.
- FO leaving a short tail.
Transition to Square Corners
- With deep red, join at any ch-1 sp from the white puff round. Round 3: ch 3, (2 dc, ch 2, 3 dc) in same sp, *ch 1, 3 dc in next ch-sp, ch 1, (3 dc, ch 2, 3 dc) in next sp 2 repeats later; rep from * around, placing the 4 corner groups evenly to begin shaping the square. Sl st to join, FO.
Red Border
- With deep red, join at any corner. Round 4: ch 3, (2 dc, ch 2, 3 dc) in same sp, *ch 1, 3 dc in next ch-1 sp, ch 1, (3 dc, ch 2, 3 dc) in next corner sp; rep from * around. Sl st to join, FO leaving a short tail.
Assembly
- Center the finished poinsettia unit (yellow center with 8 red petals) on top of the puff-stitch rounds and square border.
- Sew the poinsettia down through its center only, using several small stitches, so the sharply pointed petals stay slightly raised rather than pressed flat against the puffs beneath.
- Check that the green and white puffs remain visible peeking out around the edges of the red petals, as shown in the photo.
Finishing
Weave in all remaining tails on the wrong side of the square. Steam the poinsettia gently from the back only, helping the petals sit flat and pointed without flattening the puff rounds underneath, and avoid pressing the iron directly onto the front. If making multiple squares for a blanket or set, block each one to the same finished size, and repeat the full process for every additional square.
Tips for Success
- Work the poinsettia as its own separate unit first, confirming it lies flat on its own before sewing it onto the puff rounds.
- Keep puff stitch tension consistent between the green and white rounds; overly tight puffs look small and flat compared to looser, fuller ones.
- Space the 8 poinsettia petals evenly around the yellow center, marking every couple of stitches if needed so spacing doesn’t drift by eye alone.
- Sew the poinsettia down through its center only, not around the outer petal tips, so the petals keep some natural lift.
- If making a full set for a blanket, work all the puff-round bases first, then all the poinsettias, to keep tension and sizing consistent across the whole batch.
Common Mistakes to Avoid
- Working puffs too tightly closed loses the puffy, rounded petal look behind the poinsettia. Fix: keep a slightly looser tension on the final yarn-over pull-through of each puff.
- Sewing the poinsettia down around its petal tips instead of just the center flattens the petals against the puffs below. Fix: stitch through the center only, leaving petal tips slightly raised.
- Spacing the 8 petals unevenly around the yellow center looks lopsided on a motif this small. Fix: mark even intervals before anchoring each petal.
- Skipping the transition round between the puff rounds and the square corners leaves the shaping abrupt. Fix: work Round 3 as written to smoothly build toward the square’s 4 corners.
- Losing track of which puff round you’re on, since green and white use a similar structure. Fix: count puffs after each round before moving to the next color.
Ways to Customize This Pattern
- Swap the red poinsettia for white or cream for a winter-white version instead of classic Christmas red.
- Use a single green shade instead of alternating green and white puffs for a simpler, more subdued look.
- Scale the whole square up or down for use as a coaster, ornament, or full blanket unit.
- Add a small gold metallic thread accent to the yellow center for extra sparkle.
- Make a full set of squares in this motif for a matching holiday throw blanket or table runner.
Frequently asked questions
Yes, this square works well on its own as a coaster, mug mat, or even a small hanging ornament if you add a loop at one corner. Make as many as you like and join them only if you want a larger project.
A 4×5 grid of 20 squares at this size produces a throw roughly 65-70 cm x 80 cm; scale the grid up for a larger blanket, keeping each square’s finished size consistent.
This usually means the poinsettia was stitched down around its outer petal edges instead of just the center. Remove any outer stitches and re-attach through the center point only, so the petals can keep some lift.
Puff stitch is what gives those rounds their rounded, petal-like dimension behind the poinsettia. Substituting a flat stitch like sc will still work structurally but will lose much of the textured, layered look shown in the photo.
The finished Poinsettia Puff Stitch Granny Square Crochet Pattern

