Advanced
For experienced crocheters who enjoy complex shaping, fine detail, and ambitious construction
Single-Day Project
A satisfying project you can complete in a single afternoon or evening.
Handmade Gift
A beautiful keepsake — free forever. Read online or print at home.
About This Poppy Granny Square Blanket
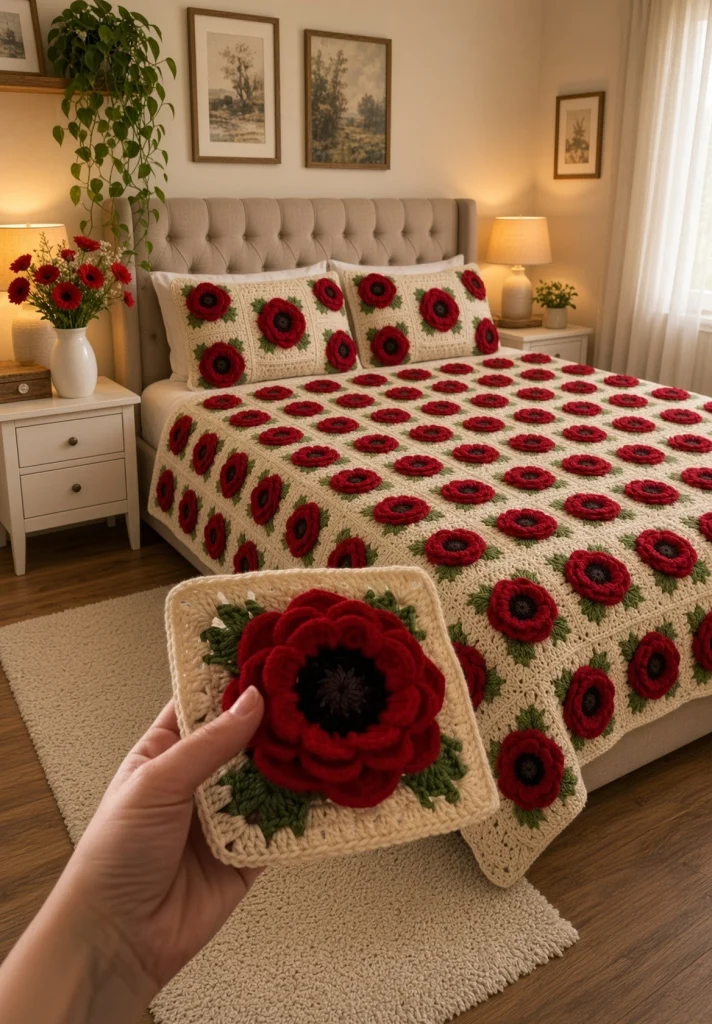
This poppy granny square blanket is built from forty-two cream squares, each one carrying a deep red poppy with three stacked petal layers, a charcoal loop-stitch center and a cluster of green leaves tucked underneath. The flowers are made as separate pieces and sewn on afterwards, which is what gives them that heavy, half-open look instead of the flat flower you get when petals are worked straight into the square. Nothing here is difficult on its own, but there are six components per square and the finished throw asks for patience.
Plan on about an hour per finished square once you find your rhythm — roughly 45 to 55 hours for the whole throw including joining and the shell border. Most people work it in batches: all the squares first, then all the centers, then an assembly-line evening of petal layers. That batching is genuinely faster than finishing one square at a time, and it keeps your tension even across the blanket.
It suits a confident crocheter who is comfortable with granny rounds, working into a magic ring, and sewing pieces together neatly. If you have never done loop stitch, the poppy centers are a gentle place to learn it — eighteen loops per flower, and they get trimmed into a fringe so small irregularities disappear. The result is a dense, warm throw that drapes well despite all the surface texture.
Materials
- Worsted / aran weight yarn in cream approx. 1100 g for 42 squares and border
- Worsted / aran weight yarn in true red approx. 550 g (middle and outer petals)
- Worsted / aran weight yarn in deep burgundy approx. 150 g (inner petals)
- Worsted / aran weight yarn in charcoal approx. 90 g (flower centers)
- Worsted / aran weight yarn in sage or olive green approx. 180 g (leaves)
- Small amount of pale grey yarn or embroidery floss for stamen stitches
- 4.0 mm crochet hook main hook for squares and petals
- 3.5 mm crochet hook for firmer flower centers
- Blunt tapestry needle size 13 or similar
- Stitch markers at least 8, for marking square orientation
- Sharp scissors for trimming the loop-stitch fringe
- Rust-proof pins for blocking squares
Abbreviations
MRmagic ringchchainsl stslip stitchscsingle crochethdchalf double crochetdcdouble crochettrtreble crochetinc2 stitches in the same stitchBLOback loops onlyFLOfront loops onlyloop stloop stitch (see Before you start)st(s)stitch(es)spspacereprepeatskskipPoppy Center (make 42, charcoal, 3.5 mm hook)
- Round 1: 6 sc in MR. (6 sts)
- Round 2: inc in each st around. (12 sts)
- Round 3: (sc in next st, inc in next st) rep 6 times. (18 sts)
- Round 4: BLO sc in each st around. (18 sts) This round pulls the edge up into a shallow cup.
- Round 5: loop st in each st around, holding every loop about 2 cm long and keeping them on the right side of the work. (18 loop sts)
- Sl st in the next st, fasten off and leave a 25 cm tail for sewing.
- Cut every loop open with sharp scissors and trim the resulting fringe down to about 8 mm, so the center reads as a fuzzy dark ring.
- With pale grey yarn, work 8–10 straight stitches from the outer edge of the center toward the middle, scattered unevenly. Keep them short, about 6 mm, so they peek through the charcoal fringe. Weave the grey ends in on the back.
Inner Petal Layer (make 42, deep burgundy, 4.0 mm hook)
- Round 1: 6 sc in MR. (6 sts)
- Round 2: inc in each st around. (12 sts)
- Round 3 (petal round, worked over all 12 sts in pairs): *(sl st, ch 2, 3 dc) in next st, (3 dc, ch 2, sl st) in next st; rep from * 6 times total. (6 petals over 12 sts)
- Fasten off, leaving a 20 cm tail. Each petal is a 6-dc cup about 2 cm tall; press the dc groups toward each other with your fingers so the petal curls inward rather than lying flat.
Middle Petal Layer (make 42, true red, 4.0 mm hook)
- Round 1: 6 sc in MR. (6 sts)
- Round 2: inc in each st around. (12 sts)
- Round 3: (sc in next st, inc in next st) rep 6 times. (18 sts)
- Round 4 (petal round, worked over all 18 sts in pairs): *(sl st, ch 3, 3 dc) in next st, (3 dc, ch 3, sl st) in next st; rep from * 9 times total. (9 petals over 18 sts)
- Fasten off, leaving a 20 cm tail. The ch-3 at each petal base makes this layer taller than the inner one, which is what lets it frame the burgundy petals instead of hiding them.
Outer Petal Layer (make 42, true red, 4.0 mm hook)
- Round 1: 6 sc in MR. (6 sts)
- Round 2: inc in each st around. (12 sts)
- Round 3: (sc in next st, inc in next st) rep 6 times. (18 sts)
- Round 4: (sc in next 2 sts, inc in next st) rep 6 times. (24 sts)
- Round 5 (petal round, worked over all 24 sts in pairs): *(sl st, ch 3, 4 dc) in next st, (4 dc, ch 3, sl st) in next st; rep from * 12 times total. (12 petals over 24 sts)
- Fasten off, leaving a 30 cm tail — this tail sews the whole flower to the square, so keep it generous.
Leaves (make 126 — three per square, green, 4.0 mm hook)
- Ch 9.
- Working into the back bumps of the chain, starting in the 2nd ch from hook: sc in next ch, hdc in next ch, dc in next 2 ch, hdc in next ch, sc in next ch. (6 sts worked, 1 ch remains)
- Tip: (sc, ch 2, sc) all in the last ch.
- Continue along the opposite side of the foundation chain: sc in next ch, hdc in next ch, dc in next 2 ch, hdc in next ch, sc in next ch. (6 sts on the second side)
- Sl st into the first sc of the leaf to close. (14 sts total plus the ch-2 tip)
- Fasten off, leaving a 15 cm tail. Do not weave in — the tail sews the leaf down.
- Optional but worth it: with the same green, work a line of surface slip stitches up the center of each leaf from base to tip for a visible vein.
Background Granny Square (make 42, cream, 4.0 mm hook)
- Round 1: into a MR work ch 3 (counts as first dc), 2 dc, ch 2, (3 dc, ch 2) 3 times; join with sl st to top of ch 3. Pull the ring closed. (12 dc, 4 ch-2 corner sps)
- Round 2: sl st into the nearest ch-2 corner sp. Ch 3, 2 dc in same sp, ch 2, 3 dc in same sp; then (3 dc, ch 2, 3 dc) in each of the next 3 corner sps; join to top of ch 3. (24 dc, 4 corners)
- Round 3: sl st into next corner sp. (Ch 3, 2 dc, ch 2, 3 dc) in that corner sp; *3 dc in the next side sp, (3 dc, ch 2, 3 dc) in the next corner sp; rep from * around, ending with 3 dc in the last side sp; join. (36 dc — 4 corners of 6 dc plus one 3-dc group per side)
- Round 4: sl st into next corner sp. (Ch 3, 2 dc, ch 2, 3 dc) in that corner sp; *3 dc in each of the next 2 side sps, (3 dc, ch 2, 3 dc) in the next corner sp; rep from * around, ending with 3 dc in each of the last 2 side sps; join. (48 dc)
- Round 5: sl st into next corner sp. (Ch 3, 2 dc, ch 2, 3 dc) in that corner sp; *3 dc in each of the next 3 side sps, (3 dc, ch 2, 3 dc) in the next corner sp; rep from * around, ending with 3 dc in each of the last 3 side sps; join. (60 dc — 15 dc per side)
- Round 6: ch 1, sc in each dc around, working (sc, ch 2, sc) in each ch-2 corner sp; join with sl st to first sc. (68 sc and 4 ch-2 corner sps — 17 sc per side between corner spaces)
- Fasten off and weave in both ends properly now. Once the flower is on top you will not want to be hunting for loose tails.
- Block each square to 14–15 cm square before assembly. Wet-blocking the squares flat is what keeps the finished blanket from going lopsided under the weight of the flowers.
Assembling One Poppy Square
- Lay a blocked cream square right side up. Find the center by folding it corner to corner twice and marking the middle with a pin.
- Position three leaves around the center pin like a loose fan — one pointing to about 10 o’clock, one to 2 o’clock, one to 6 o’clock — with their bases about 2 cm from the center so the tips reach roughly halfway to the square’s edge. Pin them.
- Sew each leaf down with its own tail, using small whip stitches along the two long sides only. Leave the tip free so it lifts off the square slightly. Weave ends into the back of the square.
- Center the outer petal layer over the leaf bases. Sew it down through the flat MR center of the layer only, using about 8 stitches in a small circle roughly 1.5 cm across — never stitch through the petals, or they flatten.
- Center the middle petal layer on top, rotated so its petals sit in the gaps between the outer petals. Sew through its flat center with 6–8 stitches.
- Center the inner burgundy layer on top, again rotated to offset the petals. Sew through its flat center with 6 stitches.
- Place the charcoal center over the hole in the middle and sew it down all the way around its Round 4 edge with small whip stitches, catching only the base of the burgundy layer so the stitching disappears under the fringe.
- Turn the square over. Weave every remaining tail into the back of the granny square, running tails in two different directions before cutting so the flower cannot work loose.
- Repeat for all 42 squares.
Joining the Squares
- Lay the squares out 6 across and 7 down. Rotate squares as needed so the leaf fans do not all point the same way — a quarter-turn on every second square looks more natural.
- Mark the top edge of every square with a stitch marker before you move anything, so the layout survives being carried across the room.
- Join with cream and the 4.0 mm hook using a flat slip-stitch seam: hold two squares wrong sides together, insert the hook through the back loop of the near square and the back loop of the far square at the same time, and sl st across all 17 sc plus one sl st into each corner ch-2 sp. (19 sl sts per seam)
- Join all squares into 7 horizontal rows of 6 first. Fasten off and weave in at the end of each seam.
- Then join the 7 rows to each other in the same way, working one long seam per row junction (6 squares × 19 sl sts = 114 sl sts per long seam). Work 1 extra sl st where two seams meet to keep the junction from pulling.
- Press the seams gently from the back with a cool iron over a damp cloth. Do not touch the flowers with the iron.
Border
- Round 1: join cream in any corner ch-2 sp. Ch 1, work (sc, ch 2, sc) in that sp, then sc evenly around the whole blanket — 17 sc across each square edge and 1 sc into each joining seam — with (sc, ch 2, sc) in each of the 4 outer corner sps. Join to first sc. (Short sides: 6 squares = 107 sc. Long sides: 7 squares = 125 sc.)
- Round 2: ch 1, sc in each sc around, working (sc, ch 2, sc) in each corner sp. On this round, add or skip one stitch per side as needed so each side ends on a multiple of 6 — short sides to 108, long sides to 126. Join to first sc.
- Round 3 (shells): ch 1, sc in first st, *sk 2 sts, 5 dc in next st, sk 2 sts, sc in next st; rep from * along the side, working (sc, ch 2, sc) in each corner sp and beginning each new side with a sc. (18 shells per short side, 21 shells per long side)
- Join with sl st to the first sc. Fasten off and weave in the ends along the inside of the shells where they will not show.
Finishing
Give the finished blanket one last check from the back: run your hand over every square and look for a tail that was only woven in one direction. Those are the ones that reappear after the first wash. Anywhere a flower center feels loose, add four or five extra stitches through the charcoal ring — it is much easier to do now than after the blanket has been used.
Block the whole throw flat one final time. Soak it in cool water with a little wool wash, press out the water between towels without wringing, then lay it out on a bed or a clean floor and pin the border shells into gentle points. Let the flowers sit face up and undisturbed, and fluff each charcoal fringe with your fingertips while the yarn is still damp. Drying takes a day or two because of the density; a fan in the room speeds it up. Once dry, the squares will hold their shape and the poppies will stand proud of the cream background exactly as they should.
Tips for Success
- Work the charcoal centers on a 3.5 mm hook even though everything else is 4.0 mm. A tighter fabric there stops the loop-stitch fringe from splaying and keeps the center a crisp dark circle rather than a floppy disc.
- Rotate each petal layer before sewing so its petals fall into the gaps of the layer below. If all three layers line up, the flower looks like a three-petal shape from a distance instead of a full poppy.
- Batch your work: make all 42 squares, then all 42 centers, then each petal layer in turn. Tension drifts far less when you repeat the same round many times in a row, and that consistency shows across a blanket this size.
- Sew petal layers down only through their flat magic-ring centers. Every stitch you place out toward a petal pins that petal flat and kills the 3D effect.
- Keep a single square from your first batch as a reference. Before you start each new batch, compare the fresh square against it and adjust your hook size by half a step if your tension has crept.
Common Mistakes to Avoid
- Flowers that overflow the square. This happens when the petal layers are worked loosely. If your outer layer measures more than 12 cm across, drop to a 3.5 mm hook for all petal layers rather than making the squares bigger.
- Wavy or cupped granny squares. Too many stitches in the Round 6 sc round causes ruffling; too few causes cupping. Count 17 sc per side between the corner spaces — not “about” 17 — and block before joining.
- Loop stitches of uneven length. Wrap around the same finger every time and keep the loop consistent at roughly 2 cm. If a few are off, trim the whole fringe after cutting rather than fixing individual loops.
- Joining seams that pucker at the junctions. When four square corners meet, work one extra slip stitch into the meeting point and keep your joining tension deliberately loose — slip-stitch seams tighten as you go without you noticing.
- Leaves sewn down flat along their whole outline. Stitch only the two long sides and leave the tip loose; otherwise the leaves read as green patches instead of foliage sitting under the flower.
Ways to Customize This Pattern
- Change the petal palette square by square — coral, dusty rose and plum alongside the red — while keeping the charcoal centers and cream background. The repetition of the center and square is what holds a mixed-color version together.
- Work a scattered layout: put poppies on only every second square and leave the alternating squares plain cream. This halves the flower-making time and gives the throw a lighter, airier look.
- Swap the cream background for deep charcoal or forest green. Red poppies on a dark ground are dramatic, and the green leaves need to shift to a lighter sage to stay visible.
- Make a smaller version: 4 × 5 squares gives a pram or lap blanket of about 60 × 75 cm in roughly 12 hours, with the same border worked over 72 and 90 stitches per side.
- Add a fourth petal layer worked over 30 stitches (Round 5: sc in next 3 sts, inc in next st, repeated 6 times; Round 6: 15 petals over 30 sts) for an even fuller, more open poppy on the central squares only.
Frequently asked questions
Each sham front is 6 squares joined 3 across and 2 down, which comes to about 45 × 30 cm and fits a standard pillow. Work a plain cream back in rows of half double crochet to the same measurement, join three sides with the same slip-stitch seam, and finish the open end with the shell border so the pillow slides in. You need 6 extra squares, 6 flowers and 18 leaves per sham.
Squares finish at about 15 cm including the join. For a double-bed coverlet of roughly 180 × 210 cm you need 12 across by 14 down, which is 168 squares. For a single bed at about 120 × 195 cm, work 8 across by 13 down, or 104 squares. Add two extra skeins of cream for every 40 squares beyond the 42 in this pattern.
Yes, if you used a superwash or acrylic yarn and wove your tails in properly. Wash on a cool, gentle cycle inside a duvet cover or large laundry bag so the petals do not catch, and dry flat. Avoid the tumble dryer — the heat flattens the petal layers and they never fully recover their shape.
Almost always one of two things. Either the petal layers were sewn down too far out from the center, which pins them open, or the three layers are too close in size. Check that your inner layer is about 6 cm across, the middle about 9 cm, and the outer about 11 cm. If they are nearly the same size, your tension is too tight on the outer layers — go up to a 4.5 mm hook for the outer petal round only.
The finished Poppy Granny Square Blanket

