Pumpkin and Scattered Leaves Table Runner Crochet Pattern
Beginner Friendly
Perfect for those just starting their crochet journey, with clear instructions and simple techniques
Single-Day Project
A satisfying project you can complete in a single afternoon or evening.
Handmade Gift
A beautiful keepsake — free forever. Read online or print at home.
About This Pumpkin and Scattered Leaves Table Runner Crochet Pattern
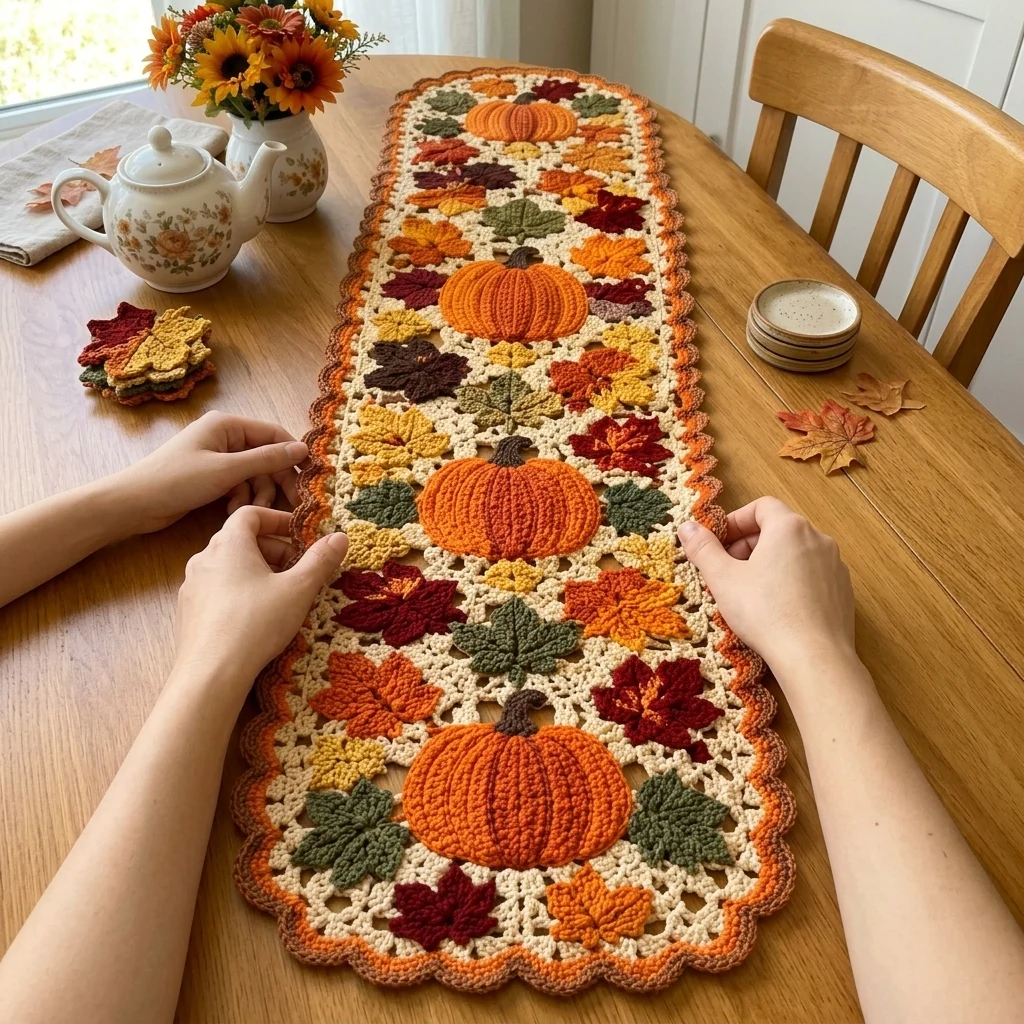
This crochet pumpkin table runner pattern centers three fully stuffed, dimensional pumpkins down an open lace mesh base, each one surrounded by a loose ring of small maple leaves in rust, gold, burgundy, olive, and brown. Unlike a flat applique pumpkin, these are worked as real 3D amigurumi-style shapes with visible ribbing, so they sit up off the surface as clear focal points against the flat, scattered leaves and open mesh around them.
What makes this design distinctive is the contrast between the two main elements: the pumpkins are solid, stuffed, and richly ribbed, while the mesh base and leaves stay completely flat, so the piece reads as three sculptural centerpieces set into a light, lacy background rather than a uniform flat panel. The leaves are scattered loosely around each pumpkin rather than following a strict grid, which is what gives the background its natural, falling-leaves look. Expect to spend 22-26 hours total across the mesh base, 3 stuffed pumpkins, and roughly 30 scattered leaves.
This is an advanced pattern, best suited to someone comfortable combining stuffed dimensional amigurumi work with a flat lace mesh background in the same piece, rather than someone wanting a single flat technique throughout.
Materials
- DK weight cotton yarn, cream ~180g, mesh base
- Worsted weight yarn, orange ~90g, 3 pumpkins
- Worsted weight yarn, brown ~20g, pumpkin stems
- DK weight yarn, rust orange ~30g, leaves
- DK weight yarn, mustard gold ~30g, leaves
- DK weight yarn, burgundy wine ~25g, leaves
- DK weight yarn, olive green ~25g, leaves
- DK weight yarn, dark brown ~20g, leaves
- DK weight yarn, orange (2 shades for ombre border) ~50g, border
- Fiberfill stuffing ~90g total, for 3 pumpkins
- Crochet hook, small 3.5 mm (US E/4), for mesh
- Crochet hook, larger 4 mm (US G/6), for pumpkins
- Tapestry/yarn needle
- Steam iron and pressing cloth, or blocking mat and pins
- Straight pins, for positioning pieces before sewing
- Sharp scissors
Abbreviations
chchainsl stslip stitchscsingle crochethdchalf double crochetdcdouble crochettrtreble/triple crochetFPdcfront post double crochetBPdcback post double crochetMRmagic ringincincrease (2 sc in one st)decdecrease (sc2tog)ch-spchain spacest(s)stitch(es)reprepeatFOfasten offFilet Mesh Base
- With cream and the smaller hook, ch 61. Row 1: dc in 6th ch from hook, *ch 1, skip 1 ch, dc in next ch; rep from * across. 19 mesh squares.
- Row 2: ch 4 (counts as dc + ch-1), turn, dc in next dc, *ch 1, dc in next dc; rep from * across, ending dc in top of turning ch. 19 squares maintained.
- Rep Row 2 until the piece measures approximately 90 cm long, keeping the 19-square width consistent throughout.
- FO after the final row, leaving a long tail for the edging join.
Rounded Corner Shaping and Scalloped Ombre Border
- With cream, join at one corner of the mesh panel. Round 1: sc evenly around the entire panel, working extra sc sts at each corner to round it into a soft, gently curved rectangle rather than sharp corners.
- Round 2, with lighter orange: sc in each st around, continuing the curved corner shaping.
- Round 3, with darker orange (scallop round): *sk 2 sts, 5 dc in next st, sk 2 sts, sl st in next st; rep from * evenly around the entire panel, adjusting slightly at the rounded corners so scallops stay even in size.
- Join with sl st to first st and FO. Weave in all ends.
Stuffed Pumpkin (make 3, in orange, with larger hook)
- Round 1: 6 sc in MR. (6 sts)
- Round 2: inc in each st around. (12 sts)
- Round 3: *sc 1, inc; rep from * around. (18 sts)
- Round 4: *sc 2, inc; rep from * around. (24 sts)
- Round 5: *sc 3, inc; rep from * around. (30 sts)
- Round 6: switch to alternating FPdc/BPdc columns to begin ribbing. (30 sts)
- Rounds 7-9: continue working FPdc over FPdc sts and BPdc over BPdc sts from the round below, maintaining ribbed columns and 30 sts.
- Round 10: *sc 3, dec; rep from * around. (24 sts)
- Round 11: *sc 2, dec; rep from * around. (18 sts) Begin stuffing firmly.
- Round 12: *sc 1, dec; rep from * around. (12 sts)
- Round 13: dec around. (6 sts) Finish stuffing to firm and even.
- FO, leaving a long tail. Thread through remaining 6 sts, pull tight to close, and secure. Repeat for 3 pumpkins total.
Pumpkin Stem (make 3, in brown)
- Round 1: 6 sc in MR. (6 sts)
- Rounds 2-5: sc around even. (6 sts)
- FO, leaving a long tail for attaching to the top of each pumpkin. Lightly stuff each stem before attaching. Repeat for 3 total.
Maple Leaf Motif (make approximately 30: mix of rust, gold, burgundy, olive, and dark brown)
- Ch 4, sl st in first ch to form a small foundation ring.
- Lobe 1, top center: ch 10. Starting in 2nd ch from hook: sl st, sc 2, hdc 2, dc 2 (8 sts). Sl st into ring.
- Lobe 2, upper right: ch 8. Starting in 2nd ch from hook: sl st, sc 2, hdc 2, dc 1 (7 sts). Sl st into ring.
- Lobe 3, lower right: ch 5. Starting in 2nd ch from hook: sl st, sc 2, hdc 1 (4 sts). Sl st into ring.
- Lobe 4, lower left: repeat Lobe 3 exactly. Sl st into ring.
- Lobe 5, upper left: repeat Lobe 2 exactly. Sl st into ring.
- Sl st into base of Lobe 1 to close. FO leaving a 10-15 cm tail for attaching. Repeat for approximately 30 leaves total, mixing all 5 colors evenly.
Blocking the Leaves and Base
- Steam-block the mesh base and border flat, pinning the corners into a clean, gently curved shape.
- Steam and pin each leaf flat with all 5 lobes spread evenly. Let dry completely before assembly.
Assembly
- Attach a stem to the top of each finished pumpkin, sewing firmly around the base so it stands upright.
- Position the 3 pumpkins evenly spaced down the center line of the blocked mesh base, and pin.
- Sew each pumpkin down firmly through its base into the mesh below.
- Scatter 8-10 leaves loosely around each pumpkin, mixing colors so no two touching leaves match, and pin.
- Sew each leaf down at its base into the mesh, angling leaves in different directions rather than pointing them all the same way.
Finishing
Once every pumpkin and leaf is attached, turn the runner over and check for any leaf held by only a single stitch; add a second point wherever a leaf feels loose. Weave in all remaining tails. Give the whole runner a final light steam, keeping the pumpkins’ ribbing and stuffing undisturbed, and let it dry completely before moving it to the table.
Tips for Success
- Stuff each pumpkin firmly and evenly; soft spots are much more visible on a ribbed surface than a plain smooth one.
- Keep FPdc and BPdc columns stacked directly over the same stitches round after round; drifting columns blur the ribbed effect.
- Scatter leaves loosely around each pumpkin rather than in a tidy ring; overlapping a few and leaving small gaps elsewhere looks more natural.
- Mix all 5 leaf colors within each pumpkin’s cluster rather than grouping by color, so no section of the runner reads as one solid shade.
- Block the mesh base and border before attaching pumpkins and leaves, so the whole background sits flat and even underneath everything else.
Common Mistakes to Avoid
- Understuffing the pumpkins makes the ribbing look saggy instead of taut. Fix: stuff firmly in small amounts throughout the decrease rounds, not all at once at the end.
- Placing leaves in a strict, even ring around each pumpkin looks mechanical rather than naturally scattered. Fix: vary spacing and let some leaves overlap slightly.
- Skipping the corner rounding on the mesh base leaves sharp, awkward corners under the scalloped border. Fix: add the extra sc sts at each corner during Round 1 as instructed.
- Sewing pumpkins on before blocking the mesh base causes the background to distort once steamed later. Fix: block the plain mesh and border first, then attach pumpkins and leaves.
- Clustering all 5 leaf colors in separate sections instead of mixing them around each pumpkin breaks the blended, scattered look. Fix: distribute colors evenly within each leaf cluster.
Ways to Customize This Pattern
- Reduce to 2 pumpkins for a shorter runner suited to a smaller table.
- Make the pumpkins in varying sizes, one larger and two smaller, for added visual interest.
- Swap the orange pumpkins for cream or sage green for a different seasonal palette.
- Reduce leaf density around each pumpkin for a lighter, more minimal background.
- Add a few small crocheted acorns scattered among the leaves for extra texture.
Frequently asked questions
Yes, firm and even stuffing matters here since the ribbing relies on taut fabric to show clearly. Stuff in small amounts throughout the decrease rounds rather than all at once at the end for the best shape.
Around 30 leaves total, roughly 8-10 per pumpkin, covers a scattered look similar to the photo. Add more if you want denser clusters, or fewer for a more minimal, airy background.
Yes, a single orange shade throughout the border still looks complete and finished. The two-tone ombre is a decorative detail rather than a structural requirement.
This usually means the FPdc and BPdc columns aren’t lining up round to round. Check that each post stitch is worked directly around the post of the same-type stitch from the previous round, not shifted over by one.
The finished Pumpkin and Scattered Leaves Table Runner Crochet Pattern

