Pumpkin and Sunflower Lace Table Runner Crochet Pattern
Beginner Friendly
Perfect for those just starting their crochet journey, with clear instructions and simple techniques
Single-Day Project
A satisfying project you can complete in a single afternoon or evening.
Handmade Gift
A beautiful keepsake — free forever. Read online or print at home.
About This Pumpkin and Sunflower Lace Table Runner Crochet Pattern
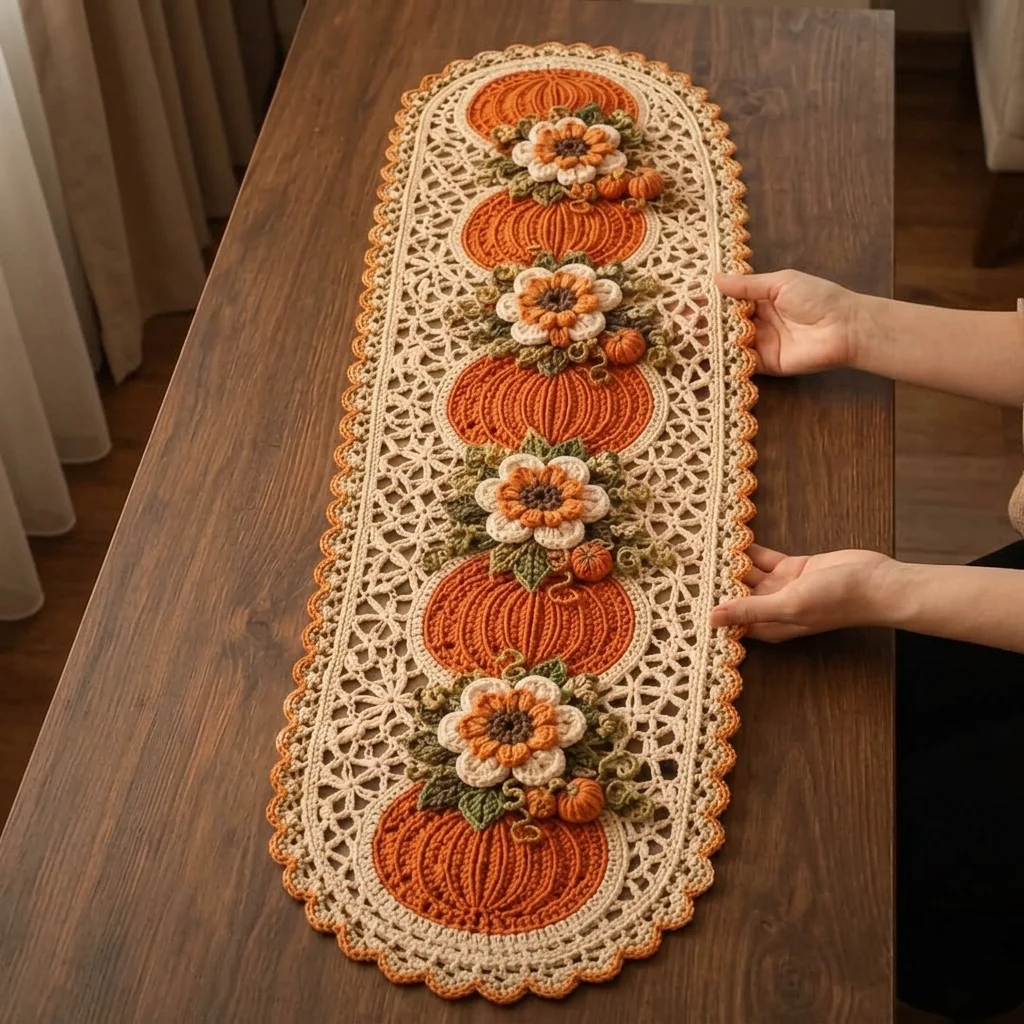
This crochet pumpkin sunflower table runner pattern layers two very different techniques on one oval base: an open, star-stitch lace mesh worked in cream, topped with four flat crocheted pumpkins in rust orange and four fully dimensional layered sunflowers with curled tendrils and tiny bobble pumpkins tucked underneath each bloom. The whole piece is framed by a scalloped double-round border in cream and rust.
What makes this design distinctive is the contrast in dimension: the lace base stays completely flat and airy, the pumpkins sit nearly flat with just enough ribbing to read as pumpkins, and the sunflowers are worked with two full rounds of petals plus a domed center, so they rise clearly off the surface between each pumpkin. That layering, flat lace, flat pumpkin, raised flower, repeating down the runner, is what gives it its rich, dimensional look. Expect to spend 20-24 hours total across the lace base, 4 pumpkins, 4 sunflowers, and all the small leaf and tendril details.
This is an advanced pattern, best suited to someone comfortable combining openwork lace with dimensional applique motifs, rather than someone tackling their first multi-technique project.
Materials
- DK weight cotton yarn, cream ~200g, lace base and border
- DK weight yarn, rust orange ~100g, pumpkins and border accent
- DK weight yarn, burnt orange ~40g, sunflower outer petals
- DK weight yarn, pale gold ~30g, sunflower inner petals
- DK weight yarn, dark brown ~15g, sunflower centers
- DK weight yarn, olive green ~40g, leaves and tendrils
- Small amount of rust orange yarn for bobble mini pumpkins
- Crochet hook, small 3 mm (US C/2), for lace base
- Crochet hook, larger 4 mm (US G/6), for pumpkins and flowers
- Tapestry/yarn needle
- Steam iron and pressing cloth, or blocking mat and pins
- Straight pins, for positioning motifs before sewing
- Sharp scissors
Abbreviations
chchainsl stslip stitchscsingle crochethdchalf double crochetdcdouble crochettrtreble/triple crochetMRmagic ringch-spchain spaceincincrease (2 sc in one st)decdecrease (sc2tog)st(s)stitch(es)reprepeatFOfasten offLace Mesh Base
- With cream and the smaller hook, ch 61. Row 1: dc in 6th ch from hook, *ch 2, skip 2 ch, dc in next ch; rep from * across. 19 ch-2 spaces.
- Row 2: ch 5, turn, dc in first dc, *ch 2, dc in next dc; rep from * across, ending with dc in top of turning ch. 19 spaces maintained.
- Row 3 (star lace row): ch 4, turn, *sc in next ch-2 sp, ch 3, dc in same sp, ch 3, sc in same sp; rep from * across to form a row of small star clusters. Maintain 19 clusters across.
- Rep Rows 2-3 alternately until the piece measures approximately 85 cm long, ending on a Row 2.
- FO after the final row, leaving a long tail for the edging join.
Oval Shaping and Border
- With cream, join at one short end of the lace panel. Round 1: sc evenly around the entire panel, working 3-4 extra sc at each short end curve to shape it into a rounded oval rather than a flat rectangle.
- Round 2 (rust orange): ch 1, sc in each st around, continuing the curve shaping at both ends. Join and FO rust.
- Round 3 (cream, scallop round): *sk 2 sts, 5 dc in next st, sk 2 sts, sl st in next st; rep from * evenly around the entire oval, adjusting slightly at the curved ends so scallops stay even.
- Join with sl st to first st and FO. Weave in all ends.
Pumpkin Motif (make 4, in rust orange, worked flat)
- Round 1: 6 sc in MR. (6 sts)
- Round 2: inc in each st around. (12 sts)
- Round 3: *sc 1, inc; rep from * around. (18 sts)
- Round 4: *sc 2, inc; rep from * around. (24 sts)
- Round 5: *sc 3, inc; rep from * around. (30 sts)
- Round 6 (ribbing row, worked in back loops only): sc in each st around through the back loop only to create a raised ridge that reads as pumpkin ribbing once flattened. (30 sts)
- Round 7: sc around even, working through both loops normally now. (30 sts)
- Sl st to close, FO leaving a short tail for attaching. The piece stays nearly flat with a raised center ridge, rather than being stuffed.
Sunflower Motif (make 4)
- With dark brown, 8 sc in MR. Sl st to join and FO, leaving a short tail. This is the flat center.
- With pale gold, join in any st of the brown center. Round 1 (inner petals): *ch 2, dc 3 in next st, ch 2, sl st in same st; rep from * around all 8 sts. 8 petals.
- With burnt orange, join in a base st between two inner petals. Round 2 (outer petals): *ch 3, dc 4 in next base st, ch 3, sl st in same st; rep from * around. 8 larger petals layered behind the first set.
- FO leaving a short tail. Fold outer petals slightly back so the two colors and layers separate visually.
Leaves (make 16, in olive green)
- Ch 8. Starting in 2nd ch from hook: sl st in next ch, sc in next 2 ch, hdc in next 2 ch, dc in next 2 ch, 3 dc in last ch.
- Continue down the other side: dc in next 2 ch, hdc in next 2 ch, sc in next 2 ch, sl st in last ch.
- FO leaving a short tail. Repeat for 16 leaves total, 4 per sunflower.
Curlicue Tendrils (make 8, in olive green)
- Ch 12. Starting in 2nd ch from hook: 3 hdc in each ch across the entire chain.
- FO leaving a short tail. The extra stitches per chain make the strip curl naturally into a spiral.
- Repeat for 8 tendrils total, 2 per sunflower cluster.
Mini Bobble Pumpkins (make 8, in rust orange)
- 4 sc in MR. Do not join.
- Pull the MR tail to close tightly, then sl st into the first sc to close the round into a small tight bobble.
- FO leaving a short tail for attaching. Repeat for 8 total, 2 tucked under each sunflower.
Assembly
- Position the 4 pumpkins evenly down the center of the lace panel, spaced to leave room for a sunflower cluster between each pair, and pin in place.
- Position the 4 sunflowers between the pumpkins, alternating down the runner as shown in the photo, and pin.
- Sew each pumpkin down firmly around its outer edge through the lace base.
- Sew each sunflower down through its center only, so the petal layers stay slightly raised off the surface.
- Tuck and tack 4 leaves around the base of each sunflower, and tie or tack 2 curled tendrils and 2 mini bobble pumpkins near each sunflower’s base, angling them outward as shown in the photo.
Finishing
Once every motif is sewn in place, steam-block the entire runner face-down on a towel, gently opening the star lace clusters so the mesh sits even and flat. Reshape the scalloped border by hand while it’s still slightly damp, and let the whole piece dry completely flat before moving it to the table. Because the pumpkins and flowers sit on top rather than stuffed, this runner packs and stores flat between uses.
Tips for Success
- Pin all 4 pumpkins and 4 sunflowers in place before sewing anything down; it’s much easier to adjust spacing while pieces are only pinned.
- Work the lace base with a smaller hook than the motifs; a looser lace stretches out of shape under the weight of the sewn-on pieces.
- Keep the pumpkin’s back-loop-only ridge round consistent in tension; too tight and the ridge disappears, too loose and it looks sloppy rather than defined.
- Curl tendrils around a pencil right after finishing them for a tighter, more even spiral.
- Block the plain lace base on its own before attaching any motifs; a pre-blocked flat base makes positioning far more accurate.
Common Mistakes to Avoid
- Sewing pumpkins and sunflowers on before blocking the lace base causes the mesh to distort once steamed later. Fix: block the plain base and border first, then applique the motifs.
- Working the star lace clusters unevenly leaves visible gaps in the mesh. Fix: keep the same number of chains and stitches in every cluster across each row.
- Sewing the sunflower down around its outer edge flattens the petal layers. Fix: stitch through the center only so the petals stay raised and separated.
- Placing all 4 pumpkins and flowers at exactly equal spacing looks stiff on an oval shape. Fix: leave slightly more space at the wider middle of the oval than near the tapered ends.
- Skipping the border’s extra stitches at the curved ends leaves the oval pointed instead of rounded. Fix: add the extra sc sts at each end as instructed during the sc rounds.
Ways to Customize This Pattern
- Reduce to 2 pumpkins and 2 sunflowers for a shorter dresser-scarf-length runner.
- Swap the sunflower colors for deep red and gold to shift the look toward a more traditional autumn palette.
- Work the pumpkin motifs in a solid neutral and skip the sunflowers for a quieter, texture-only version.
- Add a fifth pumpkin-and-sunflower pair for a longer runner on an extended table.
- Scale the whole piece down with a finer cotton thread and smaller hook for a doily-sized version.
Frequently asked questions
No. Unlike a fully dimensional amigurumi pumpkin, these motifs are worked flat with just a back-loop ridge round for texture, so the finished runner stays thin enough to fold and store flat.
You can, but the finished look will read as plainer and less textured than the photo. If you do substitute, keep the same overall row gauge so your motif spacing still lines up correctly.
The lace base needs to stay firm enough to support the weight of eight sewn-on motifs without sagging. A smaller hook keeps the mesh denser, while the larger hook keeps the pumpkins and flowers appropriately scaled and not too tight.
Sew through the center only, never through the outer petal tips, and avoid pressing directly on the flowers when steam-blocking. This keeps the two petal layers separated and slightly domed long after the runner is finished.
The finished Pumpkin and Sunflower Lace Table Runner Crochet Pattern

