Purple Iris Crochet Table Runner Pattern
Advanced
For experienced crocheters who enjoy complex shaping, fine detail, and ambitious construction
Weekend Project
A satisfying weekend make — start Friday, finish Sunday, enjoy forever.
Handmade Gift
A beautiful keepsake — free forever. Read online or print at home.
About This Purple Iris Crochet Table Runner Pattern
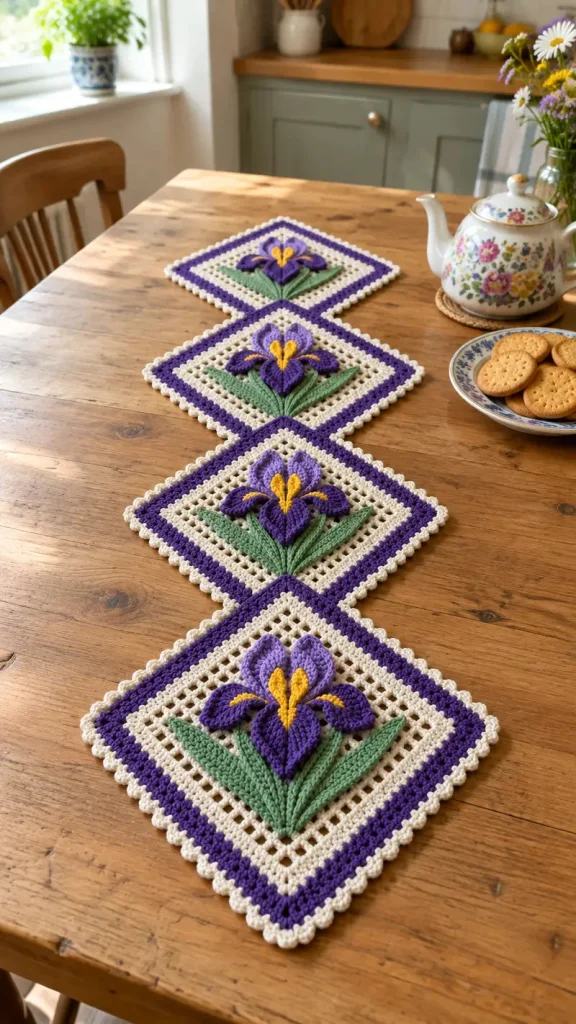
This iris crochet table runner pattern combines four cream mesh squares with deep purple borders, delicate cream picots, and raised iris flowers. Each square sits on its point, with layered violet petals, golden embroidered markings, and long green leaves arranged above the lower corner.
Allow approximately 18–24 hours for the crochet, embroidery, blocking, and assembly. This advanced project suits crocheters who enjoy detailed appliqué and careful finishing. The flowers are separate, unstuffed pieces; their overlapping edges create the depth seen in the reference.
Materials
- Smooth sport-weight cotton Approximately 125 m per 50 g; cream 150 g, deep purple 100 g, lavender 50 g, leaf green 75 g, golden yellow 15 g
- Crochet hooks 3.0 mm for squares; 2.5 mm for appliqués
- Tapestry needle and fine embroidery needle For seams, veins, and flower markings
- Stitch markers, scissors, ruler, and blocking equipment Use rustproof pins and a flat blocking surface
Abbreviations
chchainscsingle crochet, US terminologysl stslip stitchinc2 sc in the same stitchdecSingle crochet 2 stitches togetherst / stsstitch / stitchesGauge, Dimensions, and Construction
- Mesh gauge with the 3.0 mm hook: 18 stitch positions and 18 rows per 10 cm after blocking. A position is either one sc or one ch-1 space. Measure across the interior rather than the foundation edge.
- Appliqué gauge with the 2.5 mm hook: approximately 24 sc and 28 rows per 10 cm. Work firmly enough to hold the petal shapes without making them stiff.
- Each bordered square should block to approximately 20 × 20 cm. Its diagonal is approximately 28 cm. Four squares joined with small corner overlaps produce a runner approximately 110 × 28 cm.
- Make four squares, twenty petals, twelve leaves, four stems, and eight golden throat pieces. All pieces remain flat and unstuffed. Turning chains never count as stitches; joining slip stitches never count either.
Cream Mesh Panels — Make 4
- Foundation: with cream and the 3.0 mm hook, ch 30.
- Row 1: sc in the second chain from the hook and every remaining chain. Turn. 29 sc.
- Row 2: ch 1, sc in the first st; repeat (ch 1, skip 1 st, sc in the next st) 14 times. Turn. 15 sc and 14 ch-1 spaces; 29 positions.
- Rows 3–29: ch 1, sc in the first sc; repeat (ch 1, skip the next ch-1 space, sc in the next sc) 14 times. Turn after each row except Row 29. Each row has 15 sc and 14 ch-1 spaces; 29 positions.
- Mark the four corner positions. Keep cream attached. The panel has 29 positions across each horizontal edge and 29 row ends down each vertical edge.
Square Borders — Work on Each Panel
- Round 1, cream: ch 1. At each marked corner work (sc, ch 2, sc). Between corners work 27 sc: one into each intervening stitch or space along horizontal edges, and one into each intervening row end along vertical edges. Join to the first sc with a sl st. 116 sc and four ch-2 corners; 29 sc per side between corner spaces.
- Round 2, cream: ch 1, sc in every sc and work (sc, ch 2, sc) in every corner space. Join. 124 sc and four ch-2 corners; 31 sc per side. Fasten off.
- Round 3, deep purple: join in any corner space, ch 1. Work (sc, ch 2, sc) in each corner and sc in every sc. Join. 132 sc and four ch-2 corners; 33 sc per side.
- Round 4, deep purple: repeat the previous round. 140 sc and four ch-2 corners; 35 sc per side. Fasten off.
- Round 5, cream: join in a corner space, ch 1. Work (sc, ch 2, sc) in each corner and sc in every sc. Join. 148 sc and four ch-2 corners; 37 sc per side.
- Round 6, cream picots: sl st into the next corner space. For each side, work (sc, ch 3, sl st in the third chain from the hook, sc) in its starting corner space; then repeat (sc in the next st, ch 3, sl st in the third chain from the hook, sc in the next st) 18 times, and sc in the final side st. Repeat around all four sides and join to the first sc. 156 sc and 76 picots, including four corner picots. Fasten off.
- Wet-block each square to 20 × 20 cm. Pin the corners square and open the picots gently without stretching the mesh into long rectangles.
Upright Lavender Petals — Make 8
- Use lavender and the 2.5 mm hook. Leave a 20 cm starting tail for assembly. Ch 2.
- Row 1: 2 sc in the second chain from the hook. Turn. 2 sts.
- Row 2: ch 1, inc in both sts. Turn. 4 sts.
- Row 3: ch 1, inc, sc in the next 2 sts, inc. Turn. 6 sts.
- Row 4: ch 1, inc, sc in the next 4 sts, inc. Turn. 8 sts.
- Rows 5–9: ch 1, sc in each st. Turn. 8 sts per row.
- Row 10: ch 1, dec, sc in the next 4 sts, dec. Turn. 6 sts.
- Row 11: ch 1, dec, sc in the next 2 sts, dec. Turn. 4 sts.
- Row 12: ch 1, dec twice. Turn. 2 sts.
- Row 13: ch 1, dec. 1 st. Fasten off and weave in this finishing tail. The narrow starting end is the base; the final stitch is the tip. Each petal measures approximately 3.3 × 4.6 cm.
Deep Purple Side Petals — Make 8
- With deep purple and the 2.5 mm hook, ch 2, leaving a 20 cm starting tail.
- Row 1: 2 sc in the second chain from the hook. Turn. 2 sts.
- Row 2: ch 1, inc twice. Turn. 4 sts.
- Row 3: ch 1, inc, sc in the next 2 sts, inc. Turn. 6 sts.
- Row 4: ch 1, inc, sc in the next 4 sts, inc. Turn. 8 sts.
- Rows 5–7: ch 1, sc in each st. Turn. 8 sts per row.
- Row 8: ch 1, dec, sc in the next 4 sts, dec. Turn. 6 sts.
- Row 9: ch 1, dec, sc in the next 2 sts, dec. Turn. 4 sts.
- Row 10: ch 1, dec twice. Turn. 2 sts.
- Row 11: ch 1, dec. 1 st. Fasten off. Each petal measures approximately 3.3 × 3.9 cm.
Deep Purple Falling Petals — Make 4
- With deep purple and the 2.5 mm hook, ch 2, leaving a 25 cm starting tail.
- Row 1: 2 sc in the second chain from the hook. Turn. 2 sts.
- Row 2: ch 1, inc twice. Turn. 4 sts.
- Row 3: ch 1, inc, sc in the next 2 sts, inc. Turn. 6 sts.
- Row 4: ch 1, inc, sc in the next 4 sts, inc. Turn. 8 sts.
- Rows 5–10: ch 1, sc in each st. Turn. 8 sts per row.
- Row 11: ch 1, dec, sc in the next 4 sts, dec. Turn. 6 sts.
- Row 12: ch 1, dec, sc in the next 2 sts, dec. Turn. 4 sts.
- Row 13: ch 1, dec twice. Turn. 2 sts.
- Row 14: ch 1, dec. 1 st. Fasten off. Each petal measures approximately 3.3 × 5 cm.
- Using matching yarn, make a loose running stitch along the central length of each falling petal. Draw up only enough to form a shallow ridge, keeping the petal approximately 4.5 cm long. Secure on the reverse.
Pointed Green Leaves — Make 12
- With green and the 2.5 mm hook, ch 2, leaving a 25 cm starting tail.
- Row 1: 2 sc in the second chain from the hook. Turn. 2 sts.
- Row 2: ch 1, inc twice. Turn. 4 sts.
- Row 3: ch 1, inc, sc in the next 2 sts, inc. Turn. 6 sts.
- Rows 4–14: ch 1, sc in each st. Turn. 6 sts per row.
- Row 15: ch 1, dec, sc in the next 2 sts, dec. Turn. 4 sts.
- Rows 16–18: ch 1, sc in each st. Turn. 4 sts per row.
- Row 19: ch 1, dec twice. Turn. 2 sts.
- Row 20: ch 1, dec. Turn. 1 st.
- Row 21: ch 1, sc. 1 st. Fasten off. Each leaf measures approximately 2.5 × 7.5 cm.
- With matching green yarn, embroider a central stem-stitch vein from base to tip. Keep the thread relaxed so the leaf remains its full length.
Green Stems — Make 4
- With green and the 2.5 mm hook, ch 19, leaving a 20 cm starting tail.
- Row 1: sl st in the second chain from the hook and each remaining chain. 18 sl sts. Fasten off with a 25 cm sewing tail. Each stem should measure approximately 6 cm; lay it flat without pulling the slip stitches tight.
Golden Throat Pieces — Make 8
- With yellow and the 2.5 mm hook, ch 7, leaving a 20 cm starting tail.
- Row 1: sc in the second chain from the hook and the next 4 chains, then 3 sc in the final chain. Continuing along the unused side of the foundation, sc in the next 5 chains. 13 sc. This is one U-shaped row around the chain; do not join its open base.
- Fasten off with a 20 cm sewing tail. Gently shape the rounded end. Each piece measures approximately 2 × 0.8 cm; the two open ends form its base.
Arrange and Attach Each Iris
- Place one square as a diamond, with one corner pointing toward you. Measure positions from the square’s center: toward the far corner is up and toward the near corner is down. Use the same orientation for all four flowers.
- Place the lower stem end approximately 7 cm below the center and its upper end approximately 1 cm below the center. Sew both edges of the stem to the cream mesh, catching solid crochet stitches wherever possible.
- Arrange three leaves with their bases overlapping the lower stem end. Point the middle leaf upward along the stem and fan the other two toward the upper left and upper right. Sew the central vein and lower edges of each leaf to the panel. Secure each tip with a small stitch, leaving portions of the side edges raised.
- Position two lavender petals with their bases together at the square’s center, their tips pointing upward and slightly apart. Overlap their inner edges by approximately 5 mm. Sew their bases and the lower half of their outer edges to the mesh.
- Add two deep purple side petals over the lavender bases. Point them left and right, with their tips slightly lower than their shared center. Sew their bases and lower edges, leaving the upper edges free.
- Place one deep purple falling petal over the shared petal bases, pointing down the stem. Its tip should finish approximately 4.5 cm below the center. Secure its base and central ridge, then add a small anchoring stitch near its tip.
- Place two golden throat pieces over the flower center with their rounded ends pointing upward in a narrow V. Their bases should meet approximately 5 mm below the center. Sew their inner edges and bases securely.
- With yellow yarn, embroider a short line of chain stitches approximately 1.5 cm long along each side petal, beginning near the flower center. Add three short slanting stitches beside each line to suggest the iris’s golden beard. Add a central yellow line approximately 1 cm down the falling petal.
- Use lavender yarn to add three loose, radiating straight stitches to each lavender petal. Keep these within the petal fabric. Secure and bury every embroidery end on the reverse of the appliqué.
Join the Four Diamonds
- Lay all four diamonds in a straight line, with every flower pointing in the same direction. The upper corner of each lower diamond meets the lower corner of the diamond above it.
- At each of the three joins, overlap the cream corner edgings by approximately 1 cm. Keep the deep purple borders visible and the diamond centers aligned.
- With cream yarn, sew across the overlap through the corner sc stitches and the adjacent two sc on either side. Make two passes through this short seam, catching the body of the edging rather than relying on picot chains alone.
- Secure the yarn on the reverse and weave each end through at least 3 cm of cream stitches. Check that every join lies flat before tightening the final knot.
Finishing
Lay the runner flat and check that the four flowers sit at the same angle. Secure any loose petal tips with tiny matching stitches. The petals should lift gently from the mesh while the leaves and stems stay close to the surface.
Lightly dampen the joined runner and pin the borders straight. Support the flowers with your fingers while shaping them; avoid pressing their ridges flat. Let the cotton dry completely before removing the pins. Hand-wash cool, reshape flat, and use a separate trivet beneath hot teapots or dishes.
Tips for Success
- Mark all four corners before starting the border. Count each side between the ch-2 spaces after every round.
- Block the mesh panels before attaching flowers so the appliqué does not prevent the squares from opening evenly.
- Arrange one complete iris before sewing. Photograph that arrangement for reference while assembling the remaining three.
- Pass attachment stitches through sc posts rather than across open mesh holes to keep sewing threads discreet and secure.
- Use short embroidery stitches on the side petals so the yellow markings follow their curve without pulling them into folds.
Common Mistakes to Avoid
- A rectangular mesh panel will distort the diamond. Check both gauge measurements and block the central panel to 16 × 16 cm before continuing.
- Adding corner increases to the first border’s stated side count makes the border flare. Round 1 has 27 intervening sc plus two corner sc per side, totaling 29.
- Tight petal gathering makes the falling petal curl into a tube. Loosen its central running stitch until a shallow ridge remains.
- Sewing only through the picot chains creates fragile joins. Reinforce each connection through the sc stitches beneath the decorative edge.
- Pulling embroidery yarn tightly can pucker the flower. Lay the petal flat after each few stitches and ease the tension before securing the end.
Ways to Customize This Pattern
- Use pale lilac upright petals with plum side and falling petals for a softer purple iris.
- Replace the cream ground with natural linen-colored cotton while retaining the purple frame and golden details.
- Make three diamonds for an approximately 83 cm runner, or five for approximately 137 cm, using the same 1 cm corner overlaps.
- Finish individual squares as decorative table mats, omitting the joining section and keeping their raised flowers away from drinking vessels.
Frequently asked questions
The free edges create the layered flower shape. Sew the specified bases, lower edges, and anchoring points securely, but leave the upper petal edges loose so the iris keeps its relief.
Yes, but the squares, flowers, and overall runner will grow. Use compatible hooks for both fabric types, measure a blocked square, and estimate the length as four square diagonals minus the three corner overlaps.
Keep every center on the same straight line and sew a short, reinforced seam through the edging stitches around each corner. The finished runner is intended to lie on a table; lift it with support beneath several squares.
Place the teapot on a separate, stable trivet beside the flowers. The layered petals make an uneven resting surface, and this decorative runner has no tested heat-protection rating.
The finished Purple Iris Crochet Table Runner Pattern

