Purple Pansy Crochet Blanket Pattern
Beginner Friendly
Perfect for those just starting their crochet journey, with clear instructions and simple techniques
Single-Day Project
A satisfying project you can complete in a single afternoon or evening.
Handmade Gift
A beautiful keepsake — free forever. Read online or print at home.
About This Purple Pansy Crochet Blanket Pattern
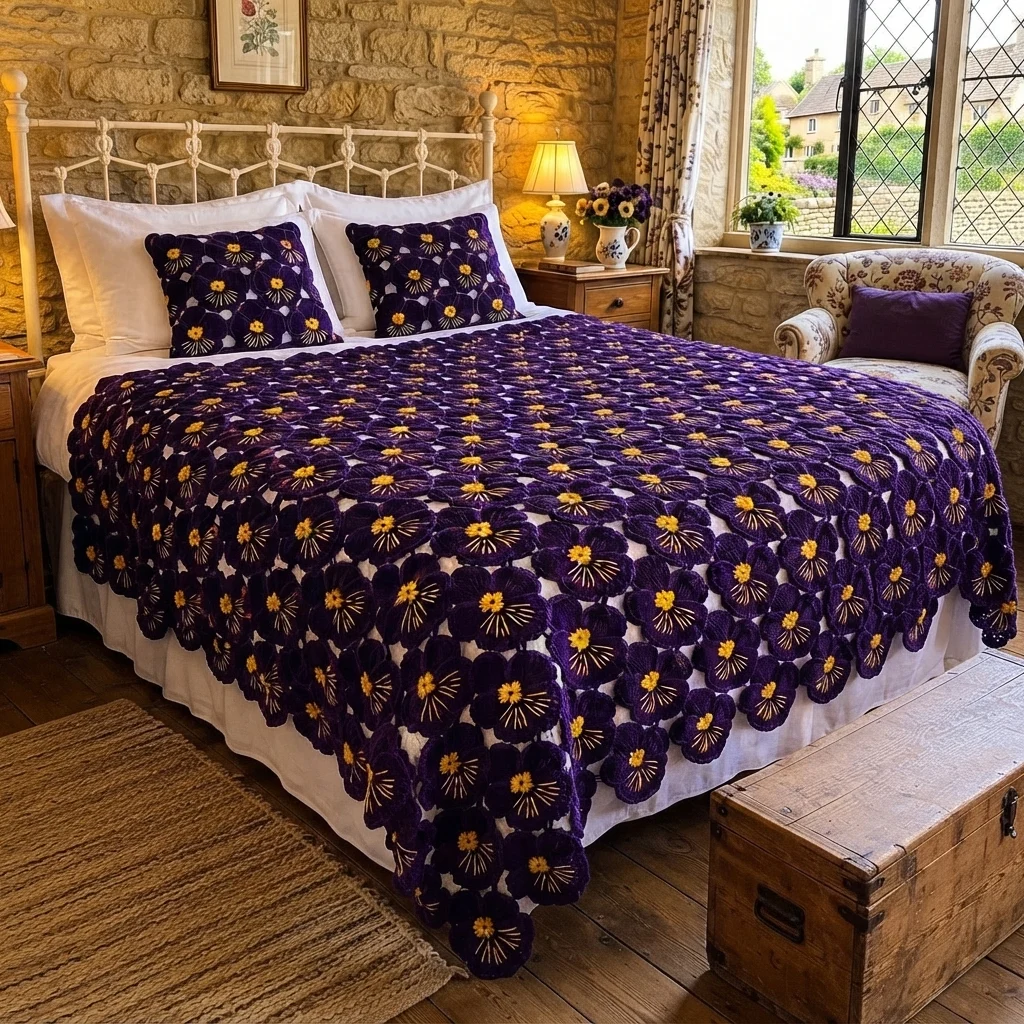
This pansy crochet blanket pattern builds a rich, velvety throw from deep purple flowers, each with a small yellow center and fine yellow whisker lines stitched across the lower petals. The motifs sit close together in offset rows, with small gaps between them, so the whole blanket looks like a bed of pansies.
It is an advanced project because of the volume and the detail. Every pansy has a base, five shaped petals worked in flat rows, a separate yellow center and twelve embroidered lines, and you need 124 of them. Each motif takes about 25 minutes, so plan on 55 to 65 hours including joining, embroidery and edging.
It suits crocheters who are comfortable with shaping in flat rows on a round base, who enjoy small repetitive motifs and who want a dramatic, jewel-toned blanket for a bed with white linen. The finished throw is about 120 x 137 cm, and it is easy to make larger by adding motifs.
Materials
- Worsted or aran cotton-blend yarn, deep purple (P) about 1.8 kg, estimated
- Worsted or aran cotton-blend yarn, golden yellow (Y) about 250 g, estimated
- Crochet hook 4.0 mm
- Yarn needle
- Stitch markers
- Flat surface and pins for blocking and layout
Abbreviations
MRmagic ringchchainscsingle crochetinc2 sc in the same stitchdecsingle crochet 2 stitches togethersl stslip stitchst(s)stitch(es)FOfasten offPpurple yarnYyellow yarn( )xrepeat the stitches in brackets the number of times givenPansy Base (P)
- Round 1: 10 sc in MR (10)
- Round 2: inc x10 (20)
- Round 3: (1 sc, inc)x10 (30). Join with a sl st to the first sc. Place a marker in the first stitch. The 30 stitches make 5 groups of 6, one group for each petal.
Petals (P, make 5 on the base)
- Work each petal in flat rows on one group of 6 stitches from round 3. Ch 1 and turn at the end of every row (the ch 1 does not count as a stitch).
- Row 1: sc in the next 6 sts of round 3 (6)
- Row 2: inc, 4 sc, inc (8)
- Row 3: inc, 6 sc, inc (10)
- Row 4: sc in each st across (10)
- Row 5: dec, 6 sc, dec (8)
- Row 6: dec, 4 sc, dec (6)
- Row 7: dec x3 (3). Do not turn and do not FO.
- Sl st evenly down the side of the petal (about 6 sl sts) until your hook is back at the base, then work row 1 of the next petal in the next 6 stitches of round 3. Repeat for all 5 petals.
- After the 5th petal, sl st down the side, FO and weave in the end. Count your petals. There must be 5, each worked over 6 base stitches.
Yellow Center (Y)
- Round 1: 6 sc in MR (6)
- Round 2: inc x6 (12). Join with a sl st, FO leaving a long tail.
- Sew the center onto the middle of the base, over rounds 1 and 2, with small stitches around the edge.
Whisker Embroidery (Y)
- Number the petals 1 to 5 clockwise, with petal 1 at the top left. Petals 3, 4 and 5 are the lower three petals.
- On each of the lower three petals, work 4 straight stitches in Y that fan out from the edge of the yellow center toward the petal edge. Make each stitch about 2.5 cm long and end it 1 cm before the petal edge (12 lines in all).
- On petals 1 and 2, work 2 short stitches each, about 1.5 cm long, near the center (4 more lines).
- Pull every stitch just snug. Pulling too tight puckers the petal.
- Secure the ends on the back of the motif and weave them into the base.
- Block each pansy flat with a damp cloth and pin it to the size of your test motif. Let it dry fully.
Blanket Layout
- Lay out 13 rows of pansies, alternating 10 and 9 per row, starting and ending with a row of 10 (124 pansies in all: 7 rows of 10 and 6 rows of 9).
- Offset each row by half a motif, so each pansy sits in the gap between two pansies in the row above, as in the photo.
- Turn every pansy the same way, with the two small petals at the top and the three whiskered petals at the bottom, before you start joining.
Joining
- Join the pansies into rows first. Hold two neighboring pansies with right sides together and whip stitch the touching petal edges together for about 4 stitches, using P.
- Join the rows to each other in the same way, joining each pansy to the two pansies above or below it.
- Leave the small gaps between the motifs open. They are part of the look.
- Weave in all ends along the back of the petals.
Finishing
Block the finished blanket by laying it flat on towels, pinning the outer petals to shape, and misting it lightly with water. Keep the pins away from the embroidery. Let it dry fully before moving it. This flattens the petals and opens the gaps evenly.
The edge of the blanket is scalloped by the outer petals. Leave it as it is, or work one round of sc in P around the outside, working 1 sc in each petal edge stitch and 2 sc in each gap, for a firmer edge. Check the embroidery for loose stitches and secure any that move.
Tips for Success
- Make one test pansy before you commit to all 124, and write down your hook size and the measurements.
- Count the stitches on round 3. There must be exactly 30, or the petals will not divide evenly.
- Make the pansies in batches of ten and keep them in a bag by row, so the layout is easy later.
- Embroider the whiskers before you block, so the stitches settle into the petals.
- Weave in the ends as you go. Doing 124 motifs at the end is slow.
Common Mistakes to Avoid
- Petals that curl up mean your first row is too tight. Work row 1 looser and spread the stitches on your hook.
- Uneven petals usually mean a wrong stitch count in one row. Check each row against the counts in brackets.
- Motifs of different sizes will not join flat. Block every pansy to the same size before joining.
- Whisker lines that all point the same way look stiff. Fan them out from the center like the spokes of a wheel.
- Joining with a tight seam pulls the petals out of shape. Keep your sewing stitches loose.
Ways to Customize This Pattern
- Swap purple for navy, burgundy or deep teal and keep the yellow center and whiskers for a different palette.
- Work the whiskers in cream or white for a softer, more delicate pansy.
- Make a baby blanket with 9 rows of alternating 7 and 6 pansies (61 pansies), about 80 x 98 cm.
- Make matching pillow covers by joining 3 rows of alternating 3 and 2 pansies (8 in all) and sewing the panel to a plain back.
- Mix two or three shades of purple, such as plum, violet and lavender, for a pansy-bed look.
Frequently asked questions
The amounts above are estimates of about 14 g of purple and 2 g of yellow per pansy, plus extra purple for joining and edging. Weigh your test pansy, multiply by 124 for each color, and add about 10 percent.
Yes. Use a larger hook for bigger pansies or a smaller hook for smaller ones, and keep the stitch counts the same so the petals stay even. If you change the hook size a lot, recheck the layout, since the number of motifs for a given blanket size will change.
Yes. On the last row of a petal, sl st it to the matching petal of a finished neighbor instead of working a plain sc. This saves sewing time, but you need to plan the layout first so every join lands in the right place.
Yes. One pansy with its embroidery works well as a brooch, a cushion decoration or a bag charm. Sew a pin back or a loop to the back and use a lighter yarn and a smaller hook for a smaller flower.
The finished Purple Pansy Crochet Blanket Pattern

