Purple Spiral Medallion Bedspread Crochet Pattern
Beginner Friendly
Perfect for those just starting their crochet journey, with clear instructions and simple techniques
Single-Day Project
A satisfying project you can complete in a single afternoon or evening.
Handmade Gift
A beautiful keepsake — free forever. Read online or print at home.
About This Purple Spiral Medallion Bedspread Crochet Pattern
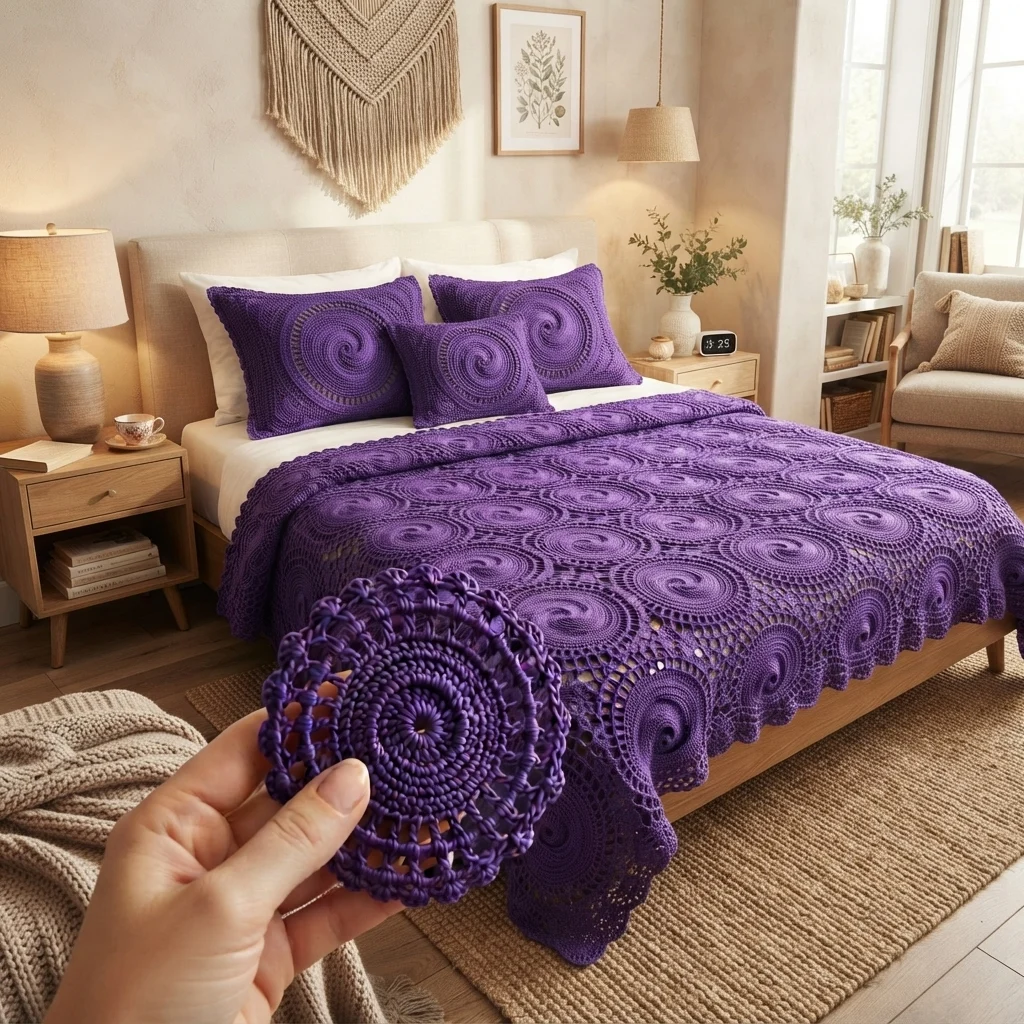
This crochet spiral medallion bedspread pattern covers a solid, lace-edged purple base in a dense field of individually worked 3D spiral medallions, each built from concentric rounds of raised, textured stitches that spiral outward into a distinctive swirl, then appliquéd onto the base so they sit raised above the surface. Two matching pillow shams repeat a softer, flatter version of the same swirl motif worked directly into the fabric, tying the set together without simply repeating the medallion everywhere.
What makes this design distinctive is the single-color, texture-only approach at such a large scale: with no contrasting colors anywhere in the piece, every bit of visual interest comes from the contrast between the solid lace-trimmed base and the raised, spiraling medallions, so stitch consistency and careful shaping matter even more than usual. Appliquéing dozens of genuinely dimensional medallions across a bedspread-sized base, while also working a related but distinct flatter swirl motif into the pillow fabric itself, is what makes this such a demanding project. Expect to spend 50-60 hours total across the full bedspread and both pillow shams.
This is an advanced pattern, best suited to someone experienced with raised spiral or bobble texture work and confident appliquéing a large number of dimensional medallions consistently across a solid base, rather than someone wanting a flat or color-based design.
Materials
- Worsted weight cotton yarn, deep purple ~1800g, entire bedspread and pillow shams
- Crochet hook 4.5 mm (US 7)
- Tapestry/yarn needle
- Pillow forms or inserts, 3 ~45 x 30 cm each, 2 standard plus 1 smaller lumbar as shown
- Fabric for pillow backing (optional) ~1.5 m, if not crocheting a full backing
- Steam iron and pressing cloth, or a large blocking mat and pins
- Sharp scissors
Abbreviations
chchainsl stslip stitchscsingle crochethdchalf double crochetdcdouble crochetFPdcfront post double crochetMRmagic ringincincrease (2 sts in one st)ch-spchain spacest(s)stitch(es)reprepeatFOfasten offBase Panel
- With deep purple, ch a foundation chain for your full bedspread width, approximately 180 sts, adjusting to your own mattress measurements.
- Work in rows of solid dc, back and forth, until the panel reaches your full target length, approximately 220 cm, checking periodically that the panel is growing evenly on both edges.
- FO after the final row, leaving a long tail for the border join.
Lace Border
- With deep purple, join at any corner of the base panel. Round 1: sc evenly around the entire perimeter, working 3 sc at each of the 4 corners to keep them flat.
- Round 2: *ch 3, skip 1 st, sl st in next st; rep from * evenly around for an open lace trim.
- Round 3 (scallop round): in each ch-3 loop from Round 2, work (sc, hdc, 3 dc, hdc, sc) to form a soft scalloped lace edge all the way around.
- Join with sl st to first st and FO. Weave in all ends.
Raised Spiral Medallion (make approximately 40-50, spaced across the bedspread)
- Round 1: 8 sc in MR. (8 sts)
- Round 2: inc in each st around. (16 sts)
- Round 3: *sc 1, inc; rep from * around. (24 sts)
- Round 4: *sc 2, inc; rep from * around. (32 sts)
- Round 5 (begin the spiral ridge): working with FPdc around selected sts from Round 4, build a raised spiral line curling from the center outward to the edge, continuing in sc between the ridge sts to keep the disc flat overall.
- Round 6: continue the spiral ridge outward by one more curl, using FPdc worked around the stitches of the ridge from the round below to keep the raised line continuous and connected.
- Round 7 (finishing edge): sc evenly around the entire disc to neaten the outer edge. Sl st to close, FO leaving a long tail for attaching.
- Repeat this entire sequence to make approximately 40-50 medallions total, enough to cover your bedspread’s surface at the density shown in the photo.
Assembly
- Block the plain base panel and border flat before attaching any medallions, so the base lies even underneath everything else.
- Lay out all medallions across the bedspread’s surface in a loosely offset grid, similar to the staggered circular arrangement shown in the photo, leaving the base fabric visible in the gaps between medallions.
- Pin the full layout before sewing anything down, checking that spacing reads even from a distance.
- Sew each medallion down firmly through its center and at 2-3 points around its outer edge, so it stays securely attached but still sits slightly raised above the base.
Pillow Sham Swirl Panel (make 3: 2 standard, 1 smaller lumbar)
- With deep purple, work a solid dc panel matching your pillow front’s dimensions.
- On the panel’s surface, work a flatter version of the spiral motif directly into the fabric using FPdc worked in a curling line from a center point outward, without the raised standalone disc construction used for the bedspread medallions, so the swirl reads as part of the fabric itself rather than an appliqué.
- Complete the panel to your pillow’s full front dimensions, then work a plain back panel to match.
Pillow Sham Assembly
- Whipstitch front and back panels together around 3 sides, leaving one side open to insert the pillow form.
- Add a few crocheted ties or a row of buttons along the opening to close the sham once the pillow form is inside.
- Repeat for all 3 pillow shams.
Finishing
Weave in every medallion’s and panel’s starting and ending tail individually across the entire bedspread and all 3 pillow shams, since a project this size accumulates a very large number of loose ends, all in the same color and easy to lose track of. Steam-block the finished bedspread flat, pinning the lace border open evenly and taking care not to press directly on the raised medallions, which should stay dimensional rather than flattening into the base. Block both pillow fronts and backs before assembling the shams, and insert the pillow forms once sewn and closed.
Tips for Success
- Since this piece uses only one color, rely on stitch count and row tallies rather than color cues to track your progress; it’s easy to lose your place in monochrome work.
- Block the base panel and border before attaching any medallions, so the base sits flat and even underneath everything else.
- Work the FPdc spiral ridge at consistent tension across every medallion, since uneven ridging is very noticeable once dozens sit across one plain-colored surface.
- Pin the full medallion layout before sewing anything down, stepping back to check spacing reads balanced from across the room.
- Steam medallions from a slight distance rather than pressing directly, to protect their raised spiral texture.
Common Mistakes to Avoid
- Losing track of row or round counts is easier than usual in an all-one-color project. Fix: keep a written tally or use stitch markers at set intervals throughout.
- Attaching medallions before blocking the base panel causes the base to distort once steamed later. Fix: block the plain panel and border first, then appliqué the medallions.
- Spacing medallions in a rigid, perfectly even grid looks mechanical against the organic swirl motif. Fix: offset medallion placement slightly row to row for a more natural, staggered look.
- Pressing an iron directly onto medallions during blocking flattens their raised spiral texture. Fix: steam from a slight distance without full contact pressure.
- Working the pillow’s flat swirl motif at a different scale than the bedspread’s raised medallions breaks the visual connection between the pieces. Fix: keep the swirl’s curl tightness and overall size proportional between both techniques.
Ways to Customize This Pattern
- Reduce medallion density for a lighter, more scattered look if full coverage feels too busy.
- Swap deep purple for a different single color to match your own bedroom decor, keeping the same texture-only approach.
- Reduce the grid size for a throw blanket instead of a full bedspread.
- Work medallions in 2 slightly different sizes for added visual variety across the surface.
- Add a fabric backing to the full bedspread for added warmth and easier care.
Frequently asked questions
Around 40-50 medallions covers a full/queen bedspread at the density shown in the photo, but exact counts depend on your medallion size and how closely you space them. Lay out your blocked base and plan spacing before committing to a final count.
Appliquéing them separately is what gives the medallions their raised, dimensional quality rather than a flat printed look. Working the spiral directly into the base, as done on the pillows, gives a different, flatter effect better suited to a smaller piece.
In some ways, yes. Without color changes to mark progress or catch mistakes, it’s easier to lose track of rows or rounds. Keeping a written tally and checking your stitch counts regularly becomes more important than in a colorwork project.
This usually means the ridge round was worked as regular sc instead of true FPdc. Recheck that the spiral round works around the post of the stitch below rather than into its top, which is what creates the raised, ropey line.
The finished Purple Spiral Medallion Bedspread Crochet Pattern

