Raised Sunflower Granny Square Crochet Pattern
Advanced
For experienced crocheters who enjoy complex shaping, fine detail, and ambitious construction
Single-Day Project
A satisfying project you can complete in a single afternoon or evening.
Handmade Gift
A beautiful keepsake — free forever. Read online or print at home.
About This Raised Sunflower Granny Square Crochet Pattern
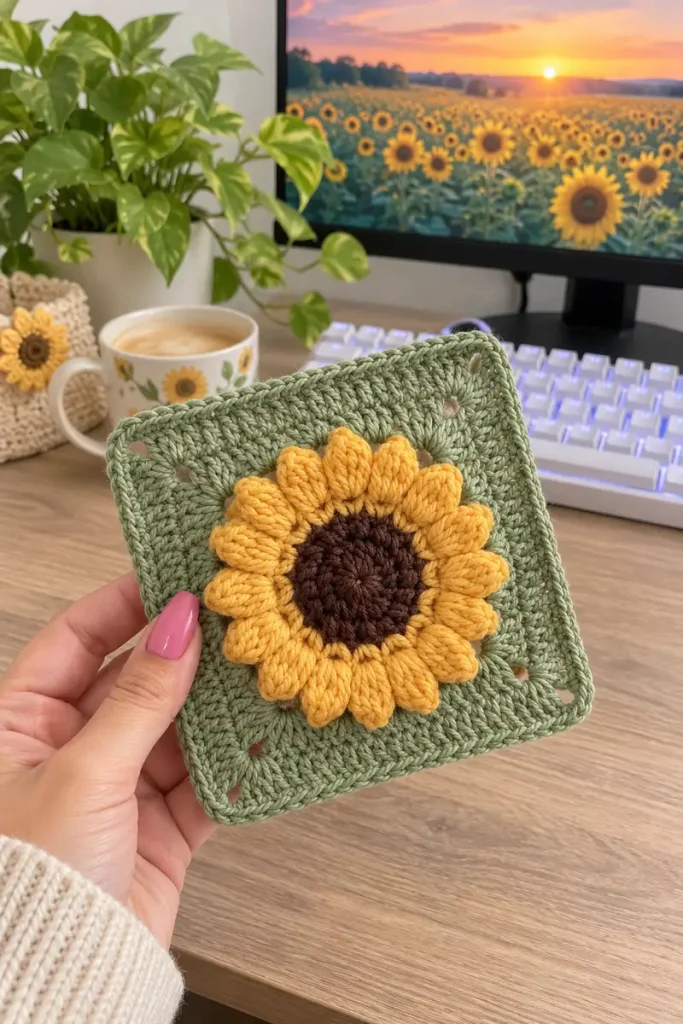
This sunflower granny square crochet pattern recreates the reference’s sage green square, dark brown flower center, and raised golden petals. Sixteen individually shaped petals sit above a solid crochet background, giving the sunflower its full, layered outline. The finished piece is a decorative square motif, suitable for a cushion front, wall display, or a larger joined project.
Allow about 7–9 hours for the crochet, surface embroidery, and careful assembly. This advanced project suits crocheters comfortable with joined rounds, small sculpted pieces, and invisible sewing. The flower is built separately and attached to the blocked square so you can adjust its placement without distorting the background.
Materials
- Sage green worsted cotton yarn Approximately 60 g / 100 m
- Golden yellow worsted cotton yarn Approximately 35 g / 60 m
- Dark brown worsted cotton yarn Approximately 20 g / 34 m, including embroidery
- Crochet hooks 3.5 mm for the square; 3.0 mm for flower pieces, or sizes needed for gauge
- Polyester filling Approximately 1–2 g for the center only
- Blunt tapestry needle and scissors For embroidery, joining, and weaving ends
- Stitch markers, ruler, blocking mat, and rustproof pins Include sixteen removable markers for petal placement
Abbreviations
chchainsl stslip stitchscsingle crochetdcdouble crochetinc2 single crochet in the same stitchdecinvisible single crochet decrease over 2 stitchesMRmagic ringst / stsstitch / stitchesGauge, Size, and Construction Notes
- Use US crochet terminology. With the 3.5 mm hook, target 16 dc and 9 rows per 10 cm after blocking. Make a swatch at least 12 cm square and measure its central 10 cm.
- With the 3.0 mm hook, target 22 sc and 24 rounds per 10 cm in continuous rounds. The seven-round brown disc should measure approximately 6 cm across before joining.
- The blocked square should measure approximately 18 × 18 cm. Each petal should measure approximately 3–3.5 cm long and 1.5 cm wide when flattened. These are design targets; adjust hook sizes separately for the square and flower.
- Work the square in joined rounds without turning. Its beginning ch 3 counts as one dc. Corner chains and joining slip stitches are excluded from dc totals.
- Work the center discs and petals in continuous rounds without joining. Mark the first stitch of each round. Each inc adds one stitch; each dec removes one stitch.
- Make one square, sixteen petals, and two center discs. All color changes occur between separate pieces. No eyes, facial details, or filling in the petals are needed.
Sage Green Background Square
- Round 1: With sage and the 3.5 mm hook, make an MR. Ch 3, 2 dc into the ring, ch 2; repeat (3 dc into the ring, ch 2) three times. Tighten the ring and sl st to the top of the beginning ch 3. There are 12 dc and four ch-2 corner spaces.
- Round 2: Sl st across the next 2 dc and into the corner space. Ch 3, then work (dc, ch 2, 2 dc) in that same space. Work dc in each of the next 3 sts; repeat [(2 dc, ch 2, 2 dc) in the next corner space, dc in each of the next 3 sts] three times. Join to the beginning ch 3. There are 28 dc, or 7 per side, and four corner spaces.
- Round 3: Sl st into the next dc and then into the corner space. Ch 3, then (dc, ch 2, 2 dc) in that space. Dc in each of the next 7 sts; repeat [(2 dc, ch 2, 2 dc) in the next corner space, dc in each of the next 7 sts] three times. Join. There are 44 dc, or 11 per side.
- Round 4: Sl st into the next dc and then into the corner space. Ch 3, then (dc, ch 2, 2 dc) in that space. Dc in each of the next 11 sts; repeat [(2 dc, ch 2, 2 dc) in the next corner space, dc in each of the next 11 sts] three times. Join. There are 60 dc, or 15 per side.
- Round 5: Sl st into the next dc and then into the corner space. Ch 3, then (dc, ch 2, 2 dc) in that space. Dc in each of the next 15 sts; repeat [(2 dc, ch 2, 2 dc) in the next corner space, dc in each of the next 15 sts] three times. Join. There are 76 dc, or 19 per side.
- Round 6: Sl st into the next dc and then into the corner space. Ch 3, then (dc, ch 2, 2 dc) in that space. Dc in each of the next 19 sts; repeat [(2 dc, ch 2, 2 dc) in the next corner space, dc in each of the next 19 sts] three times. Join. There are 92 dc, or 23 per side.
- Round 7: Sl st into the next dc and then into the corner space. Ch 3, then (dc, ch 2, 2 dc) in that space. Dc in each of the next 23 sts; repeat [(2 dc, ch 2, 2 dc) in the next corner space, dc in each of the next 23 sts] three times. Join. There are 108 dc, or 27 per side.
- Round 8, edging: Ch 1, sc in the same stitch and in every remaining dc, working (sc, ch 2, sc) into each corner space as you reach it. Join to the first sc. There are 116 sc, or 29 between adjacent corner spaces, and four ch-2 corners. Fasten off and weave in the ends.
- Wet-block the square to approximately 18 × 18 cm with straight sides and square corners. Do not stretch it beyond the fabric’s natural give. Let it dry completely.
Golden Sculpted Petals — Make Sixteen
- Round 1, outer tip: With golden yellow and the 3.0 mm hook, work 6 sc in an MR. Tighten securely. Leave the beginning tail inside the petal. There are 6 sts.
- Round 2: Repeat (sc in the next st, inc) three times. There are 9 sts.
- Round 3: Repeat (sc in the next 2 sts, inc) three times. There are 12 sts.
- Round 4: Sc in each st around. There are 12 sts.
- Round 5: Sc in each st around. There are 12 sts.
- Round 6: Repeat (sc in the next 2 sts, dec) three times. There are 9 sts.
- Round 7: Repeat (sc in the next st, dec) three times. There are 6 sts.
- Round 8: Sc in each st around. There are 6 sts. Do not stuff. Flatten the opening so three stitches on the front align with three on the back.
- Closure row: Ch 1. Work 3 sc through both layers, inserting the hook through one front and one back stitch for each sc. There are 3 closure sts. Fasten off with a 25 cm sewing tail. Press the sides gently inward to form a plump, flattened teardrop with a narrow base.
Dark Brown Center Discs — Make Two
- Round 1: With dark brown and the 3.0 mm hook, work 6 sc in an MR. There are 6 sts.
- Round 2: Inc in every st. There are 12 sts.
- Round 3: Repeat (sc in the next st, inc) six times. There are 18 sts.
- Round 4: Repeat (sc in the next 2 sts, inc) six times. There are 24 sts.
- Round 5: Repeat (sc in the next 3 sts, inc) six times. There are 30 sts.
- Round 6: Repeat (sc in the next 4 sts, inc) six times. There are 36 sts.
- Round 7: Repeat (sc in the next 5 sts, inc) six times. There are 42 sts. Cut the yarn and pull the tail through the last stitch without adding another stitch. Weave in the end. Designate one disc as the front and the other as the backing.
Embroidered Seed Texture and Center Assembly
- Before joining the discs, embroider the front with matching brown yarn. Make one small two-wrap French knot between rounds 1 and 2, six evenly spaced knots between rounds 2 and 3, twelve between rounds 4 and 5, and eighteen between rounds 6 and 7: 37 knots total.
- For each knot, bring the needle to the front, wrap the yarn twice around it, and insert the needle one yarn strand away from the exit point. Hold the wraps near the fabric while drawing the needle through. Keep each knot compact and avoid pulling the disc into a cup. Secure all embroidery ends on the back.
- Place the discs with their wrong sides together and align all 42 edge stitches. With brown yarn and a tapestry needle, whipstitch through both loops of corresponding edge stitches for 34 pairs.
- Add approximately 1–2 g of filling through the remaining opening. Spread it into a thin layer so the center rises approximately 5–8 mm rather than forming a ball. Sew the remaining 8 pairs closed, giving 42 joined pairs in total. Secure and bury the tail.
Petal Placement and Flower Attachment
- Lay the dry square right side up and mark its center. Using removable markers, mark sixteen evenly spaced positions around a circle approximately 5 cm in diameter, centered on the square. Begin with the top, right, bottom, and left positions, then divide each quarter into four equal intervals.
- Place one petal base at each marker with its tip pointing outward. The base centers sit approximately 2.5 cm from the square’s center. Let neighboring petal shoulders touch or overlap slightly. Check that the overall flower measures approximately 11–12 cm across.
- Using each yellow tail, sew the three closure stitches to the square at its marked position. Make two passes through the closure row and nearby square stitches. Catch the backs of the sage stitches where possible to minimize visible sewing on the reverse. Secure each tail separately.
- Lay the brown center over the petal bases. Its edge should overlap the inner ends of all sixteen petals by approximately 5 mm. Reposition any petal whose closure row remains visible.
- With a fresh brown strand, sew the center to the square using small stitches around its joined edge. At each petal base, pass through the center edge, the concealed yellow base, and the square, then return to the center edge. Keep the stitches relaxed enough that the square stays flat.
- Check that all sixteen petal bases are secured beneath the center. Leave the outer two-thirds of each petal unattached so the tips remain raised. Secure and bury the brown sewing tail.
Finishing
Remove the placement markers and check both sides for loose ends. Gently pinch each golden petal into an elongated oval, then arrange the tips into an even ring. Smooth the brown center with your fingers to distribute its light filling.
If assembly has drawn in the square, dampen only the green background and pin it back to its blocked dimensions. Support the flower above the mat and allow everything to dry naturally. The finished motif should have a flat sage border and a softly raised sunflower.
Tips for Success
- Keep the first finished petal beside your work as a size guide. Small tension changes become noticeable across sixteen repeated pieces.
- Count the dc between corner spaces after each square round. The sequence is 3, 7, 11, 15, 19, 23, and 27.
- Use short lengths of brown yarn for the seed knots. Long strands twist and snag against previously embroidered knots.
- Pin all sixteen petals before sewing any of them. Adjust spacing around the whole ring instead of crowding the final few petals into a gap.
- Slide a finger beneath the square while attaching the center to check that each sewing stitch is secure without tightening the background.
Common Mistakes to Avoid
- Adding stitches at the square’s round join creates a bulging side. The beginning ch 3 replaces the first dc; do not work an extra dc into its base.
- Missing a dc immediately after a corner makes the square lean. Locate the first stitch beside the corner space before beginning each side.
- Stuffing the petals makes them tubular and heavy. Leave them empty and shape them by flattening their sides.
- Overfilling the center produces a dome that hides too much of the petals. Remove filling until the center is only lightly padded.
- Sewing the flower on before blocking can lock the square into a distorted shape. Block the background first and keep all attachment stitches relaxed.
Ways to Customize This Pattern
- Use warm cream for the square while keeping the golden petals and dark brown center for a softer botanical palette.
- Make eight petals in golden yellow and eight in ochre, alternating them around the flower for subtle depth.
- Extend the green background before edging: the next dc round has 31 dc per side, or 124 total; one further round has 35 per side, or 140 total. Work every corner as established.
- Join several completed squares into a cushion front. Sew corresponding outer edging stitches together and join matching corner spaces separately.
- For a flatter center, omit the filling while retaining both discs and the embroidered seed texture. Keep the petals unstuffed as written.
Frequently asked questions
Separate petals create the reference’s pronounced teardrop shapes and let you adjust all sixteen positions before sewing. Their narrow closure rows disappear beneath the brown center.
Check that the center disc measures approximately 6 cm across and that the petal bases sit on a circle approximately 5 cm across. Move the bases inward evenly before sewing the center down. Do not stretch the center to force it over widely spaced bases.
This version is intended as a decorative motif. Its raised petals make an uneven resting surface, and the lightly filled center is not designed or tested for heat protection.
Follow your yarn’s care instructions. For washable cotton, gently hand-wash, press out moisture in a towel, and dry flat with the green corners aligned. Reshape the petals by hand and avoid pressing their raised surfaces with an iron.
The finished Raised Sunflower Granny Square Crochet Pattern

