Raspberry Flower Bedspread and Pillow Shams
Beginner Friendly
Perfect for those just starting their crochet journey, with clear instructions and simple techniques
Single-Day Project
A satisfying project you can complete in a single afternoon or evening.
Handmade Gift
A beautiful keepsake — free forever. Read online or print at home.
About This Raspberry Flower Bedspread and Pillow Shams
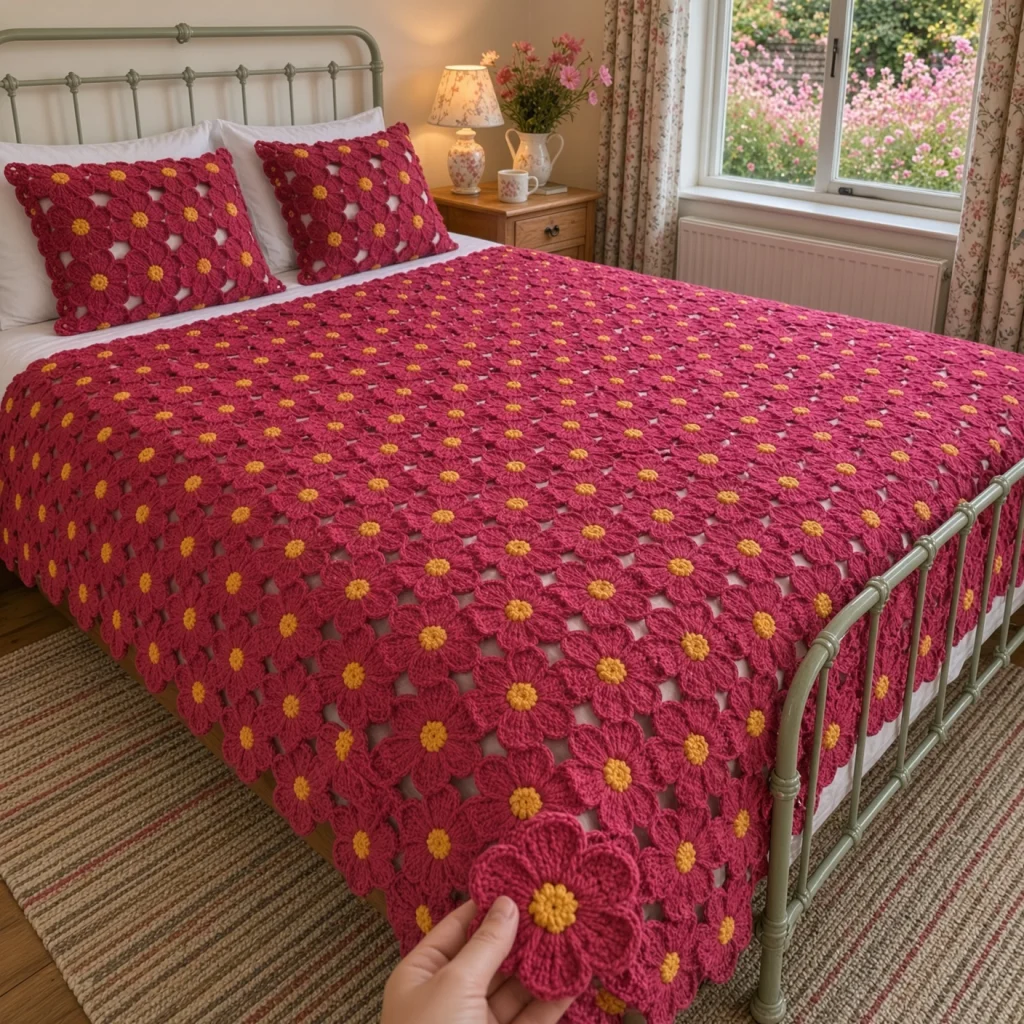
This crochet flower bedspread pattern is built from hundreds of six-petal raspberry flowers, each with a round golden center. The flowers are joined as you go at their petal tips, so there is no sewing between motifs, and the spaces left between them form small open diamonds that let the sheet underneath show through. The result is a bedspread that looks like a field of flowers laid over the bed.
The layout is what makes this design work. Each flower has six petals, and they are joined in a way that uses every petal tip exactly once: one petal to the flower on each side, and two petals to the flower above and below. That keeps the rows straight and the open diamonds even across the whole bedspread. Two matching pillow shams use the same flowers over a solid raspberry back.
The full set takes about 120 to 140 hours, since there are 451 flowers in all. Each flower only takes around 15 minutes once you know it, which makes this a good project to carry around and work on in small sessions. It suits a crocheter who is comfortable with magic rings, treble crochet and keeping careful count of a large project.
Materials
- Worsted weight cotton or cotton blend, raspberry about 3,600 m (18 skeins of 100 g / 200 m)
- Worsted weight cotton or cotton blend, golden yellow about 900 m (5 skeins of 100 g / 200 m)
- 5 mm crochet hook
- Tapestry needle and scissors
- Stitch markers a few, for marking the flower’s first petal
- Two pillows 50 x 70 cm, for the shams
- Blocking mats and rust-proof pins
- A small zip bag or box to keep finished flowers flat until you join them
Abbreviations
MRmagic ringchchainscsingle crochethdchalf double crochetdcdouble crochettrtreble crochetsl stslip stitchskskipspspacest(s)stitch(es)rndroundreprepeatJAYGjoin as you goRSright sideFlower Motif (Rnds 1-5)
- Rnd 1: with yellow, MR, ch 1, 6 sc in ring, join with sl st to first sc. Pull the ring tight. (6 sts)
- Rnd 2: ch 1, 2 sc in each st around, join. (12 sts)
- Rnd 3: ch 1, *sc in next st, 2 sc in next st; rep from * 5 more times, join. Fasten off yellow. (18 sts)
- Rnd 4: join raspberry in any st, ch 1, sc in same st, ch 4, sk next 2 sts, *sc in next st, ch 4, sk next 2 sts; rep from * 4 more times, join with sl st to first sc. (6 sc, 6 ch-4 sps)
- Rnd 5: sl st in first ch-4 sp, ch 1, in same sp work (sc, hdc, 2 dc, tr, 2 dc, hdc, sc), *in next ch-4 sp work (sc, hdc, 2 dc, tr, 2 dc, hdc, sc); rep from * 4 more times, join with sl st to first sc. (6 petals, 54 sts)
- Weave in the yellow tails now, under the center stitches on the back. Leave the raspberry yarn attached for Rnd 6.
Petal Edging (Rnd 6, first flower only)
- Rnd 6 is the outline round. It is also where flowers are joined to each other, so only the very first flower is worked plain like this.
- Rnd 6: do not ch. *Sl st in next sc, sc in next 3 sts, (sc, ch 2, sc) in next tr, sc in next 3 sts, sl st in next sc; rep from * 5 more times, join with sl st to first sl st. (48 sc, 12 sl st, 6 ch-2 sps)
- Fasten off and weave in the end.
- Petal names: hold the flower RS up with the petal where Rnd 6 started pointing left (9 o’clock). This is petal D. Going around in the direction you crocheted, the next petals are E (7 o’clock), F (5 o’clock), A (3 o’clock), B (1 o’clock) and C (11 o’clock).
Joining As You Go (Rnd 6 for all other flowers)
- Work Rnds 1-5 as usual. Start Rnd 6 at the petal you want to be D, so the first three petals you edge are D, E and F. These are the ones that join.
- Join stitch: at the tip of a petal that needs joining, replace the ch 2 with: ch 1, sl st in the ch-2 sp at the tip of the matching petal on the neighboring flower, ch 1. Then continue the round as written.
- Petal D always joins to petal A of the flower on its left.
- Petal E always joins to petal C of the flower below.
- Petal F always joins to petal B of the flower below.
- Skip any join where there is no neighbor (bottom row, left edge). Work a plain ch 2 tip there instead.
- Petals A, B and C are always left plain. They get joined later by the flowers to the right and above.
Bedspread Layout
- The bedspread is 17 flowers across and 23 rows tall. (391 flowers)
- Row 1, flower 1: work as the first flower, with no joins.
- Row 1, flowers 2-17: join petal D only, to petal A of the flower on the left. (16 joins)
- Row 2, flower 1: join petal E to petal C, and petal F to petal B, of the flower directly below. (2 joins)
- Row 2, flowers 2-17: join D to the flower on the left, and E and F to the flower below. (3 joins each)
- Rows 3-23: rep Row 2.
- Every 2 or 3 rows, lay the work flat and check that the diamonds between flowers are even and that the rows run straight.
- The finished bedspread measures about 187 x 220 cm, with a scalloped edge of free petal tips all around.
Pillow Sham Fronts (make 2)
- Each sham front is 6 flowers across and 5 rows tall. (30 flowers)
- Make and join the flowers exactly as for the bedspread layout, with 6 flowers in each row.
- Each front measures about 66 x 49 cm.
Pillow Sham Backs (make 2 sets)
- Gauge for the back: 14 hdc and 10 rows = 10 cm.
- Upper back: with raspberry, ch 94. Row 1: hdc in 3rd ch from hook and in each ch across. (92 hdc)
- Rows 2-30: ch 2 (does not count as a st), turn, hdc in each st across. Fasten off. (92 hdc)
- Lower back: with raspberry, ch 94. Work Row 1 as for the upper back. (92 hdc)
- Rows 2-28: ch 2, turn, hdc in each st across. Fasten off. (92 hdc)
- Lay the upper back over the lower back, both RS up, so the last rows overlap by about 9 cm and the rectangle measures 66 x 49 cm. Pin the overlap.
- Edging rnd: join raspberry in a top corner. Working through both layers where they overlap, 3 sc in corner st, sc in next 90 sts, 3 sc in corner st, 73 sc evenly down the side (about 3 sc for every 2 rows), 3 sc in corner st, sc in next 90 sts, 3 sc in corner st, 73 sc evenly up the other side. Join with sl st. Fasten off. (338 sts)
Sham Assembly
- Lay a sham back with the overlap side down. Place a sham front on top, RS up, centered so the outer petal tips reach the edge of the back.
- Pin every free petal tip around the edge: 12 along the top, 12 along the bottom and 5 on each side.
- With raspberry and a tapestry needle, sew each petal tip to the edging rnd of the back with 3 or 4 small stitches.
- Tack the center of each flower to the back with a couple of hidden stitches so the front doesn’t shift when the pillow goes in.
- Rep with the second sham.
Finishing
Weave in all remaining ends, running each raspberry tail along the back of its own petal edging so it doesn’t show through the open diamonds. With 451 flowers, weaving ends in as you finish each one saves days of work at the end.
Wet block the bedspread on a large flat surface. Pin out the petal tips around the edge and gently stretch each open diamond into shape. Let it dry fully before moving it. Block the shams the same way, then slide the pillows in through the envelope opening on the back.
Tips for Success
- Make all the yellow centers first, in batches of 20 or 30. It’s faster to work one color at a time, and you won’t be switching yarn on every flower.
- Place a stitch marker on petal D right after Rnd 5. It removes any guessing about which petals to join in Rnd 6.
- Keep your Rnd 6 tension the same for every flower. If some flowers are tighter, the rows will curve and the diamonds won’t line up.
- Join the bedspread on a table or the floor, not in your lap. Having the finished rows lying flat makes it easy to see which petal goes where.
- Pull the magic ring tight and weave its tail back through it in two directions. A loose center ring is the first thing to open up after washing.
Common Mistakes to Avoid
- Joining the wrong petal. If you join E to the flower on the left instead of below, the flower sits rotated and the diamonds disappear. Undo the join and check the petal letters against the marker.
- Skipping too many stitches in Rnd 4. You should have exactly 6 ch-4 spaces. If you have 5 or 7, the flower will have the wrong number of petals and won’t fit the layout.
- Twisted joins. When you sl st into the neighbor’s ch-2 sp, make sure both flowers are RS up. If one is flipped, the join will pucker.
- Rows that curve. This happens when some flowers come out larger than others. Measure every tenth flower and adjust your hook if they start to grow.
- Saggy sham fronts. If the front droops away from the pillow, you skipped tacking the flower centers. Add a few hidden stitches through the back.
Ways to Customize This Pattern
- Change the size: each extra flower adds 11 cm in width, and each extra row adds about 9.5 cm in length. A king bed needs about 21 flowers across and 25 rows.
- Use several petal colors, such as raspberry, coral and pink, scattered at random, with the same golden centers to tie them together.
- Make a baby blanket of 9 flowers by 10 rows (90 flowers, about 99 x 97 cm) in a soft cotton.
- Fill the open diamonds with a small yellow sc circle joined to the four petals around it, for a solid blanket with no gaps.
- Make a table runner of 4 flowers by 14 rows, or a single row of flowers as a shelf or mantel garland.
Frequently asked questions
Yes. Work all flowers with plain Rnd 6 edging, then sew the matching petal tips together with a few stitches each. It takes longer than joining as you go, but it lets you lay out the whole bedspread first to arrange colors.
With six petals, a flower joins one petal to each side neighbor and two petals to the flowers above and below. Every petal is used exactly once, which keeps the rows straight and makes the even diamond gaps.
Cotton or a cotton blend keeps the flowers firm and holds their shape. Acrylic or wool will drape more and can stretch over time with this much weight. Always store the bedspread folded flat, not hung.
Cut the joins around that one flower, unravel it, and make a new one. Work its Rnd 6 with joins to all its neighbors on every side that needs one. The rest of the bedspread stays intact.
The finished Raspberry Flower Bedspread and Pillow Shams

