Red Carnation Bedspread and Shams Crochet Pattern
Beginner Friendly
Perfect for those just starting their crochet journey, with clear instructions and simple techniques
Single-Day Project
A satisfying project you can complete in a single afternoon or evening.
Handmade Gift
A beautiful keepsake — free forever. Read online or print at home.
About This Red Carnation Bedspread and Shams Crochet Pattern
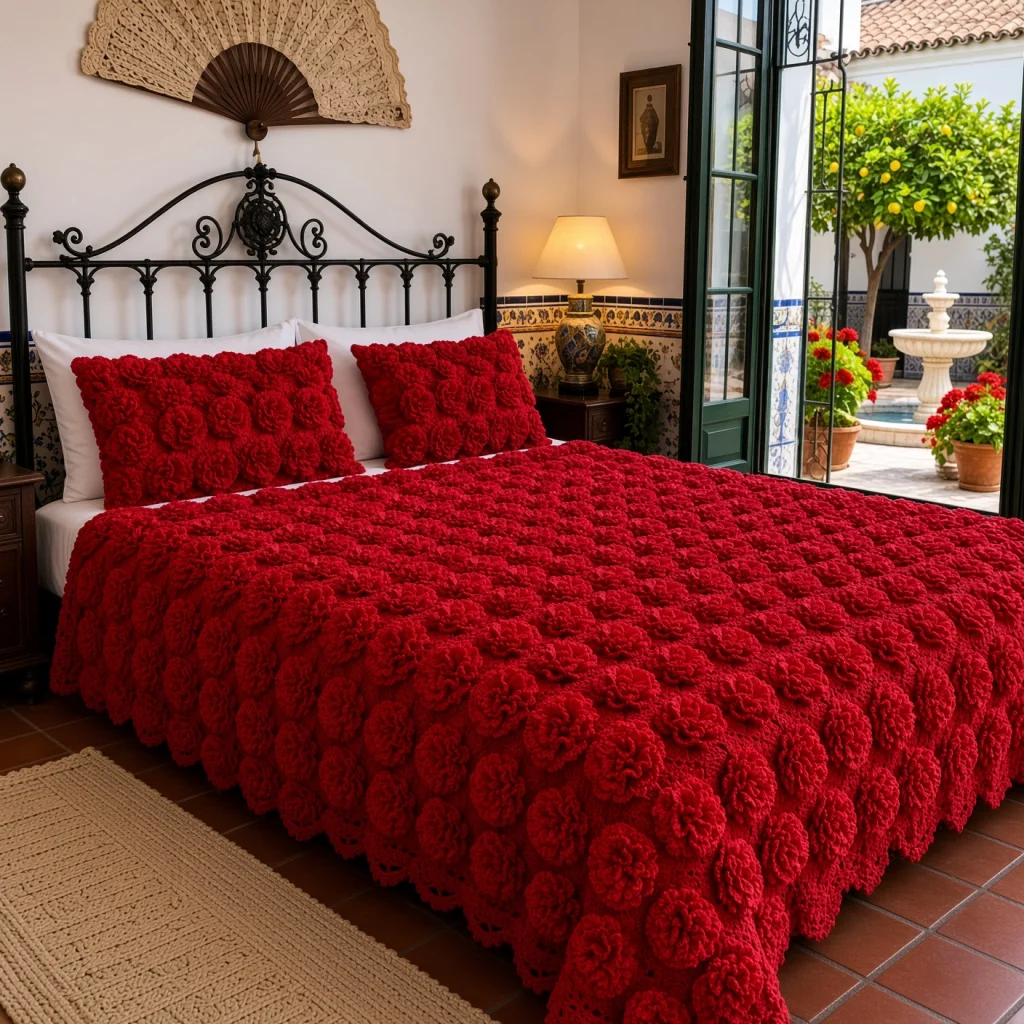
This red carnation crochet bedspread is covered edge to edge with ruffled 3D carnations, one on each of 90 solid red squares. Packed together, the flowers turn the bed into a deep red field of blooms, the kind you’d see spilling from pots in an Andalusian courtyard. A deep lace border with mesh and picot scallops frames the edge, and two pillow shams carry six carnations each.
Each carnation is built on a small disc worked in the back loops, which leaves a ring of free front loops on every round. Ruffles are then worked into those loops, three stitches in each, layer by layer from the outside in. The tallest ruffles are on the outside and the shortest in the center, so the flower forms a full, frilly dome instead of a flat rosette.
The full set takes around 180 to 210 hours, with 102 squares and 102 carnations. Each square and flower together takes about an hour and a half. It suits a crocheter who is comfortable with front and back loop work, steady increases and a large, heavy project.
Materials
- Worsted weight acrylic or acrylic blend, red about 7,800 m (39 skeins of 100 g / 200 m)
- 5 mm crochet hook
- Stitch markers a few
- Tapestry needle and scissors
- Two pillows 50 x 75 cm, for the shams
Abbreviations
MRmagic ringchchainscsingle crochethdchalf double crochetdcdouble crochettrtreble crochetsl stslip stitchBLO / FLOback loop only / front loop onlyskskipspspacest(s)stitch(es)rndroundreprepeatRS / WSright side / wrong sideRed Square (make 102)
- You need 90 squares for the bedspread and 6 for each sham front.
- Rnd 1: with red, MR, ch 3 (counts as dc here and throughout), 2 dc in ring, ch 2, *3 dc in ring, ch 2; rep from * 2 more times, join with sl st to top of ch 3. Pull the ring tight. (12 dc: 3 per side, 4 corner ch-2 sps)
- Rnd 2: ch 3, dc in next 2 sts, (2 dc, ch 2, 2 dc) in corner sp, *dc in next 3 sts, (2 dc, ch 2, 2 dc) in corner sp; rep from * 2 more times, join. (28 dc: 7 per side)
- Rnd 3: ch 3, dc in each st to the next corner, (2 dc, ch 2, 2 dc) in corner sp, *dc in each st to next corner, (2 dc, ch 2, 2 dc) in corner sp; rep from * 2 more times, dc in each remaining st, join. (44 dc: 11 per side)
- Rnds 4-9: rep Rnd 3, adding 4 sts per side each rnd. (Rnd 4: 60 dc, Rnd 5: 76, Rnd 6: 92, Rnd 7: 108, Rnd 8: 124, Rnd 9: 140 dc, 35 per side)
- Rnd 10: sl st in next st and in corner sp, ch 1, (sc, ch 2, sc) in same sp, *sc in each st to next corner, (sc, ch 2, sc) in corner sp; rep from * 2 more times, sc in each remaining st, join. Fasten off. (148 sc: 37 per side)
- The square measures about 24 cm.
Carnation Base (make 102)
- Rnd 1: with red, MR, ch 1, 8 sc in ring, join with sl st to first sc. Pull the ring tight. (8 sts)
- Rnd 2: ch 1, working in BLO, 2 sc in each st around, join. (16 sts)
- Rnd 3: ch 1, working in BLO, *sc in next st, 2 sc in next st; rep from * 7 more times, join. (24 sts)
- Rnd 4: ch 1, working in BLO, *sc in next 2 sts, 2 sc in next st; rep from * 7 more times, join. (32 sts)
- Rnd 5: ch 1, working in BLO, *sc in next 3 sts, 2 sc in next st; rep from * 7 more times, join. (40 sts)
- Don’t fasten off. The base is a flat disc about 8 cm across, with free front loops left on Rnds 1-4.
Carnation Ruffles
- Layer 1 (outer): working in both loops of Rnd 5, ch 4 (counts as tr), 2 tr in same st, 3 tr in each st around, join to top of ch 4. Fasten off. (120 tr)
- Layer 2: join red in any free front loop of Rnd 4. Ch 3 (counts as dc), 2 dc in same loop, 3 dc in each free front loop around, join. Fasten off. (96 dc)
- Layer 3: join red in any free front loop of Rnd 3. Ch 3, 2 dc in same loop, 3 dc in each free front loop around, join. Fasten off. (72 dc)
- Layer 4: join red in any free front loop of Rnd 2. Ch 2 (counts as hdc), 2 hdc in same loop, 3 hdc in each free front loop around, join. Fasten off. (48 hdc)
- Layer 5 (center): join red in any free front loop of Rnd 1. Ch 2, 2 hdc in same loop, 3 hdc in each free front loop around, join. Fasten off leaving a 50 cm tail for sewing. (24 hdc)
- Each layer ruffles more as you go. Push them upward with your fingers so the flower forms a dome about 11 cm across.
Attaching the Carnations
- Place a carnation in the center of each square.
- With the long tail, sew the base to the square around the edge of Rnd 5, working under the outer ruffle so the stitches are hidden.
- Sew a few more stitches through the center of the base so the flower can’t lift or rock.
- Fluff the ruffles out again once the flower is sewn on.
Joining the Squares
- Lay out 90 squares, 9 across and 10 long.
- Join method: place two squares side by side, RS up. With red, sl st through the BLO of the matching sts of both squares, starting in the corner ch-2 sps. (39 sl st per side, including both corners)
- Join the squares into rows of 9, then join the rows along their long edges.
- Where four corners meet, work through all four corner sps so no gap is left.
- The joined bedspread measures about 216 x 240 cm before the border.
Lace Border
- Rnd 1: with red, RS facing, join in a corner sp. Work 3 sc in each bedspread corner sp, sc in each st along the edge of every square, and 1 sc in each point where two squares meet; on the long sides only, work 2 sc in the first and last joining points instead of 1. Join. (381 sc along each long side, 341 along each short side and 12 at the corners: 1,456 sts)
- Rnd 2 (mesh): sl st to the center st of the nearest corner. Ch 6 (counts as dc and ch 3), dc in same st, *[ch 1, sk next st, dc in next st] across the side until you reach the center st of the next corner, ch 3, dc in same st; rep from * around, working the last side to the start, ch 1, join to 3rd ch of ch 6. (192 ch-1 sps along each long side, 172 along each short side, and 4 corner ch-3 sps)
- Rnd 3 (mesh): sl st in corner ch-3 sp, ch 6, dc in same sp, *[ch 1, dc in next dc] across the side to the next corner, ch 1, (dc, ch 3, dc) in corner sp; rep from * around, ending with ch 1 and join. (194 ch-1 sps along each long side, 174 along each short side)
- Rnds 4-5: rep Rnd 3, adding 2 sps per side each rnd. (Rnd 5: 198 ch-1 sps along each long side, 178 along each short side)
- Rnd 6 (shells): sl st in corner sp, ch 3, 6 dc in same sp, *[5 dc in next ch-1 sp, sc in next ch-1 sp] across the side, 7 dc in corner sp; rep from * around, omitting the last corner, join. (99 shells along each long side, 89 along each short side and 4 corner shells: 380 shells)
- Rnd 7 (picots): *sc in each dc of the shell up to the center dc, (sc, ch 3, sl st in 3rd ch from hook, sc) in center dc, sc in each remaining dc of the shell, sl st in next sc; rep from * around, join. Fasten off.
- The border is about 11 cm deep.
Pillow Sham Fronts (make 2)
- Join 6 squares with carnations, 3 across and 2 tall, as for the bedspread. (about 72 x 48 cm)
- Edging rnd: with red, join in a corner sp. Work 3 sc in each corner sp, sc in each st along the edge of every square, and 1 sc in each point where two squares meet. Join. Fasten off. (113 sc along each long side, 75 along each short side and 12 at the corners: 388 sts)
Pillow Sham Backs (make 2 sets)
- Gauge for the back: 14 hdc and 11 rows = 10 cm.
- Upper back: with red, ch 107. Row 1: hdc in 3rd ch from hook and in each ch across. (105 hdc)
- Rows 2-33: ch 2 (does not count as a st), turn, hdc in each st across. (105 hdc)
- Last row: ch 1, turn, sc in each st across. Fasten off. (105 sc)
- Lower back: with red, ch 107. Work Row 1 as for the upper back. (105 hdc)
- Rows 2-29: ch 2, turn, hdc in each st across. (105 hdc)
- Last row: ch 1, turn, sc in each st across. Fasten off. (105 sc)
- Lay the upper back over the lower back, both RS up, so the sc edges overlap by about 6 cm and the rectangle matches the front. Pin the overlap.
- Edging rnd: join red in a corner. Working through both layers where they overlap, 3 sc in corner st, sc in next 103 sts, 3 sc in corner st, 85 sc evenly along the side, 3 sc in corner st, sc in next 103 sts, 3 sc in corner st, 85 sc evenly along the other side. Join. Fasten off. (388 sts)
Sham Assembly
- Hold a front and a back WS together, with the front facing you and the corners matched.
- Joining rnd: with red, join in a corner through both layers. Sc through both layers in each st around. Join. (388 sts)
- Shell rnd: ch 1, *sc in next st, sk next st, 5 dc in next st, sk next st; rep from * around, join. Fasten off. (97 shells)
- Rep with the second sham.
Finishing
Weave in all ends on the WS. Hide the short tails from the ruffle layers inside the carnation itself, between the layers, where they can’t be seen from any angle.
Lay the bedspread flat and steam the lace border only, pinning each scallop and picot into shape. Don’t press or steam the carnations directly, or they’ll lose their volume. Once dry, fluff each flower with your fingers. Put the pillows into the shams through the back opening.
Tips for Success
- Work the carnation base firmly. A tight base keeps the free front loops neat, which makes the ruffle layers easier to work.
- Make the carnations in batches while you work the squares. One flower takes around 45 minutes, so spreading them out keeps the project moving.
- Wind several balls before you start. With 39 skeins, using the same dye lot throughout matters, because a slightly different red shows clearly in a sea of flowers.
- Sew the carnations on before joining the squares. It’s much easier to reach the back of one square than of a finished bedspread.
- Choose an acrylic or acrylic blend. Wool or cotton would make an already heavy bedspread much heavier.
Common Mistakes to Avoid
- Working the base in both loops. If Rnds 2-5 aren’t worked in the BLO, there are no front loops left for the ruffles. Always check the base before fastening off.
- Ruffles that don’t ruffle. Working 2 sts instead of 3 in each loop gives a flat, wavy edge instead of a frill. Keep to 3 sts per loop on every layer.
- Flat carnations. Pushing all the layers outward flattens the flower. Push them upward instead so each layer stands against the one outside it.
- A border that ruffles. If the lace waves, Rnd 1 has too many sts. Work exactly 1 sc per joining point except the four noted on the long sides.
- Gaps between squares. Work the join through all four corner sps where squares meet, or small holes appear under the flowers.
Ways to Customize This Pattern
- Make the carnations in two tones: deep red for the outer layers and a lighter red or pink for the center.
- Add a frilled edge to Layer 1 with (sl st, ch 2) in each tr for carnations with serrated petals.
- Change the size: each square adds 24 cm. A throw of 5 by 6 squares with the lace border is about 140 x 165 cm.
- Make the bedspread in white or ivory for a softer, bridal version.
- Leave the carnations off every other square for a checkerboard of flowers and plain squares, which halves the weight.
Frequently asked questions
Expect around 4 kg in acrylic. The carnations add a lot of yarn, which is part of what makes the bedspread look so full. Weighing one finished square with its flower before you start tells you the final weight fairly accurately.
It’s designed as a decorative bedspread. The carnations are soft but bulky, so most people fold it back at night or use it on top of a lighter blanket.
Yes. Add a Rnd 6 to the base in the BLO (*sc in next 4 sts, 2 sc in next st*, 48 sts) and work an extra tr ruffle on it. Make the squares one or two rnds bigger to match.
Wash it on a gentle cold cycle inside a large laundry bag, or by hand in a bathtub. Squeeze out the water without wringing, dry it flat, and fluff each carnation while it’s still damp.
The finished Red Carnation Bedspread and Shams Crochet Pattern

