Retro Bloom Scalloped Table Runner
Beginner Friendly
Perfect for those just starting their crochet journey, with clear instructions and simple techniques
Single-Day Project
A satisfying project you can complete in a single afternoon or evening.
Handmade Gift
A beautiful keepsake — free forever. Read online or print at home.
About This Retro Bloom Scalloped Table Runner
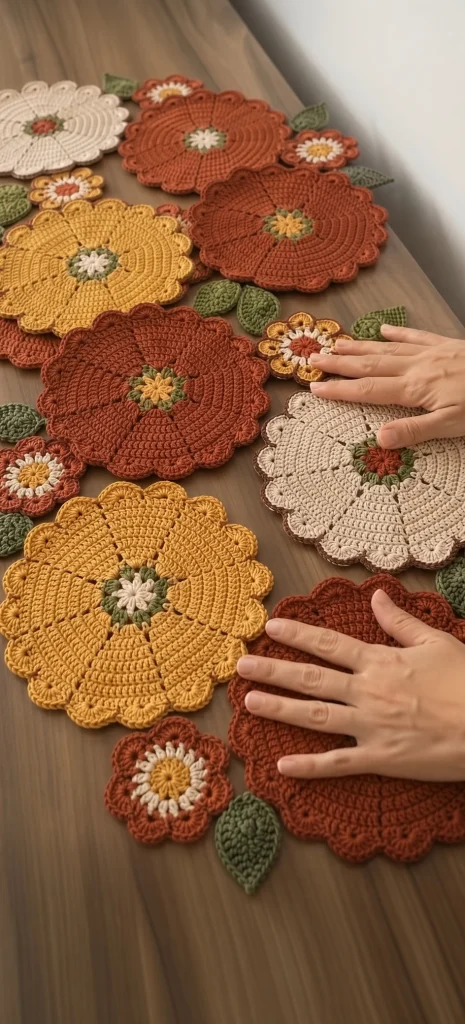
This crochet flower table runner pattern joins nine large scalloped blooms into a staggered two-column strip, filled out with eight small daisies and ten olive leaves tucked into the gaps between them. There is no backing fabric — every motif attaches directly to its neighbors, so the runner has a soft, uneven outline that follows the flowers rather than a straight hemmed edge.
The large bloom is built in three stages. A tiny two-tone center opens into eight wedge sections divided by visible spoke lines, then a round of raised petal ridges, then a deep scalloped rim that gives the flower its cut-out silhouette. The spoke lines come from working into a single stitch at the same point on each round, which leaves a clean radial seam — that detail is what makes these read as retro blooms rather than plain granny circles.
The palette runs rust, terracotta, mustard and cream, deliberately unbalanced so no color forms a stripe down the runner. Plan on around two hours per large bloom, twenty minutes per small flower, fifteen per leaf, and four or five hours to join and block — roughly 22 to 28 hours in total. It is advanced work because of the volume of motifs and because the layout is an arrangement judged by eye, not a grid. The result folds flat, packs away easily, and comes out every autumn.
Materials
- Worsted weight cotton in rust approx. 230 m (about 125 g) — 3 large blooms and small flowers
- Worsted weight cotton in terracotta approx. 160 m (about 85 g) — 2 large blooms
- Worsted weight cotton in mustard gold approx. 160 m (about 85 g) — 2 large blooms and small flowers
- Worsted weight cotton in cream approx. 180 m (about 95 g) — 2 large blooms, flower centers, small flowers
- Worsted weight cotton in olive green approx. 110 m (about 60 g) — leaves and flower centers
- Worsted weight cotton in golden yellow approx. 40 m — daisy centers
- 4 mm crochet hook US G-6
- 3.5 mm hook for the small flowers
- Tapestry needle blunt tip
- Rustproof pins 60+
- Blocking mats or a towel-covered board at least 110 x 50 cm
- Stitch markers 8-10, essential for keeping the spoke lines aligned
- Measuring tape and small sharp scissors
Abbreviations
begbeginningchchaindcdouble crochetFPdcfront post double crochethdchalf double crochetMRmagic ringreprepeatrnd(s)round(s)RSright sidescsingle crochetskskipsl stslip stitchsp(s)space(s)st(s)stitch(es)Gauge and sizing
- Gauge: 14 sc and 16 rows = 10 cm x 10 cm, blocked.
- One large bloom measures approximately 20 cm across including its scalloped rim.
- Small flower: approximately 8 cm across. Leaf: approximately 7 cm long.
- Finished runner: approximately 102 cm long by 42 cm wide at its widest point.
- All instructions use US crochet terminology.
- To lengthen, add large blooms in pairs — each pair adds about 18 cm. Add 2 small flowers and 2 leaves per pair.
Large bloom (make 9: 3 rust, 2 terracotta, 2 mustard, 2 cream)
- Rnd 1: With olive green, MR, ch 1, 8 sc in ring, pull ring closed, sl st to first sc. (8 sc)
- Rnd 2: *Ch 3, 2 dc in next sc, ch 3, sl st in same sc, sl st in next sc; rep from * 3 more times. (4 small green petal points) Fasten off olive.
- Rnd 3: Join cream with a sl st in any sl st between green points. Ch 1, work 16 sc evenly around the green center, sl st to first sc. (16 sc) Place a stitch marker in every second sc — 8 markers in total. These mark the spoke lines.
- Rnd 4: Join the main flower color with a sl st in any marked sc. Ch 1, *2 sc in the marked sc, sc in next sc; rep from * around, sl st to first sc. (24 sc) Move each marker into the first sc of its increase pair.
- Rnd 5: Ch 1, *2 sc in the marked sc, sc in next 2 sc; rep from * around, sl st to first sc. (32 sc)
- Rnd 6: Ch 1, *2 sc in the marked sc, sc in next 3 sc; rep from * around, sl st to first sc. (40 sc)
- Rnd 7: Ch 1, *2 sc in the marked sc, sc in next 4 sc; rep from * around, sl st to first sc. (48 sc)
- Rnd 8: Ch 1, *2 sc in the marked sc, sc in next 5 sc; rep from * around, sl st to first sc. (56 sc)
- Rnd 9: Ch 1, *2 sc in the marked sc, sc in next 6 sc; rep from * around, sl st to first sc. (64 sc)
- Rnd 10: Ch 1, *2 sc in the marked sc, sc in next 7 sc; rep from * around, sl st to first sc. (72 sc)
- Rnd 11: Ch 1, *2 sc in the marked sc, sc in next 8 sc; rep from * around, sl st to first sc. (80 sc)
- Rnd 12 (spoke definition): Ch 1, *FPdc around the marked sc of the round below, sc in next 9 sc; rep from * around, sl st to first st. (8 FPdc, 72 sc = 80 sts) The raised posts sit directly over the spoke lines and sharpen them.
- Rnd 13: Ch 1, *2 sc in the FPdc, sc in next 9 sc; rep from * around, sl st to first sc. (88 sc)
- Rnd 14: Ch 1, sc in each sc around, working 2 sc in each marked st, sl st to first sc. (96 sc)
- Rnd 15 (petal ridges): Ch 1, *sc in next 3 sc, hdc in next 3 sc, sc in next 3 sc, sl st in next 3 sc; rep from * around, sl st to first sc. (96 sts, 8 raised petal humps)
- Rnd 16 (scalloped rim): Ch 1, sc in first st, *sk next 2 sts, 6 dc in next st, sk next 2 sts, sc in next st; rep from * around, sl st to first sc. (16 scallops)
- Fasten off, leaving a 40 cm tail for joining. The bloom should measure 20 cm across, blocked. Make 9 in the color distribution listed above.
Small flowers (make 8: 3 rust, 3 cream, 2 mustard)
- Rnd 1: With golden yellow and the 3.5 mm hook, MR, ch 1, 10 sc in ring, pull closed, sl st to first sc. (10 sc) Fasten off golden yellow.
- Rnd 2: Join cream with a sl st in any sc. Ch 1, *ch 3, 2 dc in next sc, ch 3, sl st in same sc, sl st in next sc; rep from * 4 more times. (5 small cream petals) Fasten off cream.
- Rnd 3: Join the outer flower color with a sl st behind any cream petal, into the Rnd-1 sc below. Ch 1, working behind the cream petals, sc in each of the 10 Rnd-1 sc, sl st to first sc. (10 sc)
- Rnd 4: Ch 1, 2 sc in each sc around, sl st to first sc. (20 sc)
- Rnd 5: Ch 1, *sc in next sc, 2 sc in next sc; rep from * around, sl st to first sc. (30 sc)
- Rnd 6 (scalloped rim): Ch 1, sc in first sc, *sk next 2 sc, 5 dc in next sc, sk next 2 sc, sc in next sc; rep from * around, sl st to first sc. (5 scallops)
- Fasten off, leaving a 30 cm tail. The flower should measure about 8 cm across. Make 8.
Leaves (make 10)
- With olive green, ch 15.
- Rnd 1: Sc in 2nd ch from hook, sc in next 2 ch, hdc in next 2 ch, dc in next 4 ch, hdc in next 2 ch, sc in next 2 ch (13 sts along the first side); (sc, ch 2, sc) in the last ch — leaf tip made. Working along the opposite side of the foundation ch: sc in next 2 ch, hdc in next 2 ch, dc in next 4 ch, hdc in next 2 ch, sc in next 3 ch (13 sts along the second side); ch 2, sl st to first sc — leaf base made. (28 sts, plus a ch-2 point at each end)
- Rnd 2: Sl st into the ch-2 base sp, ch 1, (sc, ch 2, sc) in same sp. First side: sc in next 3 sts, hdc in next 2 sts, dc in next st, 2 dc in next st, dc in next 2 sts, 2 dc in next st, hdc in next 2 sts, sc in next 2 sts. (15 sts) (sc, ch 2, sc) in the ch-2 tip sp. Second side: rep the same 15-st sequence. Sl st to first sc. (34 sts, plus a ch-2 point at each end)
- Fasten off, leaving a 30 cm tail. The foundation chain stays visible down the middle as the center vein — do not cover it.
- The leaf should measure about 7 cm long. Make 10.
Layout and joining
- Block all 9 large blooms, 8 small flowers and 10 leaves before joining. Pin each bloom to a true 20 cm circle and each leaf tip out individually. Let everything dry completely.
- Lay the 9 large blooms out in a staggered two-column strip: five down the left side and four down the right, offset by about half a bloom so the right-hand flowers sit in the gaps of the left-hand ones. Adjacent blooms should just touch at their scalloped rims.
- Arrange the colors so no two of the same shade touch. With 3 rust, 2 terracotta, 2 mustard and 2 cream this works out, but it takes a few swaps to find — do it now, on the mat, not after the first join.
- Tuck the 8 small flowers into the notches where three large blooms meet, and the 10 leaves into the remaining gaps along the outer edges, angled outward.
- Pin everything down. Step back and look at the whole layout before sewing a single stitch — this runner is an arrangement, and the third join will look wrong if you did not check it against the ninth first.
- Join the large blooms first. Where two rims touch, whip stitch through the outer loops of about 8 stitches, centered on the contact point, using the tail of one of the two flowers.
- Keep every seam loose enough to lie flat. A tight join pulls two blooms into each other and the runner will buckle at that point.
- Sew the small flowers into their notches next, tacking each one to all three surrounding blooms at 3 or 4 points around its rim so it cannot rotate.
- Sew the leaves last, attaching each along its center chain into the rim of the nearest bloom, leaving the tip and outer edges free so the leaf lifts slightly.
- Secure each seam with two small backstitches on the wrong side and weave tails into the backs of the motifs, never across an open gap where they would show from the front.
Finishing
Give the assembled runner a final block once every join is sewn. Mist it with water rather than soaking, then pin the whole thing flat starting from the center and working outward, so any accumulated unevenness pushes to the edges rather than the middle. Each scallop gets its own pin, pulled gently outward so the rim keeps its cut-out shape rather than rounding off.
Do not pin the leaf tips or the raised petal humps flat. Press them with your fingertips so they settle and leave them — the slight relief in those rounds is what stops the blooms reading as flat discs.
Check the back before it dries. On a runner with this much open edge, any tail that crosses a gap between motifs will be visible from the front, so trim and re-weave anything questionable while you can still get at it.
Let it dry fully, at least twelve hours. Store the runner rolled around a cardboard tube rather than folded, since a crease across a bloom center is difficult to block out. Hand wash in cool water with mild detergent, squeeze out in a towel without wringing, and re-block flat while damp. Never hang it to dry — the joins will stretch under the weight of the motifs below.
Tips for Success
- Use eight stitch markers from Rnd 3 onward and move them every single round. The spoke lines are the signature of this bloom, and once the markers are lost the increases drift and the spokes spiral instead of running straight out from the center.
- Count the stitches at the end of each round — the total should always be the round number times 8, from Rnd 4 through Rnd 11. It is the fastest way to catch an error before it compounds.
- Work the FPdc in Rnd 12 loosely. Tight post stitches pull the flower into a bowl, and over 8 posts the cupping is enough that blocking will not fully correct it.
- Make all nine blooms before joining any of them. Laying them out together is the only way to balance the four colors, and you will move at least three of them once you see the whole strip.
- Block every motif individually before joining. This runner has no backing to hide unevenness, so each piece has to be right on its own.
Common Mistakes to Avoid
- Spoke lines that curve instead of running straight. This means your increases are not stacking on the same radius — each round’s increase must sit directly above the previous round’s. If you notice it at Rnd 7, rip back; by Rnd 11 the curve is locked in.
- Blooms that ruffle at the outer rounds. Rnd 14 adds 8 stitches and Rnd 15 adds none — if you added increases to Rnd 15 as well, the rim waves. Count 96 before starting the scallop round.
- Working Rnd 3 of the small flower into the cream petals instead of the Rnd-1 sc behind them. The cream petals must stay free and sitting forward; if they lie flat under the outer rounds the flower loses its layered look entirely.
- Joining the blooms too tightly. Tight seams are the most common reason one of these runners will not lie flat. If the finished piece ripples, find the join pulling hardest, undo it, and redo it with more give.
- Sewing the small flowers at only one point. They rotate with handling and end up crooked. Tack each one at 3 or 4 points around its rim to all three surrounding blooms.
Ways to Customize This Pattern
- Make a single large bloom as a trivet or a set of four as placemats — at 20 cm across and this dense, it already works under a hot dish without any changes.
- Work all nine blooms in one color with the centers in a contrasting shade. The spoke construction carries the whole design and the runner becomes considerably more modern.
- Swap the autumn palette for dusty blue, sage, cream and soft grey for a version that suits a spring or coastal table without altering a single stitch count.
- Add a joining round in olive around the entire finished outline, working sc into each scallop and ch-3 across each notch, to give the runner a unified edge instead of a flower-shaped one.
- Add four more large blooms in two staggered pairs for a 138 cm runner, plus 4 more small flowers and 4 more leaves.
Frequently asked questions
Cupping in the early rounds means the increases are too tight — a flat circle in single crochet needs exactly 8 increases per round at this stitch count, and if any round has 7 the fabric pulls in. Count each round against the pattern. If the cupping starts at Rnd 12, the front post stitches are the cause; rip back that round and work the posts a full hook size looser.
It does, provided each bloom is joined to every bloom it touches, not just to the one above and below it. The staggered layout means most blooms touch three or four others, and each of those contacts needs a seam. If yours feels floppy, look for contact points you skipped rather than adding stitches to the seams you already made.
Yes, with a 3 mm hook. Each bloom comes out around 15 cm and the finished runner about 78 cm, which suits a smaller table. The stitch counts stay identical — only the gauge changes. You will need roughly 30 percent less yarn overall.
They belong in the notches where three large blooms meet, because those gaps are the only place the runner shows a hole rather than an edge. Lay all nine blooms out first, find the notches, and you will usually get seven or eight of them naturally. If you end up with fewer, put the spare flowers along the outer edge beside a leaf instead.
The scallops themselves are fine, since they are dense double crochet. The vulnerable parts are the leaves, which attach along one line and can catch on a plate edge. If the runner will be used rather than displayed, add a second line of stitching along each leaf’s outer edge — you lose a little lift but it becomes much more practical.
The finished Retro Bloom Scalloped Table Runner

