Advanced
For experienced crocheters who enjoy complex shaping, fine detail, and ambitious construction
Single-Day Project
A satisfying project you can complete in a single afternoon or evening.
Handmade Gift
A beautiful keepsake — free forever. Read online or print at home.
About This Retro Granny Square Blanket
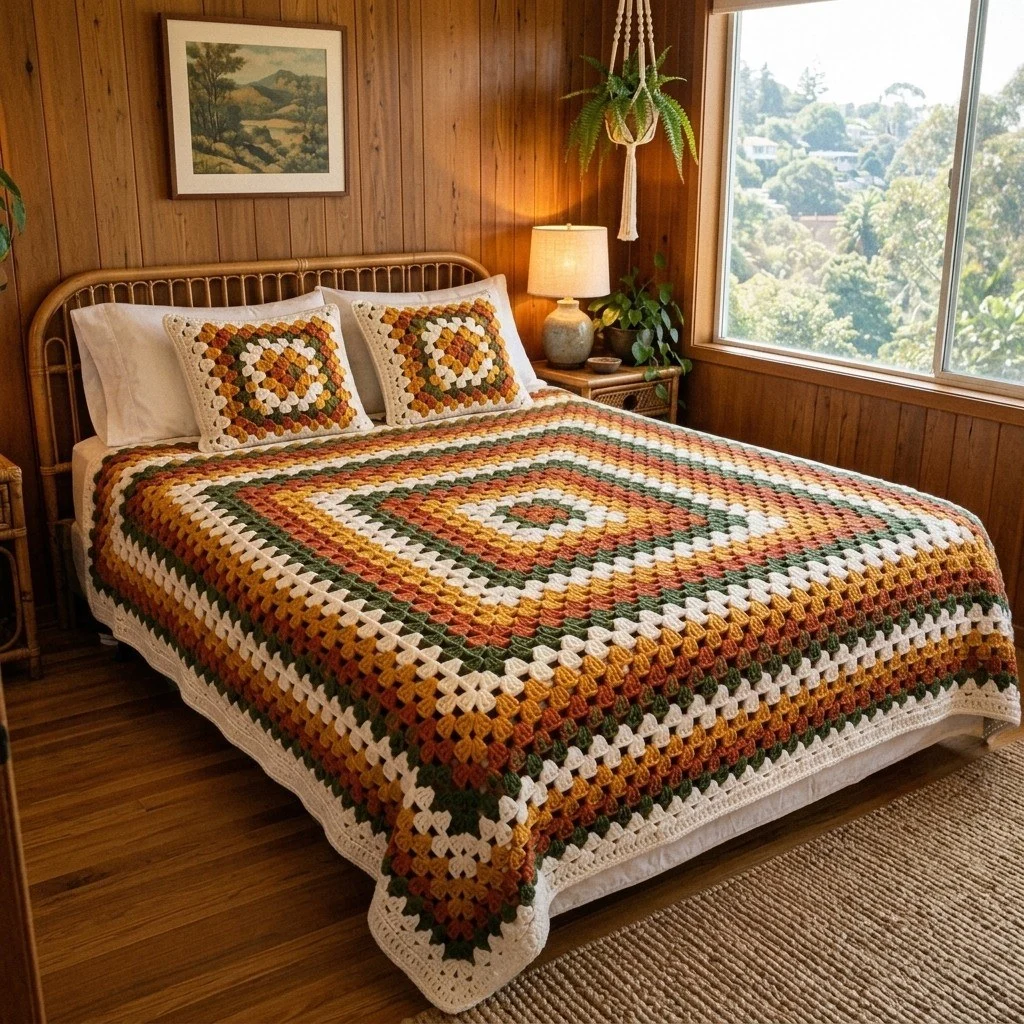
This granny square blanket crochet pattern turns one single square into a full bedspread, worked from a tiny olive centre all the way out to a wide cream border and a shell edge. There is no joining, no sewing of motifs and no ends to weave in every ten minutes — just one square that keeps growing, with the colour rhythm of cream, olive green, gold and rust repeating in concentric frames until it covers the whole bed.
It is an advanced project not because the stitches are hard — it is all double crochet groups — but because of the scale and the planning. You carry a four-colour sequence over fifty-two rounds, keep four corners square across two metres of fabric, manage colour joins that stay invisible on the right side, and finish with a blocked, even edge that hangs straight over the mattress. The last rounds are over 600 stitches long, so tension control and an honest row counter matter more here than any fancy technique.
Expect 40 to 55 hours of hooking, spread over a few weeks. It suits anyone who has made granny squares before and wants a heirloom-scale piece: the first twenty rounds fly by in an evening or two, and the outer rounds are perfect slow television crochet. If you want it smaller, the pattern is written so you can stop at any round and still land on a clean colour change.
Materials
- Worsted / aran acrylic or acrylic-wool blend in cream approx. 1500 g
- Worsted / aran yarn in mustard gold approx. 950 g
- Worsted / aran yarn in rust / terracotta approx. 950 g
- Worsted / aran yarn in olive green approx. 600 g
- 5 mm (H) crochet hook main hook
- 4.5 mm crochet hook optional, for the shell edging if you edge loosely
- Blunt tapestry needle for weaving in ends
- Stitch markers 4, one per corner
- Row counter or notes app essential over 57 rounds
- Rust-proof pins and a measuring tape for blocking
- Sharp scissors
Abbreviations
MRmagic ringchchainsl stslip stitchscsingle crochetdcdouble crochetst(s)stitch(es)sp(s)space(s)grpgroup of 3 dcstanding dcdouble crochet started with a slip knot on the hook, no joining chreprepeatFOfasten offRSright sideGauge, Shaping Rule and Sizing
- Gauge: with 5 mm hook, one granny round measures about 2 cm deep, so each completed round adds roughly 4 cm to the total width. A 6-round swatch should measure about 24 cm across the diagonal-free straight edge.
- Stitch count rule: at Round n the square has 4n groups of 3 dc, that is 12n dc in total, plus 4 ch-2 corner sps and 4 × (n − 1) ch-1 side sps.
- Side rule: at Round n, each straight side has (n − 2) groups of 3 dc between the two corner groups. Use this to check a side at any point without counting the whole round.
- Finished size as written: 52 pattern rounds + 4 border rounds + 1 edging round = approx. 210 cm square before blocking, 215 cm after.
- To resize: stop at Round 39 for a 160 cm throw, Round 45 for a 185 cm double cover, or continue to Round 60 for a 240 cm king cover. Always stop at the end of a colour block, then work the 4 cream border rounds and the edging.
- Keep 4 stitch markers in the 4 corner ch-2 sps and move them up as you go. On rounds over 400 stitches they are the fastest way to confirm the square is still square.
Colour Sequence
- The blanket uses a 13-round colour repeat worked four times, Rounds 1 to 52.
- Repeat round 1: olive green.
- Repeat rounds 2 and 3: cream.
- Repeat rounds 4 and 5: gold.
- Repeat rounds 6 and 7: rust.
- Repeat rounds 8, 9 and 10: cream.
- Repeat round 11: olive green.
- Repeat round 12: gold.
- Repeat round 13: rust.
- So: Rounds 1-13 = repeat 1, Rounds 14-26 = repeat 2, Rounds 27-39 = repeat 3, Rounds 40-52 = repeat 4. Round 40 is olive, Round 52 is rust.
- Rounds 53-56 are all cream (the wide outer border), and Round 57, the shell edging, is cream.
- Write the full 57-round colour list out on paper before you start and tick each round off. It is far easier than recounting a 600-stitch round to work out where you are.
Centre Rounds 1-8
- Round 1 (olive): MR, ch 3 (counts as first dc), 2 dc in ring, ch 2, [3 dc in ring, ch 2] 3 times, sl st to top of beginning ch-3. Pull the ring tight. FO. (4 grps, 12 dc, 4 corner sps)
- Round 2 (cream): standing dc in any corner ch-2 sp, 2 dc in same sp, ch 2, 3 dc in same sp, *ch 1, (3 dc, ch 2, 3 dc) in next corner sp; rep from * twice more, ch 1, sl st to first dc. FO. (8 grps, 24 dc, 4 corner sps, 4 ch-1 sps)
- Round 3 (cream): standing dc in any corner ch-2 sp, 2 dc in same sp, ch 2, 3 dc in same sp, *ch 1, 3 dc in next ch-1 sp, ch 1, (3 dc, ch 2, 3 dc) in next corner sp; rep from * twice more, ch 1, 3 dc in last ch-1 sp, ch 1, sl st to first dc. FO. (12 grps, 36 dc, 1 grp per side)
- Round 4 (gold): standing dc in any corner ch-2 sp, 2 dc in same sp, ch 2, 3 dc in same sp, *[ch 1, 3 dc in next ch-1 sp] to next corner, ch 1, (3 dc, ch 2, 3 dc) in corner sp; rep from * around, ending [ch 1, 3 dc in next ch-1 sp] to beginning corner, ch 1, sl st to first dc. FO. (16 grps, 48 dc, 2 grps per side)
- Round 5 (gold): work as Round 4. (20 grps, 60 dc, 3 grps per side)
- Round 6 (rust): work as Round 4. (24 grps, 72 dc, 4 grps per side)
- Round 7 (rust): work as Round 4. (28 grps, 84 dc, 5 grps per side)
- Round 8 (cream): work as Round 4. (32 grps, 96 dc, 6 grps per side)
- Measure now: the square should be about 32 cm across. If it is more than 3 cm off, change hook size before you commit to fifty more rounds.
Growing the Square: Rounds 9-52
- All rounds from here are worked exactly like Round 4: join with a standing dc in a corner ch-2 sp, work (3 dc, ch 2, 3 dc) in every corner sp, 3 dc in every ch-1 side sp, and ch 1 between all groups. Sl st to the first dc and FO at the end of every round.
- Start each round in a different corner each time. Rotating the join spreads the slight step where the round closes so it never builds into a visible seam up one side.
- Rounds 9 and 10 (cream): 36 grps / 108 dc, then 40 grps / 120 dc.
- Round 11 (olive): 44 grps, 132 dc, 9 grps per side.
- Round 12 (gold): 48 grps, 144 dc.
- Round 13 (rust): 52 grps, 156 dc, 11 grps per side. End of colour repeat 1; square measures about 52 cm.
- Rounds 14-26: work colour repeat 2 (olive, cream, cream, gold, gold, rust, rust, cream, cream, cream, olive, gold, rust). Round 26 has 104 grps, 312 dc, 24 grps per side; square measures about 104 cm.
- Rounds 27-39: work colour repeat 3 in the same order. Round 39 has 156 grps, 468 dc, 37 grps per side; square measures about 156 cm.
- Rounds 40-52: work colour repeat 4 in the same order. Round 52 (rust) has 208 grps, 624 dc, 50 grps per side; square measures about 200 cm.
- Checkpoint habit: at the end of every olive round, count the groups along one side only and compare it with (n − 2). One side right means all four are right, because any error shows as a crooked corner immediately.
- If you find a missing or extra group more than two rounds back, do not rip the whole blanket: on the next round, work 2 dc instead of 3 in the affected sp, or add an extra ch-1 sp, and the granny texture will hide the correction completely.
Wide Cream Border: Rounds 53-56
- Round 53 (cream): work as the standard granny round. (212 grps, 636 dc, 51 grps per side)
- Round 54 (cream): work as the standard granny round. (216 grps, 648 dc, 52 grps per side)
- Round 55 (cream): work as the standard granny round. (220 grps, 660 dc, 53 grps per side)
- Round 56 (cream): work as the standard granny round, but do not FO — continue straight into the edging. (224 grps, 672 dc, 54 grps per side)
- These four rounds are what makes the blanket read as a finished bedspread rather than a big square, so resist the urge to cut them short. The plain cream band is also where the eye rests after all that colour.
- Work these rounds a touch firmer than the body. The border carries the weight of the whole blanket when it hangs over the bed, and a loose outer edge will flare and ripple.
Shell Edging: Round 57
- Round 57 (cream, RS facing): sl st across into the centre dc of the first 3-dc group after any corner.
- Ch 1, sc in that centre dc, *5 dc in next ch-1 sp, sc in centre dc of next 3-dc grp; rep from * along the side to the corner.
- At each corner: 7 dc in the ch-2 corner sp, then sc in the centre dc of the next 3-dc grp and continue the 5-dc shell repeat along the next side.
- Work all four sides the same way, then sl st to the first sc. (220 five-dc shells, 4 seven-dc corner shells, 224 sc)
- FO leaving a 20 cm tail and weave it along the back of the shells so the join point disappears.
- If your shells pucker or cup, redo the round with a 4.5 mm hook and work 4 dc shells instead of 5. If they ruffle and wave, skip the sc on every eighth repeat is not the fix — instead work the round again more firmly, or move up to a sc between shells worked into a skipped stitch.
Finishing
Go over the back of the blanket and check every tail. With 57 colour joins there will be a few you missed; split each tail in two and weave the halves in opposite directions through the dc posts, never along the ch-1 spaces, where they will work loose. Trim the ends only after the blanket has been blocked and settled, not before.
Blocking is what turns this from a homemade square into a bedspread. Lay the blanket out on a clean floor or a bed covered with towels, pin the four corners first to an exact square, measuring both diagonals so they match, then pin along each side every 15 cm, pulling each corner shell out into a point. Spritz the whole piece evenly with cool water, pat it smooth, and let it dry fully — a day or two for acrylic in a well-aired room. For acrylic you can also steam from about 5 cm above the fabric, moving the iron constantly and never touching it down; the stitches relax, the edges stop curling and the colour bands straighten into clean concentric frames.
Once dry, spread the blanket on the bed with the olive centre sitting roughly over the middle of the mattress and the corners hanging as diamonds over the sides, exactly as in the photo. Wash it on a cool gentle cycle in a large machine, and dry flat where possible — a blanket this size holds a lot of water and will stretch if you hang it wet.
Tips for Success
- Use a standing dc to start every round instead of ch-3. Over 57 rounds the ch-3 method builds a visible ladder of taller stitches up one corner, while standing stitches keep every group the same height.
- Keep the four corner markers in place from Round 2 onwards. On the outer rounds the fabric is heavy and bunched in your lap, and markers are the only quick way to see that a side has not gained or lost a group.
- Wind each colour into two or three smaller balls. Dragging a 500 g ball across your lap on a 600-stitch round is what causes uneven tension in the second half of a round.
- Work the colour changes at the corner, not mid-side. The corner ch-2 absorbs the join and the new colour’s first group sits level with the rest.
- Photograph the blanket flat every ten rounds. Colour-band mistakes are almost invisible up close but jump out instantly in a photo, while there is still time to adjust the next repeat.
Common Mistakes to Avoid
- Working only one 3-dc group in the corner space instead of (3 dc, ch 2, 3 dc). The square stops growing at the corner and starts curving into a circle. Count: each corner must contain two groups separated by ch 2.
- Putting a group into the gap between the two corner groups. That ch-2 is a corner, not a side space — an extra group there makes a flared, wavy corner that no amount of blocking will flatten.
- Letting tension loosen as the rounds get long. By Round 50 a relaxed grip adds centimetres to the last side and the square turns into a rectangle. Measure both diagonals every tenth round; they should match within 2 cm.
- Skipping the ch-1 between groups when you are tired. The fabric tightens, the colour bands narrow and the blanket ends up smaller than the stated size. Every pair of groups on a side is separated by exactly one chain.
- Leaving all the tails until the end. On a blanket this size that is well over a hundred ends at once, and most people give up and knot them, which leaves hard lumps you can feel through the bedspread.
Ways to Customize This Pattern
- Make the matching pillow shams: work a separate granny square to Round 14 for each (56 grps, 168 dc), then a second identical square, and join them with a sc seam around three sides, leaving the fourth open for the pillow form. Use the same colour repeat so the shams echo the centre of the blanket.
- Swap the palette while keeping the rhythm: dusty pink, sage, oatmeal and charcoal reads modern; navy, mustard, cream and teal reads coastal. The 13-round repeat works with any four colours as long as one of them is a light neutral carrying the widest band.
- Make it a rectangle for a longer bed: work to Round 40, then on following rounds work the corner increases only at the two corners of the short ends, adding plain groups along the long sides, until you reach the length you want.
- Change the edge character: a simple round of sc followed by a round of reverse sc gives a tailored, flat finish instead of the scalloped shells, which suits a more contemporary bedroom.
- Work the olive rounds in a tweed or heathered yarn of the same weight. The flecks break up the solid frames and give the whole blanket a vintage wool look without changing a single stitch.
Frequently asked questions
Around 4000 g of worsted weight in total: roughly 1500 g cream, 950 g gold, 950 g rust and 600 g olive. Cream dominates because it covers five of every thirteen rounds plus the four border rounds, which are the longest rounds in the blanket. Buy the cream in one dye lot up front — you will notice a lot change across a 60 cm band far more than in a single olive round.
Almost always a missing or extra group on one side, or a corner worked as a single group. Count the groups between corners on all four sides: at Round n each side must have exactly (n − 2) groups. If one side is short by one, add an extra 3 dc into the ch-1 space nearest that corner on the next round; if it is long by one, work two adjacent spaces as a single group. Tension drift causes the rest, and blocking will pull a 2-3 cm difference square.
Not for this colour sequence. Most colours sit out for several rounds at a time, so carrying would leave long floats on the back and distort the corners. Fasten off each round and rejoin with a standing dc — it is more ends, but the right side stays completely clean and the blanket is reversible, which matters when it hangs over the edges of the bed.
One giant square, for this look. The continuous concentric frames are the whole point of the design, and there are no seams to stiffen the drape or to pull apart after a few washes. The trade-off is that the final rounds take over an hour each, so keep a lightweight project going alongside it for days when you do not want to lift two kilos of blanket into your lap.
Ripple means the edging has more stitches than the border can support. Work Round 57 with a hook half a size smaller than the body, and keep the sc between shells firm — that sc is what pulls each shell into a scallop. If it still waves after blocking, pull the round out and work 4-dc shells instead of 5-dc shells, which removes 220 stitches from the edge.
The finished Retro Granny Square Blanket

