Rolling Hills Landscape Crochet Blanket Pattern
Beginner Friendly
Perfect for those just starting their crochet journey, with clear instructions and simple techniques
Single-Day Project
A satisfying project you can complete in a single afternoon or evening.
Handmade Gift
A beautiful keepsake — free forever. Read online or print at home.
About This Rolling Hills Landscape Crochet Blanket Pattern
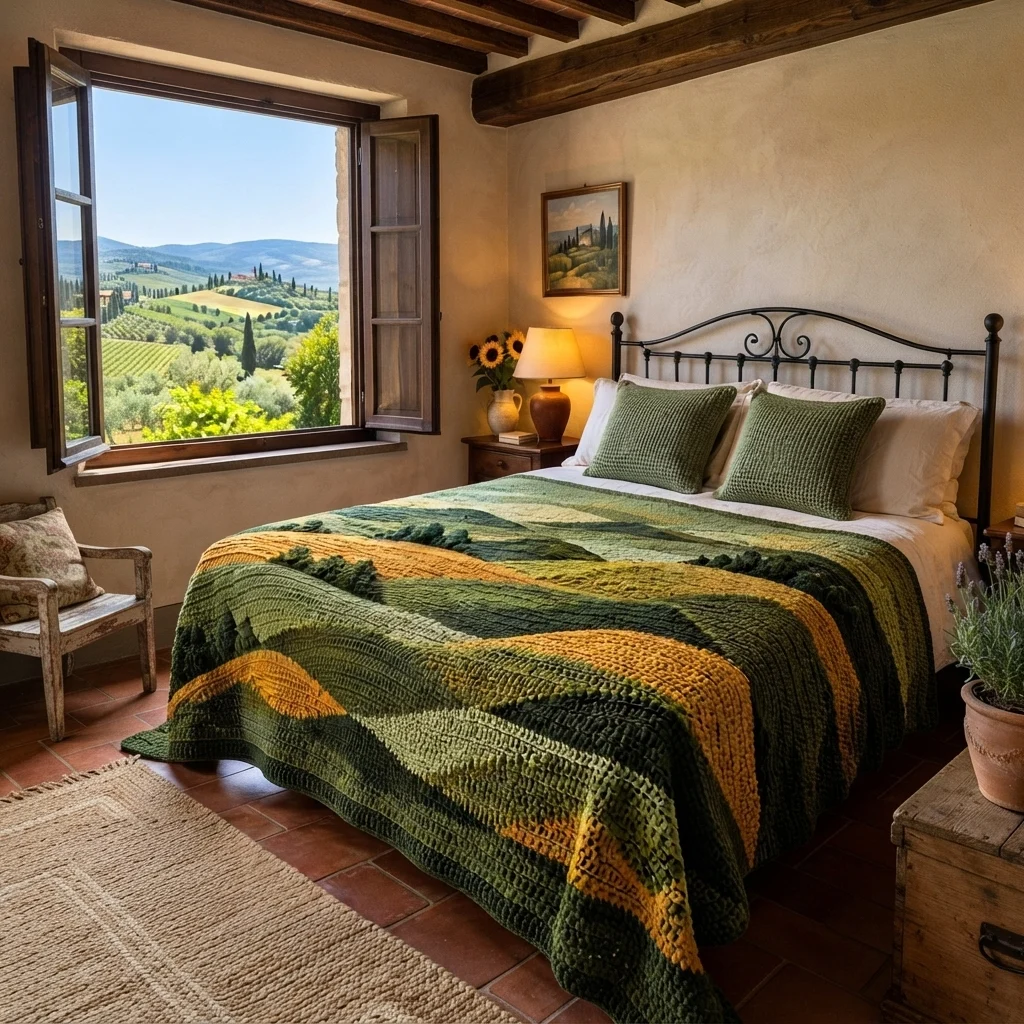
This landscape crochet blanket pattern turns a view of Tuscan hills into a heavy, textured throw. Four bands of rolling color run down the blanket, with sage and forest green hills, olive slopes and golden mustard fields, and a few dark green tree tufts sit along the hill lines like cypress and olive groves.
It is an advanced pattern because every row uses two colors. You work tapestry single crochet over a 24-row hill table that moves the color change a few stitches each row, so the line between the colors swells and falls like a hillside. The rows are long, 150 stitches each, and you work 192 of them, then add a forest green border and sew on 14 small tree tufts. Plan on 45 to 55 hours in total.
It suits crocheters who are comfortable carrying a second color in single crochet and who like following a table. The finished blanket is about 150 x 195 cm, and you can change the width in steps of 1 stitch and the length in steps of 24 rows.
Materials
- Chunky cotton-blend yarn, forest green (F) about 1.1 kg, estimated
- Chunky cotton-blend yarn, olive green (O) about 600 g, estimated
- Chunky cotton-blend yarn, sage green (S) about 600 g, estimated
- Chunky cotton-blend yarn, mustard gold (M) about 600 g, estimated
- Crochet hook 6.5 mm
- Polyester fiberfill a small amount for the tree tufts
- Yarn needle
- Stitch markers one every 24 rows
- Flat surface and pins for blocking
Abbreviations
MRmagic ringchchainscsingle crochetinc2 sc in the same stitchdecsingle crochet 2 stitches togethersl stslip stitchst(s)stitch(es)RSright sideWSwrong sideFOfasten offXthe first color of a band (the hill color)Ythe second color of a band (the valley color)( )xrepeat the stitches in brackets the number of times givenColors for Each Band
- Band 1 (rows 1-48): X = sage (S), Y = forest green (F). These are the far hills at the top of the bed.
- Band 2 (rows 49-96): X = mustard (M), Y = olive (O). This is the first golden field.
- Band 3 (rows 97-144): X = sage (S), Y = olive (O). These are the soft green slopes.
- Band 4 (rows 145-192): X = mustard (M), Y = forest green (F). This is the last field, at the foot of the bed.
- At the end of each band, FO both colors and join the two colors of the next band. Leave 10 cm tails and weave them in later.
How the Hill Table Works
- Every row has 150 stitches. The ch 1 at the start of each row does not count as a stitch. Turn at the end of every row.
- On every row, X is always on the right-hand side of the fabric and Y on the left. The table gives the number of X stitches, called n. The number of Y stitches is always 150 minus n.
- RS rows (odd rows): work n sc in X, then 150 – n sc in Y.
- WS rows (even rows): work 150 – n sc in Y, then n sc in X. This keeps the hill line in the same place from the front.
- Change color on the last pull-through of the last stitch of the old color. Carry the unused color loosely along the top of the stitches and crochet over it.
- To find n for a row, take the row number within its band, from 1 to 48. Use the table below, and when you reach row 24, start again at row 1 of the table. A band is two full waves.
Hill Table (24 rows)
- Table row 1: 40 X, 110 Y
- Table row 2: 42 X, 108 Y
- Table row 3: 45 X, 105 Y
- Table row 4: 49 X, 101 Y
- Table row 5: 54 X, 96 Y
- Table row 6: 60 X, 90 Y
- Table row 7: 66 X, 84 Y
- Table row 8: 72 X, 78 Y
- Table row 9: 77 X, 73 Y
- Table row 10: 81 X, 69 Y
- Table row 11: 84 X, 66 Y
- Table row 12: 86 X, 64 Y
- Table row 13: 86 X, 64 Y
- Table row 14: 84 X, 66 Y
- Table row 15: 81 X, 69 Y
- Table row 16: 77 X, 73 Y
- Table row 17: 72 X, 78 Y
- Table row 18: 66 X, 84 Y
- Table row 19: 60 X, 90 Y
- Table row 20: 54 X, 96 Y
- Table row 21: 49 X, 101 Y
- Table row 22: 45 X, 105 Y
- Table row 23: 42 X, 108 Y
- Table row 24: 40 X, 110 Y
- Check the table: every pair adds up to 150, the table is symmetrical, and no row moves the hill line by more than 6 stitches.
Blanket Body (rows 1-192)
- Foundation: with S, ch 151.
- Row 1 (RS, table row 1): sc in the 2nd ch from the hook and in the next 39 chs in S (40 sc, X), then change to F and sc in each of the remaining 110 chs (150). The foundation chain is in S for the first 40 chs and F for the rest, so work the chain in S, carry F along it, and change at ch 41.
- Rows 2-48: ch 1, turn, and follow the hill table (X on the right, Y on the left) for each row (150). Row 2 uses table row 2, row 3 uses table row 3, and so on up to table row 24 at row 24, then start again at table row 1 at row 25.
- Row 48 ends table row 24 of the second wave. FO S and F.
- Band 2 (rows 49-96): join M and O on the RS and repeat the table from row 1 (row 49 = table row 1). Work all 48 rows, then FO.
- Band 3 (rows 97-144): join S and O and repeat the table from row 1 (row 97 = table row 1). Work all 48 rows, then FO.
- Band 4 (rows 145-192): join M and F and repeat the table from row 1 (row 145 = table row 1). Work all 48 rows, then FO.
- Place a stitch marker in the turning chain of rows 24, 48, 72, 96, 120, 144, 168 and 192 so you can check your length.
- Check your body: every row must have exactly 150 stitches, the body should measure about 136 cm wide and 175 cm tall, and each band should look like two gentle hills.
Forest Green Border (F)
- Round 1: with the RS facing you and row 192 at the top, join F in the top right corner stitch. Ch 1 and work 3 sc in the corner stitch. Sc in each of the next 148 sts across row 192. Work 3 sc in the next corner stitch.
- Work 190 sc evenly down the left side, one in each row end between the corners. Work 3 sc in the bottom left corner, then 148 sc along the foundation edge, 3 sc in the bottom right corner and 190 sc up the right side. Join with a sl st to the first sc (688).
- Rounds 2-5: ch 1, sc in each st around, working 3 sc in the middle st of each 3-sc corner group. Join with a sl st at the end of each round. Each round adds 8 stitches: round 2 has 696, round 3 has 704, round 4 has 712 and round 5 has 720.
- FO and weave in the end.
- Check your border: it should be about 5 cm wide. After round 5, the foot and head edges have 156 stitches between the corner groups, and each side has 198.
Tree Tufts (make 14, F)
- Round 1: 6 sc in MR (6)
- Round 2: inc x6 (12)
- Round 3: (1 sc, inc)x6 (18)
- Rounds 4-5: sc in each st around (18)
- Round 6: (1 sc, dec)x6 (12). Stuff lightly with a small ball of fiberfill.
- Round 7: dec x6 (6). FO leaving a long tail and close the hole.
- Pull the stitches around the sides gently with your needle to rough up the surface, so the tuft looks like a clump of foliage.
Placing the Tufts
- Lay the blanket flat. Put 3 tufts along the hill line between band 1 and band 2 (around rows 44 to 52), spaced about 30 cm apart, to the right of the hill peaks.
- Put 4 tufts along the line between band 2 and band 3, in the valley dips (around rows 92 to 100).
- Put 4 tufts along the line between band 3 and band 4 (around rows 140 to 148), and 3 tufts near the left edge of band 4, a few rows apart.
- Sew each tuft on with small stitches around its flat base and through the back loops of the blanket so it stands up. Group two tufts close together in a few places for a grove effect.
- Weave in all ends along the back.
Finishing
Weave in all ends along the back, following the stitches for at least 8 cm. Block the blanket by laying it flat on towels, pinning the corners and edges to about 150 x 195 cm, and misting it with water. Keep the pins away from the tufts so you do not flatten them. Let it dry fully before moving it. Blocking relaxes the carried yarn and smooths the hill lines.
Drape the blanket across the bed with band 1 at the head and band 4 hanging over the foot, and it will look like the photo.
Tips for Success
- Write the 24 numbers on a card and tick off each row. Keep a second card for the current band and its two colors.
- Count the stitches at the end of every row for the first few bands. There should always be 150.
- Carry the unused color loosely and keep the same tension on both colors, so the hill line stays smooth.
- Wind each color into its own ball and keep the two balls on opposite sides of you so they do not tangle.
- Block the blanket before sewing on the tufts, so you can place them against the final hill lines.
Common Mistakes to Avoid
- Working an even row with X first flips the hills. On every WS row, work Y first and X last.
- Pulling the carried yarn tight puckers the blanket. Spread the stitches on your hook after every color change.
- Losing your place in the table makes the hills jump. Use a stitch marker every 24 rows and tick off each row.
- Joining a new color in the middle of a row leaves a visible knot. Join at the end of a row, on the last pull-through.
- Working different corner counts in the border makes it ripple. Use exactly 3 sc in each corner stitch on every round.
Ways to Customize This Pattern
- Swap the palette for autumn colors, such as rust, ochre and deep brown, or for blues and grays for a coastal landscape.
- Make a baby blanket with 80 stitches (ch 81) and 96 rows (two bands), and scale the table by using about half of each n, about 80 x 90 cm.
- Add a lavender row by making one band with X = lavender and Y = sage, for a lavender-field look.
- Make matching pillow covers by working 60 stitches for 66 rows, sewing them to a plain green back, and adding a tuft to each.
- Add sunflower dots by sewing small mustard puff stitches along the mustard bands.
Frequently asked questions
The amounts above are estimates of about 2.9 kg in all. Each band uses about half of each of its two colors, and forest green is used in two bands plus the border. Weigh your swatch, scale it up by area, and add about 10 percent.
For width, change the stitch count, and multiply every number in the table by the new width divided by 150, then round. For length, add or remove 24 rows at a time, which is one full wave, and keep each band at a multiple of 24 rows.
Yes. Both colors appear in every row, so the unused yarn travels across the back of the fabric. Crocheting over it hides it inside the stitches, so the back stays neat and you have almost no ends to weave in.
With a washable cotton blend, wash it on a gentle cycle in cool water, press out the water without wringing, and lay it flat to dry. Take the tufts off first if the stitching looks loose.
The finished Rolling Hills Landscape Crochet Blanket Pattern

