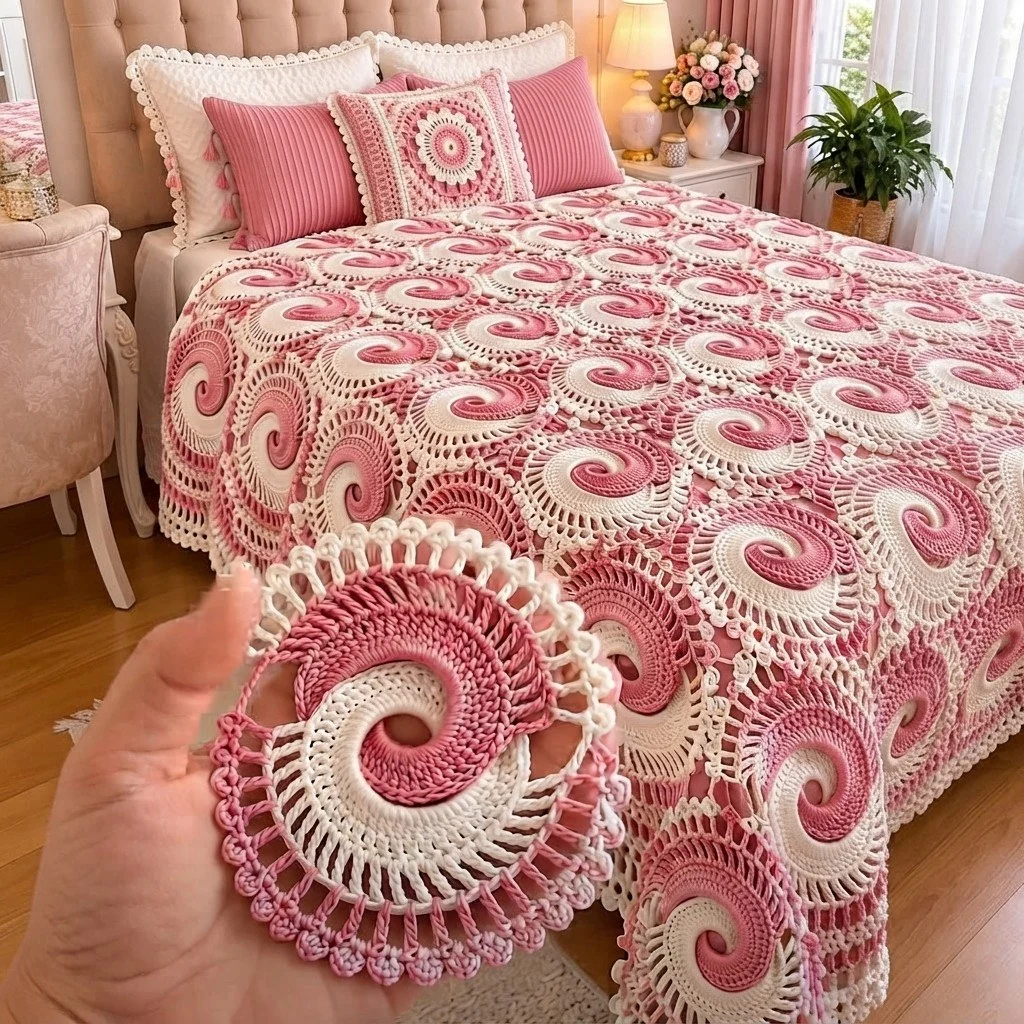
Rose and Cream Spiral Crochet Bedspread
Advanced
For experienced crocheters who enjoy complex shaping, fine detail, and ambitious construction
Weekend Project
A satisfying weekend make — start Friday, finish Sunday, enjoy forever.
Handmade Gift
A beautiful keepsake — free forever. Read online or print at home.
About This Rose and Cream Spiral Crochet Bedspread
This spiral crochet bedspread pattern turns one two-colour swirl motif into a full bed-sized cover in rose pink and soft cream. Each motif is worked as a true double spiral: two strands run at the same time, each colour chasing the other around the ring, so the pink and cream arms wind out from the centre without a single colour change knot. Around that solid swirl sits a ring of open chain-and-treble spokes, and the whole thing is finished with a picot shell edging that gives the motif its scalloped, doily-like rim.
The motifs are joined as you go at six evenly spaced points, so they sit in an offset honeycomb rather than a stiff square grid. The small triangular gaps left between every three circles are filled with a tiny cream three-point filler, which is what keeps the surface smooth enough to actually sleep under. A double round of border in cream and rose pulls the outer scallops into one continuous edge.
This is a long project, not a weekend one. A single motif takes most people 25 to 35 minutes once the spiral clicks, and the full bedspread runs somewhere around 60 to 80 hours of hooking plus blocking time. It suits a confident crocheter who is comfortable working two live loops at once and reading stitch counts carefully — but because every motif is identical, it is an excellent long-haul project to carry around and work one piece at a time.
Materials
- Worsted weight cotton yarn in rose pink approx. 1300 g / 2600 m
- Worsted weight cotton yarn in cream approx. 1350 g / 2700 m
- 4.5 mm crochet hook or size needed for gauge
- Locking stitch markers at least 4 — two of them hold the live spiral loops
- Blunt tapestry needle for ends and the odd repair join
- Sharp scissors
- Rust-proof pins and a blocking surface a foam mat or a towel-covered bed
- Spray bottle of water or a steam iron for blocking the motifs flat
- Tape measure
Abbreviations
MRmagic ringchchainst(s)stitch(es)sl stslip stitchscsingle crochetinc2 sc in the same stitchhdchalf double crochetdcdouble crochettrtreble crochetsp(s)space(s)picotch 3, sl st into top of last dc madereprepeatRSright side( ) x3work instructions in brackets 3 timesSpiral Motif — Centre (make 111)
- With rose, make a magic ring and work 6 sc into the ring. Drop the rose loop onto a marker. (6 rose sts)
- With cream, join into the same magic ring and work 6 sc into the ring, placing them after the rose stitches. Pull the ring closed, but not so tight that you cannot get the hook back in. Drop the cream loop onto a marker. (12 sts total — two arms of 6)
- How the spiral works: each colour always works into the stitches made by the other colour on the previous pass. The two loops chase each other around the circle. Alternate passes as written below, always picking up whichever loop is sitting furthest behind.
- Pass 1, rose: pick up the rose loop and work (sc in next st, inc) x3 over the 6 cream sts. Drop rose. (9 rose sts)
- Pass 1, cream: pick up cream and work (sc in next st, inc) x3 over the 6 rose sts. Drop cream. (9 cream sts — 18 sts in the round)
- Pass 2, rose: (sc in next 2 sts, inc) x3 over the 9 cream sts. (12 rose sts)
- Pass 2, cream: (sc in next 2 sts, inc) x3 over the 9 rose sts. (12 cream sts — 24 sts in the round)
- Pass 3, rose: (sc in next 3 sts, inc) x3. (15 rose sts)
- Pass 3, cream: (sc in next 3 sts, inc) x3. (15 cream sts — 30 sts in the round)
- Pass 4, rose: (sc in next 4 sts, inc) x3. (18 rose sts)
- Pass 4, cream: (sc in next 4 sts, inc) x3. (18 cream sts — 36 sts in the round)
- Pass 5, rose: (sc in next 5 sts, inc) x3. (21 rose sts)
- Pass 5, cream: (sc in next 5 sts, inc) x3. (21 cream sts — 42 sts in the round)
- Pass 6, rose: (sc in next 6 sts, inc) x3. (24 rose sts)
- Pass 6, cream: (sc in next 6 sts, inc) x3. (24 cream sts — 48 sts in the round)
- Pass 7, rose: (sc in next 7 sts, inc) x3. (27 rose sts)
- Pass 7, cream: (sc in next 7 sts, inc) x3. (27 cream sts — 54 sts in the round)
- Pass 8, rose: (sc in next 8 sts, inc) x3. (30 rose sts)
- Pass 8, cream: (sc in next 8 sts, inc) x3. (30 cream sts — 60 sts in the round)
- Levelling pass, rose: working into the next 6 cream sts, make sl st in next st, sc in next st, hdc in next st, dc in next 2 sts, tr in next st. Fasten off rose and pull the tail through. This ramps the rose arm up to full height so the outer edge is level. (edge count unchanged — 60 sts)
- Levelling pass, cream: in exactly the same way, working into the next 6 rose sts, make sl st, sc, hdc, dc, dc, tr. Fasten off cream. (60 sts around the outer edge)
- Run a finger around the edge — it should now be a smooth circle with no visible step. If one side still sits low, add one more hdc into the stitch before the ramp begins.
Spiral Motif — Open Spoke Rounds
- Spoke Round 1: join cream with a sl st in any st of the 60-st edge. Ch 4 (counts as first dc + ch 1), skip 1 st, *dc in next st, ch 1, skip 1 st*, rep from * around, sl st to 3rd ch of beginning ch-4. (30 dc and 30 ch-1 sps)
- Spoke Round 2: sl st into the first ch-1 sp. Ch 6 (counts as first tr + ch 2), *tr in top of next dc, ch 2*, rep from * around, sl st to 4th ch of beginning ch-6. (30 tr and 30 ch-2 sps — these are the long open spokes)
- Fasten off cream and weave the end into the back of a tr post, not along the ch sps, so the openwork stays open.
- Check the circle lies flat. If it cups, your tr are too short — work the next motif with a half size larger hook for these two rounds only. If it ruffles, the tr are too loose.
Spiral Motif — Picot Shell Edging
- Edging Round 1: join cream with a sl st in any ch-2 sp. Ch 1, *2 sc in ch-2 sp, sc in top of next tr*, rep from * around, sl st to first sc. (90 sc)
- Fasten off cream.
- Edging Round 2: join rose with a sl st in any sc. *Sl st in next st, skip 1 st, work (2 dc, picot, 2 dc) all in next st*, rep from * around. You will use 3 sts per repeat. Sl st to the base of the first shell. (30 picot shells)
- Fasten off rose, leaving a 10 cm tail. Weave the tail into the back of a shell.
- Block the finished motif flat to 16 cm across, pinning each picot out into a point. Do this for every motif before joining — unblocked motifs will not line up.
- Make the first motif complete as written. All remaining 110 motifs are joined during Edging Round 2, as set out in the next section.
Joining the Motifs As You Go
- Layout: the motifs sit in an offset honeycomb. Row 1 has 9 motifs. Row 2 has 8 motifs, each sitting in the dip between two motifs of row 1. Continue alternating for 13 rows: seven 9-motif rows and six 8-motif rows. (111 motifs in total)
- Each motif joins to its neighbours at 6 evenly spaced shells — shells 1, 6, 11, 16, 21 and 26 of Edging Round 2. Count them before you start so you are never guessing mid-round.
- To join at a shell, work (2 dc) into the stitch as usual, then instead of the picot work: ch 1, sl st into the picot of the matching shell on the neighbouring motif, ch 1, then 2 dc into the same stitch to finish the shell.
- Motifs on the outer edge of the bedspread simply have fewer join points — work a normal picot wherever there is no neighbour.
- Work the whole bedspread row by row rather than block by block. Finish all of row 1 first, joining each new motif to the one before it at shells 11 and 16 only.
- For every motif in row 2 onwards, join to the motif on its left first, then to the two motifs above it, always working in the direction of the round so the sl sts do not twist.
- Keep the right side facing you for every single join. One motif joined wrong side up will show as a reversed swirl and there is no fixing it short of frogging the edging round.
Filler Motifs (make approx. 96, in cream)
- Round 1: with cream, make a magic ring and work 6 sc into the ring. Sl st to first sc. (6 sts)
- Round 2: ch 1, inc in each st around, sl st to first sc. (12 sts)
- Round 3: ch 1, *sc in next 3 sts, (sc, ch 6, sc) in next st*, rep from * 3 times in total, sl st to first sc. (15 sc and 3 ch-6 loops)
- Do not fasten off yet. Hold the filler right side up over a triangular gap between three joined motifs, with one ch-6 loop pointing at each motif.
- Attach each ch-6 loop by working a sl st into the picot of the shell that sits closest to it on that motif, then sl st back along the loop to the body of the filler.
- Sl st to the first sc of the round, fasten off and weave the end through the back of the filler.
- Make and attach one filler for every three-circle gap. The exact number depends on your layout — count the gaps once the first three rows are joined and work to that.
Outer Border
- Border Round 1: join cream with a sl st in any outer picot of any edge motif. Ch 1, sc in the same picot, then *sc in each of the next 4 dc of the shell, ch 4, sc in the picot of the next shell*, rep around the whole outer edge of the bedspread.
- Where two edge motifs meet, work ch 4, sc into the join point, ch 4, then continue — this bridges the dip so the edge runs straight instead of scalloping inwards.
- At the four corners of the bedspread, work ch 4, (sc, ch 4, sc) in the outermost picot, ch 4, then continue, to give the corner enough slack to lie flat.
- Sl st to the first sc. Fasten off cream.
- Border Round 2: join rose with a sl st in any sc. Ch 1, sc in the same st, *4 sc in next ch-4 sp, sc in next sc*, rep around, sl st to first sc. Count your total — it must be a multiple of 3 for the final round. Adjust by working 3 sc instead of 4 in one or two ch-4 sps on the last side.
- Border Round 3: *sl st in next st, skip 1 st, work (2 dc, picot, 2 dc) in next st*, rep from * around, working (2 dc, picot, 2 dc, picot, 2 dc) in each corner stitch. Sl st to the base of the first shell and fasten off rose.
- Weave in the border ends along the back of the shells, in two directions, and trim close.
Finishing
Weave in every remaining end before blocking, splitting each tail and running the halves in opposite directions through the back of the solid spiral. Cotton has no memory and ends worked in one direction will work themselves loose the first time the bedspread is washed. There will be a lot of them — set aside an evening and work through a row at a time.
Wet-block the finished bedspread. Soak it in cool water, press out the water between towels without wringing, then lay it flat and pin it to size: pin the four corners first, then the midpoint of each side, then every edge picot. Measure the diagonals and adjust until they match, or the finished cover will hang crooked on the bed. Let it dry completely, which can take a day and a half in a cool room. Once dry, the spokes will have opened up and the picots will hold their points. Wash it afterwards on a cool gentle cycle in a mesh bag and dry it flat.
Tips for Success
- Keep the two spiral strands coming from opposite sides of your lap, or from two separate bags. If both balls sit together they will twist around each other within three passes and you will spend more time untangling than crocheting.
- Count every pass out loud: the whole motif depends on each arm ending at 9, 12, 15, 18, 21, 24, 27 and 30 stitches. One missed increase on pass 3 will not show until pass 7, when the circle starts to cup.
- Make and block five motifs before committing to the full project. Measure them — if yours come out at 15 cm or 17 cm instead of 16 cm, recalculate the number of rows and motifs now rather than halfway through.
- Work the picot by slip stitching into the top of the last dc rather than into the third chain from the hook. It sits tighter against the shell and gives the firm pointed tip you need for the join slip stitches to grab.
- Store finished motifs flat in stacks of ten, each stack in its own bag. Stuffed into a tub they crease along the spokes and need reblocking before joining.
Common Mistakes to Avoid
- Working into your own colour. Each pass must go into the other colour’s stitches. If you find yourself crocheting rose over rose, you have picked up the wrong loop — undo back to the last colour boundary and swap.
- Skipping the levelling pass. Without the sl st–sc–hdc–dc–dc–tr ramp, the spiral finishes with a visible step and the first spoke round rides up over it. The motif will never block flat. Always ramp both arms.
- Pulling the ch-2 spoke spaces tight. Tight chains close the openwork and shrink the motif by more than a centimetre, which throws off the whole layout. Chain loosely and check the motif measures 16 cm after blocking.
- Joining at the wrong shells. Six join points at shells 1, 6, 11, 16, 21 and 26 keep the honeycomb even. Joining at five points or at unevenly spaced shells pulls the circles into ovals and leaves gaps the fillers cannot cover.
- Leaving the fillers until the end. Attaching fillers into an already finished bedspread means wrestling several kilos of cotton for every tiny piece. Fill each gap as soon as the three circles around it are joined.
Ways to Customize This Pattern
- Make a cot blanket or a sofa throw instead: 5 rows of 4 motifs and 4 rows of 3 motifs gives roughly 65 x 130 cm, and takes about eight hours rather than eighty.
- Switch the spiral colours halfway. Work the inner four passes in rose and the outer four in a deeper berry shade, keeping the second arm cream throughout, for a motif that reads as three colours.
- Use the same two colours for both spiral arms in a solid cream version, and keep the rose for the shells and border only. The swirl still shows as texture rather than colour, which suits a quieter bedroom.
- Replace the picot shells with a plain round of (3 dc, ch 2, 3 dc) shells for a flatter, less frilly edge that works better on a bedspread that gets tucked under a mattress.
- Scatter the colours: make a third of the motifs with cream centres and rose outer arms, reversing the swirl direction visually, and place them at random across the layout.
Frequently asked questions
Put a locking stitch marker through the dropped loop every single time, before you touch the other yarn. Worsted cotton is slippery and a dropped loop will run back three or four stitches on its own. Two markers permanently assigned to the spiral loops, plus separate markers for counting, is the setup that works.
You can, but it is much slower and the result is bulkier. If you prefer it, work every motif complete with picots, lay them out on the floor in the honeycomb, then whipstitch picot to picot with cream through the back loops only. Expect to add ten to twelve hours and a noticeably stiffer seam line.
Almost always a missed increase in the spiral centre, or trebles worked too short in Spoke Round 2. Check your arm counts against the pattern first — they must read 9, 12, 15, 18, 21, 24, 27, 30. If the counts are right, the spoke rounds are too tight; go up a half hook size for those two rounds only and block firmly.
Each spiral motif uses roughly 10 g of rose and 10 g of cream, so budget about 1300 g of each for the full 111 motifs, plus another 300 to 400 g of cream for the fillers and border. Buy the whole amount in one dye lot at the start if you can — across 111 motifs a slight lot difference shows as patchy banding across the bed.
The finished Rose and Cream Spiral Crochet Bedspread

