Rose and Sage Flower Crochet Curtain Pattern
Advanced
For experienced crocheters who enjoy complex shaping, fine detail, and ambitious construction
Single-Day Project
A satisfying project you can complete in a single afternoon or evening.
Handmade Gift
A beautiful keepsake — free forever. Read online or print at home.
About This Rose and Sage Flower Crochet Curtain Pattern
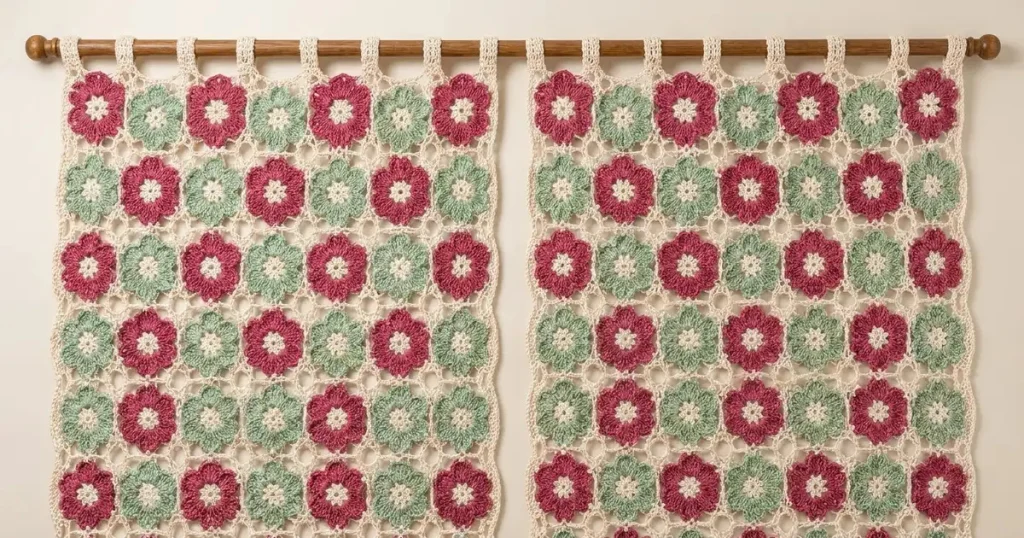
This flower crochet curtain pattern combines dusty rose and soft sage flowers with ivory centers and an open ivory lace framework. Two separate panels hang from folded crochet tabs, leaving a narrow opening between them like the curtain in the reference photograph.
The flowers are made individually, squared with chain lace, and sewn into alternating rows. Shaped petals, careful blocking, discreet lace seams, and reinforced hanging bands make this an advanced project for crocheters comfortable with fine cotton and detailed finishing. Allow approximately 55–75 hours for the pair, working through the motifs in small batches.
Materials
- Sport-weight cotton in ivory Approximately 700 m, including centers, lace frames, bands, tabs, and joining
- Sport-weight cotton in dusty rose Approximately 400 m
- Sport-weight cotton in muted sage green Approximately 400 m
- Crochet hook 3.0 mm, or size needed for blocked gauge
- Tapestry needle and scissors For seams and securely woven ends
- Blocking mats, rustproof pins, and measuring tape Enough space to block individual motifs and completed panels
- Curtain rod Approximately 2–2.5 cm diameter, with removable end cap
- Removable stitch markers For corners, layout, and tab placement
Abbreviations
chchainscsingle crochetdcdouble crochetsl stslip stitchst / stsstitch / stitchesMRmagic ringRS / WSright side / wrong sideGauge, Dimensions, and Construction
- Use US crochet terminology. Work flower rounds with the RS facing throughout. Beginning chains do not count as stitches unless specifically stated.
- Blocked motif gauge: one completed framed flower measures 8 × 8 cm. Make a separate sc swatch for the hanging band: 20 sc and 20 rows measure 10 × 10 cm after washing and drying.
- Each panel contains 7 columns and 8 rows: 56 motifs measuring approximately 56 × 64 cm before the hanging band. The band adds 2 cm; folded tabs add approximately 6 cm above it. Overall hanging length is approximately 72 cm.
- Make 112 motifs for the pair: 56 rose and 56 sage. All centers, frames, bands, and tabs are ivory. Each panel uses 28 flowers of each color.
- The photograph does not show the complete lower edge. This design finishes with a straight row of framed flowers and retains the photographed open lace appearance.
Flower Centers — Make 112 in Ivory
- Round 1: Work 8 sc in MR. Pull the ring firmly closed; sl st to the first sc. (8 sc)
- Round 2: Ch 1, work 2 sc in each st around; sl st to the first sc. Fasten off. (16 sc)
Shaped Flower Petals — Make 56 Rose and 56 Sage
- Round 3: Join the flower color with a sl st in any center st. For the first petal, ch 2, work 3 dc in that same st, ch 2, sl st in the next st. For each of the remaining 7 petals, sl st in the next unworked st, ch 2, work 3 dc in that same st, ch 2, sl st in the next st. After the eighth petal, sl st to the initial joining sl st. Fasten off. (8 petals, using 2 center sts each; 24 dc and 16 ch-2 sections)
- Identify the middle dc of each three-dc petal group. These 8 stitches are the attachment points for the ivory framework. Mark them if the fine cotton makes them difficult to see.
Ivory Lace Frames — Work Around Every Flower
- Round 4: Join ivory with a sc in the middle dc of any petal. Repeat the following 7 times: ch 5, sc in the middle dc of the next petal. Ch 5; sl st to the first sc. (8 sc and 8 ch-5 spaces)
- Round 5: Sl st into the first ch-5 space. Ch 1, work (sc, ch 3, sc) in that space to form the first corner. Repeat the following 3 times: ch 5, sc in the next ch-5 space, ch 5, work (sc, ch 3, sc) in the next ch-5 space. Ch 5, sc in the final unworked ch-5 space, ch 5; sl st to the first sc. Fasten off. (12 sc, 8 ch-5 side spaces, and 4 ch-3 corner spaces)
- Each side of the square has two ch-5 spaces, with one sc between them, extending between two corner groups. Pin the four ch-3 corners into an 8 cm square and distribute the side chains evenly. Wet-block and dry fully.
- Weave center and petal ends securely through stitches of the matching color. Keep the ivory frame ends available for seaming if they are at least 25 cm long; otherwise weave them in and use separate joining lengths.
Panel Layout and Lace Seams — Make Two Panels
- Arrange each panel RS up in 7 columns and 8 rows. Rows 1, 3, 5, and 7, read left to right: rose, sage, rose, sage, rose, sage, rose. Rows 2, 4, 6, and 8: sage, rose, sage, rose, sage, rose, sage.
- Join adjacent motifs with their RS facing upward and edges touching. Use ivory yarn and a tapestry needle. Align the two corner groups, the two ch-5 side spaces, and the middle side sc.
- At the first corner, whipstitch through the middle chain of each matching ch-3 corner space. Continue along the shared side, pairing each of the 5 chains of the first ch-5 space, then the middle sc, then each of the 5 chains of the second ch-5 space. Finish through the middle chains of the opposite corner spaces. This gives 13 paired sewing points per shared side.
- Keep the seam relaxed so paired chain arches lie together without drawing the flower frames inward. Join all 7 motifs into each row. There are 6 vertical seams per row, or 48 vertical seams per panel.
- Join the 8 completed rows in the same way. Work across all 7 motif edges for each row junction: 49 horizontal seams per panel. At every four-motif intersection, catch the four corner midpoint chains together with one additional small securing stitch.
- Block the assembled lace rectangle to approximately 56 × 64 cm. Do not add a solid side or bottom border; the outer ivory chain frame forms the light, gently scalloped edge.
Ivory Hanging Bands — Make Two
- Foundation: Ch 113 in ivory.
- Row 1: Sc in the second ch from the hook and in each remaining ch; turn. (112 sc)
- Row 2: Ch 1, sc in each st across; turn. (112 sc)
- Row 3: Ch 1, sc in each st across; turn. (112 sc)
- Row 4: Ch 1, sc in each st across. Fasten off. (112 sc)
- Block each band to 56 × 2 cm. Mark it into seven sections of 16 sts. Place the foundation edge against the upper edge of the lace panel, matching one section to each motif.
- For each motif, match its first top corner midpoint to band st 1 of the corresponding section, its middle top sc to st 8, and its second corner midpoint to st 16. Spread the two intervening ch-5 arches evenly and sew their chains to the band edge, allowing small gaps between attachment stitches as needed. Work one discreet securing stitch at each motif junction. Do not gather the lace.
Folded Hanging Tabs — Make Sixteen
- Foundation: Ch 7 in ivory.
- Row 1: Sc in the second ch from the hook and in each remaining ch; turn. (6 sc)
- Rows 2–24: Ch 1, sc in each st across; turn after every row except Row 24. Fasten off with a 40 cm sewing tail. (6 sc per row; 24 rows total)
- Block each tab to approximately 3 × 12 cm. Fold it in half across its length, bringing its foundation edge and Row 24 together. The folded tab measures approximately 3 × 6 cm.
- Place 8 folded tabs along each hanging band. Their six-stitch attachment ranges are band sts 1–6, 16–21, 32–37, 48–53, 64–69, 80–85, 96–101, and 107–112, counted from the left with the panel RS facing you.
- Overlap both short ends of each tab onto the WS of the band by approximately 5 mm. Sew through both tab ends and the upper two band rows using two horizontal passes. The folded loop should extend approximately 6 cm above the finished band, allowing for small differences in the fold and overlap.
Finishing
Lay both panels together and check that their bands and lower edges align. Weave in the remaining ends through several ivory stitches, reversing direction once so the ends stay secure during washing. Ease any tight seam before the final blocking.
Wash gently according to the yarn label, press out water in a towel, and pin each panel to its finished measurements. Let the cotton dry completely before threading the rod through the tabs. Hang the panels with a small center gap and arrange the folds by hand so the flowers remain easy to see.
Tips for Success
- Block the first rose and sage motifs together. Different colors of the same cotton can behave differently; both flowers need matching 8 cm frames.
- Keep each petal’s middle dc visible when adding the ivory frame. Attaching beside it pulls the flower off center.
- Pin a whole row before sewing. Matching the corner points first keeps the two chain arches on every side aligned.
- Check hanging-band gauge separately. A band that measures less than 56 cm will gather the lace even when the motif gauge is correct.
- Support the wet panels on a towel. Lifting saturated cotton by the tabs can stretch their attachment points.
Common Mistakes to Avoid
- Making seven or nine petals: each petal consumes exactly two of the 16 center stitches. Count all eight before starting the frame.
- Putting corners in adjacent Round 4 spaces: alternate corner spaces and side spaces in Round 5 to create four equal sides.
- Pulling lace seams tight: loosen the sewing thread until the joined edge measures the same length as an unsewn motif edge.
- Rotating a row into the wrong color sequence: mark the top-left rose flower and check the alternating layout before joining rows.
- Sewing only one end of a folded tab: stitch through both short ends and reinforce across the band to prevent the loop opening under the curtain’s weight.
Ways to Customize This Pattern
- For a longer curtain, add complete alternating rows. Each extra row adds approximately 8 cm and uses 7 motifs per panel.
- For a narrower window, use 5 columns. Each lace panel will measure approximately 40 cm wide; make a band of 80 sc using a foundation of 81 chains.
- Use warm cream instead of ivory for a softer vintage palette while keeping the rose and sage flowers.
- Arrange rose flowers in vertical stripes separated by sage columns. Keep the same motif totals only if you balance the colors across the two panels.
- For a larger rod, lengthen every tab equally by adding sc rows. Every 4 additional rows adds approximately 1 cm to the folded tab height at the stated gauge.
Frequently asked questions
The eight petals and first ivory round form a circular unit. Round 5 creates four corners by placing corner groups into alternate chain spaces. Blocking then establishes the square frame without changing the flower itself.
Yes, but the panels will be smaller unless you add motifs. Block a complete framed flower, multiply its width by 7 and its height by 8, then plan the band from your separate sc gauge. The listed dimensions and yarn estimate apply to the specified cotton gauge.
Block both panels to identical measurements and attach their outermost tabs flush with the band ends. Position the panels evenly on the rod and adjust the tab spacing until the center edges hang parallel.
The ivory chain framework leaves open spaces around the flowers, so the panels filter light and offer limited privacy. Hang them over a separate plain sheer if you want more coverage while keeping the floral lace visible.
The finished Rose and Sage Flower Crochet Curtain Pattern

