Advanced
For experienced crocheters who enjoy complex shaping, fine detail, and ambitious construction
Weekend Project
A satisfying weekend make — start Friday, finish Sunday, enjoy forever.
Handmade Gift
A beautiful keepsake — free forever. Read online or print at home.
About This Rose Fan Lace Crochet Bedspread
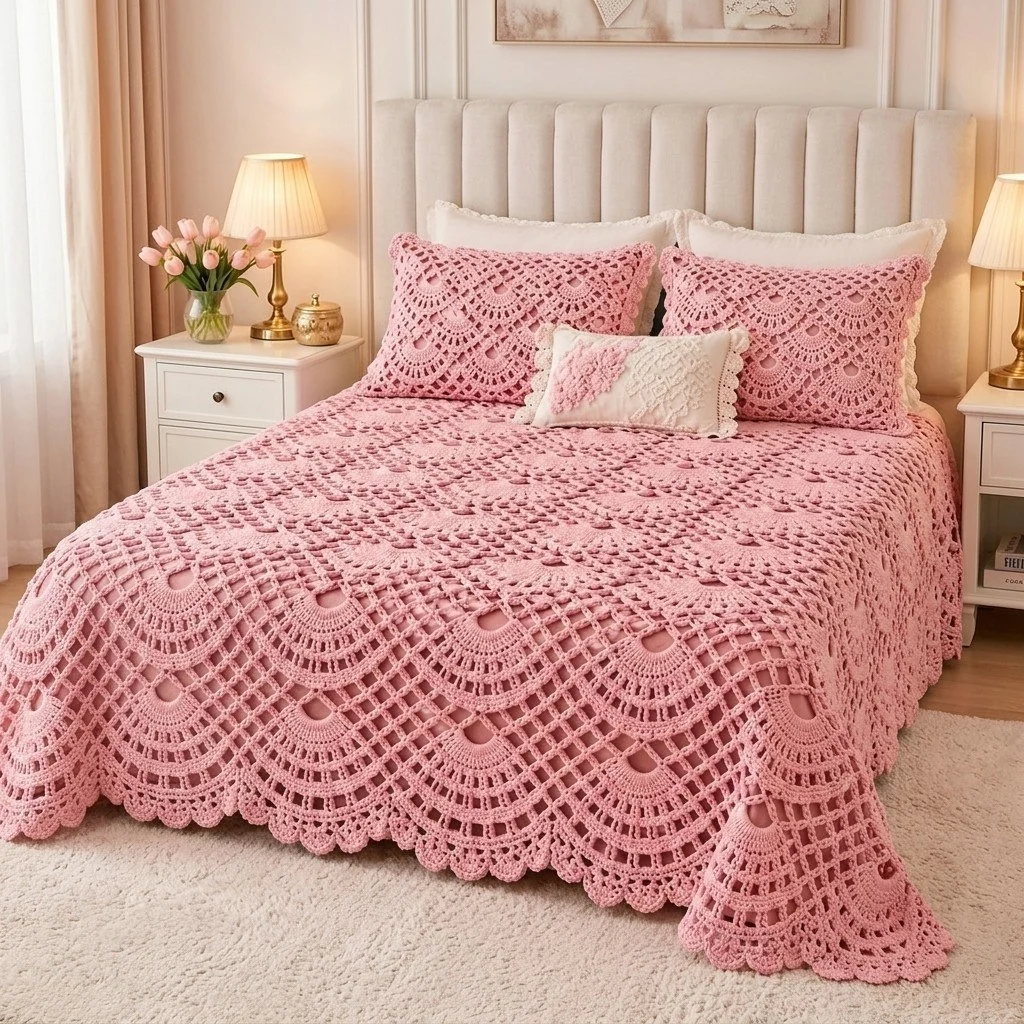
This pink crochet bedspread pattern makes the exact coverlet in the photo: three wide strips of open fan lace, rows of raised puff stitches scattered through the field, soft vertical ridges running the length of the bed, and a deep scalloped border that spills over the edges in half-circles. It is worked in rose pink worsted cotton on a 5 mm hook, in one colour from start to finish, so all the interest comes from the stitch structure rather than from colour changes. The lace is a strict twelve-stitch repeat, which means every row can be checked against a number before you move on — and on a piece this size, that habit is what keeps the edges straight.
The construction is deliberately split into pieces. Three identical strips are worked flat, blocked separately, then seamed along their long edges; surface slip-stitch ridges are added on top of the finished panel; and the border is worked in rounds around all four sides, growing from a plain single crochet round into four rounds of chain mesh and finally into a round of thirteen-stitch fans edged with picots. Working in strips keeps the project portable for most of its life, and it means a mistake costs you one strip, not a whole bedspread.
Plan on roughly 60 to 80 hours spread over several weeks, and about 2.6 kg of cotton. This is a project for someone who is comfortable reading a repeat, counting chain spaces, and blocking seriously — the lace looks crumpled and uneven until it is pinned out wet, and then it opens into the flat, even fan field you see in the photo. If you have made a large lace blanket or a filet piece before, you have everything you need for this.
Materials
- Worsted / aran weight cotton or cotton-blend yarn in rose pink approx. 2,600 g / about 5,200 m total
- 5 mm crochet hook main hook for strips and border
- 5.5 mm crochet hook for the foundation chains only, so they do not pull in
- Blunt tapestry needle size 13 or similar, for seaming and ends
- Stitch markers at least 20, for marking puff rows and border quarters
- Rustproof T-pins and blocking mats enough surface for one 80 x 225 cm strip at a time
- Spray bottle with cool water for wet-blocking the strips and border
- Flexible measuring tape for checking strip length every 20 rows
- Scrap cotton yarn in a contrast colour for the gauge swatch and for basting the seams
Abbreviations
chchainsl stslip stitchscsingle crochetdcdouble crochetdc2togdouble crochet 2 stitches together (1 stitch decreased)puffpuff stitch (see Special Stitches)shell5 dc worked into one stitchfan13 dc worked into one chain looppicotch 3, sl st in 3rd ch from hookskskipsp(s)space(es)st(s)stitch(es)reprepeatRS / WSright side / wrong sideyoyarn overGauge and Sizing
- Gauge swatch: ch 41 with the 5.5 mm hook. Work Row 1 and Row 2 of the Lace Strip, then work Rows 3–6 twice. You will have 3 pattern repeats across.
- Wet the swatch, pin it flat without stretching, and let it dry completely before measuring.
- Target gauge after blocking: one 12-stitch repeat measures 8.5 cm wide, and 4 pattern rows measure 8.8 cm tall, using the 5 mm hook.
- If your repeat is wider than 8.5 cm, go down to a 4.5 mm hook; if narrower, go up to 5.5 mm for the pattern rows.
- Finished strip, blocked: about 76.5 cm wide and 223 cm long. Joined panel: about 230 x 223 cm. With the border added: about 260 x 250 cm, which gives a queen bed (152 x 203 cm) a drop of roughly 50 cm at the sides and foot.
- To resize: each extra strip adds about 76.5 cm of width, and each 4-row repeat adds about 8.8 cm of length. Keep the number of rows the same in every strip.
Special Stitches
- Puff stitch (puff): yo, insert hook in the indicated space, yo and pull up a loop to the height of a dc. Work this 4 times in the same space (9 loops on the hook). Yo and draw through all 9 loops, then ch 1 to close and lock the puff. Keep the pulled-up loops long and even — short loops make a hard knot instead of a soft dome.
- Shell: 5 dc worked into one stitch. In every pattern row after the set-up, the shell is worked into the centre (3rd) dc of the shell below.
- Fan: 13 dc worked into one ch-5 loop, used only in the border.
- Picot: ch 3, sl st into the 3rd ch from the hook.
- Surface sl st ridge: with RS facing and working yarn held behind the fabric, insert the hook front to back through the fabric, pull up a loop, then insert again a short distance along the line, pull up a loop and draw it through the loop on the hook. Repeat to form a raised chain line on the surface.
- Pattern note: the beginning ch 3 of every row counts as the first dc. The lace is a 12-stitch repeat plus 3 stitches, and every pattern row has exactly 10 columns of 3 dc, 9 shells and 18 spaces. Check that count before you turn.
Lace Strip (Make 3)
- With the 5.5 mm hook, ch 113 loosely. Switch to the 5 mm hook.
- Row 1 (RS): dc in 4th ch from hook and in each ch across. Turn. (111 dc, counting the beginning ch 3 as a dc)
- Row 2 (set-up): ch 3, dc in next 2 dc; *ch 4, sk 4 dc, 5 dc in next dc, ch 4, sk 4 dc, dc in next 3 dc; rep from * 8 more times. Turn. (9 shells, 10 columns of 3 dc, 18 ch-4 sps; 108 sts consumed by the repeats plus the first 3 = 111)
- Row 3: ch 3, dc in next 2 dc; *ch 4, sk ch-4 sp, 5 dc in centre (3rd) dc of next shell, ch 4, sk ch-4 sp, dc in next 3 dc; rep from * 8 more times. Turn. (9 shells, 10 columns, 18 ch-4 sps)
- Row 4: rep Row 3. Turn.
- Row 5 (puff row): ch 3, dc in next 2 dc; *ch 2, puff in next ch-4 sp, ch 2, 5 dc in centre dc of next shell, ch 2, puff in next ch-4 sp, ch 2, dc in next 3 dc; rep from * 8 more times. Turn. (9 shells, 18 puffs, 36 ch-2 sps)
- Row 6: ch 3, dc in next 2 dc; *ch 4, sk (ch 2, puff, ch 2), 5 dc in centre dc of next shell, ch 4, sk (ch 2, puff, ch 2), dc in next 3 dc; rep from * 8 more times. Turn. (back to 18 ch-4 sps)
- Rows 7–98: rep Rows 3–6 twenty-three more times (24 four-row repeats worked in total, 96 pattern rows). Mark the right-hand edge of every puff row with a stitch marker as you go — you should finish with 24 markers.
- Row 99 (straightening row): ch 3, dc in next 2 dc; *3 dc in next ch-4 sp, dc in first dc of next shell, dc2tog over next 2 dc, dc2tog over next 2 dc, 3 dc in next ch-4 sp, dc in next 3 dc; rep from * 8 more times. Turn. (12 sts made per repeat; 111 dc total — the same count as Row 1)
- Fasten off, leaving a 20 cm tail. Make 3 strips exactly alike.
- Wet-block each strip separately: soak, roll in a towel, then pin to 76.5 cm wide and 223 cm long, keeping the row-end edges straight. Let dry fully before seaming.
Joining the Strips
- Lay the three blocked strips side by side, all with the RS facing up and all with Row 1 at the same end. Check that the puff rows line up across all three strips; if one strip is off by a row, re-pin and re-dry it rather than easing it in.
- Pin the first two strips together along their long row-end edges, matching Row 1 to Row 1 and Row 99 to Row 99, with a pin every 20 rows.
- Thread a tapestry needle with a 2 m length of yarn. Whip stitch the two edges together through the outer loop of each row-end stitch, working one stitch into each row-end — 99 whip stitches down the seam. Keep the tension matched to the fabric: the seam must stretch as much as the lace does.
- Join the third strip to the free long edge of the middle strip in the same way. The middle strip is the one with a seam on both sides.
- Weave in the seam tails along the seam line for at least 8 cm, then trim. The joined panel measures about 230 x 223 cm.
Surface Chain Ridges
- Five raised lines run the length of the finished panel: one directly over each of the 2 seams, and one up the centre 3-dc column of each of the 3 strips (the 5th column of 10, counting from the right-hand edge of that strip).
- With RS facing, join yarn with a sl st at the bottom of the first line, at the edge of Row 1.
- Work surface sl st ridge up the line, placing 1 sl st per row of the lace — 99 sl sts in total per line. Keep the loops loose and even; a tight ridge will shorten the panel down that line and pucker the lace.
- Fasten off at the top of Row 99 and weave the tail into the ridge itself.
- Repeat for the remaining 4 lines. Measure the panel again afterwards: it should still be 223 cm long. If a ridge has drawn the fabric up, pull it out and rework it with a half-size larger hook.
Border: Setup and Mesh Rounds
- Rnd 1 (foundation round, RS): join yarn with a sl st in any corner of the panel, ch 1. Work sc all the way around as follows — across each short edge (the Row 1 and Row 99 edges): 1 sc in each dc of all 3 strips and 1 sc in each of the 2 seams = 335 sc per short edge. Along each long edge: 343 sc spaced evenly (about 3 sc in each row-end, with a 4th added in roughly every other row-end) — end with exactly 343. Work 3 sc in each of the 4 corners. Join with sl st to first sc. (335 + 3 + 343 + 3 + 335 + 3 + 343 + 3 = 1368 sc)
- Rnd 2: ch 1, sc in first sc, *ch 5, sk 5 sc, sc in next sc; rep from * around, ending ch 5, sk the last 5 sc, join with sl st to first sc. (228 ch-5 loops; adjust by one stitch if needed so that a loop sits squarely across each corner)
- Rnd 3: sl st to centre of first ch-5 loop, ch 1, sc in same loop, *ch 5, sc in next loop; rep from * around, working (sc, ch 5, sc) in each of the 4 corner loops. Join with sl st to first sc. (232 loops)
- Rnd 4: rep Rnd 3. (236 loops)
- Rnd 5: rep Rnd 3. (240 loops)
- Lay the panel flat and check: the mesh should lie smooth, not ruffled and not cupped. If it ruffles, you added corner increases where they were not needed; if it cups, add one more (sc, ch 5, sc) at each corner on the next round.
Border: Scalloped Fan Edge
- Rnd 6 (fan round): sl st to centre of first ch-5 loop, ch 3 (counts as first dc), 12 dc in same loop, *sc in next loop, 13 dc in next loop; rep from * around, ending sc in last loop. Join with sl st to top of beginning ch 3. (120 fans of 13 dc each, separated by 120 sc)
- Rnd 7 (picot round): ch 1, sc in same st, *[picot, sc in next dc] 12 times across the fan, sc in next sc between fans, sc in first dc of next fan; rep from * around, ending with the last sc in the sc between fans. Join with sl st to first sc. (120 fans each carrying 13 sc and 12 picots; 1,680 sc and 1,440 picots in all)
- Fasten off, leaving a 25 cm tail. Close the join invisibly by threading the tail through the top of the first sc and back down into the last stitch.
- Count the fans along each edge before you fasten off: with an even layout you should have about 34 fans on each long side and about 26 on each short side, with one fan sitting centred on each corner.
Finishing
Weave in every remaining end along a seam or inside a column of dc, going at least 8 cm in each direction and splitting the yarn once or twice on the way back — a bedspread gets shaken out and washed, and short ends will work their way free. Trim nothing until all ends are woven.
Then block the whole piece one last time. Soak it in cool water, press out the water between towels without wringing, and lay it flat on a clean sheet. Pin the body of the spread square first, measuring corner to corner so the diagonals match, then pin each border fan individually — one pin at the centre dc of every fan, pulled out just enough to make a clean half-circle. This step is what turns a wavy edge into the crisp scallops in the photo. Let it dry fully, which can take two days for a piece this size, then unpin and lay it on the bed with the Row 1 edge at the head.
Tips for Success
- Count the columns, not the stitches. At the end of every pattern row you should be able to point to 10 columns of 3 dc and 9 shells. That check takes ten seconds and catches almost every error.
- Mark the right-hand edge of each puff row as you finish it. When you join the strips later, those markers let you match the strips row for row at a glance instead of recounting 99 rows.
- Pull the puff loops up to the full height of a dc before closing them. Puffs worked short sit flat and disappear into the lace; the raised dots in the photo come from generous loops and a loose ch 1 to close.
- Weigh your yarn as you go. Note the grams used for strip one, and you will know exactly whether you have enough for strips two and three plus the border, which alone eats about 450 g.
- Block each strip before seaming, not after. Seaming unblocked lace means seaming two edges that are still going to change length, and the seam will ripple once the piece relaxes.
Common Mistakes to Avoid
- Working the new shell into the wrong dc of the shell below. It must go into the centre, the 3rd of the 5 dc. Off by one and the fan column leans sideways a little more with every row — count 1, 2, 3 every time until it becomes automatic.
- Losing the 3-dc edge column. The beginning ch 3 counts as a dc, so the first column is ch 3 plus 2 dc. Crocheting into the first real stitch as well gives 4 dc and a flared edge; skipping it gives 2 dc and a pulled-in edge.
- Chaining the foundation too tightly. 113 tight chains will measure noticeably less than 113 loose ones, and since the whole strip width is set by that chain, the strips will not match. Use the 5.5 mm hook for the chain only.
- Guessing the single crochet count on Rnd 1 of the border. If the long edges are not 343 sc each, the whole mesh and fan math stops working. Place a marker every 50 sc as you work that round so you can correct early.
- Pulling the surface ridges too tight. The ridge should sit on the fabric, not grip it. If the panel measures shorter than 223 cm after the ridges go on, undo them and rework with a larger hook.
Ways to Customize This Pattern
- Change the size by strips: 2 strips make a generous single-bed coverlet (about 183 cm wide finished), 4 strips cover a king (about 336 cm wide). Length is adjusted in 4-row repeats, 8.8 cm at a time.
- Swap the colour while keeping the structure: cream, dusty sage, soft clay or a pale grey-blue all show the puff dots and scallops just as clearly as the rose pink does.
- Work the border in a second shade — a cream or ivory edge against the pink panel sharpens the scallop line and is the easiest way to make the piece look vintage.
- Deepen the border by repeating Rnd 3 two or four more times before the fan round, adding 4 loops per round. Six mesh rounds instead of four gives a drop that reaches almost to the floor.
- Make a matching throw instead: 2 strips, 48 pattern rows each, and the same border worked over a reduced Rnd 1 count that is a multiple of 12.
Frequently asked questions
Yes, but think it through first. You would chain 341 for the full width (111 x 3, plus 8 stitches absorbed by what were the seams — in practice, ch 341 gives 339 dc, which is 28 repeats plus 3). The lace repeat itself works fine at that width. What changes is the handling: from about row 40 onward you are dragging 8 kg of damp-feeling cotton across your lap on every row, and you lose the ability to block the piece in manageable sections. The strips also give you the five surface ridges a natural home.
Count repeats, not centimetres, and keep tension consistent by always working each strip in similar sessions — tired-hands rows are looser than fresh-hands rows. Every strip gets 24 four-row repeats, ending on Row 99. Measure at repeat 12 and again at repeat 24, and if one strip is running more than 3 cm long, that is a tension drift you can correct in blocking; more than 6 cm and you should rework the last repeats with a half-size smaller hook.
Almost always it is too many stitches in Rnd 1, or corner increases added on a round that did not need them. A 13-dc fan needs roughly 7 cm of edge to settle into. Before the fan round, lay the mesh rounds flat on the floor: if the mesh already waves, undo back to Rnd 2 and recount. If only the corners flare, drop the corner (sc, ch 5, sc) on one of the mesh rounds and work a plain sc there instead.
Machine wash cold on a gentle cycle in a front-loader, with no fabric softener, and skip the dryer entirely. Lay it flat on towels or over a drying rack in several folds, reshaping the border scallops by hand while it is damp. Cotton lace of this weight will regain its shape from one careful flat dry; repeated tumble drying will cause the puff stitches to flatten and the picots to curl.
You can, and it will be lighter and cheaper, but it drapes differently. Acrylic blocks less permanently, so the scallops will soften after a few washes, and the puff stitches will look slightly woollier and less defined. If you go that route, choose a smooth, tightly plied acrylic rather than a soft fluffy one, and consider going down to a 4.5 mm hook to keep the fabric from growing on the bed.
The finished Rose Fan Lace Crochet Bedspread

