Advanced
For experienced crocheters who enjoy complex shaping, fine detail, and ambitious construction
Weekend Project
A satisfying weekend make — start Friday, finish Sunday, enjoy forever.
Handmade Gift
A beautiful keepsake — free forever. Read online or print at home.
About This Rose Fan Lace Crochet Panel Pattern
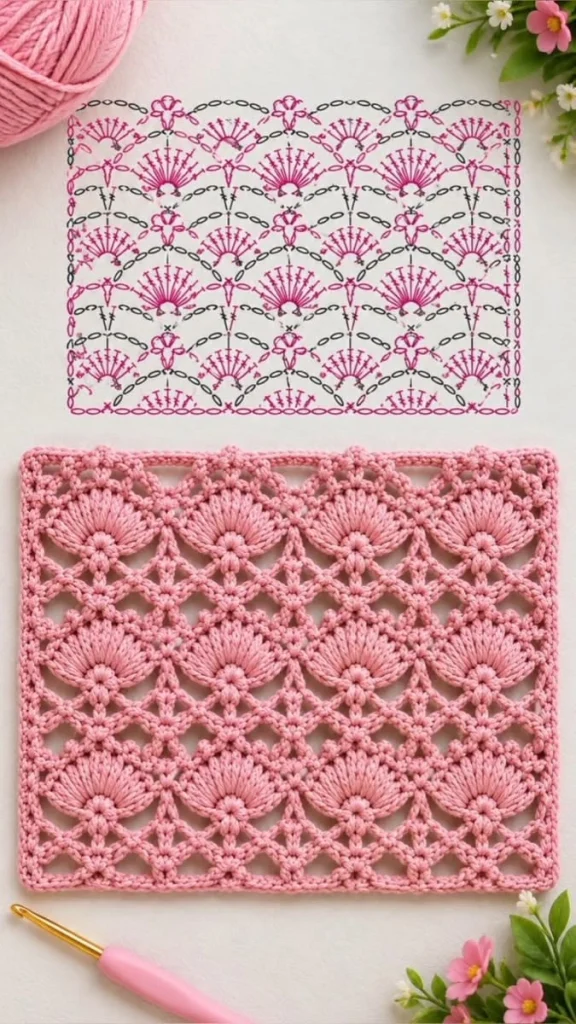
This fan lace crochet panel pattern creates a rose-pink rectangle with twelve sculpted fans and open diamond details. Inspired by the photographed lace swatch, its repeated semicircles sit inside a delicate square framework, with small raised stitches adding texture around each fan.
Allow approximately 14–18 hours for crocheting, assembling, and finishing the panel, plus drying time. This advanced project suits crocheters who enjoy precise blocking, decorative stitch placement, and careful lace assembly. The finished piece makes a small table accent or a decorative panel for a larger textile.
Materials
- Smooth sport-weight cotton in dusty rose pink Approximately 150 g / 450 m; includes allowance for swatching
- 3.0 mm crochet hook Adjust to obtain gauge
- Tapestry needle For joining and attaching lace details
- Locking stitch markers At least eight
- Blocking board, rustproof pins, and ruler For twelve matching squares
- Scissors For trimming ends after finishing
Abbreviations
chchainscsingle crochetdcdouble crochettrtreble crochetsl stslip stitchst / stsstitch / stitchesRSright sideGauge, Size, and Construction
- Use US crochet terminology throughout. Turning chains do not count as stitches. Work joined rounds without turning unless instructed otherwise.
- Target blocked gauge: 24 sc and 28 rows measure 10 × 10 cm. Make a swatch at least 30 stitches wide and 34 rows high, wash it, and measure the central area.
- Each completed frame must block to 8 × 8 cm, measured between the centers of its corner spaces. Its final round has 19 sc along each side between corner spaces.
- Make twelve frames, twelve fans, twelve diamond cords, and twenty-four short connector cords. Assemble four squares across and three down, then add the outer edging.
- The joined grid measures approximately 32 × 24 cm; the edging brings the finished panel to approximately 33 × 25 cm. Cotton, tension, and blocking can change these measurements.
- For all placement directions, view each square from the RS with its bottom edge horizontal. Coordinates are measured in centimeters from its bottom-left corner: horizontal position first, height second.
Square Frames — Make 12
- Foundation: Ch 64 loosely. Join with a sl st to the first ch without twisting. Keep the ring open; it will become the perimeter of a square.
- Round 1: Ch 1, sc in each ch around; join to first sc. Count: 64 sc. Mark stitches 1, 17, 33, and 49 as corners.
- Round 2: Ch 1, work (sc, ch 2, sc) in the first marked st, sc in the next 15 sts; repeat this sequence at each of the remaining three marked corners. Join to first sc. Count: 68 sc and four ch-2 corner spaces.
- Round 3: Ch 1, sc in every sc and work (sc, ch 2, sc) in each corner space; join to first sc. Count: 76 sc and four ch-2 corner spaces, with 19 sc between consecutive corner spaces. Fasten off.
- Wet-block the frame to an 8 cm square. Pin the corner spaces first, then straighten the sides without stretching the stitches into gaps. Allow to dry completely.
Raised Fan Motifs — Make 12
- Special stitch, picot: Ch 3, sl st through the front loop and the adjacent front vertical strand of the sc just completed. The picot adds no stitches to the working edge.
- Foundation: Ch 4 and sl st to first ch to form a ring. Leave a 20 cm tail for attaching the fan base.
- Row 1: Ch 4, work 13 tr into the ring. Turn. Count: 13 tr. Arrange the stitches into a semicircle, leaving the straight lower edge open.
- Row 2: Ch 1, sc in first tr, (ch 2, sc in next tr) twelve times. Turn. Count: 13 sc and twelve ch-2 spaces.
- Row 3: Ch 1, sc in first sc and make a picot; (2 sc in next ch-2 space, sc in next sc, make a picot) twelve times. Count: 37 sc and 13 picots. Fasten off, leaving a 60 cm sewing tail.
- Block the fan to approximately 5.5–6 cm across and 2.5–3 cm from its ring to the center of the curved edge. Keep the trebles spread evenly. The bottom of the ring and the ends of the fan should form a shallow, nearly straight baseline.
Diamond Lattice Cords — Make 12
- Foundation: Ch 40 loosely, leaving a 25 cm tail. Join to first ch with a sl st, taking care not to twist the chain.
- Round 1: Sl st in each of the 40 chains around. Count: 40 sl sts. Fasten off with a 40 cm tail. Mark the first, eleventh, twenty-first, and thirty-first slip stitches; these four marks divide the cord into four equal ten-stitch sides.
- Block each loop into a diamond approximately 6 cm wide and 3 cm high. Pin the four marked stitches at the diamond points. The cord should remain supple; do not pull it drum-tight.
Short Connector Cords — Make 24
- Foundation: Ch 10, leaving a 20 cm tail.
- Row 1: Sl st in second ch from hook and each remaining ch. Count: 9 sl sts. Fasten off with a 20 cm tail.
- Block each cord to approximately 2.1 cm long. Make two cords for each square.
Assemble Each Lace Square
- Pin one dry frame over an 8 cm square outline, RS facing up. Place a fan with its base ring centered at (4, 4.5). Spread its crown toward the upper edge. Its center picot should sit near (4, 7.5), with its outer ends near (1, 4.5) and (7, 4.5).
- Place one lattice diamond below the fan. Position its marked points at top (4, 4), right (7, 2.5), bottom (4, 1), and left (1, 2.5). Rotate the loop so its joining seam lies at the top point.
- Use small oversewing stitches to attach the fan ring to the diamond’s top point. Bridge the approximately 0.5 cm space with three parallel strands, then wrap those strands closely with the working yarn to form one firm connecting bar. Secure the yarn through existing stitches.
- Attach the fan’s outermost picots to the frame’s left and right edges at 4.5 cm above the bottom. Make wrapped bars across the approximately 1 cm gaps using the same three-strand method. Attach the center crown picot to the midpoint of the upper frame edge with a short wrapped bar.
- Attach the diamond’s left and right points to the respective frame edges at 2.5 cm above the bottom. Attach its bottom point to the midpoint of the bottom edge. Use three-strand wrapped bars across the approximately 1 cm gaps.
- Lay one short connector from the fan ring to the right frame edge at a height of 5.5 cm, and the other from the fan ring to the left frame edge at the same height. These cords span only the gaps between each fan’s outer lower end and its frame: tuck their inner ends behind the outer fan stitches, then stitch each end securely. Do not stretch them across the full width of the fan.
- Check that all bars and cords lie flat when the pins are removed. Secure each attachment through at least two existing stitches, weave in the tails, and repeat for all twelve squares.
Join the Panel
- Arrange the squares in three rows of four, all fans pointing upward. Keep the RS facing you throughout assembly.
- Join adjacent squares with a flat mattress seam through corresponding outer loops of the 19 side stitches. Work one stitch pair at a time, drawing the yarn snug enough to close the gap while keeping the seam flat. Secure the adjacent corner spaces together with two small sewing stitches at each end.
- Complete the three vertical seams in each row, then join the two horizontal boundaries between rows. Each side-to-side join pairs 19 stitches with 19 stitches. At four-square intersections, sew through all four corner spaces twice to close the center neatly.
- The exposed perimeter contains 266 sc: 76 along each long edge and 57 along each short edge. There are also ten seam junctions along the perimeter and four outer corner spaces. Place markers in the four outer corner spaces.
Outer Edging
- Round 1: Join yarn in any outer corner space. Ch 1, work (sc, ch 2, sc) in that space. Work sc in each exposed frame sc. At each of the ten perimeter seam junctions, work one sc through both joined corner spaces together. At each remaining outer corner, work (sc, ch 2, sc). Join to first sc. Count: 284 sc and four ch-2 corner spaces.
- Check the sides before continuing: each long side has 81 sc between corner spaces, and each short side has 61 sc. These totals include the two corner-adjacent stitches contributed to each side.
- Round 2: Ch 1, sc in every sc, and work (sc, ch 2, sc) in each corner space. Join to first sc. Count: 292 sc and four ch-2 corner spaces; 83 sc along each long side and 63 along each short side.
- Round 3: Ch 1, sl st loosely in every sc and work 2 sl sts in each ch-2 corner space. Join to first sl st. Count: 300 sl sts. Fasten off. Keep this round relaxed so it does not draw the panel inward.
Finishing
Weave every remaining tail through several stitches on the back, changing direction once before trimming. Check the fan rings, diamond points, and seam intersections with a gentle tug; reinforce any attachment that moves independently of its supporting stitches.
Soak the panel in cool water, press out excess moisture in a towel, and pin it into a rectangle approximately 33 × 25 cm. Align the seams first, then open the fans and diamonds with individual pins. Let the cotton dry fully before lifting it. The finished lace should rest flat with softly raised fan stitches.
Tips for Success
- Block all frames on the same measured outline so the nineteen-stitch sides match during joining.
- Spread each fan’s thirteen trebles before pinning its picots; uneven spacing makes the semicircle lean.
- Make wrapped bars with the square pinned to its final size. Bars formed on an unblocked frame can pull the lace inward.
- Keep a completed square beside you while assembling the others so the diamond points and fan bases stay level across the panel.
Common Mistakes to Avoid
- Counting the fan’s turning chain as a treble produces an extra ray. Count thirteen actual trebles before starting Row 2.
- Working only one sc into a frame corner space loses the square’s symmetry. Each corner receives sc, ch 2, sc in both shaping rounds.
- Pulling mattress seams tight creates ridges. Ease the seam yarn until the two frame edges lie beside one another.
- Adding two edging stitches at a seam junction changes the border count. Work one sc through the two joined corner spaces together.
- A tight final slip-stitch round curls the border. Undo that round and remake it with a looser hand or a slightly larger hook.
Ways to Customize This Pattern
- Use ivory cotton for a traditional lace version while retaining the raised fan texture.
- Make twenty-four squares and arrange them four across by six down for a longer table panel; recalculate the outer edging for the larger perimeter.
- Work the frames and lattice in pale blush and the fans in dusty rose for a subtle two-tone effect.
- Mount the completed panel over a contrasting fabric backing, sewing only around the perimeter so the open diamonds remain visible.
Frequently asked questions
No. This is an original construction inspired by the pink fans and open lattice in the photograph. Separate frames, fans, and diamond cords create a related appearance, so its stitch structure differs from the pictured chart.
First check that it contains thirteen trebles and that its turning chain was not counted. Block the fan separately. If it still exceeds 6 cm across, remake it with a smaller hook while keeping the frame at the stated gauge. Complete this adjustment on the sample square before making the full set.
The short bars connect the lace without filling its open spaces. Making them on the blocked outline lets you set the exact distance between the diamond, fan, and frame while keeping the panel flat.
No. Wet blocking should define the cotton lace for ordinary table use. If you prefer a firmer display piece, test a washable fabric stiffener on your gauge swatch first and follow its label directions.
The finished Rose Fan Lace Crochet Panel Pattern

