Advanced
For experienced crocheters who enjoy complex shaping, fine detail, and ambitious construction
Weekend Project
A satisfying weekend make — start Friday, finish Sunday, enjoy forever.
Handmade Gift
A beautiful keepsake — free forever. Read online or print at home.
About This Rose Garden Crochet Curtains Pattern
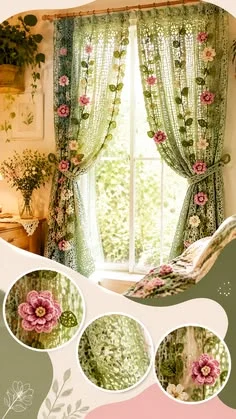
This crochet floral curtain pattern recreates the garden feeling of the reference with sage-green mesh panels, trailing olive leaves, layered pink flowers, and small ivory blossoms. The open fabric lets daylight through, while separately crocheted vines and flowers give the curtains their raised botanical detail. Matching tiebacks gather the panels at the sides.
The project combines filet-style mesh, shaped leaves, two-layer flowers, surface embroidery, and carefully placed appliqué. Allow approximately 65–85 hours for the pair, including blocking and hand sewing. It suits an experienced crocheter who enjoys a substantial home project and is comfortable keeping long mesh panels square. This is an original interpretation of the photographed curtains; the instructions do not reproduce an unseen commercial pattern.
Materials
- Sport-weight, smooth, washable cotton Approximately 250 m per 100 g; use the same yarn range for all colors
- Sage green 1,000 g / 2,500 m for panels, edging, tabs, and tiebacks
- Olive green 200 g / 500 m for vines and leaves
- Dusty rose pink 100 g / 250 m for outer flower petals
- Soft blush pink 50 g / 125 m for inner pink petals
- Warm ivory 100 g / 250 m for ivory flowers
- Muted golden yellow 25 g / approximately 62 m for flower centers
- Crochet hook 3.0 mm, or size needed for gauge
- Tapestry needle, scissors, removable markers, and tape measure Use matching fine sewing thread if preferred for appliqué
- Blocking surface and rustproof pins Large enough to block each panel flat
- Curtain rod and two wall hooks for tiebacks Tabs accommodate a rod up to approximately 20 mm in diameter; check your hardware first
Abbreviations
chchainsl stslip stitchscsingle crochethdchalf double crochetdcdouble crochettrtreble crochetMRmagic ringFLOfront loop onlyBLOback loop onlyst / stsstitch / stitchesRS / WSright side / wrong sideGauge, Dimensions, and Construction
- Use US crochet terminology. Panel rows are turned; flower rounds are joined. Starting chains count only where explicitly stated. Work into both loops unless instructed otherwise.
- Blocked mesh gauge: 20 stitch positions and 10 rows = 10 cm. A stitch position is either one dc or one ch; equivalently, 10 complete mesh spaces span approximately 10 cm. Measure across several spaces, away from the edges.
- Gauge swatch foundation: ch 44. Row 1: dc in fourth ch from hook and every remaining ch, treating the three skipped chains as a turning chain that does not count. You have 41 dc.
- Swatch Row 2: ch 3, turn; this ch 3 counts as the first dc. Skip the first dc, then repeat (ch 1, skip next dc, dc in next dc) 20 times. You have 21 dc and 20 ch-1 spaces, or 41 positions.
- Swatch Rows 3–22: ch 3, turn; repeat (ch 1, dc in next dc) 20 times, placing the last dc in the top of the previous turning ch. Each row has 21 dc and 20 spaces. Wash, block, dry, then measure the central 20 spaces and 20 rows.
- Additional blocked gauges: approximately 22 sc and 24 sc rows = 10 cm; a finished large flower measures approximately 6–7 cm across. Make a flower before committing to the full set.
- Each panel contains 60 mesh spaces across and 150 total rows. Its unedged width is approximately 60.5 cm; side edging brings the width to approximately 62 cm. Target blocked height is 150 cm, excluding tabs. The pair measures approximately 124 cm across when laid flat.
- Make two panels, twelve hanging tabs, two tieback bands, twenty-four large flowers, forty-eight leaves, and six long vines. Twelve flowers decorate the curtain panels and twelve decorate the tiebacks and lower corners as specified during assembly.
- Keep one chosen face as the RS throughout assembly. The curtains contain no stuffing, eyes, or toy components.
Sage Mesh Panels — Make Two
- Foundation: with sage, ch 124 loosely. Work into the back bumps if comfortable.
- Row 1: dc in fourth ch from hook and in each remaining ch. The skipped three chains do not count as a stitch. Count 121 dc. Place a marker in the first and last dc.
- Row 2: ch 3, turn; this counts as the first dc. Skip the first dc, then repeat (ch 1, skip next dc, dc in next dc) 60 times. Count 61 dc and 60 ch-1 spaces: 121 stitch positions.
- Rows 3–149: ch 3, turn; this counts as the first dc. Repeat (ch 1, dc in next dc) 60 times, working the last dc into the top of the previous turning ch. Every row has 61 dc and 60 ch-1 spaces. There are 148 mesh rows in total, Rows 2–149.
- Row 150: ch 3, turn; this does not count as a stitch. Dc in the first dc, then repeat (dc in next ch-1 space, dc in next dc) 60 times. Count 121 dc. Fasten off. Row 150 is the top header; Row 1 is the bottom hem.
- Check the panel every ten rows. Its edges should remain straight and every mesh row must contain exactly 60 spaces. Make the second panel identically.
Long-Edge Borders — Four Edges Total
- With the RS facing, join sage at one end of a long edge. Row 1: ch 1, work 2 sc around the end of each of the 150 panel rows. Count 300 sc. Do not add corner stitches; this border covers only the long edge.
- Row 2: ch 1, turn; repeat (sc in each of the next 5 sts, ch 3, sl st in the first of those 3 ch) 60 times. Count 300 sc and 60 small picots. The picot chains do not replace or consume any border stitches.
- Fasten off and repeat on the opposite long edge. Work both borders on the second panel in the same way. The solid header and bottom hem receive no additional edging.
- Wash and block the undecorated panels to approximately 62 × 150 cm. Pin the mesh into straight vertical columns without pulling the picots taut. Let both panels dry completely.
Hanging Tabs — Make Twelve
- With sage, ch 8. Row 1: sc in second ch from hook and across. Count 7 sc.
- Rows 2–18: ch 1, turn, sc in each st. Count 7 sc per row. Fasten off with a 35 cm sewing tail. Each tab is approximately 3.2 × 7.5 cm before folding.
- Fold each tab across its length so the first and last rows meet. The folded tab is approximately 3.75 cm high. Check one around the actual rod before attaching the full set.
- On each panel, count header stitches from the left edge and mark stitches 4, 27, 50, 72, 95, and 118. These are the six tab centers.
- Center each tab over its marker. Place one short end against the front of the header and the other against the back, overlapping the header by approximately 1 cm. Sew both ends securely through the header with two horizontal rows of small stitches. Keep all loops the same height.
Layered Flowers — Make Twelve Pink and Twelve Ivory
- Use yellow for every center. Round 1: make 6 sc in an MR; join with a sl st to the first sc. Count 6 sc. Close the ring firmly.
- Round 2: ch 1, work 2 sc in each st; join to the first sc. Count 12 sc. Fasten off yellow. Identify the front and back loops of these 12 stitches before beginning the petals.
- Inner petal round: join blush pink in the FLO of any Round 2 stitch for a pink flower, or ivory for an ivory flower. Repeat (sl st in the FLO of the next st, ch 2, work 3 dc in that same front loop, ch 2, sl st in the FLO of the next st) 6 times. Each petal uses two foundation stitches. Count 6 inner petals; all 12 back loops remain unused. Fasten off.
- Outer foundation round: fold the inner petals forward. Join dusty rose in an unused back loop of Round 2 for a pink flower, or ivory for an ivory flower. Ch 1, work 2 sc in each of the 12 unused back loops; join to the first sc. Count 24 sc.
- Outer petal round: repeat (sl st in next st, skip next st, work 5 tr in next st, skip next st) 6 times. Join to the first sl st. Each repeat uses four foundation stitches, producing 6 outer petals. Fasten off with a 45 cm sewing tail.
- Arrange each inner petal between two outer petals. With yellow, embroider three short straight stitches across the center, keeping the stitches inside the yellow disk. Weave in all ends except the sewing tail.
- Steam lightly only if the yarn manufacturer allows it, or damp-block the flowers flat. Avoid stretching the petal tips. Finished diameter should be approximately 6–7 cm.
Pointed Olive Leaves — Make Forty-Eight
- With olive, ch 10. Work around both sides of this foundation chain.
- Round 1, first side: sc in second ch from hook, hdc in next ch, dc in each of next 4 ch, hdc in next ch, sc in next ch, then work 3 sc in the final ch. You have worked 11 sts.
- Round 1, second side: rotate the chain and use the unused loops. Sc in next ch, hdc in next ch, dc in each of next 4 ch, hdc in next ch, sc in final ch. Join to the first sc. Count 19 sts around the leaf.
- Fasten off with a 30 cm tail. The rounded end containing 3 sc is the leaf tip. Use the tail at the opposite end to pinch the two base edges together with one stitch, creating a shallow cup.
- With a separate strand of olive, embroider a loose central vein from the pinched base toward the tip. Do not pull tightly enough to shorten the leaf. Aim for leaves approximately 4–5 cm long.
Trailing Vines — Make Six
- With olive, ch 181 loosely. Starting in the second ch from the hook, sl st in every ch. Count 180 sl sts. Fasten off with a sewing tail.
- Block each cord to approximately 130 cm without forcing it. Cord length depends on slip-stitch tension; the exact stitch count is 180, while 130 cm is the placement target.
- If your cord naturally measures less than 130 cm, lay it in a gentler curve or leave more space above the hem. Do not stretch a short cord hard enough to gather the curtain.
- Use three vines per panel. Pin them vertically at approximately 10 cm, 31 cm, and 52 cm from the left finished edge. Begin each vine approximately 8 cm below the header and arrange shallow curves toward the hem.
- Using olive yarn or matching sewing thread, couch each cord to the mesh at intervals of approximately 2 cm. Pass stitches around mesh dc posts and leave the intervening mesh spaces open.
Floral Tieback Bands — Make Two
- With sage, ch 82. Row 1: sc in second ch from hook and every remaining ch. Count 81 sc.
- Rows 2–8: ch 1, turn, sc in every st. Count 81 sc per row. The blocked band measures approximately 37 × 3.3 cm before end loops.
- First end loop: after Row 8, ch 12. Sl st into the outer corner of Row 1 at this same short end. Fasten off. The chain bridges the short end and forms a hanging loop.
- Second end loop: join sage at the Row 8 corner of the opposite short end, ch 12, and sl st into the Row 1 corner directly below. Fasten off. Each band has two separate ch-12 end loops.
- Block both bands flat. Sew two pink flowers and two ivory flowers along the central 24 cm of each band, alternating colors and overlapping the outer petals slightly. Keep both end loops clear.
- Add four leaves to each band, two projecting above the flowers and two below. Sew through the band itself beneath each flower center so the weight is supported.
Panel Flower Placement and Leaf Assembly
- Use the following coordinates on the first panel, measured from its left finished edge and down from the top header. Place pink flower centers at approximately (10 cm, 30 cm), (31 cm, 75 cm), and (52 cm, 115 cm). Place ivory flower centers at approximately (52 cm, 35 cm), (10 cm, 85 cm), and (31 cm, 125 cm).
- Mirror these six flower positions on the second panel by replacing each horizontal measurement with 62 cm minus that measurement. Keep the vertical measurements unchanged. These placements use three pink and three ivory flowers per panel.
- Add one extra pink flower and one extra ivory flower near the lower inner corner of each panel, approximately 12 cm above the hem. Set their centers approximately 8 cm apart and connect them visually to the nearest vine with small embroidered olive stem stitches.
- The panel decorations use eight pink flowers and eight ivory flowers in total. The two tiebacks use the remaining four pink and four ivory flowers. Total: twenty-four flowers.
- Allocate twenty leaves to each panel and four to each tieback. For each panel, place six leaves on each outer vine and eight on the center vine. Alternate their direction, with bases touching the vine and tips pointing diagonally upward or outward.
- Pin every motif before sewing. Attach each flower through its center and at three evenly spaced points around the outer foundation round. Catch mesh dc posts rather than sewing into unsupported ch-1 spaces. Leave the outer petal tips free.
- Sew each leaf along its central vein and at its base. Leave the outer edges free to retain their shallow shaping. Where a flower covers a leaf base, sew the leaf first.
Finishing
Weave every yarn end through several solid stitches on the back, changing direction once before trimming. Inspect the backs of the flowers and leaves for loose floats. Lay both curtains side by side and check that the headers, hems, and tab heights match.
Give the completed panels a gentle final wash according to the yarn label. Support the wet fabric with both hands and dry it flat to the original blocked measurements. Once dry, slide the tabs onto the rod. Gather each panel loosely and secure both loops of its tieback over the corresponding wall hook. Let the flowers sit on the front of the gathered fabric without pulling the mesh tightly around them.
Tips for Success
- Mark every tenth mesh space across the first open row. Six groups of ten make it easy to spot a missed chain before it changes the panel width.
- Block the bare panels before placing flowers. This keeps the vines from being sewn too tightly across fabric that still needs to open.
- Work slip-stitch vines with a relaxed hand. A tight cord is difficult to couch into gentle curves and can pull the mesh into puckers.
- Support each flower at its center and foundation round. Sewing only the center allows a large flower to flop forward when the curtain hangs.
- Pin the tieback flowers while the band is curved around a folded towel. Check that the petals sit comfortably when the band wraps around the gathered curtain.
Common Mistakes to Avoid
- Missing the last dc of a mesh row narrows the curtain. Work the final dc into the top of the turning ch and confirm that there are still 60 spaces.
- Counting the turning chain in the solid rows adds an unwanted stitch. Row 1 and Row 150 each contain 121 actual dc; their turning chains do not count.
- Working inner petals through both loops removes the foundation for the outer layer. Use FLO for the inner petals and reserve all twelve back loops for the outer foundation.
- Sewing vine cords under tension gathers the panel. Lay the curtain flat, pin the full cord first, and keep couching stitches loose enough for the mesh to remain square.
- Hanging cotton while wet can lengthen the hems unevenly. Dry the panels flat and hang them only after the fibers are fully dry.
Ways to Customize This Pattern
- For a warmer garden palette, use muted peach outer petals and cream inner petals while retaining the sage panels and olive foliage.
- For narrower panels, reduce the foundation by 20 chains per 10 cm of mesh width. Each reduction removes ten mesh spaces and twenty stitch positions; redistribute the tabs evenly across the new header.
- For a shorter window, remove ten mesh rows per approximately 10 cm of height. Keep both solid rows and shorten the vines to suit the revised panel.
- For a quieter floral arrangement, omit the four lower-corner flowers and place them on removable matching bands around a curtain rod finial or other suitable household accent.
- For a wider rod, lengthen every tab by the same number of sc rows. At the stated gauge, six added rows provide approximately 2.5 cm of extra unfolded tab length.
Frequently asked questions
The open mesh is decorative and lets light through. For nighttime privacy, hang a separate plain lining or blind behind the crochet panels. Keep the lining on its own rings or rod so its weight does not stretch the mesh.
The two panels measure approximately 124 cm across when flat. On a rod around 90–100 cm wide they will have light gathering; wider rods give a flatter appearance. Check the actual blocked width before choosing the final rod position.
Cotton mesh relaxes under its own weight, particularly with attached flowers. Wash and block the swatch, then hang the first finished panel for a day before making the second. If needed, remove mesh rows from the first panel before decorating it and match that revised row count on the second.
Yes, if every yarn color is washable and colorfast. Hand wash gently, support the wet panels, and dry flat. Reshape the layered petals with your fingertips before the flowers dry.
Yes. Omit the twelve tabs and attach six rings per panel at the marked header positions. Use rings that close securely and distribute the fabric evenly across the rod.
The finished Rose Garden Crochet Curtains Pattern

