Rosebud Prayer Angel Crochet Pattern
Advanced
For experienced crocheters who enjoy complex shaping, fine detail, and ambitious construction
Single-Day Project
A satisfying project you can complete in a single afternoon or evening.
Handmade Gift
A beautiful keepsake — free forever. Read online or print at home.
About This Rosebud Prayer Angel Crochet Pattern
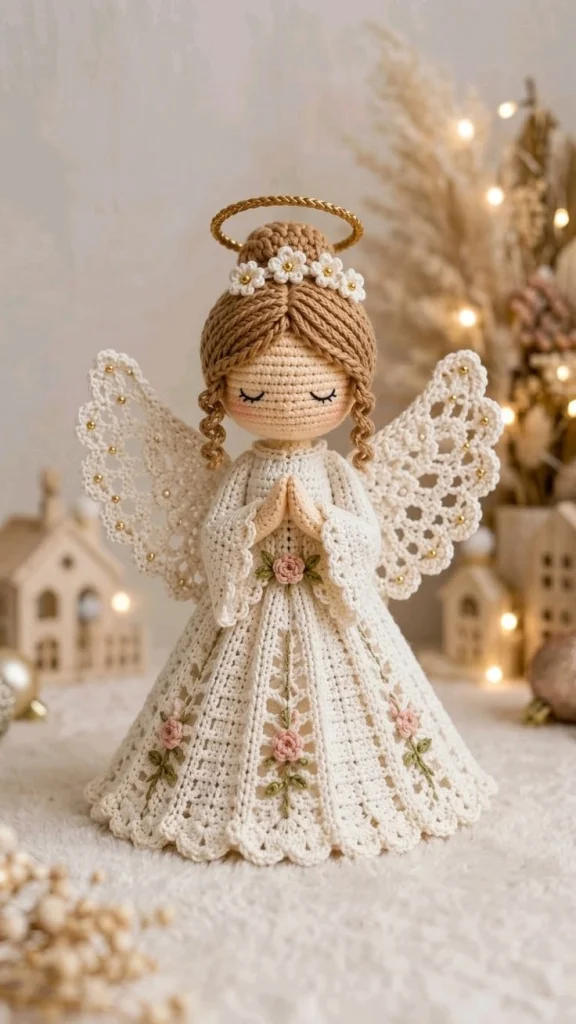
This crochet angel pattern creates a peaceful display figure with closed embroidered eyes, honey-brown swept hair, and hands joined in prayer. An ivory paneled gown, open lace wings, tiny blush roses, and a fine golden halo echo the soft details of the reference photograph.
The dress combines solid shaping with mesh openings, while separate hair strands, shaped sleeves, and embroidered leafy stems give the figure its layered finish. Allow approximately 25–35 hours plus blocking and drying time. This advanced project suits crocheters comfortable with small stitches, lace assembly, surface embroidery, and careful positioning.
Materials
- Ivory sport-weight cotton Approximately 140 g / 420 m for body, sleeves, gown, and wings
- Light peach sport-weight cotton Approximately 25 g / 75 m for head and hands
- Honey-brown sport-weight cotton Approximately 35 g / 105 m for cap, bun, and hair
- Size 10 cotton crochet thread Ivory, approximately 20 m for flowers; dusty pink, approximately 15 m for roses
- Olive-green embroidery cotton Approximately 5 m for stems and leaves
- Black embroidery cotton One separated strand for closed eyes
- Gold crochet thread Approximately 8 m for halo wrapping and flower centers
- Crochet hooks 2.25 mm for sport cotton; 1.5 mm for flowers and roses
- Polyester stuffing Approximately 45 g
- Gold seed beads Optional: 20 for wings and 5 for flower centers
- Gold craft wire Approximately 35 cm of 1 mm wire for the display halo and its support
- Firm plastic canvas One 5 cm circle, with edges rounded, for the enclosed body base
- Fabric stiffener, rustproof pins, and blocking mat For the gown and wings
- Tapestry needle, fine sewing needle, matching sewing thread, stitch markers, and scissors For assembly and details
Abbreviations
MRmagic ringchchainscsingle crochethdchalf double crochetdcdouble crochetsl stslip stitchinc2 sc in one stitchdecinvisible single crochet decrease over 2 stitchesBLOback loop onlyst / stsstitch / stitchesGauge, Construction, and Placement
- Use US crochet terminology. With sport cotton and the 2.25 mm hook, 26 sc and 32 rows should measure 10 × 10 cm in a flat, lightly blocked swatch. Work stuffed parts firmly enough that stuffing does not show.
- For the skirt panel, work Rows 1–40 below and block to the dimensions in the tip. Adjust hook size if necessary. Mesh rows can change the length even when the solid-stitch gauge matches.
- Target dimensions are approximately 28 cm from hem to halo, 7 cm across the head, a 20–21 cm hem diameter, and a 23 cm wingspan. These are estimates at the stated gauge.
- Work head, body, hands, sleeves, hair cap, and bun in continuous rounds unless directed otherwise. Mark the first stitch. Turning chains never count as stitches.
- For flat mesh rows, each ch-1 space counts as one position. On the following solid row, work one stitch into each stitch and one into each ch-1 space unless an increase is specified.
- The angel is a decorative figure. The reference has embroidered sleeping eyes, so no safety eyes are used. Wire, beads, stiffener, and the internal base make this version unsuitable as a child’s toy.
Head
- Round 1: With peach and the 2.25 mm hook, work 6 sc in MR. (6)
- Round 2: Inc in every st. (12)
- Round 3: (Sc, inc) 6 times. (18)
- Round 4: (2 sc, inc) 6 times. (24)
- Round 5: (3 sc, inc) 6 times. (30)
- Round 6: (4 sc, inc) 6 times. (36)
- Round 7: (5 sc, inc) 6 times. (42)
- Round 8: (6 sc, inc) 6 times. (48)
- Round 9: (7 sc, inc) 6 times. (54)
- Rounds 10–19: Sc in every st for 10 rounds. (54 each round)
- Round 20: (7 sc, dec) 6 times. (48)
- Round 21: (6 sc, dec) 6 times. (42)
- Round 22: (5 sc, dec) 6 times. (36)
- Round 23: (4 sc, dec) 6 times. (30)
- Round 24: (3 sc, dec) 6 times. (24)
- Round 25: (2 sc, dec) 6 times. (18) Fasten off with a long sewing tail. Leave the neck opening unclosed.
- Before stuffing, embroider two closed eyes across Rounds 16–17 on the chosen front. Each eye spans 5 stitch columns; leave 7 columns between their inner ends. Make each eye as two shallow downward-curving backstitches and add three short lashes along its outer half. Secure ends inside.
- Stuff the head firmly, maintaining a rounded chin. Add very light peach-pink embroidery shading at the cheeks if desired; leave the face without a mouth to match the reference.
Body and Enclosed Base
- Round 1: With ivory and the 2.25 mm hook, work 6 sc in MR. (6)
- Round 2: Inc in every st. (12)
- Round 3: (Sc, inc) 6 times. (18)
- Round 4: (2 sc, inc) 6 times. (24)
- Round 5: (3 sc, inc) 6 times. (30)
- Round 6: (4 sc, inc) 6 times. (36)
- Round 7: (5 sc, inc) 6 times. (42)
- Round 8: Working BLO, sc in every st. (42) Mark the unused front loops for the skirt attachment.
- Rounds 9–12: Sc in every st for 4 rounds. (42 each round) Place the rounded plastic-canvas circle flat inside the base.
- Round 13: (5 sc, dec) 6 times. (36)
- Rounds 14–18: Sc in every st for 5 rounds. (36 each round)
- Round 19: (4 sc, dec) 6 times. (30)
- Rounds 20–22: Sc in every st for 3 rounds. (30 each round)
- Round 23: (3 sc, dec) 6 times. (24) Stuff firmly above the base, keeping the bottom flat.
- Round 24: (2 sc, dec) 6 times. (18)
- Rounds 25–26: Sc in every st for 2 rounds. (18 each round) Fasten off. Add stuffing into the neck. Sew the head’s 18-stitch opening to these 18 stitches, matching the face to the body front.
Lace Gown Panels — Make 8
- Use ivory sport cotton and the 2.25 mm hook. Row 1: Ch 6, sc in second ch from hook and each remaining ch; turn. (5)
- Row 2: Ch 1, sc in every st; turn. (5)
- Row 3: Ch 1, sc in first st, (ch 1, skip 1 st, sc in next st) twice; turn. (3 sc, 2 spaces; 5 positions)
- Row 4: Ch 1, inc in first st, sc in next 3 positions, inc in last st; turn. (7)
- Row 5: Ch 1, sc in first st, (ch 1, skip 1 st, sc in next st) 3 times; turn. (4 sc, 3 spaces; 7 positions)
- Row 6: Ch 1, sc in every position; turn. (7)
- Row 7: Repeat Row 5. (7 positions)
- Row 8: Ch 1, inc in first st, sc in next 5 positions, inc in last st; turn. (9)
- Row 9: Ch 1, sc in first st, (ch 1, skip 1 st, sc in next st) 4 times; turn. (9 positions)
- Row 10: Ch 1, sc in every position; turn. (9)
- Row 11: Repeat Row 9. (9 positions)
- Row 12: Ch 1, inc in first st, sc in next 7 positions, inc in last st; turn. (11)
- Row 13: Ch 1, sc in first st, (ch 1, skip 1 st, sc in next st) 5 times; turn. (11 positions)
- Row 14: Ch 1, sc in every position; turn. (11)
- Row 15: Repeat Row 13. (11 positions)
- Row 16: Ch 1, inc in first st, sc in next 9 positions, inc in last st; turn. (13)
- Row 17: Ch 1, sc in first st, (ch 1, skip 1 st, sc in next st) 6 times; turn. (13 positions)
- Row 18: Ch 1, sc in every position; turn. (13)
- Row 19: Repeat Row 17. (13 positions)
- Row 20: Ch 1, inc in first st, sc in next 11 positions, inc in last st; turn. (15)
- Row 21: Ch 1, sc in first st, (ch 1, skip 1 st, sc in next st) 7 times; turn. (15 positions)
- Row 22: Ch 1, sc in every position; turn. (15)
- Row 23: Repeat Row 21. (15 positions)
- Row 24: Ch 1, inc in first st, sc in next 13 positions, inc in last st; turn. (17)
- Row 25: Ch 1, sc in first st, (ch 1, skip 1 st, sc in next st) 8 times; turn. (17 positions)
- Row 26: Ch 1, sc in every position; turn. (17)
- Row 27: Repeat Row 25. (17 positions)
- Row 28: Ch 1, inc in first st, sc in next 15 positions, inc in last st; turn. (19)
- Row 29: Ch 1, sc in first st, (ch 1, skip 1 st, sc in next st) 9 times; turn. (19 positions)
- Row 30: Ch 1, sc in every position; turn. (19)
- Row 31: Repeat Row 29. (19 positions)
- Row 32: Ch 1, inc in first st, sc in next 17 positions, inc in last st; turn. (21)
- Row 33: Ch 1, sc in first st, (ch 1, skip 1 st, sc in next st) 10 times; turn. (21 positions)
- Row 34: Ch 1, sc in every position; turn. (21)
- Row 35: Repeat Row 33. (21 positions)
- Row 36: Ch 1, sc in every position; turn. (21)
- Row 37: Repeat Row 33. (21 positions)
- Row 38: Ch 1, sc in every position; turn. (21)
- Row 39: Repeat Row 33. (21 positions)
- Row 40: Ch 1, sc in every position. (21) Fasten off.
- Block each panel to approximately 12.5 cm long, 2 cm across the top, and 8 cm across the bottom. Keep all eight the same size.
Gown Joining, Raised Seams, and Scalloped Hem
- Arrange all eight panels with the same side facing outward. Match their numbered rows and mattress-stitch the long edges together, taking one small stitch through each paired row end. Close the last seam to form a tube that widens toward the hem. Each panel contributes 5 top stitches and 21 hem stitches: 40 at the top and 168 at the hem.
- For each raised seam, join ivory at the waist and surface sl st down the seam, making one loose surface stitch across each paired row end. Make 40 surface stitches per seam. Fasten off at the hem without tightening the chain.
- Hem round: Join ivory at any panel seam. Ch 1, then (sc in next st, skip next st, 5 dc in next st, skip next st) 42 times. Join with sl st to first sc. (42 sc and 42 shells; 252 worked stitches) Fasten off.
- Mark quarters on the gown top at 10-stitch intervals. Mark the body’s unused Round 8 loops in groups of 10, 11, 10, and 11. Sew corresponding quarters together, placing two gown stitches into one body loop at one point in each 11-loop quarter by taking one gown stitch across two adjacent body loops. This distributes the 40 gown stitches evenly over 42 body loops.
- Shape the skirt into a bell with the body suspended centrally inside it. The body base hangs above the hem; the stiffened gown supplies the broad display footprint. Apply stiffener to the lower two-thirds of the skirt and dry over a covered bowl or cone approximately 20 cm across at its base.
Praying Hands and Forearms — Make 2
- Round 1: With peach and the 2.25 mm hook, work 6 sc in MR. This is the joined fingertip end. (6)
- Round 2: (Sc, inc) 3 times. (9)
- Rounds 3–6: Sc in every st for 4 rounds. (9 each round)
- Round 7: (Sc, dec) 3 times. (6)
- Rounds 8–12: Sc in every st for 5 rounds. (6 each round) Fasten off with a sewing tail.
- Add a small amount of stuffing only to the palm. Flatten the hand with the round beginning on its outer edge. Use peach sewing stitches to suggest two finger divisions along the upper palm, without pulling them deeply into the stuffing.
- Make a thumb on the inner palm edge: join peach around a stitch at Round 5, ch 3, sl st in second ch from hook, sc in last ch, then sl st around the neighboring palm stitch. Fasten off and secure. Mirror the placement on the other hand.
Bell Sleeves — Make 2
- Start at the shoulder with ivory and the 2.25 mm hook. Round 1: Ch 12, join with sl st without twisting, then sc in every ch. (12)
- Rounds 2–4: Sc in every st for 3 rounds. (12 each round)
- Round 5: (3 sc, inc) 3 times. (15)
- Rounds 6–8: Sc in every st for 3 rounds. (15 each round)
- Round 9: (4 sc, inc) 3 times. (18)
- Rounds 10–12: Sc in every st for 3 rounds. (18 each round)
- Round 13: (5 sc, inc) 3 times. (21)
- Round 14: Sc in every st. (21)
- Round 15: (6 sc, inc) 3 times. (24)
- Round 16: (Sc in next st, skip next st, 5 dc in next st, skip next st) 6 times. Join with sl st to first sc. (6 sc and 6 shells; 36 worked stitches) Fasten off.
- Place each forearm inside its sleeve so the palm and wrist extend beyond the cuff. Sew the open forearm end securely to the inside of the sleeve at Round 9. Leave the sleeves unstuffed.
- Sew each shoulder opening to a side of the body across Rounds 20–24. Angle the cuffs forward. Bring the palms together at the upper chest with fingertips upward, then sew the palms together along their touching edges. Tack each wrist to the gown with two hidden stitches to hold the prayer pose.
Lace Wings — Make 2
- Use ivory sport cotton and the 2.25 mm hook. These triangular lace fans are mounted with their narrow tips at the upper back and their broad scalloped edges pointing outward. Row 1: Ch 4, sc in second ch from hook and next 2 ch; turn. (3)
- Row 2: Ch 1, inc in first st, sc in next st, inc in last st; turn. (5)
- Row 3: Ch 1, sc in first st, (ch 1, skip 1 st, sc in next st) twice; turn. (5 positions)
- Row 4: Ch 1, inc in first st, sc in next 3 positions, inc in last st; turn. (7)
- Row 5: Ch 1, sc in first st, (ch 1, skip 1 st, sc in next st) 3 times; turn. (7 positions)
- Row 6: Ch 1, inc in first st, sc in next 5 positions, inc in last st; turn. (9)
- Row 7: Ch 1, sc in first st, (ch 1, skip 1 st, sc in next st) 4 times; turn. (9 positions)
- Row 8: Ch 1, inc in first st, sc in next 7 positions, inc in last st; turn. (11)
- Row 9: Ch 1, sc in first st, (ch 1, skip 1 st, sc in next st) 5 times; turn. (11 positions)
- Row 10: Ch 1, inc in first st, sc in next 9 positions, inc in last st; turn. (13)
- Row 11: Ch 1, sc in first st, (ch 1, skip 1 st, sc in next st) 6 times; turn. (13 positions)
- Row 12: Ch 1, inc in first st, sc in next 11 positions, inc in last st; turn. (15)
- Row 13: Ch 1, sc in first st, (ch 1, skip 1 st, sc in next st) 7 times; turn. (15 positions)
- Row 14: Ch 1, inc in first st, sc in next 13 positions, inc in last st; turn. (17)
- Row 15: Ch 1, sc in first st, (ch 1, skip 1 st, sc in next st) 8 times; turn. (17 positions)
- Row 16: Ch 1, inc in first st, sc in next 15 positions, inc in last st; turn. (19)
- Row 17: Ch 1, sc in first st, (ch 1, skip 1 st, sc in next st) 9 times; turn. (19 positions)
- Row 18: Ch 1, inc in first st, sc in next 17 positions, inc in last st; turn. (21)
- Row 19: Ch 1, sc in first st, (ch 1, skip 1 st, sc in next st) 10 times; turn. (21 positions)
- Row 20: Ch 1, inc in first st, sc in next 19 positions, inc in last st; turn. (23)
- Row 21: Ch 1, sc in first st, (ch 1, skip 1 st, sc in next st) 11 times; turn. (23 positions)
- Row 22: Ch 1, sc in every position; turn. (23)
- Outer scallops: Ch 1, sc in first st; (skip 1 st, 5 dc in next st, skip 1 st, sl st in next st) 5 times; skip next st, sc in last st. (5 shells, 5 sl st, 2 sc) Fasten off.
- Join ivory at either end of the foundation chain. Work 22 sc up the adjacent sloping edge, one into each row end. Fasten off. Repeat along the other sloping edge. Leave the 3-stitch foundation edge free for sewing.
- Block each wing to approximately 9 × 8 cm, excluding scallop tips. Pin the broad outer edge into a gentle curve, with its upper corner slightly higher than its lower corner. Apply stiffener thoroughly and allow to dry completely. Make the second wing a mirror image.
- If using beads, sew one at the center of each outer scallop and five more along the sloping borders of each wing. Secure each separately with sewing thread. Sew the narrow end and approximately 3 cm of the lower inner edge of each wing to the body back across Rounds 14–23. Set the upper outer corners just below the crown of the head.
Hair Cap and Bun
- Cap Round 1: With honey-brown and the 2.25 mm hook, work 6 sc in MR. (6)
- Round 2: Inc in every st. (12)
- Round 3: (Sc, inc) 6 times. (18)
- Round 4: (2 sc, inc) 6 times. (24)
- Round 5: (3 sc, inc) 6 times. (30)
- Round 6: (4 sc, inc) 6 times. (36)
- Round 7: (5 sc, inc) 6 times. (42)
- Round 8: (6 sc, inc) 6 times. (48)
- Round 9: (7 sc, inc) 6 times. (54)
- Rounds 10–12: Sc in every st for 3 rounds. (54 each round) Fasten off with a long tail. Fit the cap over the crown, placing its front edge around Head Round 11, above the eyes. Sew around the edge.
- Bun Round 1: Work 6 sc in MR. (6)
- Round 2: Inc in every st. (12)
- Round 3: (Sc, inc) 6 times. (18)
- Round 4: (2 sc, inc) 6 times. (24)
- Rounds 5–7: Sc in every st for 3 rounds. (24 each round)
- Round 8: (2 sc, dec) 6 times. (18) Stuff lightly.
- Round 9: (Sc, dec) 6 times. (12) Fasten off with a sewing tail. Sew the open edge to the upper back of the cap, keeping the bun visible above the forehead flowers.
Swept Hair Strands and Side Curls
- Make 16 swept strands with honey-brown and the 2.25 mm hook. For each strand, ch 23, sl st in second ch from hook and each remaining ch. (22 sl st) Leave sewing tails at both ends.
- Mark a center part from the front crown down to the center forehead. Arrange eight strands on each side, each beginning near the part and sweeping diagonally across the cap toward the side. Allow the lowest strands to frame the cheeks without covering the embroidered eyes.
- Sew each strand at its ends and at two intermediate points, catching only the underside of the strand. Keep the chain ridges visible. Hide surplus strand length behind the ear area or beneath the bun rather than stretching it flat.
- Make 2 long side curls: ch 19, work 3 sc in second ch from hook and every remaining ch. (54 sc) Fasten off and twist into a spiral.
- Make 2 short side curls: ch 13, work 3 sc in second ch from hook and every remaining ch. (36 sc) Fasten off and twist into a spiral.
- Sew one long and one short curl at each side of the cap near the lower hairline. Stagger their attachment points so they fall beside the cheeks and shoulders.
Forehead Flowers — Make 5
- With ivory size 10 thread and the 1.5 mm hook, work 5 sc in MR. Join with sl st to first sc. (5)
- Petal round: In each of the 5 stitches work (sl st, ch 2, 2 dc, ch 2, sl st). (5 petals) Fasten off, leaving a sewing tail.
- Embroider three small gold straight stitches across each center, or sew one gold bead at the center. Arrange the five flowers in a shallow arc across the upper forehead, covering the ends of the swept strands.
Pink Roses and Leaf Embroidery
- Make 5 roses with dusty-pink size 10 thread and the 1.5 mm hook. Row 1: Ch 16, sc in second ch from hook and each remaining ch; turn. (15)
- Row 2: Ch 1, (sl st in next st, 5 hdc in next st, sl st in next st) 5 times. (5 petals; 35 worked stitches) Fasten off with a long tail.
- Roll each strip from one short end, keeping its scallops uppermost. Sew through all layers of the straight lower edge to hold a rose approximately 1–1.5 cm across.
- Place one rose at center front just below the praying hands, covering the waist seam. Place the other four on skirt panels 1, 3, 5, and 7, counting the center-front panel as panel 1. Position the front rose around Panel Row 29, the side roses around Row 25, and the back rose around Row 29.
- Before sewing the skirt roses, embroider a 4 cm olive-green stem down the center of each selected panel using small backstitches anchored into solid rows. Add three pairs of detached-chain leaves, each approximately 6 mm long. Let the lowest leaves sit above the scalloped hem.
- Sew the roses above the stems. Add two detached-chain leaves on each side of the waist rose. Keep embroidery tension loose enough that the mesh stays open.
Golden Halo
- Form a 5.5 cm diameter ring at one end of the gold wire. Twist the short end around the longer wire immediately below the ring, leaving approximately 9 cm of straight support wire. Fold the final 1 cm of the support back against itself to remove the exposed point.
- With gold crochet thread and the 1.5 mm hook, join around the ring and work 100 sc over the wire, sliding the stitches together to cover it evenly. Join with sl st to first sc. (100) Fasten off and weave in the ends.
- Wrap the twisted join and support with gold thread. Bend the support so the ring sits horizontally approximately 1 cm above the bun.
- Slide the support beneath the back of the hair cap, outside the stuffed head. Sew it firmly to the cap and upper back at three points, concealing the folded end under the gown neckline. Check that the ring remains level when the figure stands.
Neckline Trim
- With ivory sport cotton and the 2.25 mm hook, ch 25. Sc in second ch from hook and each remaining ch. (24)
- Ch 1, turn; (sl st in next st, ch 3, sl st in next st) 12 times. (12 small loops) Fasten off with a sewing tail.
- Fit the straight edge around the neck seam with the loops pointing outward. Sew it in place, overlapping the ends at the back as needed to cover the seam. Leave the hands free of the trim.
Finishing
Let every stiffened piece dry fully before final assembly. Stand the angel on a level surface and adjust the skirt so all eight panels share the weight evenly. Secure the wing roots with several small stitches through the body fabric, then check the prayer pose from both the front and side.
Weave in every visible tail and secure the roses, curls, and flowers with matching thread. Set the halo level above the bun and gently separate the hair strands with your fingers. The finished figure should have a calm face, an even bell-shaped hem, and wings that lift away from the gown without pulling the shoulders backward.
Tips for Success
- Label the skirt panels as you finish them. Join matching row ends so the mesh bands continue evenly across all eight seams.
- Pin the hair strands before sewing. Establish the center part first, then work outward in alternating pairs to keep the sweep balanced.
- Block the wings together on one paper outline, flipping the outline for the second wing. Matching their curves matters more than stretching them aggressively.
- Use a narrow strip of scrap paper behind the mesh while embroidering leaves. It makes the solid anchoring rows easier to see; remove it before stiffening.
- Support the head while fitting the halo. A short, firmly sewn support holds the ring more reliably than a long wire pushed into stuffing.
Common Mistakes to Avoid
- Missing a mesh space on a solid row narrows the panel. Count every ch-1 space as one position and check the stated total before turning.
- Tight surface stitches shorten the skirt seams. Pull each loop up to the height of its row and compare the seam against an untrimmed panel.
- Overstuffed hands look rounded and separate at the fingertips. Remove excess stuffing and flatten the palms before securing the prayer pose.
- Attaching damp wings lets them sag permanently. Dry them completely, then sew a broad inner edge to the back rather than fastening only the narrow tip.
- Heavy embroidery puckers the lace. Anchor each leaf into a solid row and ease the thread until the panel lies flat.
Ways to Customize This Pattern
- Use warm chestnut or pale flax yarn for the swept hair while keeping the ivory gown and blush roses.
- Replace the wing beads with small gold embroidered knots for a softer surface detail.
- Make the roses in muted mauve and embroider sage-green leaves for a cooler palette.
- Add roses to all eight skirt panels, keeping each stem centered between the raised seams.
- For a simpler display silhouette, omit the two short curls and retain one long spiral at each side of the face.
Frequently asked questions
The stiffened bell-shaped skirt is intended to support this display version. The small internal body base keeps the torso flat but does not reach the hem. If your cotton or stiffener leaves the skirt flexible, place a removable 12 cm-tall display cone with a 19 cm base under the gown.
Eight five-stitch panel tops produce 40 stitches. The body follows six-part amigurumi shaping and has 42 loops at the waist. In each of the two 11-loop quarters, sew one gown stitch across two adjacent body loops; all other stitches join one to one.
Use firm cotton, apply stiffener evenly, and dry the wings flat under pins. Sew each narrow end plus approximately 3 cm of its lower inner edge to the back. If the wings still droop, apply another thin coat of stiffener and let them dry again before attaching.
Dust gently with a soft brush and spot-clean the cotton with a barely damp cloth. Immersion can soften the stiffener, distort the embroidery, and affect the wire halo. Reblock any dampened lace before displaying it again.
The finished Rosebud Prayer Angel Crochet Pattern

