Rosewood Petal Hexagon Crochet Motif
Advanced
For experienced crocheters who enjoy complex shaping, fine detail, and ambitious construction
Single-Day Project
A satisfying project you can complete in a single afternoon or evening.
Handmade Gift
A beautiful keepsake — free forever. Read online or print at home.
About This Rosewood Petal Hexagon Crochet Motif
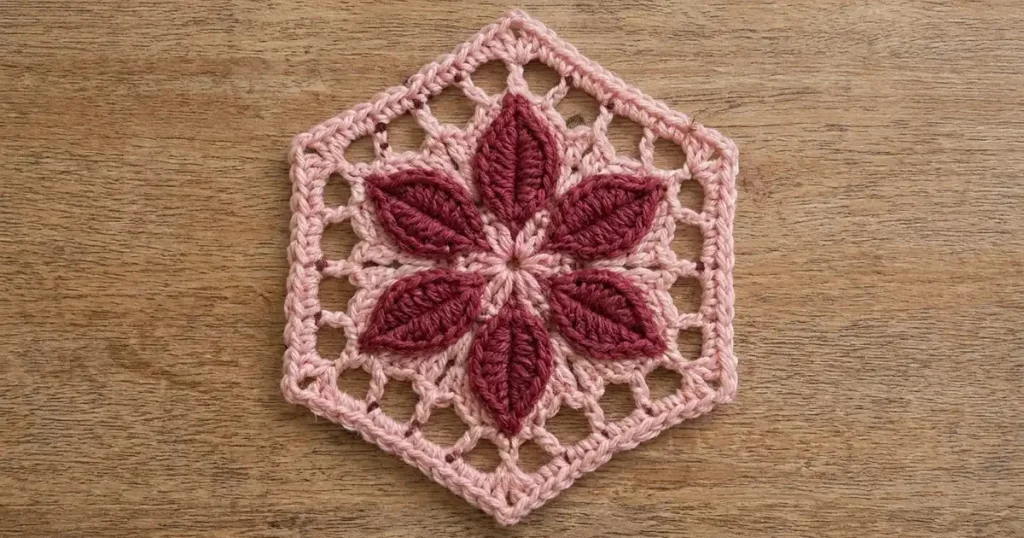
This floral hexagon crochet pattern pairs six raised burgundy petals with a blush pink center and an open hexagonal frame. Inspired by the photographed motif, it uses separately crocheted pointed petals, narrow embroidered veins and a firm outer border to give the flower definition against the lace.
Allow approximately 5–7 hours, plus drying time after blocking. This advanced decorative motif suits crocheters comfortable with working both sides of a foundation chain, reading lace spaces and attaching small pieces without flattening their texture. The construction makes a flat floral appliqué or small decorative mat, with no stuffing or facial features.
Materials
- Blush pink DK yarn Approximately 15 g or 40 m; color A
- Deep burgundy DK yarn Approximately 15 g or 40 m; color B, including embroidery
- 3.0 mm crochet hook Adjust as needed to obtain gauge
- Tapestry needle For assembly and embroidered veins
- Six locking stitch markers For the hexagon corners
- Scissors, ruler, rustproof pins and blocking mat For accurate placement and finishing
Abbreviations
chchainsl stslip stitchscsingle crochethdchalf double crochetdcdouble crochettrtreble crochetMRmagic ringststitchGauge, Size and Construction
- Use US crochet terminology. Gauge after light wet blocking: 22 dc and 12 rows measure 10 × 10 cm. For a swatch, ch 25; dc in the fourth chain from the hook and each remaining chain. The skipped three chains count as the first dc, giving 23 dc. Work subsequent rows with ch 3 counting as the first dc, skip the first stitch, and dc across, including the top of the turning chain. Make 13 rows and measure the central area.
- The proposed finished motif measures approximately 13 cm between opposite points and 11.3 cm between opposite flat sides. Each petal measures approximately 4.5 × 2 cm. These are blocking targets; yarn and individual stitch proportions affect the result.
- Make one pink foundation and six separate burgundy petals. Embroider the petal veins, then attach the petals with their tips pointing toward the six corners.
- Work foundation rounds with the right side facing throughout. Beginning chains do not count as stitches. Join only as directed; joining slip stitches never count toward a round total. Each corner is a ch-2 space.
Blush Pink Hexagon Foundation
- Round 1: With A, make an MR, ch 2, work 12 dc into the ring. Tighten the ring and sl st into the first dc. Count: 12 dc.
- Round 2: Ch 2. Repeat six times: 2 dc in the next st, dc in the next st, ch 2. Join to the first dc. Count: 18 dc and six corner ch-2 spaces; three dc between neighboring corners. Mark every corner space.
- Round 3: Ch 2. Work one dc in each dc and work (dc, ch 2, dc) in every corner space around. Join to the first dc. Count: 30 dc and six corner spaces; five dc along each side.
- Round 4 setup: Sl st forward to the next corner space, including a sl st into that space. Ch 2 and work (dc, ch 2, dc) in that corner. This is the first corner of the round.
- Round 4: Across the next five dc, work dc in the first st, ch 1, skip one st, dc in the next st, ch 1, skip one st, dc in the last st. Work (dc, ch 2, dc) in the next corner. Repeat this side-and-corner sequence four more times, then work the final side only. Join to the first dc. Count: 30 dc, twelve side ch-1 spaces and six corner ch-2 spaces. Between corners, each side reads: dc, dc, ch 1, dc, ch 1, dc, dc.
- Round 5 setup: Sl st into the immediately following corner space. Ch 2 and work (dc, ch 2, dc) in that corner.
- Round 5: Across the next side, dc in its first dc, ch 1, skip the second dc, dc in the first ch-1 space, ch 1, skip the middle dc, dc in the second ch-1 space, ch 1, skip the next dc, dc in the final dc. Work (dc, ch 2, dc) in the next corner. Repeat this side-and-corner sequence four more times, then work the final side only. Join to the first dc. Count: 36 dc, eighteen side ch-1 spaces and six corner ch-2 spaces. Each side now contains six dc and three ch-1 spaces, including the dc contributed by its neighboring corners.
- Round 6 setup: Sl st into the immediately following corner space. Ch 1 and work (sc, ch 2, sc) in that corner.
- Round 6: Work sc in every dc and one sc in every side ch-1 space across the next side; work (sc, ch 2, sc) in the next corner. Repeat this side-and-corner sequence four more times, then work the final side only. Join to the first sc. Count: 66 sc and six corner ch-2 spaces; eleven sc between neighboring corners. Fasten off and weave in the ends on the wrong side.
- Lightly wet block the foundation into a regular hexagon. Pin the six corner spaces with opposite points approximately 13 cm apart, keeping the sides straight. Let it dry completely before attaching the petals.
Burgundy Pointed Petals — Make Six
- Foundation: With B, leave a 25 cm starting tail and ch 12. The end near the hook is the petal base; the far end becomes the pointed tip.
- Round 1, first side: Sc in the second chain from the hook, hdc in the next chain, dc in each of the next two chains, tr in each of the next three chains, dc in each of the next two chains, hdc in the next chain. Ten foundation chains have been worked.
- Round 1, tip and return side: In the final chain work (sc, ch 2, sc). Rotate to work into the unused loops along the other side of the foundation. Hdc in the next chain, dc in each of the next two chains, tr in each of the next three chains, dc in each of the next two chains, hdc in the next chain and sc in the final chain. Sl st into the first sc. Count: 22 stitches and one tip ch-2 space; ten stitches on each side plus two tip sc.
- Round 2: Ch 1 loosely; it does not count. Sl st into each of the first eleven stitches, work (sl st, ch 1, sl st) in the tip ch-2 space, then sl st into each of the remaining eleven stitches. Join to the first edging sl st. Count: 24 edging slip stitches and one tip ch-1 space. Keep these slip stitches relaxed so the petal does not curl tightly.
- Fasten off, leaving a 40 cm tail for attachment. Weave in only the starting tail. Smooth the petal with the right side facing up and lightly block to approximately 4.5 × 2 cm. A shallow natural cup is desirable; do not stretch the petal flat under tension.
Raised Petal Veins
- Thread a separate 35 cm length of B onto a tapestry needle. Bring it from back to front at the petal base, just inside the edging. Follow the central foundation chain toward the pointed tip.
- Work stem stitch in approximately 4 mm steps: insert the needle one step ahead along the center line, then bring it up halfway back toward the previous exit point. Keep the working yarn consistently on the same side of the needle. Repeat to form a narrow raised line.
- Finish immediately below the tip space, without pulling the point inward. Secure and weave both embroidery ends into the wrong side of the petal. Repeat for all six petals. The embroidery is separate from the crochet stitch counts.
Petal Placement and Attachment
- Lay the dry foundation right side up with one corner pointing upward. Place one petal along each of the six lines running from the center to a corner. All petal right sides and embroidered veins face upward.
- Position each petal base approximately 7 mm from the center of the magic ring. Aim each tip toward its corresponding corner, approximately 8–12 mm inside the outer corner. Leave the small pink central area visible. Pin all six before sewing.
- Using each petal’s attachment tail, sew its two base stitches to the pink dc fabric beneath them. Continue along one side with small couching stitches around the burgundy edging and through the nearest pink stitch or chain strand. Make approximately five evenly spaced attachment points along that side.
- Secure the tip to the nearest pink stitch or mesh junction, then work approximately five attachment points down the other side. Where a petal edge lies over a mesh opening, carry the needle through the back of the petal to the next available pink strand; do not draw a long stitch across the open space.
- Keep the sewing tension relaxed so the petal body remains slightly raised between its secured edges and its central vein stays visible. Secure the tail beneath the petal and weave it through several stitches. Repeat for the remaining five petals.
Finishing
Check the flower from the front before trimming any tails. The six tips should point toward the corners, the pink center should remain visible and the outer border should rest flat. Adjust any attachment stitch that pulls a mesh opening out of shape.
Weave in the remaining ends on the wrong side. If the border needs reshaping, dampen the pink frame and pin it gently back into a regular hexagon, leaving the burgundy petals free of pins. Let the motif dry fully. Avoid pressing the raised petals with an iron.
Tips for Success
- Keep the six corner markers in place through the border round. They distinguish corner ch-2 spaces from the smaller side openings.
- Check each lace side before joining: Round 4 has two side openings, and Round 5 has three. Correct a missed opening before starting the next round.
- Make all six petals with the same treble height. Lay them together before embroidery and remake any petal that is noticeably longer.
- Pin opposite petals first, then fill the remaining positions. This makes it easier to keep the flower centered within the hexagon.
- Catch the underside of the burgundy edging when sewing so the attachment thread stays discreet and the rounded edge remains visible.
Common Mistakes to Avoid
- Counting the beginning chains as dc adds an unwanted stitch. They never count in the foundation; join into the first actual stitch.
- Working the Round 5 mesh into stitches that should be skipped changes the side count. Follow the full side sequence and check for six dc and three openings between corners.
- Missing the final return-side sc makes a petal uneven. Round 1 must contain 22 stitches plus the tip space before edging.
- Tight slip-stitch edging folds the petals into narrow tubes. Remove the edging and remake it with loose loops, using a slightly larger hook for that round if necessary.
- Pulling the sewing yarn tight puckers the lace. Loosen the affected attachment stitches and secure the petal without shortening the pink strands beneath it.
Ways to Customize This Pattern
- Keep the blush frame and alternate burgundy and dusty rose petals for a softer two-tone flower.
- Use a slightly lighter burgundy for the embroidered veins to emphasize the six central ridges.
- Make the whole motif in fine cotton with a matching smaller hook for a delicate appliqué. Swatch again because the finished dimensions will change.
- Join several completed motifs into a decorative panel by whipstitching the eleven border sc of adjacent sides together, then securing the corresponding corner spaces.
Frequently asked questions
Separate petals give the flower its raised edges and let you control the six pointed shapes independently. Sewing them onto the blocked foundation also makes their alignment easier to adjust.
Check the foundation gauge and the petal’s blocked length first. If the foundation is correctly sized but the petal is too long, remake the petals with a hook 0.25 mm smaller. Keep all six petals the same size and preserve a visible pink margin around their tips.
Yes. The petals cover much of the solid center, while the outer mesh and a small pink center remain visible. Do not sew the petals together along their neighboring edges.
The raised petals make the surface uneven, so this version works best as a decorative mat or appliqué. Choose a flat motif for supporting a cup securely.
The finished Rosewood Petal Hexagon Crochet Motif

