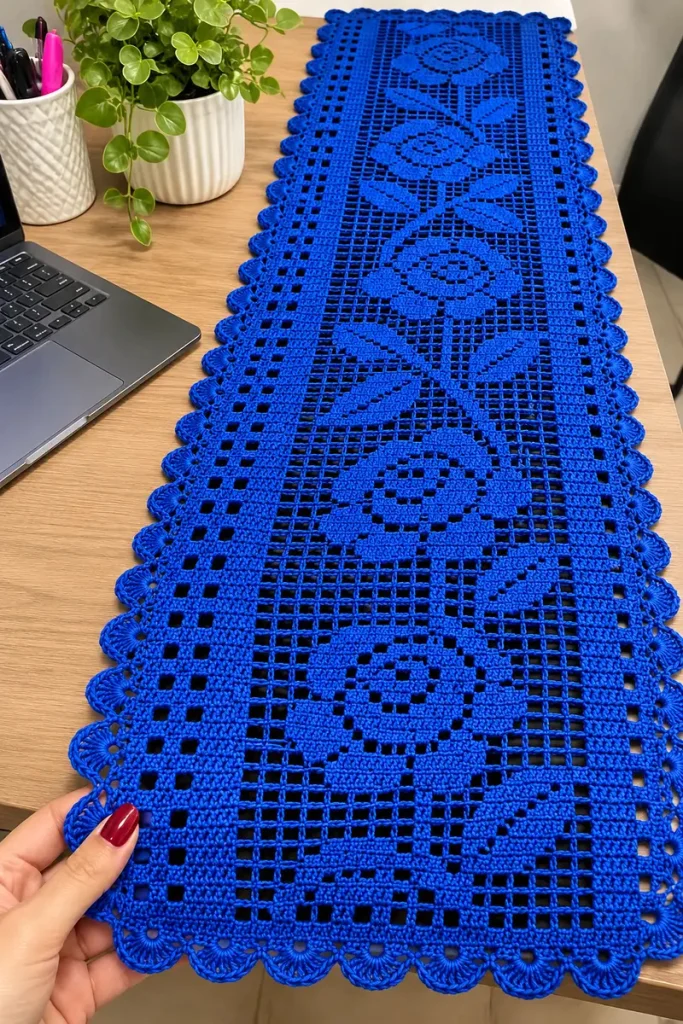
Royal Blue Rose Filet Crochet Table Runner
Advanced
For experienced crocheters who enjoy complex shaping, fine detail, and ambitious construction
Single-Day Project
A satisfying project you can complete in a single afternoon or evening.
Handmade Gift
A beautiful keepsake — free forever. Read online or print at home.
About This Royal Blue Rose Filet Crochet Table Runner
This rose filet crochet table runner pairs five royal blue roses with narrow geometric side bands and a scalloped outline. Inspired by the photographed runner, the design uses solid crochet blocks against an open mesh ground to draw petals, stems, and pointed leaves.
Allow approximately 35–45 hours for the runner and its border. This advanced project suits crocheters comfortable reading filet patterns, tracking mirrored rows, and blocking cotton lace. The floral panel is worked flat in one piece, followed by a carefully counted perimeter and deep fan edging.
Materials
- Royal blue size 10 mercerized crochet cotton Approximately 1,600–1,900 m; buy the same dye lot throughout
- Steel crochet hook 1.75 mm, or size needed for blocked gauge
- Fine tapestry needle and scissors For securing thread ends
- Removable stitch markers For corners, side bands, and motif boundaries
- Blocking mats, rustproof pins, and measuring tape For opening the mesh evenly
Abbreviations
chchainsl stslip stitchscsingle crochetsc2togsingle crochet two stitches togetherdcdouble crochettrtreble crochetFfilled filet cellOopen filet cellRSright sideWSwrong sideGauge, Size, and Filet Method
- Use US crochet terminology. Blocked gauge: 10 filet cells across and 10 dc rows high measure 8 × 4 cm. A horizontal span of 10 cells contains 31 stitch positions, including both boundary posts.
- Make a gauge swatch: ch 34, dc in the fourth chain from the hook and in each remaining chain. The skipped three chains count as the first dc: 32 dc would result from this foundation, so instead use the following filet foundation for the actual swatch: ch 33, dc in the fourth chain from the hook and in each remaining chain, giving 31 dc including the turning chain.
- For the next 11 swatch rows, ch 3, turn, then work 10 O cells. Each O is ch 2, skip the next two stitch positions, dc in the next boundary post. Block and measure an interior span of 10 cells and 10 rows.
- For all runner rows after the foundation, ch 3 and turn; this counts as the first boundary dc. An F cell is dc in each of the next three stitch positions. An O cell is ch 2, skip two positions, dc in the next boundary post.
- When an F is worked over an O, work 2 dc into its ch-2 space and 1 dc into its ending post. Adjacent cells share boundary posts: do not add an extra dc between cells.
- Every runner row contains 41 cells and spans 124 stitch positions: 41 × 3 + 1. Open chains count as positions when checking width. The unbordered panel has 284 rows and measures approximately 32.8 × 113.6 cm at gauge. The edging adds approximately 3 cm to each overall dimension.
Foundation and Permanent Side Bands
- Foundation row, Row 1, RS: ch 126. Dc in the fourth chain from the hook and every remaining chain. Count the skipped three chains as the first dc: 124 dc, equivalent to 41 F cells.
- Row 2, WS: ch 3, turn; work 41 F cells. There are 124 dc including the turning chain.
- Rows 3–282 form five repeats of the 56-row rose motif. On every one of these rows, cells 1–6, viewed from the RS, are F, O, F, O, F, F. Cells 7–35 form the 29-cell floral panel. Cells 36–41 are F, F, O, F, O, F.
- Number the floral panel separately from 1 to 29, left to right when viewing the RS. Floral cell 1 is overall cell 7. The side bands are mirror images, so their working sequence stays the same when the work is turned.
- Work each floral chart line below twice: first on an RS row, then on its following WS row. On RS rows work floral cells 1–29; on WS rows work cells 29–1. All floral cells outside the listed filled ranges are O.
Rose Motif: Chart Lines 1–14
- Chart line 1, local rows 1–2: F in floral cells 12–18.
- Chart line 2, local rows 3–4: F in cells 9–21.
- Chart line 3, local rows 5–6: F in cells 7–11 and 19–23.
- Chart line 4, local rows 7–8: F in cells 6–9, 13–17, and 21–24.
- Chart line 5, local rows 9–10: F in cells 5–8, 11–13, 17–19, and 22–25.
- Chart line 6, local rows 11–12: F in cells 5–7, 10–12, 15–16, 19–20, and 23–25.
- Chart line 7, local rows 13–14: F in cells 4–7, 10–11, 14–16, 20–21, and 24–26.
- Chart line 8, local rows 15–16: F in cells 4–7, 10–12, 18–21, and 24–26.
- Chart line 9, local rows 17–18: F in cells 5–8, 12–19, and 23–25.
- Chart line 10, local rows 19–20: F in cells 5–9, 21–25.
- Chart line 11, local rows 21–22: F in cells 6–11 and 19–24.
- Chart line 12, local rows 23–24: F in cells 8–21.
- Chart line 13, local rows 25–26: F in cells 10–20.
- Chart line 14, local rows 27–28: F in cells 13–17.
Stem and Leaves: Chart Lines 15–28
- Chart line 15, local rows 29–30: F in cells 14–16.
- Chart line 16, local rows 31–32: F in cells 6–8 and 14–16.
- Chart line 17, local rows 33–34: F in cells 5–10 and 14–16.
- Chart line 18, local rows 35–36: F in cells 5–12 and 14–16.
- Chart line 19, local rows 37–38: F in cells 7–16.
- Chart line 20, local rows 39–40: F in cells 10–16.
- Chart line 21, local rows 41–42: F in cells 14–16 and 22–24.
- Chart line 22, local rows 43–44: F in cells 14–16 and 20–25.
- Chart line 23, local rows 45–46: F in cells 14–16 and 18–25.
- Chart line 24, local rows 47–48: F in cells 14–23.
- Chart line 25, local rows 49–50: F in cells 14–20.
- Chart line 26, local rows 51–52: F in cells 14–16.
- Chart line 27, local rows 53–54: F in cells 14–16.
- Chart line 28, local rows 55–56: F in cells 14–16.
Complete the Five-Rose Panel
- Rows 3–58: work chart lines 1–28, each twice, with the permanent side bands on every row.
- Rows 59–114: repeat the same 56-row motif.
- Rows 115–170: repeat the same 56-row motif.
- Rows 171–226: repeat the same 56-row motif.
- Rows 227–282: repeat the same 56-row motif. Five roses are now complete.
- Row 283: ch 3, turn; work 41 F cells, filling every open space. Count 124 dc including the turning chain.
- Row 284: ch 3, turn; work 41 F cells. Count 124 dc including the turning chain. Fasten off.
Counted Perimeter Foundation
- With the RS facing, join royal blue thread at the first stitch of a short edge. Work clockwise around the runner. This perimeter round uses ch-2 corner spaces; these spaces are separate from all stated side counts.
- First short side: sc across the 124 stitch positions, replacing stitch pairs 15–16, 46–47, 77–78, and 108–109 with sc2tog. Work all other positions individually. This consumes 124 positions and produces 120 sc. Ch 2 for the corner.
- First long side: work 2 sc around the end post of every one of the 284 rows, distributing them evenly along each post. Count 568 sc. Ch 2 for the corner.
- Second short side: work into all 124 foundation-chain positions, using sc2tog over the same four numbered pairs measured from your current starting corner. Count 120 sc. Ch 2 for the corner.
- Second long side: work 2 sc around each of the 284 row-end posts. Count 568 sc. Ch 2 and join with sl st to the first sc. Total: 1,376 sc and four ch-2 corner spaces.
- Do not count joining slip stitches as edging stitches. Mark the first and last sc of each side. If a side count differs, correct this round before continuing.
Scalloped Fan Border
- Fasten off the perimeter thread and rejoin with sl st in any corner ch-2 space. Ch 1, then work 9 tr into that same corner space. The joining sl st and ch 1 do not count as stitches.
- Across the next short side, repeat the following 10 times: skip 5 sc, work 9 tr into the next sc, skip 5 sc, sl st in the next sc. Each repeat consumes exactly 12 sc; 10 repeats consume all 120 sc.
- Work 9 tr in the next corner ch-2 space. Across the next long side, repeat 71 times: skip 3 sc, work 7 tr into the next sc, skip 3 sc, sl st in the next sc. Each repeat consumes 8 sc; 71 repeats consume all 568 sc.
- Work 9 tr in the next corner space. Work the second short side exactly as the first: 10 fans over 120 sc.
- Work 9 tr in the final corner space. Work the second long side exactly as the first: 71 fans over 568 sc. Join with sl st to the first tr of the starting corner fan and fasten off.
- Border check: 20 short-side fans, 142 long-side fans, and four corner fans. The smaller long-side fans accommodate the closer spacing of the row-end stitches.
Finishing
Weave each thread end through the backs of several solid blocks, reverse direction, and secure it without pulling the mesh inward. There are no separate motifs to sew together; the roses, leaves, and side bands are built into the panel.
Soak the runner in cool water, gently squeeze out the water, and roll it in a towel. Pin the straight panel edges first, checking that both long sides measure the same. Open each fan with a pin at its center and let the runner dry completely. Aim for approximately 36 × 117 cm overall, allowing the measured swatch to guide the final dimensions.
Tips for Success
- Mark the boundaries after overall cells 6 and 35. These markers separate the permanent bands from the changing floral panel.
- Record both the chart line and whether you have completed its first or second crochet row. Each line must be worked twice.
- Keep ch-2 spaces relaxed enough to match the width of two dc. Tight chains pinch the rose outlines and narrow the side bands.
- Inspect each completed flower against a light background before starting its leaves. A misplaced filled cell is easier to repair while it is nearby.
- Measure the perimeter after several fan repeats. If the fans cup or ripple strongly, adjust edging hook size before completing the border.
Common Mistakes to Avoid
- Adding a new starting dc for every cell increases the width. Work the initial turning chain once; each subsequent cell contributes only three positions.
- Reading WS rows in the RS direction swaps the leaf placement within a doubled chart line. Reverse the floral-cell order on every WS row.
- Working only one row per chart line shortens each rose. Complete both rows before moving to the next line.
- Using the short-side fan repeat on a long side leaves unmatched stitches. Short sides use 12-stitch repeats; long sides use 8-stitch repeats.
- Pulling the corners outward during blocking can make pointed ends. Pin each corner fan into a rounded curve and keep the panel rectangular.
Ways to Customize This Pattern
- Keep the photographed look with royal blue cotton, or use ivory for a softer lace effect while preserving the same chart.
- Make a three-rose runner by working three 56-row motifs between the two starting and two ending solid rows: 172 rows total. Each long perimeter side then has 344 sc and takes 43 eight-stitch fan repeats.
- Make a four-rose version with 228 total rows. Each long perimeter side has 456 sc and takes 57 eight-stitch fan repeats.
- For a narrower visual border, replace every tr in the fan round with dc while retaining the same fan stitch counts and placement.
Frequently asked questions
The specified mesh is wider than it is tall. Doubling each chart line gives the rose and leaf shapes enough height and creates a substantial five-motif runner. Working each line once produces a much shorter, compressed design.
Yes, but the 124-position width will become much larger. Measure a blocked filet swatch first. Multiply your cell width by 41 for panel width and your row height by 284 for panel length, then add the edging allowance.
The short edges follow individual stitch positions, while the long edges contain two sc per row end. Their physical spacing differs. Twelve-stitch short-edge fans and eight-stitch long-edge fans compensate for that difference.
It is an original interpretation of the photographed royal blue floral runner. It retains five roses, leafy stems, open geometric bands, and scalloped edges; the counted floral layout and border are newly designed.
The finished Royal Blue Rose Filet Crochet Table Runner

