Ruby and Cream Floral Crochet Table Runner
Advanced
For experienced crocheters who enjoy complex shaping, fine detail, and ambitious construction
Single-Day Project
A satisfying project you can complete in a single afternoon or evening.
Handmade Gift
A beautiful keepsake — free forever. Read online or print at home.
About This Ruby and Cream Floral Crochet Table Runner
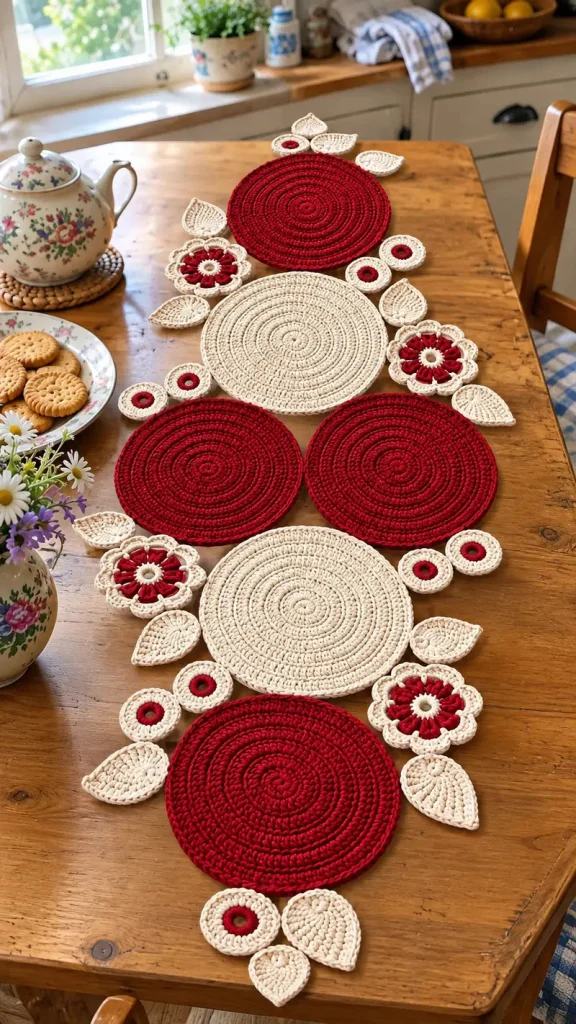
This crochet floral table runner pattern brings together deep ruby circles, warm cream panels, and a loose border of flowers, little rings, and pointed leaves. The arrangement follows the photographed piece: one red circle at each end, two cream circles through the middle, and a pair of red circles sitting side by side at the widest point.
Raised circular ridges give the large panels definition, while cream scallops frame the red flower petals. This is an advanced project for crocheters comfortable with working around foundation chains, making clusters, surface embroidery, and joining separate motifs. Allow approximately 22–30 hours, including blocking and assembly. The runner is worked flat and left unstuffed.
Materials
- DK cotton in deep ruby red Approximately 650 m; buy about 750 m to allow for gauge variation
- DK cotton in warm cream Approximately 750 m; buy about 850 m to allow for gauge variation
- 3.5 mm crochet hook Adjust to obtain the blocked motif measurements
- Tapestry needle For seams, surface veins, and weaving in ends
- Stitch markers For round beginnings and assembly points
- Blocking mats, rustproof pins, measuring tape, and scissors A flat blocking area at least 132 × 48 cm is helpful
- Full-size paper or a washable marking sheet For plotting motif centers before joining
Abbreviations
chchainsl stslip stitchscsingle crochethdchalf double crochetdcdouble crochettrtreble crochetincWork 2 stitches of the specified type into one stitchMRmagic ringBLOback loop onlyst / stsstitch / stitches3-tr clusterThree trebles closed together in the same insertion point; method belowGauge, Construction, and Special Techniques
- Use US crochet terminology throughout. Target blocked gauge is approximately 16 dc and 8⅓ rounds per 10 cm, measured away from the center of a circular swatch. The controlling measurement is a finished 10-round circle measuring 24 cm across.
- Make 6 large circles: 4 ruby and 2 cream. Also make 4 flowers, 13 small rings, and 12 leaves. Target blocked sizes are 24 cm for circles, approximately 10 cm for flowers, 6 cm for rings, and approximately 8 × 4.5 cm for leaves.
- Work joined rounds with the right side facing. Do not turn unless instructed. Beginning ch 2 on circles does not count as a stitch. Join to the first actual stitch, never to the turning chain. Joining slip stitches do not count.
- For a 3-tr cluster: yarn over twice, insert hook into the indicated stitch, draw up a loop, yarn over and pull through 2 loops twice, leaving the last loop of that treble on the hook. Repeat twice more in the same stitch. Yarn over and pull through all 4 loops.
- When changing color, finish the old round and fasten off. Join the new color with a slip stitch at the specified point. Leave approximately 20 cm tails on small motifs for assembly.
- There are no eyes, facial details, or stuffing in this table runner. Its surface details are the circular ridges, layered flower petals, and embroidered leaf veins.
Large Ridged Circles — Make 4 Ruby and 2 Cream
- Round 1: Make an MR, ch 2, work 12 dc into the ring. Close the ring firmly and join. (12 sts)
- Round 2: Ch 2, work a dc inc in each stitch around. Join. (24 sts)
- Round 3: Ch 2, working BLO, repeat (dc in next st, dc inc in next st) 12 times. Join. (36 sts)
- Round 4: Ch 2, repeat (dc in next 2 sts, dc inc in next st) 12 times. Join. (48 sts)
- Round 5: Ch 2, working BLO, repeat (dc in next 3 sts, dc inc in next st) 12 times. Join. (60 sts)
- Round 6: Ch 2, repeat (dc in next 4 sts, dc inc in next st) 12 times. Join. (72 sts)
- Round 7: Ch 2, working BLO, repeat (dc in next 5 sts, dc inc in next st) 12 times. Join. (84 sts)
- Round 8: Ch 2, repeat (dc in next 6 sts, dc inc in next st) 12 times. Join. (96 sts)
- Round 9: Ch 2, working BLO, repeat (dc in next 7 sts, dc inc in next st) 12 times. Join. (108 sts)
- Round 10: Ch 2, repeat (dc in next 8 sts, dc inc in next st) 12 times. Join. (120 sts)
- Round 11: Loosely sl st through both loops of every stitch around. Do not add a second joining stitch; fasten off with an invisible finish into the first slip stitch. (120 sl sts)
- Secure the center tail through several stitch bases in opposing directions. Wet-block the circle to 24 cm across, keeping the ridges facing upward. Make all six circles the same diameter.
Ruby Flowers with Cream Scallops — Make 4
- Round 1, cream: Make an MR, ch 1, work 12 sc into the ring and join. Leave a small visible central opening, approximately 4 mm, before securing the ring tail. (12 sts)
- Round 2, cream: Ch 1, sc inc in every stitch around. Join and fasten off. (24 sts)
- Round 3, ruby: Join in the front loop of any Round 2 stitch. Working in front loops throughout, repeat the following 12 times: sl st in next available stitch, ch 3, work a 3-tr cluster in that same stitch, ch 3, sl st in that same stitch, then sl st in the following stitch. On the first repeat, work the first slip stitch into the joining stitch. Join to the first petal base and fasten off. (12 petals; 24 Round 2 stitches used)
- Round 4, cream: Fold petals forward to expose the unused back loops of Round 2. Join in the back loop behind the first petal base. Repeat (ch 5, skip the next back loop, sl st in the following back loop) 12 times, with the last slip stitch returning to the joining point. (12 ch-5 spaces)
- Round 5, cream: In each ch-5 space work (sc, hdc, 3 dc, hdc, sc). Join to the first sc and fasten off. (12 scallops; 84 sts)
- Spread the ruby clusters evenly, with one cream scallop behind each petal. Block gently to approximately 10 cm across without stretching the center opening.
Small Ruby-Centered Rings — Make 13
- Foundation, ruby: Ch 6 and sl st into the first chain to form a ring. Keep the opening visible.
- Round 1, ruby: Ch 1, work 12 sc into the chain ring. Join. (12 sts)
- Round 2, ruby: Ch 1, sc inc in each stitch around. Join and fasten off. (24 sts)
- Round 3, cream: Join in any stitch, ch 2, repeat (dc in next st, dc inc in next st) 12 times, starting in the joining stitch. Join and fasten off. (36 sts)
- Flatten and block to approximately 6 cm across. Leave a cream sewing tail on each ring, and weave the ruby ends securely through the red rounds.
Pointed Cream Leaves — Make 12
- Foundation: With cream, ch 11. Work around both sides of this chain; do not join until the end of Round 1.
- Round 1, first side: Starting in the second chain from the hook, sc in next 2 chains, hdc in next 2 chains, dc in next 3 chains, hdc in next 2 chains. Work 5 sc in the last chain. These first-side instructions use all 10 available foundation chains.
- Round 1, return side: Working into the unused loops along the underside, hdc in next 2 chains, dc in next 3 chains, hdc in next 2 chains, sc in next 2 chains. Work 2 additional sc into the same foundation chain as the first sc of the round. Join to the first sc. (25 sts total)
- Round 2: Ch 1, sc in next 11 sts, work (sc, ch 2, sc) in next stitch, then sc in next 13 sts. Join to the first sc and fasten off. The ch-2 point sits in the middle stitch of the 5-sc tip. (26 sc and one ch-2 point)
- Surface detail: With a separate cream strand, backstitch a central vein from the rounded base toward the pointed tip. Add three short diagonal veins on each side, following the taller stitches. Keep the stitches loose enough for the leaf to lie flat.
- Block each leaf to approximately 8 × 4.5 cm. Keep the pointed end crisp and allow the rounded base to remain slightly cupped only until it is pinned flat.
Layout and Structural Joining
- On your layout sheet, draw a vertical centerline. Measure all coordinates in centimeters, with positive x to the right and y running from the top toward the bottom. Mark the large-circle centers as follows: ruby A at (0, 12), cream B at (0, 36), ruby C at (-12, 60), ruby D at (12, 60), cream E at (0, 84), and ruby F at (0, 108).
- Place the blocked circles right side up on these centers. Circles A and B touch, C and D touch, and E and F touch. The four diagonal gaps between B/C, B/D, C/E, and D/E are approximately 2.8 cm at their nearest edges.
- At each touching pair, use matching yarn to whipstitch 4 opposing edge stitches together through both loops. Center each short seam on the point of contact. Secure each seam separately without gathering the circles.
- Make 8 narrow bridge cords: 4 ruby and 4 cream. For each cord, ch 7, then sl st in the second chain from the hook and each remaining chain. (6 sl sts) Leave a 20 cm tail at both ends. Block each cord to approximately 3 cm long.
- Across each diagonal gap, attach two cords, one ruby and one cream, approximately 1 cm apart. Sew each cord end across 3 edge stitches on its circle. These paired bridges secure B to C, B to D, C to E, and D to E. They should lie flat with slight ease.
- Place the four flower centers at (-14, 24), (14, 48), (-14, 82), and (14, 100). Allow the cream scallops to overlap the nearest large-circle edge by approximately 1 cm. Sew each flower to that circle across two neighboring scallops, taking 3 small stitches through each scallop and the underlying circle.
- Place the 13 small-ring centers at (-3, -1), (10, 1), (10, 21), (15, 27), (-17, 43), (-12, 47), (18, 75), (13, 79), (-13, 93), (-18, 97), (-4, 122), (-9, 8), and (7, 116). These positions create loose pairs and scattered accents around the circles.
- For each ring, sew an arc of 4–6 cream edge stitches to the nearest circle, flower, or previously attached ring. Where a ring does not quite touch, shift it inward only enough to create a firm seam. Keep its center opening unobstructed.
- Position the 12 leaves with their rounded bases at these approximate coordinates and their points facing outward: (2, 1) upward; (5, 2) upper-right; (-13, 22) upward; (-12, 31) left; (14, 44) upward; (18, 51) right; (-17, 76) left; (-13, 87) lower-left; (17, 88) right; (-13, 108) lower-left; (13, 111) lower-right; and (2, 121) downward.
- Slide each leaf base beneath a nearby circle, ring, or flower by approximately 1 cm. Sew the base across at least 4 stitches, then secure one adjacent side for another 1–2 cm. Leave each pointed tip free. Adjust only the small motifs to obtain a balanced outline approximately 132 × 48 cm.
- Check that every small motif has a secure connection to the main runner. Add a second short attachment wherever a flower or ring pivots freely. Remove the layout sheet before the final wet block.
Finishing
Weave each tail through several stitch bases, reverse direction, and pass through a second group of stitches before trimming. Keep red tails within red areas so they do not show through the cream stitches. Turn the runner over and check each bridge and motif attachment with a gentle tug.
Soak according to the yarn label, press out water in a towel, and pin the runner flat to approximately 132 × 48 cm. Open the flower scallops and straighten the leaf points without pulling the circles out of round. Let it dry completely before moving it. Wash gently and dry flat for future care; test the ruby yarn for color transfer before soaking the assembled piece.
Tips for Success
- Measure every circle in two directions after blocking. A diameter difference greater than 5 mm will make the paired center panels harder to align.
- Keep the finishing slip stitches loose. Pulling them tight reduces the circumference and makes the large circles cup.
- Mark every second stitch of the flower foundation before making petals. Each petal occupies one stitch, with the next stitch forming the gap between petals.
- Pin the entire arrangement before sewing the small motifs. Their attachment points can then support the outer silhouette instead of pulling it sideways.
- Use separate yarn lengths for structural seams. A broken decorative attachment should not release a long chain of neighboring motifs.
Common Mistakes to Avoid
- Counting the beginning ch 2 as a dc adds an unwanted stitch each round. Mark the first actual dc and join directly to it.
- Working flower petals through both loops removes the attachment points for the cream arches. Undo that round and use front loops only.
- Closing the small-ring foundation like a magic ring hides its opening. Use the specified chain ring and keep its center open during blocking.
- Missing the two extra stitches at the rounded leaf base leaves Round 1 short. Count 25 stitches before beginning the pointed edging.
- Tight bridge cords pull the cream circles toward the center pair. Detach and remake a cord if it cannot span its gap with a little ease.
Ways to Customize This Pattern
- Replace ruby with navy or forest green while retaining cream for the flowers, rings, and leaves.
- For a shorter runner, omit the top ruby circle and its nearby accents. Move the remaining upper accents inward and block the revised arrangement before joining.
- Use a slightly darker cream strand for the leaf veins to make their stitched detail more visible.
- For a coordinated table set, make extra large circles as mats and extra small rings as decorative coaster accents. Keep loose motifs away from cup bases.
Frequently asked questions
The two ruby center circles sit side by side. Their diagonal distance from each neighboring cream circle leaves a small gap, so paired cords hold those four connections securely while preserving the photographed open arrangement.
Yes, but every motif and the finished runner will be smaller. Measure your blocked circle, divide its diameter by 24, and multiply the layout coordinates and target bridge length by that number. Confirm the small motifs fit before sewing.
Work the petals into the front loops of the 24-stitch foundation. The cream arches attach to the unused back loops behind them. During blocking, lift each ruby cluster gently forward and spread its cream scallop behind it.
Use it as a decorative runner and place a suitable heat-resistant trivet beneath hot cookware. The open joins and raised flower details do not provide an even protective layer.
The finished Ruby and Cream Floral Crochet Table Runner

