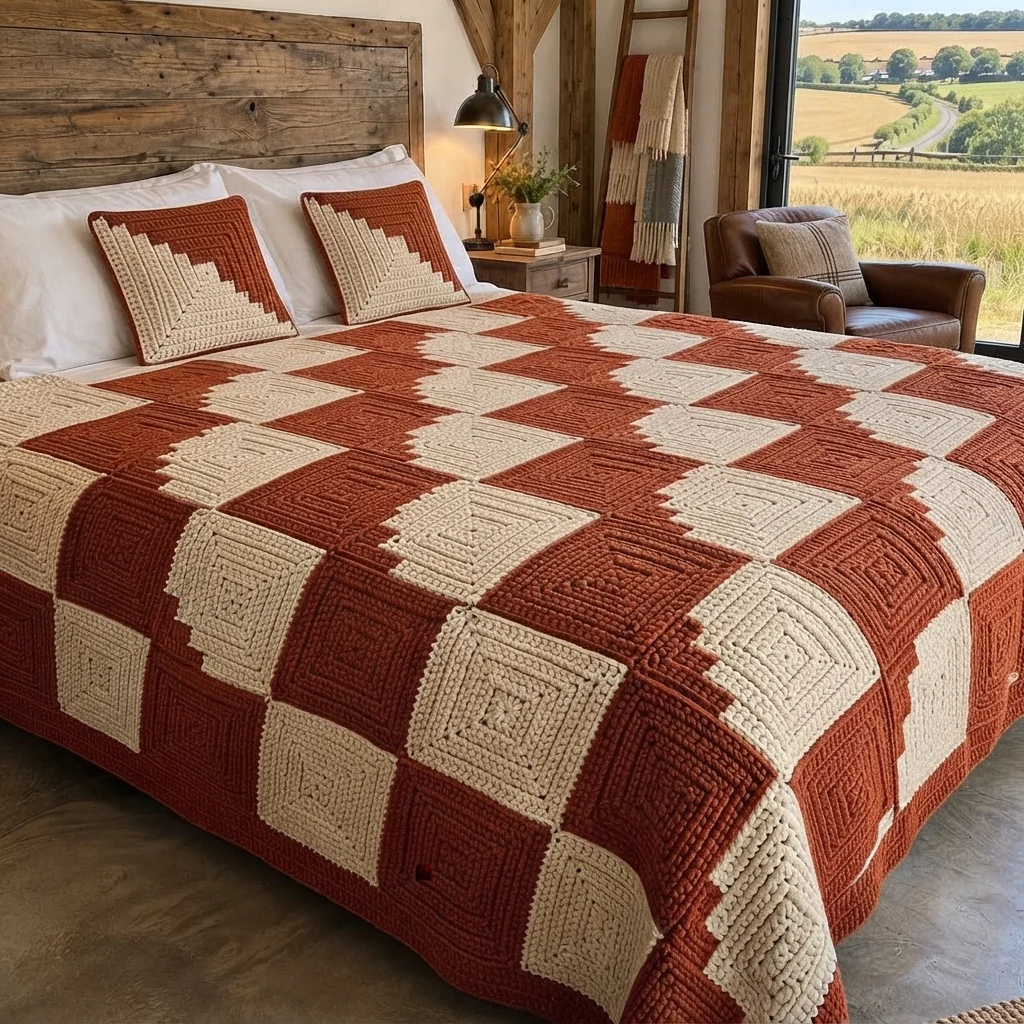
Rust and Cream Diagonal Square Crochet Blanket
Beginner Friendly
Perfect for those just starting their crochet journey, with clear instructions and simple techniques
Single-Day Project
A satisfying project you can complete in a single afternoon or evening.
Handmade Gift
A beautiful keepsake — free forever. Read online or print at home.
About This Rust and Cream Diagonal Square Crochet Blanket
This rust and cream crochet blanket pattern builds a bed-sized blanket from 80 identical squares, each one split on the diagonal and worked outward from the center in tight rounds of single crochet. Once the squares are turned in a simple quarter-turn layout, the cream halves meet at the corners and form large diamonds that run across the bed in a checkerboard of cream and rust.
Every square is the same, so the stitch pattern is repetitive rather than complicated. The challenge is the colorwork. You carry two yarns inside your stitches, change color at exact corners, and keep your tension even for many hours. The result is a dense, heavy fabric with crisp concentric lines that looks far more complicated than it is to make.
Plan on about one hour per square, so roughly 90 to 110 hours for the full bed size, or about 35 hours for a throw. It suits crocheters who are comfortable with single crochet in the round and with carrying yarn, and who want a long project they can finish in small batches. The pattern also includes covers for two matching 40 cm pillows.
Materials
- Bulky (weight 5-6) yarn in rust / terracotta about 1,300 m (1,420 yd) for the bed-size blanket with border
- Bulky (weight 5-6) yarn in cream / ecru about 1,200 m (1,310 yd) for the bed-size blanket
- Extra yarn for two pillow covers about 250 m (270 yd) of each color
- 6 mm (US J-10) crochet hook
- Large-eye tapestry needle for seaming and weaving in ends
- 4 stitch markers one per corner
- Blocking mats and rustproof pins or a flat towel-covered surface
- Two 40 cm (16 in) pillow inserts optional, for the pillow covers
Abbreviations
MRmagic ringscsingle crochetsl stslip stitchst(s)stitch(es)yoyarn overcnrcorner: 3 sc in the same st4 scsc in each of the next 4 sts (same idea for any number)TL, BL, BR, TRtop-left, bottom-left, bottom-right, top-right cornersRSright sideSquare (make 80 for the bed size)
Each square is worked from the center out, counterclockwise, as a continuous spiral with no joining and no turning. The square is split on the diagonal: cream on the left and bottom sides, rust on the top and right sides. In every round the color changes in only two places: just before the TL corner (rust to cream) and just before the BR corner (cream to rust). “Change to cream” or “change to rust” always means draw the new color through on the last yo of that sc, so the next stitch is the new color. Carry the unused strand along the tops of the previous round and work each sc over it. Place a marker in the center sc of each cnr and move it up each round.
- Rd 1: With rust, 4 sc in MR, changing to cream on the last yo of the 4th sc. Pull the MR tail to close the ring tightly. Mark the first st (TL). (4)
- Rd 2: With cream, cnr in st 1 (TL) and cnr in st 2 (BL), changing to rust on the last yo of the last sc of the BL corner. With rust, cnr in st 3 (BR) and cnr in st 4 (TR). (12)
- Rd 3: 1 sc (change to cream), cnr, 2 sc, cnr, 2 sc (change to rust), cnr, 2 sc, cnr, 1 sc. (20)
- Rd 4: 1 sc (change to cream), cnr, 4 sc, cnr, 4 sc (change to rust), cnr, 4 sc, cnr, 3 sc. (28)
- Rd 5: 1 sc (change to cream), cnr, 6 sc, cnr, 6 sc (change to rust), cnr, 6 sc, cnr, 5 sc. (36)
- Rd 6: 1 sc (change to cream), cnr, 8 sc, cnr, 8 sc (change to rust), cnr, 8 sc, cnr, 7 sc. (44)
- Rd 7: 1 sc (change to cream), cnr, 10 sc, cnr, 10 sc (change to rust), cnr, 10 sc, cnr, 9 sc. (52)
- Rd 8: 1 sc (change to cream), cnr, 12 sc, cnr, 12 sc (change to rust), cnr, 12 sc, cnr, 11 sc. (60)
- Rd 9: 1 sc (change to cream), cnr, 14 sc, cnr, 14 sc (change to rust), cnr, 14 sc, cnr, 13 sc. (68)
- Rd 10: 1 sc (change to cream), cnr, 16 sc, cnr, 16 sc (change to rust), cnr, 16 sc, cnr, 15 sc. (76)
- Rd 11: 1 sc (change to cream), cnr, 18 sc, cnr, 18 sc (change to rust), cnr, 18 sc, cnr, 17 sc. (84)
- Rd 12: 1 sc (change to cream), cnr, 20 sc, cnr, 20 sc (change to rust), cnr, 20 sc, cnr, 19 sc. (92)
- Rd 13: 1 sc (change to cream), cnr, 22 sc, cnr, 22 sc (change to rust), cnr, 22 sc, cnr, 21 sc. (100)
- Rd 14: 1 sc (change to cream), cnr, 24 sc, cnr, 24 sc (change to rust), cnr, 24 sc, cnr, 23 sc. (108) Sl st in the next st. Fasten off both colors and weave in all ends. The square measures 20 cm (8 in) after blocking.
Layout and Sizing
- Name the four turns of the finished square. A is the square as worked, with cream on the left and bottom. B is A turned a quarter turn clockwise, with cream on the top and left. C is A turned a half turn, with cream on the top and right. D is A turned a quarter turn counterclockwise, with cream on the right and bottom.
- Odd rows (1, 3, 5 and so on): alternate B, C, B, C across, starting with B at the left.
- Even rows (2, 4, 6 and so on): alternate A, D, A, D across, starting with A at the left. Every seam in this layout joins cream to cream or rust to rust, and the cream triangles meet in groups of four to form the diamonds.
- Sizes: throw, 5 squares across by 6 down (30 squares), about 100 x 120 cm. Twin, 6 across by 9 down (54 squares), about 120 x 180 cm. Full or double, 8 across by 10 down (80 squares), about 160 x 200 cm. The border adds about 6 cm in each direction.
- Lay out every square on the floor and take a photo before you join anything.
Joining the Squares
- Block every square to 20 cm and let it dry completely.
- Join the squares into rows first, then join the rows to each other.
- Place two squares with right sides facing up and edges touching. Using a tapestry needle, whip stitch through the back loops of both edges, matching corner to corner first and then easing the 24 sts between the corners. Use rust yarn on rust edges and cream yarn on cream edges.
- Where four squares meet, stitch across the join in a plus shape so there is no gap at the center.
Border
- Rd 1: Join rust at any outer corner of the blanket. Work 3 sc in the corner, then 1 sc in each st along the edge and 1 sc in each seam, with 3 sc in every remaining outer corner. Join with a sl st to the first sc.
- Rd 2: Ch 1, sc in each st around with 3 sc in each outer corner. Join with a sl st, fasten off, and weave in the end.
Matching Pillow Cover (make 2)
- Make 8 squares for each cover: 4 for the front and 4 for the back.
- Join the front as a 2 x 2 panel: top row B, C and bottom row A, D. Join the back the same way. Each panel measures 40 cm (16 in) square.
- With wrong sides together, seam the panels along three sides using whip stitch in rust.
- Insert the 40 cm pillow and close the fourth side with whip stitch, or sew on snaps if you want to remove the insert for washing.
Finishing
Weave in every end before blocking, as each square has a handful and they are much easier to hide on a single square than on the finished blanket. Block the whole blanket flat once the border is done, following your yarn’s care label: wet-block wool, and steam acrylic by holding the iron above the fabric without pressing. The blanket is heavy, so wash it gently and dry it flat to keep the diamonds square.
Tips for Success
- Keep the carried strand relaxed. It should lie flat under your stitches without pulling the fabric, or the square will pucker and refuse to block flat.
- Let both skeins hang freely every round or two and untwist them. Working in a spiral winds the two yarns around each other quickly.
- Use an opaque, firmly spun cream. A rust strand carried behind cream stitches can show through as a shadow on a thin or loosely spun yarn.
- Check your stitch count on the first few squares (each round should be 8 x the round number minus 4), then rely on your corner markers once you have the rhythm.
- Make the squares in batches of ten and block each batch together so they all end up the same size.
Common Mistakes to Avoid
- Changing color at the wrong stitch lets the diagonal drift. Only change just before the TL corner and just before the BR corner, and rip back to the last correct corner if you slip.
- Missing a corner increase turns the square into a rounded blob. Always work 3 sc in each marked corner stitch.
- Pulling the carried yarn tight puckers the fabric. Unpick the round and carry it looser.
- Joining squares in the wrong orientation breaks the diamonds. Follow the layout key and photograph it before seaming.
- Using a hook that is too large leaves gaps where the other color shows through. Drop down half a size so the fabric stays dense.
Ways to Customize This Pattern
- Swap the colors. Navy and oatmeal, sage and cream, or charcoal and white all work, as long as the two colors have strong contrast.
- Use worsted yarn and a 4 mm hook for a lighter blanket. Expect about 18 rounds per square, so make a test square and measure it.
- Turn every square the same way (all A) for diagonal stripes instead of diamonds.
- Make a throw or baby blanket using the smaller sizes in the Layout and Sizing section.
- Make a floor cushion by joining a 3 x 3 panel of squares for the front and back.
Frequently asked questions
Yes. Every square is made exactly the same way. The diamond effect comes entirely from turning the finished squares into the A, B, C and D positions shown in the layout.
You can, but it is less forgiving. Cotton has little stretch, so a carried strand shows more and the fabric is stiffer and heavier. A wool or acrylic bulky yarn gives smoother colorwork.
You can, but this pattern is written for whip stitch seams because they keep each seam the same color as the squares it joins. Join-as-you-go would need a color change at every edge and adds a lot of ends.
About an hour once you find your rhythm, a little longer for the first few. Carrying the second color slows you down compared with plain single crochet.
The finished Rust and Cream Diagonal Square Crochet Blanket

