Sage and Ivory Daisy Crochet Table Runner Pattern
Advanced
For experienced crocheters who enjoy complex shaping, fine detail, and ambitious construction
Weekend Project
A satisfying weekend make — start Friday, finish Sunday, enjoy forever.
Handmade Gift
A beautiful keepsake — free forever. Read online or print at home.
About This Sage and Ivory Daisy Crochet Table Runner Pattern
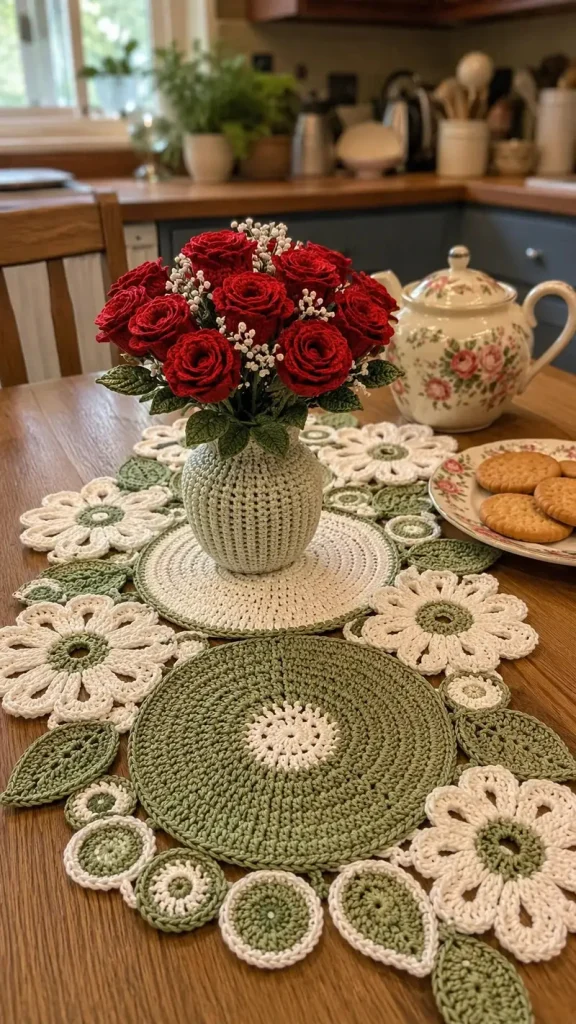
This daisy crochet table runner pattern brings together broad sage and ivory circles, long cream petals, little two-color medallions, and pointed green leaves. Inspired by the textile beneath the vase in the reference photograph, it creates an open, irregular runner with visible wooden tabletop between the motifs. The rose bouquet and vase are styling elements and are not included in these instructions.
The construction suits experienced crocheters who enjoy shaping individual motifs and arranging them into a balanced piece. Raised leaf veins, individually worked petals, contrasting surface stitching, and carefully distributed sewn joins give the runner its detail. Allow approximately 18–24 hours, including motif making, blocking, layout, and assembly.
Materials
- DK cotton yarn in sage green Approximately 250 g / 625 m
- DK cotton yarn in warm ivory Approximately 200 g / 500 m; use the same yarn range as the sage
- 3.0 mm crochet hook Or size needed to obtain the blocked gauge
- Tapestry needle and scissors For surface embroidery, joining, and finishing
- Locking stitch markers At least 12
- Blocking mat, rustproof pins, ruler, and paper For full-size layout and motif blocking
- Smooth contrasting thread For temporary basting
Abbreviations
chchainsl stslip stitchscsingle crochethdchalf double crochetdcdouble crochetinc2 stitches of the specified type in one stitchMRmagic ringBLOback loop onlyst / stsstitch / stitchesRS / WSright side / wrong sideGauge, Dimensions, and Construction
- Use US crochet terminology throughout. Blocked gauge: 18 dc and 9 rows = 10 cm; approximately 22 sc and 24 rows = 10 cm. Make separate swatches at least 12 cm square, wash gently, dry flat, and measure the central 10 cm.
- A completed large panel should measure approximately 22–23 cm across, a daisy 10–11 cm, a small medallion 4.5–5 cm, and a leaf approximately 7 × 3 cm. The assembled runner measures approximately 44 × 64 cm, depending on petal spread and leaf angles.
- Make 2 large panels, 5 daisies, 10 small medallions, and 10 leaves. Nothing is stuffed, and no eyes or other toy components are required.
- Work joined rounds with the RS facing unless instructed otherwise. Beginning ch 1 or ch 2 never counts as a stitch. Join each round with a sl st in its first stitch; do not work into joining slip stitches.
- For a color change, complete the final yarn-over of the last stitch with the new color, then join with the new color. Cut the old color when it is no longer needed, leaving a 15 cm tail.
- For a clean edge, keep decorative slip stitches loose. Their finished stitch count matches the underlying round, but they are not used as additional stitches in subsequent instructions.
Large Circular Panels — Make 2
- Panel A: work Rounds 1–2 in ivory, then Rounds 3–10 in sage. Panel B: work Rounds 1–10 in ivory. Both panels receive a sage edge.
- Round 1: Make 12 dc in MR; tighten and join. (12 sts)
- Round 2: Ch 2, dc inc in every stitch; join. (24 sts)
- Round 3: Ch 2, repeat (dc in next st, dc inc in next st) 12 times; join. (36 sts)
- Round 4: Ch 2, repeat (dc in next 2 sts, dc inc in next st) 12 times; join. (48 sts)
- Round 5: Ch 2, repeat (dc in next 3 sts, dc inc in next st) 12 times; join. (60 sts)
- Round 6: Ch 2, repeat (dc in next 4 sts, dc inc in next st) 12 times; join. (72 sts)
- Round 7: Ch 2, repeat (dc in next 5 sts, dc inc in next st) 12 times; join. (84 sts)
- Round 8: Ch 2, repeat (dc in next 6 sts, dc inc in next st) 12 times; join. (96 sts)
- Round 9: Ch 2, repeat (dc in next 7 sts, dc inc in next st) 12 times; join. (108 sts)
- Round 10: Ch 2, repeat (dc in next 8 sts, dc inc in next st) 12 times; join. (120 sts)
- Round 11: With sage, ch 1, repeat (sc in next 9 sts, sc inc in next st) 12 times; join. (132 sts)
- Round 12: Sl st in BLO of each stitch around. (132 slip stitches) Fasten off and needle-join to the first slip stitch without making an extra stitch.
- Surface detail on Panel A: With ivory and the RS facing, work a loose surface-slip-stitch circle along the boundary between Rounds 2 and 3, drawing one loop through each of the 24 Round 2 stitch positions. Fasten off on the WS. Keep the panel flat while working.
- Surface detail on Panel B: With sage, work a loose surface-slip-stitch circle along the boundary between Rounds 10 and 11, drawing one loop through each of the 120 Round 10 stitch positions. Fasten off on the WS.
Daisy Centers — Make 5
- Round 1: With sage, make 10 sc in MR; tighten and join. (10 sts)
- Round 2: Ch 1, sc inc in every stitch; join. (20 sts)
- Round 3: Ch 1, sc in each stitch; join. (20 sts) Fasten off sage.
- Mark the first stitch of Round 3. These 20 stitches support 10 petals, with exactly 2 base stitches used for each petal.
Long Ivory Daisy Petals — Work on Each Center
- Join ivory with a sl st in the marked center stitch. This is the starting anchor and does not consume a stitch from the 20-stitch petal repeat.
- Petal 1: Ch 10. Working back toward the center, sc in the second chain from the hook, hdc in next chain, dc in next 5 chains, hdc in next chain, sc in last chain. (9 stitches along the chain)
- Sl st in the next unused center stitch, then sl st in the following center stitch. These 2 anchors complete the first petal repeat.
- Petals 2–10: Repeat the preceding petal and its 2 anchoring slip stitches 9 more times. For the final anchor of Petal 10, work into the original marked center stitch. (10 petals; all 20 center stitches used once as repeat anchors)
- Fasten off with a 30 cm tail. Turn each petal so its stitch faces point upward and its chain edge runs along one side. Gently cup the broad dc section; do not twist the base.
- Using ivory on the WS, make one small tack through the adjoining lower edges of each neighboring pair of petals, approximately 1 cm from the center. Work all 10 tacks, leaving the outer portions separate. These tacks stabilize the open gaps without flattening the petal tips.
- Weave in the remaining tail. Block each flower to approximately 10–11 cm across, with 10 evenly spaced petals.
Two-Color Small Medallions — Make 10
- Color arrangement: Make 6 with sage Rounds 1–3 and ivory Round 4. Make 4 with sage Round 1, ivory Round 2, sage Round 3, and ivory Round 4.
- Round 1: Make 6 sc in MR; tighten and join. (6 sts)
- Round 2: Ch 1, sc inc in every stitch; join. (12 sts)
- Round 3: Ch 2, repeat (dc in next st, dc inc in next st) 6 times; join. (18 sts)
- Round 4: Ch 1, repeat (sc in next 2 sts, sc inc in next st) 6 times; join. (24 sts)
- Round 5: With the same ivory, work a loose sl st in BLO of each stitch. (24 slip stitches) Fasten off with a 35 cm joining tail and needle-join the edge.
- Block to approximately 4.5–5 cm across. Mark opposite sides of one medallion: this will bridge the two large panels.
Pointed Sage Leaves — Make 10
- Foundation: With sage, ch 13. The first chain made is the base end; the end nearest the hook is the pointed tip.
- Round 1, first side: Sc in second chain from hook, hdc in next 2 chains, dc in next 6 chains, hdc in next 2 chains, 3 sc in last chain. This uses all 12 available foundation chains. (14 sts so far)
- Round 1, second side: Rotate to work along the unused loops of the foundation. Skip the chain containing the 3-sc base turn; hdc in next 2 chains, dc in next 6 chains, hdc in next 2 chains, then 2 sc in the chain containing the first sc. Join to the first sc. (26 sts total)
- Round 2: Ch 1, sc in next 12 sts, 3 sc in next st, sc in next 12 sts, 3 sc in last st; join. (30 sts) The two 3-sc groups sit at the base and tip.
- Round 3: Sl st loosely in BLO of all 30 stitches. Fasten off, leaving a 40 cm joining tail. (30 slip stitches)
- Central vein: With a separate sage strand, surface sl st along the foundation chain from base to tip, making one surface stitch at each of its 12 worked chain positions. Keep the strand relaxed so the leaf retains its length.
- Side veins: With the same strand and a tapestry needle, embroider 3 diagonal straight stitches on each side of the central vein, running from the center toward the edge. Work at roughly one-quarter, one-half, and three-quarters of the leaf length. Secure on the WS.
- Block to approximately 7 × 3 cm. Pin the tip sharply and allow a shallow central fold rather than stretching the leaf completely flat.
Blocking and Full-Size Layout
- Soak the completed motifs in cool water according to the yarn label. Press out water between towels without wringing. Pin the circular pieces flat, spread the petals evenly, and shape the leaves. Let everything dry completely.
- Draw a vertical centerline on paper. Coordinates below are in centimeters: x is the distance left or right of this line, and y runs down the runner. Mark the center of ivory Panel B at (0, 0) and sage Panel A at (0, 25).
- Place daisy centers at approximately (-15, 0), (15, 0), (-15, 25), (15, 25), and (0, 41). Rotate the side daisies so two petals rest against their neighboring large panel. Rotate the lower daisy so two upper petals touch Panel A.
- Place the marked bridge medallion at (0, 12.5). Its opposite edges should overlap the lower edge of Panel B and the upper edge of Panel A slightly. Adjust the panel spacing by up to 1 cm to obtain contact without stretching.
- Place the remaining 9 medallions at approximately (-7, -10), (0, -12), (7, -10), (-12, 10), (12, 10), (-12, 16), (12, 16), (-8, 37), and (8, 37). Move each by up to 2 cm so it touches at least two neighboring motifs. Alternate solid sage centers with ivory-ringed centers.
- Place 2 leaves in the upper end gaps between the top medallions and side daisies, 4 along the outer sides between the two pairs of side daisies, 2 in the lower gaps beside Panel A, and 2 beside the terminal daisy. Point the leaves outward or diagonally along the runner rather than all in the same direction.
- Before sewing, check that every medallion and daisy has at least two separate contact areas and that each leaf has two supporting contacts, or one sewn base plus a second side tack. Small overlaps of 3–6 mm are intentional. The measured motif edges take priority over the approximate center coordinates.
- Keep the outermost leaf tips within approximately 22 cm of the centerline. The upper medallions and lower daisy establish an overall length near 64 cm. Photograph or trace the final arrangement before lifting any pieces.
Joining the Runner
- Baste the arranged motifs together with contrasting thread. Lift the runner gently from its center to locate unsupported motifs; lay it down and add or reposition contacts before permanent joining.
- Join from the WS with matching yarn. Use small whipstitches through the underside loops of each edge, leaving the decorative top slip stitches visible. Sew neighboring motifs together without pulling one over the other.
- Join the central bridge medallion to each large panel across 4–5 medallion edge stitches and the corresponding panel edge span. These two seams connect the main panels.
- Join each side daisy to its neighboring panel at two separate petal edges. Sew 3–4 edge stitches at each contact. Join the terminal daisy to Panel A in the same way.
- Join each remaining medallion to at least two neighbors, using 3–4 medallion edge stitches at each contact. Match the physical lengths of the edges; a one-to-one stitch correspondence is unnecessary when stitch heights differ.
- Attach each leaf base across 3–4 edge stitches. Add a second seam or small tack along one side approximately halfway toward the tip, connecting it to the neighboring motif. Leave the outer tip free.
- Where a petal touches a medallion or leaf, add a discreet 2–3-stitch seam on the WS. Keep the open spaces between motifs clear of loose bridging strands.
- Secure each joining strand by weaving it through at least 4 cm of nearby stitches, reversing direction once. Remove all basting thread.
Finishing
Lay the runner flat and smooth the circles with your hands. Open each daisy so its petals sit evenly, then turn the leaf tips outward to show their veins. Check the underside for loose strands and secure any joins that open when the runner is lifted.
Give the assembled piece a final damp block to its relaxed outline, approximately 44 × 64 cm. Pin the circular edges and petal tips without stretching the joining seams. Let it dry completely before placing it on the table. For a display like the photograph, place a separate waterproof coaster beneath a vase so moisture cannot soak into the cotton.
Tips for Success
- Count each large-panel round before continuing. Every dc round adds exactly 12 stitches; a missed increase becomes obvious once the next round is worked.
- Keep the petal chains slightly loose. Tight foundation chains make the long petals curl sideways instead of opening around the center.
- Block all five daisies to the same diameter. Consistent flower sizes make the paired side placements much easier to balance.
- Use the surface stitching as decoration rather than tensioning cord. Check that the large panels still lie flat after each decorative circle.
- Leave the layout basted until all primary joins are complete. The small medallions can shift while the larger motifs are handled.
Common Mistakes to Avoid
- Counting beginning chains or joining slip stitches as stitches adds unwanted increases. Mark the first actual stitch of each round and join directly to it.
- Anchoring every petal into only one center stitch crowds the flower. Each complete petal repeat must advance across exactly two center stitches.
- Working the edging slip stitches tightly cups the circles and leaves. Use a relaxed loop or a slightly larger hook for that decorative round.
- Forcing motifs to meet their paper coordinates can buckle the runner. Shift the small motifs and adjust panel spacing until the blocked edges meet naturally.
- Joining a daisy by one petal allows it to swivel. Attach two separated petals and add a neighboring medallion contact where the layout allows.
Ways to Customize This Pattern
- Reverse the large-panel colors while retaining ivory petals and sage leaves for a lighter foreground circle.
- Make all ten medallions with ivory middle rings to emphasize the small circular details around the edge.
- Extend the runner by repeating the large-panel and paired-side-daisy arrangement before adding the terminal flower. Include another bridge medallion and supporting leaves for each extension.
- Use a second, slightly darker sage for the embroidered leaf veins to make their structure more visible.
- Make a matching centerpiece with one large panel, two daisies, four medallions, and four leaves, using the same two-contact joining principle.
Frequently asked questions
No. The instructions cover the sage and ivory table runner beneath the arrangement. The rose bouquet, vase, teapot, and plate are separate styling objects in the reference photograph.
The foundation chains may be tighter than the return stitches, or a petal may have rotated at its base. Loosen the chain tension, turn the stitch faces upward, and block the flower before adding its stabilizing tacks.
Move the panels slightly closer together before sewing. Their 25 cm center spacing is a layout guide, and the bridge needs a small overlap at both edges. Do not stretch the medallion across an unsupported gap.
Follow the cotton yarn’s care instructions. Gentle hand washing and drying flat help preserve the long petals and open joins. Reshape the circles, flowers, and leaf tips while damp, and lift the wet runner with both hands.
The finished Sage and Ivory Daisy Crochet Table Runner Pattern

