Sage Leaf Basketweave Crochet Wall Hanging
Advanced
For experienced crocheters who enjoy complex shaping, fine detail, and ambitious construction
Multi-Day Project
A rewarding 12+ hour journey — perfect for dedicated crafters who love detailed work.
Handmade Gift
A beautiful keepsake — free forever. Read online or print at home.
About This Sage Leaf Basketweave Crochet Wall Hanging
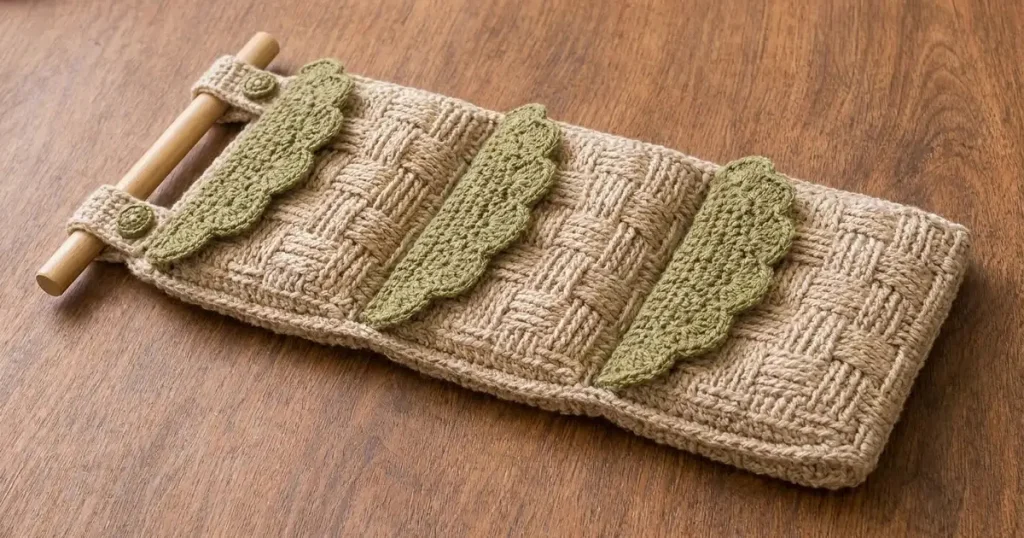
This leaf crochet wall hanging pattern combines an oatmeal basketweave panel with three long, scalloped sage leaves and a natural wooden dowel. Raised post stitches give the background its woven appearance, while separately crocheted leaves sit above the surface with softly lifted edges. Two button-trimmed tabs support the short end of the panel.
Allow approximately 12–16 hours for the crochet, embroidery and assembly, plus drying time after blocking. This advanced project suits crocheters comfortable with front and back post stitches, shaping flat pieces and sewing appliqués onto textured fabric. The reference shows a decorative textile rather than a stuffed toy, so this construction uses an unstuffed panel, layered botanical motifs and reinforced hanging tabs.
Materials
- Worsted cotton or cotton-blend yarn in oatmeal Approximately 450 m; choose a firmly plied yarn with good stitch definition
- Matching-weight yarn in muted sage green Approximately 180 m, including embroidery and button covers
- Crochet hooks 4 mm for the panel; 3.5 mm for leaves, tabs and buttons
- Natural wooden dowel 35 cm long and approximately 18–20 mm in diameter, with smooth ends
- Tapestry needle, scissors, removable markers and blocking pins For joining and finishing
- Strong matching sewing thread and sewing needle For reinforcing the hanging tabs
- Hanging cord Approximately 80 cm of strong cotton cord
Abbreviations
chchainsl stslip stitchscsingle crochethdchalf double crochetdcdouble crochettrtreble crochetFPdcfront post double crochet: work around the post from front to back to frontBPdcback post double crochet: work around the post from back to front to backinc2 sc in the same stitchdecsingle crochet 2 stitches togetherMRmagic ringst / stsstitch / stitchesGauge, Dimensions and Pattern Notes
- Use US crochet terminology. Work flat unless a round is explicitly stated. Turning chains never count as stitches.
- Blocked basketweave gauge with the 4 mm hook: 16 stitches and 10 rows = 10 × 10 cm. Make a 24-stitch swatch using the panel’s four-stitch post groups and work at least 16 rows before blocking.
- Blocked sc gauge with the 3.5 mm hook: 20 stitches and 24 rows = 10 × 10 cm. Adjust hooks to achieve both gauges rather than assuming the same adjustment suits both fabrics.
- The panel before its border measures approximately 25 × 61 cm. The bordered panel measures approximately 27 × 63 cm. Each edged leaf measures approximately 8 × 20 cm, and each tab approximately 4 × 10 cm before folding.
- The foundation and final row form the short edges. For hanging, the foundation edge is the top. The three leaves cross the panel width and are spaced along its length.
- For every flat sc row after Row 1, ch 1 and turn before working. For every panel row after Row 1, ch 2 and turn. These chains are additional to the written stitch counts.
Oatmeal Basketweave Panel
- Row 1: With oatmeal and the 4 mm hook, ch 42. Dc in the third chain from the hook and in each remaining chain. The two skipped chains do not count as a stitch. (40 sts)
- Define post sequence A as: repeat FPdc in the next 4 sts, BPdc in the next 4 sts, five times. Define sequence B as: repeat BPdc in the next 4 sts, FPdc in the next 4 sts, five times. Each sequence works all 40 posts exactly once.
- Rows 2–6: Work sequence A on each row. (40 sts per row)
- Rows 7–11: Work sequence B on each row. (40 sts per row)
- Rows 12–16: Work sequence A on each row. (40 sts per row)
- Rows 17–21: Work sequence B on each row. (40 sts per row)
- Rows 22–26: Work sequence A on each row. (40 sts per row)
- Rows 27–31: Work sequence B on each row. (40 sts per row)
- Rows 32–36: Work sequence A on each row. (40 sts per row)
- Rows 37–41: Work sequence B on each row. (40 sts per row)
- Rows 42–46: Work sequence A on each row. (40 sts per row)
- Rows 47–51: Work sequence B on each row. (40 sts per row)
- Rows 52–56: Work sequence A on each row. (40 sts per row)
- Rows 57–61: Work sequence B on each row. (40 sts per row)
- Mark the face you prefer as the right side. Fasten off and block the panel to approximately 25 × 61 cm without flattening the raised blocks.
Panel Border
- Round 1: With the right side facing, join oatmeal at the first foundation stitch. Ch 1. Sc in each of the 40 foundation stitches, ch 2; work 98 sc evenly along the first long edge, ch 2; sc in each of the 40 final-row stitches, ch 2; work 98 sc evenly along the second long edge, ch 2. Join with a sl st to the first sc. (276 sc and four ch-2 corner spaces)
- For each 98-stitch long edge, work 2 sc into each row end of Rows 1, 3, 5 and every other odd-numbered row through Row 61; also work 2 sc into the row ends of Rows 2, 12, 22, 32, 42 and 52. Work 1 sc into every other row end. This gives 37 row ends with 2 sc and 24 row ends with 1 sc: 98 sc total. Keep these side stitches separate from the short-edge stitches.
- Round 2: Ch 1. Sc in every sc around; work (sc, ch 2, sc) in each corner space. Join with a sl st to the first sc. (284 sc and four ch-2 corner spaces)
- Round 3: Repeat Round 2. (292 sc and four ch-2 corner spaces) Fasten off. Lightly block the border until it lies flat.
Shaped Sage Leaves — Make Three
- Row 1: With sage and the 3.5 mm hook, ch 3. Sc in the second chain from the hook and in the remaining chain. (2 sts) This is the leaf base.
- Row 2: Inc in each st. (4 sts)
- Row 3: Inc, sc in the next 2 sts, inc. (6 sts)
- Row 4: Inc, sc in the next 4 sts, inc. (8 sts)
- Row 5: Inc, sc in the next 6 sts, inc. (10 sts)
- Row 6: Inc, sc in the next 8 sts, inc. (12 sts)
- Rows 7–38: Sc in each st. (12 sts per row; 32 rows)
- Row 39: Dec, sc in the next 8 sts, dec. (10 sts)
- Row 40: Dec, sc in the next 6 sts, dec. (8 sts)
- Row 41: Dec, sc in the next 4 sts, dec. (6 sts)
- Row 42: Dec, sc in the next 2 sts, dec. (4 sts)
- Row 43: Dec twice. (2 sts)
- Row 44: Dec. (1 st) Fasten off. This is the pointed tip.
- Edging Round 1: With the chosen right side facing, join sage at the side end of Row 1. Ch 1. Work 1 sc into each of the 44 row ends along the first side, 1 sc into the top stitch of Row 44, 1 sc into each of the 44 row ends along the second side, then 1 sc into each of the 2 unused foundation chains. Join with a sl st to the first sc. (91 sc) The side stitches at Row 44 are separate from its top stitch.
- Edging Round 2, first side: Ch 1, sc in the first 4 sts. Repeat the following five times: skip 2 sts, work (sc, hdc, dc, tr, dc, hdc, sc) into the next st, skip 2 sts, sl st in the next st, sc in each of the next 2 sts. These five repeats consume the remaining 40 first-side stitches.
- Edging Round 2, tip: Work (sc, ch 2, sc) into the single tip stitch.
- Edging Round 2, second side: Repeat the same eight-stitch scallop repeat five times over the next 40 sts, then sc in the remaining 4 side stitches. Sc in the final 2 foundation-edge stitches and join with a sl st to the first sc. (112 sts and one ch-2 tip space; joining sl st excluded) Fasten off, leaving a 90 cm sewing tail.
- Block each leaf to approximately 8 × 20 cm. Pin the tips and scallops gently; keep all three leaves the same length.
Embroidered Leaf Veins
- Thread a separate 70 cm length of sage yarn. On each leaf, work a line of small backstitches along the center, starting at Row 2 and finishing at Row 42. Catch the crochet fabric without pulling the stitches together.
- Add paired diagonal branch veins at Rows 10, 18, 26 and 34. Run each branch from the center vein toward the side, stopping approximately 1 cm before the scalloped edge.
- Secure the embroidery on the wrong side. Weave in its ends separately from the long assembly tail.
Oatmeal Hanging Tabs — Make Two
- Row 1: With oatmeal and the 3.5 mm hook, ch 9. Sc in the second chain from the hook and in every remaining chain. (8 sts)
- Rows 2–24: Sc in each st. (8 sts per row) Fasten off, leaving a 70 cm sewing tail.
- Block each tab to approximately 4 × 10 cm. Before sewing, wrap one around the actual dowel and check that its ends can overlap the front and back of the panel by approximately 1.5 cm. The loop should allow the dowel to slide through without stretching the tab.
Sage Button Motifs — Make Two
- Round 1: With sage and the 3.5 mm hook, work 6 sc in an MR. Pull the ring closed. (6 sts)
- Round 2: Inc in every st. (12 sts)
- Round 3: Sl st loosely in each st. (12 sl sts) Fasten off, leaving a 35 cm sewing tail.
- These are flat decorative discs. Sew a small spiral of sage backstitches across each center for the raised button effect; leave them unstuffed.
Assembly and Placement
- Lay the blocked panel right side up with its foundation edge at the top. Measure all placements on the unbordered basketweave rectangle so the border does not change the spacing.
- Position the three leaf centerlines approximately 10, 30 and 50 cm below the foundation edge, corresponding roughly to panel Rows 10, 30 and 50. Each leaf runs across the panel width, with its base 2.5 cm inside the right long edge and its tip pointing toward the left long edge. Keep all three leaves parallel.
- Using each leaf’s long tail, sew along both sides of its central vein, catching the backs of the panel’s raised stitches. Secure the narrow base and tip as well. Add one small anchoring stitch on each side near leaf Rows 12 and 32. Leave the scalloped rims free to lift slightly.
- Center one hanging tab 4 cm from each long edge along the foundation edge. Sew one end of each tab onto the front, overlapping the panel by 1.5 cm. Pass the remaining tab over the dowel, bring its other end down the back and overlap the panel by 1.5 cm.
- Sew each back end firmly in place. Reinforce both attachment areas with matching sewing thread, passing through solid crochet stitches rather than only through border loops. Remove and reinsert the dowel to confirm that both loops remain open.
- Sew one sage button motif onto the front of each tab over its attachment area. Secure the entire disc perimeter; the discs are decorative and do not function as fasteners.
- Tie the hanging cord securely around the exposed dowel immediately outside each tab. Adjust the cord until the panel hangs level.
Finishing
Weave all remaining ends into the backs of the stitches and trim them after checking the joins. Smooth the leaf edges with your fingers and let their scallops rest above the basketweave texture. The three appliqués should feel securely attached without flattening into the background.
Slide the dowel into place and hang the piece for a day before making any final cord adjustment. To clean it, remove the dowel and cord, hand wash according to the yarn label, and dry flat with the panel squared and the leaves gently arranged.
Tips for Success
- Place markers after every four panel stitches. The ten marked groups make a misplaced front or back post stitch easy to find.
- Work the post sequences as written after turning. Each row contains an even number of four-stitch groups, which keeps the raised columns aligned within each five-row band.
- Mark every tenth leaf row while crocheting. This makes the 32 straight rows easier to track and helps match the embroidery across all three leaves.
- Pin all three leaves before sewing the first one. Check the spacing with the panel held upright so any visual tilt is obvious.
- Use small, relaxed appliqué stitches. Pulling the sewing yarn tightly can draw the panel into ridges beneath the leaves.
Common Mistakes to Avoid
- Counting turning chains as panel stitches adds width. Count 40 actual stitches on every row and leave the turning chain unworked.
- Working into both the top of a stitch and its post creates an increase. Each post stitch replaces the ordinary stitch above that same post.
- Putting two border stitches into every row end makes the long edges flare. Follow the specified 98-stitch distribution on each side.
- Skipping a leaf row end throws off the scallop repeat. Count 44 stitches on each side before starting the second edging round.
- Making the hanging tabs tight around the dowel strains their seams. Check the actual dowel before sewing and preserve enough room for it to slide through.
Ways to Customize This Pattern
- Use three related greens, such as olive, sage and moss, while keeping the oatmeal background and matching each leaf’s embroidery to its own yarn.
- Make a shorter two-leaf hanging by ending the panel after Row 41. For its first border round, use 66 sc on each long edge: 2 sc in every odd row end and in Rows 2, 12, 22 and 32; 1 sc in every other row end. Place leaves approximately 10 and 30 cm below the top.
- Embroider the veins in a slightly lighter green for more visible botanical detail. Keep the branch stitches short so they do not snag.
- Use a darker wooden dowel for stronger contrast with the oatmeal tabs, keeping the same diameter so the loops still fit.
Frequently asked questions
Front and back post stitches draw the fabric inward. Measure the blocked textured swatch rather than the chain or plain first row. If 40 stitches do not measure approximately 25 cm after blocking, adjust your hook before making the full panel.
No. Secure their centers, tips, bases and the specified side anchors. Leaving the scalloped rims free creates the layered appearance shown in the reference while keeping the long leaves stable.
Yes. The tabs form closed fabric loops, so the dowel slides out sideways after you untie the hanging cord. Choose a dowel without fixed oversized end caps.
The edging may be tighter than the leaf body, or several scallops may have been squeezed into too few stitches. Check that each repeat consumes eight foundation stitches, loosen your edging tension and wet block the leaf before attaching it.
The finished Sage Leaf Basketweave Crochet Wall Hanging

