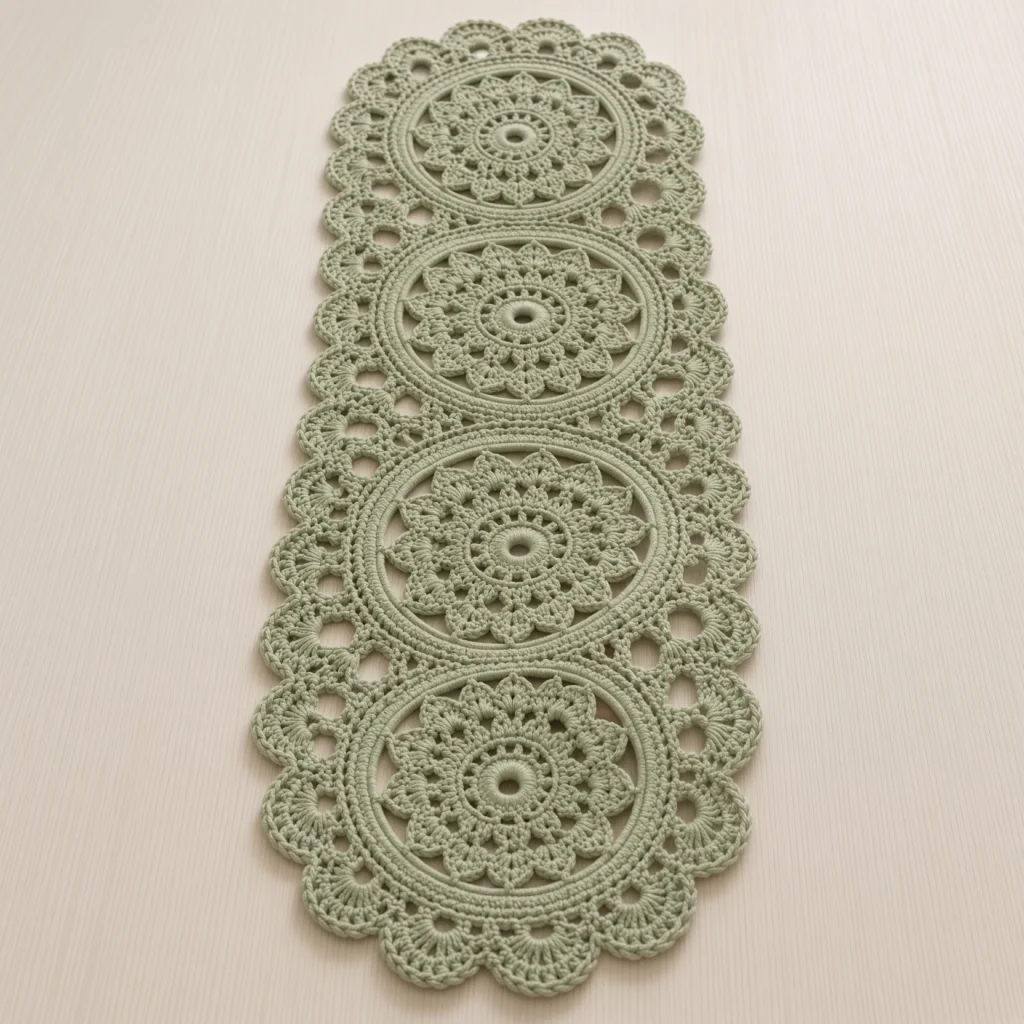
Sage Mandala Lace Table Runner
Beginner Friendly
Perfect for those just starting their crochet journey, with clear instructions and simple techniques
Single-Day Project
A satisfying project you can complete in a single afternoon or evening.
Handmade Gift
A beautiful keepsake — free forever. Read online or print at home.
About This Sage Mandala Lace Table Runner
This crochet mandala table runner pattern turns four identical sage green lace medallions into one long, scalloped runner that looks far more complicated than it is to work. Each medallion is a thirteen-round mandala: an open center ring, a tier of sixteen small petals, a smooth raised band, a second tier of sixteen larger fanned petals, and another smooth band that gives the circle a clean finished outline. The four circles sit in a row, touching, and the little open rings tucked into the notches between them are worked separately and sewn in — that small detail is what keeps the runner from looking like four doilies pushed together.
The whole thing is worked in one color. That sounds plain on paper, but in a piece this open the interest comes from texture rather than contrast: the petals sit forward off the fabric, the two hdc bands sit flat and smooth behind them, and the shadow between the layers does the work a second color would normally do. Sage is what the sample uses and it suits a natural linen or bare wood table, though the pattern works just as well in cream, dusty rose, or charcoal.
Plan on roughly five to six hours per medallion once you’ve got the rhythm, plus another four or five for joining, filler rings, and the scalloped picot border — about 20 to 26 hours in total. It’s an advanced project, mainly because of the working-behind-the-petals rounds and the sheer stitch count in the border, not because any single technique is difficult. If you’ve made a lace doily before and you’re comfortable keeping your place in a long round, you can make this.
Materials
- Size 3 crochet cotton in sage green approx. 850-950 m (about 300 g)
- 2.75 mm crochet hook US C-2/D-3
- Tapestry needle blunt tip, for joining and weaving in
- Blocking mats or a towel-covered board at least 100 x 30 cm of working space
- Rustproof T-pins 60+; you will use more than you expect on the scallops
- Spray bottle of water or light spray starch starch recommended for a crisp finish
- Stitch markers 4-6, for marking round beginnings and join points
- Measuring tape to check the medallion against gauge
- Small sharp scissors
Abbreviations
begbeginningchchaindcdouble crochethdchalf double crochetlp(s)loop(s)picotch 3, sl st in 3rd ch from hookreprepeatrnd(s)round(s)RSright sidescsingle crochetskskipsl stslip stitchsp(s)space(s)st(s)stitch(es)Gauge and sizing
- Gauge: Rnds 1-5 of the medallion measure 7 cm across, blocked.
- One finished medallion measures about 24 cm across after blocking.
- Finished runner: approximately 98 cm long by 27 cm wide, measured to the outer edge of the scallops.
- All instructions use US crochet terminology.
- Every round of the medallion is joined with a sl st and worked with the RS facing — do not turn.
- To lengthen the runner, add medallions in multiples of one (each adds about 24 cm); to shorten, make three. Make one extra pair of filler rings for every medallion you add.
Medallion (make 4)
- Rnd 1: Ch 6, sl st in first ch to form a ring. Ch 3 (counts as dc here and throughout), 15 dc in ring, sl st to top of beg ch-3. (16 dc)
- Rnd 2: Ch 3, dc in same st, 2 dc in each st around, sl st to top of beg ch-3. (32 dc)
- Rnd 3: Ch 4 (counts as dc + ch 1), sk next dc, *dc in next dc, ch 1, sk next dc; rep from * around, sl st to 3rd ch of beg ch-4. (16 dc, 16 ch-1 sps)
- Rnd 4: Sl st into first ch-1 sp, ch 1, sc in same sp, *ch 5, sc in next ch-1 sp; rep from * around, ch 5, sl st to first sc. (16 sc, 16 ch-5 lps)
- Rnd 5 (inner petals): Sl st into first ch-5 lp, ch 1, (sc, hdc, 3 dc, hdc, sc) in same lp, then work (sc, hdc, 3 dc, hdc, sc) in each ch-5 lp around, sl st to first sc. (16 petals of 7 sts)
- Rnd 6 (worked behind the petals): Fold the first petal forward toward you. Sl st behind it into the Rnd-4 sc directly below, ch 1, sc in that same sc. *Ch 6, taking the chain behind the next petal, sc in next Rnd-4 sc; rep from * around, ch 6, sl st to first sc. (16 sc, 16 ch-6 lps)
- Rnd 7: Sl st to center of first ch-6 lp, ch 3, 4 dc in same lp, ch 3, *5 dc in next ch-6 lp, ch 3; rep from * around, sl st to top of beg ch-3. (16 fans of 5 dc = 80 dc, 16 ch-3 sps)
- Rnd 8: Ch 1, sc in same st (the 1st dc of a fan), *ch 3, sk next dc, sc in next dc, ch 3, sk next dc, sc in next dc, ch 3, sc in next ch-3 sp, ch 3, sc in 1st dc of next fan; rep from * around, ending the last rep with ch 3, sl st to first sc. (64 sc, 64 ch-3 sps)
- Rnd 9 (inner band): Sl st into first ch-3 sp, ch 2 (counts as hdc), hdc in same sp, hdc in next sc, *2 hdc in next ch-3 sp, hdc in next sc; rep from * around, sl st to top of beg ch-2. (192 hdc)
- Rnd 10: Ch 1, sc in same st, *ch 5, sk next 5 hdc, sc in next hdc; rep from * around, ending ch 5, sl st to first sc. (32 sc, 32 ch-5 lps)
- Rnd 11 (outer petals): Sl st to center of first ch-5 lp, ch 3, 6 dc in same lp, *sc in next lp, 7 dc in next lp; rep from * around, sc in last lp, sl st to top of beg ch-3. (16 fans of 7 dc = 112 dc, 16 sc)
- Rnd 12: Ch 1, sc in same st (the 1st dc of a fan), *ch 3, sk next dc, sc in next dc, ch 3, sk next dc (the center dc), sc in next dc, ch 3, sk next dc, sc in next dc, ch 3, sk next sc, sc in 1st dc of next fan; rep from * around, ending the last rep with ch 3, sl st to first sc. (64 sc, 64 ch-3 sps)
- Rnd 13 (outer band): Sl st into first ch-3 sp, ch 2 (counts as hdc), 2 hdc in same sp, hdc in next sc, *3 hdc in next ch-3 sp, hdc in next sc; rep from * around, sl st to top of beg ch-2. (256 hdc)
- Fasten off and weave in ends. The medallion should measure about 24 cm across once blocked. Make 4 identical medallions.
Filler rings (make 6)
- Rnd 1: Ch 10, sl st in first ch to form a ring.
- Rnd 2: Ch 1, 24 sc in ring, sl st to first sc. (24 sc)
- Fasten off, leaving a 40 cm tail for sewing. The ring should measure about 2 cm across.
- Make 6 in total — two rings for each of the three points where medallions meet, one on each long side of the runner.
Joining the medallions
- Block all four medallions flat and to the same diameter before joining. Pinning them to equal size now is the single biggest factor in whether the finished runner lies straight.
- Lay the four medallions in a row on your blocking surface, RS up, with the outer bands just touching. Pin the row down so nothing shifts.
- At the first contact point, count 9 hdc on each medallion, centered exactly on the point where the two circles touch. Mark the outer two stitches of each group.
- Thread a tapestry needle with a 50 cm length of yarn. With the medallions still flat and edge to edge, whip stitch through the back loops only of the 9 marked hdc on one medallion and the corresponding 9 hdc on the other, working stitch for stitch. Do not pull the seam tight — it should lie as flat as the fabric around it.
- Secure the seam ends with two small backstitches on the wrong side and weave in.
- Repeat for the remaining two contact points, keeping the whole row pinned straight as you work. Check with a straightedge that the four centers sit on one line before moving on.
- Each join leaves a V-shaped notch on both long sides of the runner. Slip a filler ring into each notch so it sits level with the fabric, then sew it in place with its long tail: tack it to each neighboring medallion’s outer band at 3 evenly spaced points, 6 tacking points per ring. Weave in the tail.
Border
- Rnd 1 (counting round): Join yarn with a sl st to any hdc of Rnd 13 at one short end of the runner. Ch 1, then sc evenly around the entire outer edge: work 1 sc in each exposed hdc of every medallion’s Rnd 13, and 1 sc in each of the 8 outermost sc of each filler ring as you pass it. Skip the hdc buried in the seams. Sl st to first sc. Your total should be a multiple of 12 — aim for about 1,020 sc, and adjust by adding or skipping 1-2 sc immediately beside a seam, where it will not show.
- Rnd 2 (arches): Ch 1, sc in same st, *ch 7, sk next 11 sc, sc in next sc; rep from * around, ending ch 7, sl st to first sc. (85 sc, 85 ch-7 arches, based on 1,020 sc in Rnd 1)
- Rnd 3 (picot scallops): Sl st into first ch-7 arch, ch 3, 2 dc in same arch, picot, 3 dc in same arch, picot, 3 dc in same arch, *(3 dc, picot, 3 dc, picot, 3 dc) in next arch; rep from * around, sl st to top of beg ch-3. (85 scallops, each with 9 dc and 2 picots)
- Fasten off, leaving a 15 cm tail.
Finishing
Weave every end into the back of a solid band rather than a lace section, where a tail will show through. Run each tail under at least 6 stitches, change direction once, and trim close.
Wet block the finished runner. Soak it in cool water for ten minutes, press the water out between towels without wringing, then lay it on your blocking surface. Pin the four medallion centers along a single straight line first, then pin the two long edges parallel to that line so the runner squares up. Only after the body is square should you pin the scallops: put one pin through the center picot of each scallop and pull it out to a gentle even curve, working alternately from opposite ends of the runner so the tension stays balanced. Expect to use around sixty pins.
Let it dry completely, at least twelve hours, before unpinning. If you want a crisper, more sculptural finish that holds the scallops out on their own, mist lightly with spray starch while it is still pinned and let it dry a second time. Re-block after each wash.
Tips for Success
- On Rnds 6 and 12, fold the petal tier forward toward you with your non-hook hand and keep it there while you work. The chains must pass behind the petals, not through them — if you can see the chain running across the front of a petal, undo it.
- Mark the first stitch of Rnds 9 and 13 with a stitch marker. Those are 192- and 256-stitch rounds, and losing your place two-thirds of the way through means recounting the whole round.
- Count the 16 fans at the end of Rnd 7 and again at the end of Rnd 11. Everything after those rounds depends on having exactly 16, and it is the last easy place to catch an error.
- Work all four medallions to Rnd 13 before joining any of them, and block them together so they come out the same size. Blocking one at a time almost always produces four slightly different circles.
- Keep your border Rnd 1 tension loose. A tight sc round around a 1,000-stitch perimeter will cup the whole runner, and no amount of blocking fully fixes it.
Common Mistakes to Avoid
- Working Rnd 6 into the petal stitches instead of the Rnd-4 sc. This is the most common error in the pattern and it flattens the petals completely. If your petals lie flat rather than standing forward, frog back to Rnd 5 and look for the 16 sc from Rnd 4 sitting behind them.
- Ending Rnd 8 or Rnd 12 with 63 or 65 spaces instead of 64. The cause is nearly always working the last sc into the wrong stitch of the final fan. Recount before starting the following band round, because 256 hdc worked over the wrong base cannot be salvaged without ripping it out.
- Pulling the joining seams tight. A tight whip stitch draws the two medallions into each other and makes the notch pucker, which then throws the filler ring out of plane. The seam should have the same give as the fabric on either side of it.
- Starting border Rnd 2 without checking that Rnd 1 is a multiple of 12. If it isn’t, the last arch will span the wrong number of stitches and one scallop will sit visibly crooked. Adjust in Rnd 1, beside a seam.
- Unpinning before the piece is fully dry. Damp lace relaxes back to its unblocked shape within an hour, and the scallops are the first thing to go soft.
Ways to Customize This Pattern
- Work Rnds 9 and 13 — the two smooth bands — in a contrasting cream or off-white. The bands read as outlined rings and the petal tiers appear to float between them.
- Make a single medallion through Rnd 13, then work border Rnds 2 and 3 directly around it (256 hdc gives 21 arches if you skip 11 and sc in the 12th, adjusting once) for a matching 28 cm round centerpiece or placemat.
- Swap the size 3 cotton for DK cotton and a 4 mm hook. Each medallion grows to roughly 33 cm, giving a 135 cm runner that suits a long dining table; you will need about twice the yardage.
- Replace the two picots in each scallop with a single 5 mm wooden or ceramic bead sewn at the scallop’s center point, for a heavier, more decorative edge on a sideboard runner.
- Work the four medallions in a graded set of tones — palest sage at one end through to deep olive at the other — keeping the border in the mid tone to tie them together.
Frequently asked questions
Ruffling at the first band round almost always means Rnd 8 has more than 64 ch-3 spaces, usually because a fan was worked with 6 dc instead of 5 back in Rnd 7. Count the spaces in Rnd 8. If you have 64 and it still ruffles, your hdc are being worked too loosely relative to your chains — go down half a hook size for Rnd 9 only, then return to 2.75 mm.
Yes. On the last three medallions, join during Rnd 13: when you reach the 9 stitches that will meet the previous medallion, work each hdc as normal but drop the loop, pull it through the corresponding hdc on the finished medallion, and continue. It is faster, but the seam is less adjustable, so only do this if your medallions have already blocked to matching size.
Structurally, no — the runner holds together without them. Visually, they matter a lot: without them the notch between each pair of medallions is a deep empty V, and the border has to bridge a gap of several centimeters, which pulls the scallops out of line. If you skip them, add a ch-9 loop across each notch in border Rnd 1 to keep the outline smooth.
Each medallion contributes 256 hdc, each seam hides 9 stitches on each side of it, and each filler ring adds 8. So for n medallions: (256 x n) − (18 x (n−1)) + (16 x (n−1)). Round the result to the nearest multiple of 12 by adding or skipping a stitch or two beside each seam, then divide by 12 to get your number of arches and scallops.
Cotton lace washes well, but hand wash it in cool water with a mild detergent and never wring it. Squeeze it out in a towel and re-block it flat while damp. Machine washing will not destroy it, but the scallops will come out limp and you will be re-blocking anyway, so hand washing saves no effort either way.
The finished Sage Mandala Lace Table Runner

