Sage Petal Lattice Crochet Table Runner
Beginner Friendly
Perfect for those just starting their crochet journey, with clear instructions and simple techniques
Single-Day Project
A satisfying project you can complete in a single afternoon or evening.
Handmade Gift
A beautiful keepsake — free forever. Read online or print at home.
About This Sage Petal Lattice Crochet Table Runner
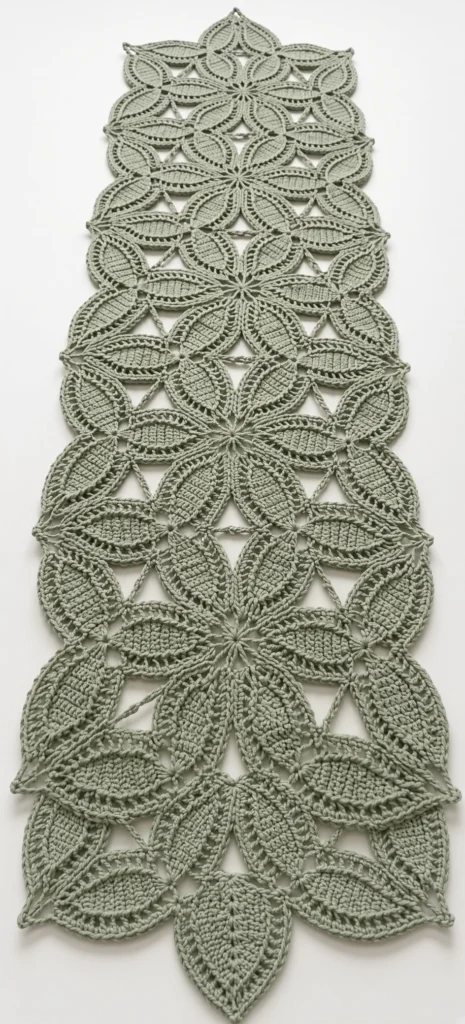
This crochet leaf table runner pattern is built from fifty pointed petals, worked one at a time and joined to each other as you go, never sewn. Eight petals radiate from a small ring to make a rosette, five rosettes run down the length of the table, and eight bridge petals fill the gaps where one rosette meets the next. The open lattice between the petals is not a stitch pattern at all. It is negative space, created by joining each petal to its neighbour only along the lower half of its side and leaving the outer half free.
Expect 16 to 20 hours. Each petal takes around twelve minutes once you stop counting, and they are portable, so the bulk of the work happens in odd half hours. The demanding part is the joining, which has to be done in a strict order. Every petal is joined at its base to the hub ring and at fixed points to the petals either side of it, and a single missed join will pull the whole runner out of true in a way that blocking cannot rescue. This suits someone who has made granny squares or motif blankets and wants to move up to true join-as-you-go lace.
Smooth worsted cotton in a soft sage is what gives the piece its definition. The petals read as individual leaves only because the yarn holds a crisp edge, and a fuzzy or hairy fibre will blur the outlines and close up the lattice. One colour throughout is deliberate here. The interest comes from the shadows the openings cast on the table, not from contrast. Written in US terms.
Materials
- Worsted / Aran cotton in sage green approx. 350 g / 700 m
- 3.5 mm crochet hook one size down from the ball band, for firm petals
- 4.0 mm crochet hook for the foundation chains only, see the notes
- Tapestry needle blunt, large eye
- Stitch markers at least 8, one per petal in a rosette
- Rust-proof pins you will need around 100 for blocking
- Blocking mats, or a spare bed and a clean sheet the runner is 112 cm long and must be blocked in one piece
- Spray bottle and a steam iron with a pressing cloth
- Tape measure and sharp scissors
Abbreviations
chchainscsingle crochethdchalf double crochetdcdouble crochetsl stslip stitchst / stsstitch / stitchesreprepeatRSright sideFOfasten offGauge and Working Notes
- Gauge: one finished petal measures about 9 cm long and 3.5 cm at its widest. One completed rosette measures about 20 cm across.
- Work all foundation chains with the 4.0 mm hook and everything else with the 3.5 mm. A tight foundation chain is the main cause of petals that curl along the spine instead of lying flat.
- Every petal is worked in the round with the RS facing throughout. Do not turn at the end of a round.
- Each petal has two points, a tip and a base. Mark the base point of every finished petal with a scrap of yarn. Once a petal is off the hook the two ends look identical, and orientation matters during joining.
- All joins are made in Round 3. Rounds 1 and 2 are identical for every petal in the runner, so work them in batches and leave Round 3 until the piece is in position.
- Joining slip stitches must be worked loosely, at the same tension as a normal chain. A tight join puckers the lattice and the runner will never block flat.
- Leave a 15 cm tail on each petal. You will not sew with it, but you will need it to close the small gap at the base point after joining.
The Petal, Rounds 1 and 2 (make 50)
- With the 4.0 mm hook, ch 16. Change to the 3.5 mm hook.
- Round 1, first side: sc in the 2nd ch from hook, sc in next ch, hdc in next 2 ch, dc in next 6 ch, hdc in next 2 ch, sc in next 2 ch (14 sts worked, one chain still free at the far end).
- Round 1, tip: work 3 sc into that last free chain (17).
- Round 1, second side: working into the free loops along the underside of the foundation chain, sc in next 2, hdc in next 2, dc in next 6, hdc in next 2, sc in next 2 (31).
- Round 1, base: work 3 sc into the remaining unworked chain at the base, sl st into the first sc of the round (34).
- Round 2: ch 1, sc in the next 14 sts; at the tip work sc in next st, 3 sc in the centre st, sc in next st; sc in the next 14 sts; at the base work sc in next st, 3 sc in the centre st, sc in next st; sl st into the first sc (38).
- Do not fasten off if you are about to join this petal. If you are working in batches, FO here leaving a 15 cm tail and mark the base point. Round 3 is worked later, on the piece.
The Petal, Round 3 Joining Round
- Round 3 worked plain (first petal of the runner only): ch 1, sc in the next 14 sts; at the tip work sc in next 2 sts, 3 sc in the centre st, sc in next 2 sts; sc in the next 14 sts; at the base work sc in next 2 sts, 3 sc in the centre st, sc in next 2 sts; sl st into the first sc (42).
- Round 3 worked with joins: work exactly as above, but wherever the instructions for the rosette or the bridge call for a join, replace that single sc with a join stitch.
- To make a join stitch: insert the hook into the corresponding stitch of the neighbouring petal or hub, yarn over, draw a loop through, then complete a normal sc into your own stitch. The two pieces are now locked at that point and the round continues as written. The stitch count of 42 is unchanged.
- Count join positions from the base point of the petal, along whichever side you are joining. The two side positions used throughout are the 4th sc and the 8th sc from the base. Joining any further up the side closes the open diamond and flattens the lattice.
- The base point joins to the hub ring across 2 stitches: the centre st of the 3-sc base group joins to one hub stitch, and the sc immediately after it joins to the next hub stitch.
- Always work joins with the RS of both petals facing you. A petal joined face down will sit proud of the fabric and cannot be corrected without undoing the round.
Hub Ring (make 5)
- With the 4.0 mm hook, ch 4 and sl st into the first ch to form a ring. Do not pull it closed. The small open centre is part of the design.
- Round 1: change to the 3.5 mm hook, ch 1, work 16 sc into the ring, sl st into the first sc (16).
- FO, leaving a 20 cm tail. Finished diameter about 2.5 cm.
- Sixteen stitches is not arbitrary. Eight petals join across 2 stitches each, so every hub stitch is used exactly once and the petals sit at even 45 degree intervals with no gap to fudge.
Building a Rosette (make 5)
- Lay a hub ring flat with the RS facing. Petals will be added clockwise around it.
- Petal 1: work Round 3, joining the base point to hub stitches 1 and 2. Leave both sides free. FO.
- Petal 2: work Round 3, joining the base point to hub stitches 3 and 4, and joining the right-hand side to petal 1 at the 4th and 8th sc from the base. FO.
- Petals 3 to 7: repeat as for petal 2, advancing 2 hub stitches each time (petal 3 to hub sts 5 and 6, petal 4 to sts 7 and 8, and so on through petal 7 at hub sts 13 and 14), each one joined to the previous petal at the 4th and 8th sc from the base.
- Petal 8: join the base point to hub stitches 15 and 16, join the right-hand side to petal 7, and join the left-hand side to petal 1 at the same two positions, closing the ring. FO.
- Use the hub tail to close the small gap at each base point if any hub shows through, then weave it in. The finished rosette measures about 20 cm across with eight open diamonds between the petals.
- Make 5 rosettes in total before joining any of them together.
Joining the Rosettes into a Column
- Lay the five rosettes in a vertical line on a large flat surface, all with the RS facing, so that one petal tip of each rosette points directly at a petal tip of the next.
- Join each pair of facing tips with 3 sl sts worked loosely through both tip stitches, using a separate 30 cm length of yarn. Work all four junctions before moving on.
- Check the column is straight before you go further. Stand at one end and sight down it. A rosette that sits even a centimetre off the centre line will read as crooked once the bridge petals are in and it is much harder to undo then.
- Each junction leaves two large open gaps, one on the left and one on the right, between the outward-facing petals of the two rosettes. These are filled by the bridge petals.
Bridge Petals (make 8, 2 per junction)
- Work Rounds 1 and 2 of the petal as written.
- Position the petal in the gap at one side of a junction with its base point toward the centre of the runner and its tip pointing outward, so it sits horizontally across the gap.
- Round 3: work the joining round, joining the base point to the two petal sides that meet at the junction, one join into each, at their 8th sc from the base.
- Continue Round 3, joining the upper side of the bridge petal to the nearest petal of the rosette above at its 4th sc from the base, and the lower side to the nearest petal of the rosette below at its 4th sc from the base.
- Complete the round and FO. The bridge petal is now anchored at four points and its outer tip is free, forming the widest part of the runner.
- Repeat for the other side of the same junction, then for all four junctions, for 8 bridge petals in total. The runner now measures about 30 cm at its widest.
End Points (make 2)
- Work Rounds 1 and 2 of the petal as written.
- Position it at the very top of the runner, in line with the free petal tip of the top rosette, base point toward the rosette and tip pointing away.
- Round 3: work the joining round, joining the base point to the free tip of that rosette petal across 2 stitches. Leave both sides free. FO.
- Repeat at the bottom of the runner. These two petals give the piece its pointed ends and bring the finished length to about 112 cm.
Edge Bars and Stabilising Bars
- Edge bars: join yarn at the tip of any outer petal on the runner outline. *Ch 5, sl st into the tip of the next outer petal along the edge*; rep from * all the way around the outline, skipping the two end point petals so their tips stay free. Sl st to the starting tip and FO.
- Keep every ch-5 bar slack enough to lie flat but not so slack that it sags into the opening. If a bar pulls the two tips toward each other, redo it with ch 6.
- Stabilising bars: at each junction there are two narrow interior diamonds left open between the rosette petals and the bridge petal. Bridge each one with a ch-4 bar, joining the two facing petal sides with a sl st at each end.
- Work 4 stabilising bars per junction, 16 in total. FO and weave in each end separately rather than carrying the yarn across an opening, where it will show.
- These bars are structural, not decorative. Without them the runner stretches lengthwise under its own weight and the diamonds distort into slots.
Finishing
Weave in every end on the back of a petal, following the line of the stitches for at least 4 cm and splitting the yarn once or twice along the way. There are around 120 ends in this piece. Do them as you go rather than saving them all for the end, because at that volume they stop being a finishing task and become a second project.
Block the whole runner in one piece. Do not block the petals individually and then assemble, because the joins pull each petal slightly out of the shape you set. Soak the finished runner in cool water, roll it in a towel to take out the excess, then lay it on blocking mats or a sheet on a spare bed. Pin the two end points first to fix the total length at 112 cm, then pin the centre of each hub ring to hold the column straight, then work outward pinning every free petal tip. Pull each tip to a sharp point, not a rounded one. The openings will not form properly unless the tips are under tension.
Leave it to dry completely, which takes a full day, and do not lift it while damp. Once dry, unpin and lay it on the table. If any petal still lifts at the tip, press just that petal from the back under a damp cloth with the iron barely touching. The runner will hold its blocking through normal use and needs re-blocking only after washing.
Tips for Success
- Work Rounds 1 and 2 of all fifty petals first, then do nothing but joining. Switching between making and joining is where miscounts creep in, because the two tasks use different parts of your attention.
- Mark the base point of every petal the moment it comes off the hook. The tip and the base look the same, and a petal joined the wrong way round changes the direction of the spine and shows immediately.
- Count join positions out loud, from the base point along the side, every single time. The 4th and 8th sc are the whole geometry of this design, and being one stitch out on a few petals is what makes a runner look homemade rather than handmade.
- Photograph each rosette from directly above as you finish it. Compare the eight openings. If one is visibly smaller, that petal is joined too high and it is a five minute fix now.
- Clear the blocking space before you start the final assembly. A 112 cm runner needs somewhere it can lie untouched for a day, and knowing where that is stops you rushing the last stage.
Common Mistakes to Avoid
- Petals that curl along the spine. The foundation chain is too tight for the three rounds worked around it. Use the 4.0 mm hook for the chain only, as written, and if it still curls go up to 4.5 mm for the chain.
- Rounded petals instead of pointed ones. This comes from skipping the 3 sc in the centre stitch at each point in Rounds 2 and 3. Those six stitches per petal are what turn an oval into a leaf, and no amount of pinning will sharpen a petal that lacks them.
- Joins worked too far up the side. Joining at the 10th or 12th sc rather than the 8th closes the open diamond and the lattice disappears. If the piece looks solid rather than airy after the first rosette, this is why.
- Tight joining slip stitches. The join has to have the same give as the fabric either side of it. A tight join shortens the seam, cups the two petals toward each other, and puts a permanent pucker at that point that blocking cannot pull out.
- Blocking petals or rosettes separately before assembly. Each join redistributes tension across both pieces, so anything blocked beforehand shifts. Block once, at the end, with the whole runner assembled.
- Carrying yarn across an opening between stabilising bars. It shows as a straight line through the lace and catches on cutlery. Fasten off and rejoin for each bar.
Ways to Customize This Pattern
- Change the length by whole rosettes. Each rosette adds or removes about 20 cm, plus 2 bridge petals and 8 petals. Four rosettes gives a 92 cm runner, six gives 132 cm for a long dining table.
- Make a single round doily instead. One rosette with 8 outward-facing petals joined to the free tips gives a 38 cm centrepiece, using 16 petals and one hub.
- Work a pair of matching placemats from two rosettes each, joined at one junction with 2 bridge petals, finishing at roughly 42 cm by 30 cm.
- Go two-tone by working the hub rings and the 8 bridge petals in cream against sage. It changes the piece from a texture study into a graphic one and makes the rosette structure obvious at a glance.
- Drop to DK cotton and a 3.0 mm hook for a finer version at about 85 cm long, or go to size 10 thread and a 1.75 mm hook for a true heirloom doily runner at around 55 cm.
- Hang it instead of laying it flat. The lattice reads beautifully against a window, and the edge bars are strong enough to take a slim rod threaded through the top three of them.
Frequently asked questions
You can, and it is a legitimate way to work if joining mid-round frustrates you, but it takes longer and the result is less stable. Sewn joins sit on the surface and let the petals shift against each other, so the open diamonds distort over time. If you do sew, use a whip stitch through the back loops only at the same four positions given in the pattern, and add the stabilising bars regardless.
Almost always the joining slip stitches are too tight, which shortens every seam and forces the surplus fabric out to the edge. Check whether the ripple sits at the outer petal tips while the centre column stays flat, which confirms it. Undo the tightest joins on the two worst petals per rosette and redo them loosely, then block hard. If the ripple is even all the way round instead, the problem is gauge and the fix is a smaller hook next time.
More than in almost any other project of this type. Unblocked, the petals sit soft and the openings close to about half their intended size, so the piece looks like a lumpy green mat. Blocked, the tips pull to points and the lattice opens up. Budget the drying day into your plan rather than treating it as optional finishing.
It will work up fine but it will not block. Acrylic has no memory for wet blocking, so the petal tips stay rounded and the lattice stays half closed, and steaming it flat enough to compensate risks killing the fibre. If cotton is not an option, a cotton and linen blend or a mercerised acrylic and cotton mix will hold a point well enough.
Hand wash in cool water with a mild detergent, press the water out against the side of the basin rather than wringing, and never hang it wet, because the weight of the water will stretch the column by several centimetres. Lay it out and re-pin the end points and hub centres exactly as you did the first time. Cotton comes back to shape every wash as long as you reblock it.
The finished Sage Petal Lattice Crochet Table Runner

