Sage Ridge Textured Bucket Bag Crochet Pattern
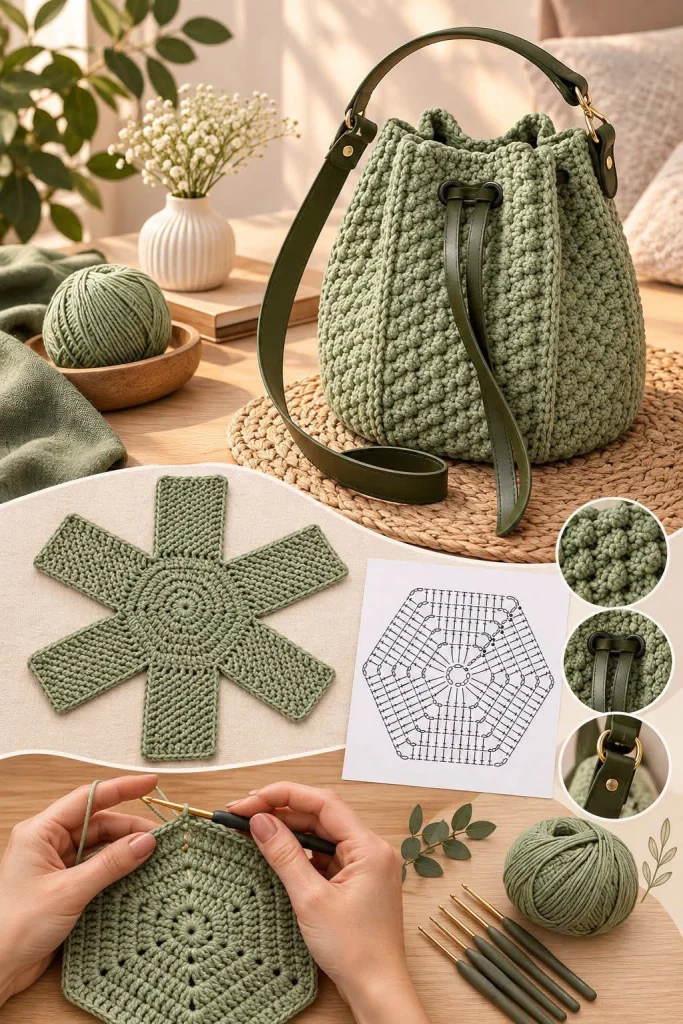
Advanced
For experienced crocheters who enjoy complex shaping, fine detail, and ambitious construction
Weekend Project
A satisfying weekend make — start Friday, finish Sunday, enjoy forever.
Handmade Gift
A beautiful keepsake — free forever. Read online or print at home.
About This Sage Ridge Textured Bucket Bag Crochet Pattern
This textured bucket bag crochet pattern pairs a sage-green body with dark olive leather fittings. Six shaped panels create a softly rounded silhouette, while raised joining ribs frame the bobble texture. A leather drawcord gathers the opening beneath a short handle, and an optional shoulder strap makes the bag easier to carry.
The construction is intended for experienced crocheters who enjoy precise assembly and fabric finishing. Allow approximately 18–24 hours for crocheting, joining, lining and installing the purchased hardware. The circular base, shaped panels and reinforced upper band are crocheted separately or in stages; the leather handle, drawcord and shoulder strap are purchased components.
This is an original interpretation of the photographed bag. The small diagram in the reference is decorative inspiration rather than a readable stitch chart. The instructions below provide their own stitch counts and assembly map.
Materials
- Sage-green bulky cotton cord or firmly plied cotton yarn Approximately 650–800 m; choose a smooth, low-stretch yarn that meets gauge
- Crochet hook 5 mm starting size; adjust to gauge
- Dark olive flat leather drawcord Approximately 120 cm long, 5–6 mm wide and thin enough to pass through the selected eyelets
- Dark olive leather short handle Approximately 40–45 cm long, with swivel clasps at both ends
- Optional dark olive shoulder strap Approximately 95–120 cm, adjustable, with swivel clasps
- Leather anchor tabs and D-rings Two tabs, approximately 20 mm wide with 70 mm of usable length; two matching D-rings
- Bag eyelets with washers 12, approximately 8 mm internal diameter, with a barrel length suitable for the reinforced fabric thickness
- Eyelet setter and hole punch Matched to the purchased hardware
- Lining fabric and woven interfacing Approximately 60 × 100 cm lining; enough interfacing for the upper band and base
- Cotton webbing 25 mm wide; approximately 65 cm for a continuous support band and two anchor reinforcements
- Flexible bag-base insert One piece cut to fit inside the finished base; round off all edges
- Matching sewing thread, strong upholstery thread and leather needle For lining, reinforcement and handle anchors
- Tapestry needle, stitch markers, clips and measuring tape A sewing machine is useful for the lining
Abbreviations
chchainscsingle crochet, US terminologysl stslip stitchinc2 sc in the same stitchdecsingle crochet 2 stitches togetherMRmagic ringBO5-leg bobble; counts as 1 stitchRSright side, facing outwardWSwrong side, facing the liningst / stsstitch / stitchesGauge, Texture and Construction Map
- Target blocked panel gauge: 16 stitches and 20 rows = 10 cm in the panel fabric, measured across several bobble repeats without flattening the texture. Make a swatch at least 20 stitches wide, working three plain sc rows followed by one bobble row, and repeat.
- Target plain-sc gauge for the base and upper band: approximately 16 stitches and 18 rounds = 10 cm. The base must lie flat; its finished diameter is expected to be approximately 14–15 cm. Adjust the base hook separately if necessary.
- For BO: yarn over, insert hook in the indicated stitch, yarn over and pull up a loop, yarn over and pull through 2 loops; repeat that action 5 times into the same stitch. There are 6 loops on the hook. Yarn over and pull through all 6. Do not add a closing chain.
- Work bobbles on WS rows and push them toward the RS. Each BO uses one stitch and creates one stitch. All unspecified stitches are worked through both loops.
- For all panel rows after Row 1, ch 1 and turn before working. Turning chains never count as stitches. Row 1 is an RS row; even-numbered rows are WS rows.
- The base finishes with 72 stitches, divided into six groups of 12. Each panel has 12 stitches at its bottom, 16 through its widest section and 12 at its top. The assembled upper edge therefore contains 72 stitches.
- Label the panels A–F clockwise as viewed from above. The seam between F and A is the front center. The seam between C and D is the back center. Side handle anchors sit on panels B and E, halfway between the two eyelets on each panel.
Circular Base
- Round 1: With sage yarn, work 6 sc in MR. Tighten securely. Work in a continuous spiral and mark the first stitch. (6 sts)
- Round 2: Inc in each stitch. (12 sts)
- Round 3: Repeat (sc 1, inc) 6 times. (18 sts)
- Round 4: Repeat (sc 2, inc) 6 times. (24 sts)
- Round 5: Repeat (sc 3, inc) 6 times. (30 sts)
- Round 6: Repeat (sc 4, inc) 6 times. (36 sts)
- Round 7: Repeat (sc 5, inc) 6 times. (42 sts)
- Round 8: Repeat (sc 6, inc) 6 times. (48 sts)
- Round 9: Repeat (sc 7, inc) 6 times. (54 sts)
- Round 10: Repeat (sc 8, inc) 6 times. (60 sts)
- Round 11: Repeat (sc 9, inc) 6 times. (66 sts)
- Round 12: Repeat (sc 10, inc) 6 times. (72 sts)
- Sl st in the next stitch to finish; this slip stitch is not an additional attachment position. Fasten off. Mark six consecutive groups of 12 stitches, numbered 1–12, 13–24, 25–36, 37–48, 49–60 and 61–72. Lightly block flat.
Six Shaped Body Panels
- Make six identical panels in sage. Row 1: Ch 13; sc in the second chain from the hook and each remaining chain. Leave the unused foundation loops accessible for base assembly. (12 sts)
- Rows 2–3: Sc in each stitch. (12 sts per row)
- Row 4: Sc 2, repeat (BO, sc 3) twice, sc 2. (12 sts)
- Row 5: Sc in each stitch. (12 sts)
- Row 6: Inc, sc 10, inc. (14 sts)
- Row 7: Sc in each stitch. (14 sts)
- Row 8: Sc 2, repeat (BO, sc 3) 3 times. (14 sts)
- Row 9: Sc in each stitch. (14 sts)
- Row 10: Inc, sc 12, inc. (16 sts)
- Row 11: Sc in each stitch. (16 sts)
- Row 12: Sc 2, repeat (BO, sc 3) 3 times, sc 2. (16 sts)
- Rows 13–15: Sc in each stitch. (16 sts per row)
- Row 16: Sc 2, repeat (BO, sc 3) 3 times, sc 2. (16 sts)
- Rows 17–19: Sc in each stitch. (16 sts per row)
- Row 20: Sc 2, repeat (BO, sc 3) 3 times, sc 2. (16 sts)
- Rows 21–23: Sc in each stitch. (16 sts per row)
- Row 24: Sc 2, repeat (BO, sc 3) 3 times, sc 2. (16 sts)
- Rows 25–27: Sc in each stitch. (16 sts per row)
- Row 28: Sc 2, repeat (BO, sc 3) 3 times, sc 2. (16 sts)
- Rows 29–31: Sc in each stitch. (16 sts per row)
- Row 32: Sc 2, repeat (BO, sc 3) 3 times, sc 2. (16 sts)
- Rows 33–35: Sc in each stitch. (16 sts per row)
- Row 36: Sc 2, repeat (BO, sc 3) 3 times, sc 2. (16 sts)
- Rows 37–39: Sc in each stitch. (16 sts per row)
- Row 40: Sc 2, repeat (BO, sc 3) 3 times, sc 2. (16 sts)
- Row 41: Sc in each stitch. (16 sts)
- Row 42: Dec, sc 12, dec. (14 sts)
- Row 43: Sc in each stitch. (14 sts)
- Row 44: Sc 2, repeat (BO, sc 3) 3 times. (14 sts)
- Row 45: Sc in each stitch. (14 sts)
- Row 46: Dec, sc 10, dec. (12 sts)
- Rows 47–48: Sc in each stitch. Fasten off after Row 48. (12 sts per row)
- Block all six panels to matching measurements, approximately 24 cm high, 7.5 cm across each end and 10 cm across the widest section. Let the bobbles retain their rounded shape.
Raised Vertical Joining Ribs
- Arrange panels A–F with every foundation edge at the bottom. Place A and B with WS together so both RS faces remain outside. Match Rows 1–48 exactly.
- Starting at the bottom, join sage yarn through the paired Row 1 ends. Ch 1, then work one sc through both panel edges at each corresponding row end. Catch two secure strands from each edge wherever possible. (48 joining sc)
- Fasten off without adding a top-edge stitch. The seam allowance and joining sc sit outside the bag, forming a raised rib.
- Repeat for B–C, C–D, D–E, E–F and F–A. Each of the six vertical joins contains 48 sc. Keep every seam equally firm so the body does not twist.
Attach the Base
- Turn the body inside out. Position the base inside the lower opening with its WS facing you. Match panel A to base stitches 1–12, B to 13–24, C to 25–36, D to 37–48, E to 49–60 and F to 61–72.
- Using sage yarn and a tapestry needle, backstitch each unused panel foundation loop to one corresponding base stitch. Use both loops of each base stitch. Make exactly 12 attachment stitches per panel and 72 around the base.
- The vertical seam ridges are not additional base positions. At each panel boundary, pass the sewing yarn through the foot of the rib to secure it, then continue with the next allocated base stitch without skipping or duplicating one.
- Secure the sewing yarn at several points inside. Turn the bag RS out and check that the base lies flat and every panel rises evenly from it.
Upper Band and Eyelet Openings
- Use joined rounds with the RS facing. Start at the F–A front seam, immediately before panel A’s first top stitch. Ch 1 at the beginning of each round; join with sl st to the first sc at the end. Chains used to start rounds and joining slip stitches do not count.
- Round 1: Sc in each of the 12 top stitches of panels A–F. Do not work into the vertical seam caps. (72 sts)
- Round 2: Sc in each stitch. (72 sts)
- Round 3: Repeat (sc 4, ch 2, skip 2 stitches) 12 times. (48 sc and 12 ch-2 spaces; 72 stitch positions)
- Round 4: Repeat (sc in the next 4 sc, work 2 sc into the next ch-2 space) 12 times. (72 sts)
- Round 5: Sc in each stitch. (72 sts)
- Round 6: Sc in each stitch. Fasten off neatly. (72 sts)
- Each panel has two openings: one over its original top positions 5–6 and another over positions 11–12. The opening centers are six stitches apart. The uncinched upper circumference is approximately 45 cm at gauge.
- Leave the openings empty until the lining and reinforcement are prepared. Use the actual openings to mark the eyelet locations; do not estimate them from a ruler alone.
Fitted Lining and Base Support
- Make the lining from the assembled bag’s actual measurements. Lay one blocked panel on paper and trace its finished outline without including the raised joining ribs. Add the depth of the completed upper band above its top edge. This outline is the lining seam line.
- Add 1 cm seam allowance around both sides and the bottom, and 2 cm above the upper seam line for a folded hem. Cut six lining panels. Mark the original seam lines, front center and side-anchor positions.
- Sew the six lining panels together with right sides facing, stitching along the marked side seam lines. Leave an 8 cm turning gap in one lower side seam. Press the seam allowances open.
- Trace the finished crochet base as a seam-line template. Check that the paper circle’s circumference matches the sewn lining body’s lower seam line; adjust the circle slightly if needed. Add a 1 cm seam allowance and cut one lining base and one interfacing base.
- Fuse or sew the interfacing to the lining base according to its instructions. Sew the base into the lining tube, matching six equally spaced marks to the six panel seams.
- Cut the flexible insert approximately 3–5 mm smaller than the crochet base all around. Round and smooth its edges. Place it flat inside the crochet bag before fitting the lining. The insert sits between the crochet base and the lining base.
- Turn the lining so its seam allowances face the crochet. Fold its upper edge to the marked finished height, turning the raw edge under twice by 1 cm. Clip it approximately 3 mm below the crochet rim. The lining should reach the base without pulling the upper edge downward.
Upper Reinforcement and Eyelet Installation
- Cut a woven interfacing strip to the measured inside upper circumference plus a 1 cm overlap, and approximately 3 cm deep. Position it against the WS of the lining behind the upper band. Mark all 12 crochet openings through to this strip and the lining.
- Cut a 25 mm cotton webbing support band to the inside circumference plus a 2 cm overlap. Position it around the lining’s outside, immediately below the eyelet centers, so its upper edge clears every eyelet washer. Sew its overlap, then stitch both long edges to the lining and interfacing. Do not sew through the crochet at this stage.
- Before closing the lining gap, add the two anchor reinforcement patches described in the next section. This keeps access to the inside of the lining for sewing.
- Reinsert the lining and align all marks. At each crochet opening, punch only the lining and interfacing to the eyelet maker’s required diameter. Keep the crochet strands intact. If necessary, gently spread the existing chain opening with a blunt tool.
- Install each eyelet from the outside through the crochet opening, lining and interfacing, with its washer inside. Confirm that the barrel fits the actual layer thickness before setting. Set one sample through spare materials first.
- Set all 12 eyelets, checking for sharp edges and securely captured fabric. Hand-sew the lining’s folded rim to the inside of the crochet band with small stitches, and close the lower lining gap.
Leather Anchors, Handle and Optional Strap
- Use purchased leather fittings in dark olive. The crochet pattern does not include a crocheted handle, strap or drawcord. Choose anchor tabs intended for stitched bag attachment, with holes that allow a rectangular stitch line.
- On panels B and E, mark the midpoint between the two eyelets, approximately above top positions 8–9. This is slightly offset from each panel center so the leather clears the washers. Place the D-rings just above the upper rim. The folded leather tabs should extend approximately 3–4 cm down the outside and inside of the bag.
- Cut two 25 mm × 7 cm webbing patches. Before installing the lining permanently, sew one vertically at each anchor position on the lining’s outside. Overlap the horizontal support band by at least 2 cm and sew a rectangle with crossed diagonals through the overlapping webbing and lining.
- Fold each leather tab through its D-ring and over the bag rim, keeping the tab centered between the two eyelets on that panel. Align its inner portion with the vertical webbing patch.
- With strong upholstery thread, stitch through the prepared leather holes, crochet, lining and webbing reinforcement. Use two passes around a rectangle approximately 15 mm wide and 25 mm high, keeping stitches clear of eyelet washers. Secure thread ends inside the lining area before closing it.
- Clip the short leather handle to the two D-rings. Clip the optional shoulder strap to the same rings only if the rings and clasps comfortably accommodate both sets of fittings; otherwise remove the short handle when using the shoulder strap.
- Inspect the assembled anchors before use. Begin with light contents and check for movement, stretched crochet or loosening stitches. This original design has no verified carrying-load rating.
Leather Drawcord
- Keep the F–A seam facing forward. The first opening clockwise from this seam lies near the beginning of panel A; the final opening lies near the end of panel F.
- Feed one end of the olive leather drawcord from outside to inside through the first opening. Continue alternately inside and outside through all 12 eyelets. After the twelfth opening, both ends emerge outside on either side of the front seam.
- Center the cord so both ends are even. Cinch the opening gradually, distributing the gathers around all six panels. Tie the ends in a loose bow or a simple overhand knot when closed.
- Test the cord length before trimming. Leave enough slack to open the mouth fully, then finish the leather ends according to the supplier’s directions. The photographed long hanging ends can be retained without adding beads or decorative fittings.
Finishing
Weave crochet ends through several stitches on the inside, reversing direction before trimming. Smooth the lining into the base and check that it supports the contents without hanging from the eyelets. The six raised ribs should run from the base to the upper band, with the front drawcord centered between panels F and A.
Let the bag rest with a rolled towel inside to settle its shape, then remove the towel before use. Wipe the leather separately and follow the yarn and leather suppliers’ care instructions. Inspect the anchor stitching and eyelet edges regularly, especially after the bag has carried heavier items.
Tips for Success
- Place a removable marker every eight panel rows. Matching these markers during joining makes it easier to keep all six ribs the same length.
- Push each bobble outward before working the following plain row. This keeps the texture on the exterior without tightening the panel edges.
- Count the upper edge before starting the eyelet round: six panel tops of 12 stitches must produce exactly 72 stitches.
- Fit the lining with the bag standing on its base. A lining that is too short pulls on the rim and concentrates strain around the eyelets.
- Install the leather anchors through the webbing reinforcement. The crochet stitches alone should not carry the handle attachment.
Common Mistakes to Avoid
- Adding a chain after every bobble increases the stitch count. Close the bobble by pulling through its six loops, then work the next stated stitch directly.
- Working into seam caps at the top adds unwanted stitches and shifts the eyelets. Work only into each panel’s 12 final-row stitches.
- Joining two row ends into one seam stitch shortens a rib and twists the body. Undo that section and restore one joining sc per paired row end.
- Cutting yarn strands to fit an eyelet weakens the opening. Use the chain space, spread it gently and choose hardware with a suitable barrel.
- Sewing a tight lining into a softly rounded bag flattens the panels. Trace the blocked panel shape and check the lining fit before setting any eyelets.
Ways to Customize This Pattern
- Use a deeper moss shade for the crocheted body while retaining the dark olive leather for the same restrained appearance.
- Choose a plain sage lining or a darker olive lining; keep the same six-panel shape and reinforcement.
- Add a flat internal pocket to one lining panel before sewing the lining together. Keep its top below the reinforcement band.
- Use the short handle alone for a compact handbag, or remove it and use the optional adjustable strap for shoulder wear.
- Choose antique brass or dark gunmetal fittings, keeping the same eyelet diameter and matched D-ring and clasp sizes.
Frequently asked questions
Each 12-stitch bottom attaches to one sixth of the 72-stitch base. Increasing to 16 stitches adds fullness above the base, and decreasing back to 12 stitches brings the opening inward. Together, the six shaped panels create the bucket silhouette.
The lining and webbing form part of this design’s reinforcement. Keep them when using the leather handle or shoulder strap: the eyelets need backed fabric, and the anchor stitches need a stable layer behind the crochet.
Keep the 72-stitch allocation and adjust the base hook or tension. A rippling base generally needs tighter stitches; a cupping base generally needs looser stitches. Make the correction before attaching the panels, then lightly block and recheck.
Only if it slides freely through a sample eyelet and bends around its edge without catching. Test a doubled section where the ends overlap during handling. A stiff or oversized cord makes the opening difficult to gather.
No carrying capacity has been established for this untested design. It is intended as a personal handbag with light contents. Yarn stretch, stitching, leather quality and hardware all affect performance, so check the finished construction gradually under a light load.
The finished Sage Ridge Textured Bucket Bag Crochet Pattern

