Advanced
For experienced crocheters who enjoy complex shaping, fine detail, and ambitious construction
Single-Day Project
A satisfying project you can complete in a single afternoon or evening.
Handmade Gift
A beautiful keepsake — free forever. Read online or print at home.
About This Sage Shell Heirloom Bedspread
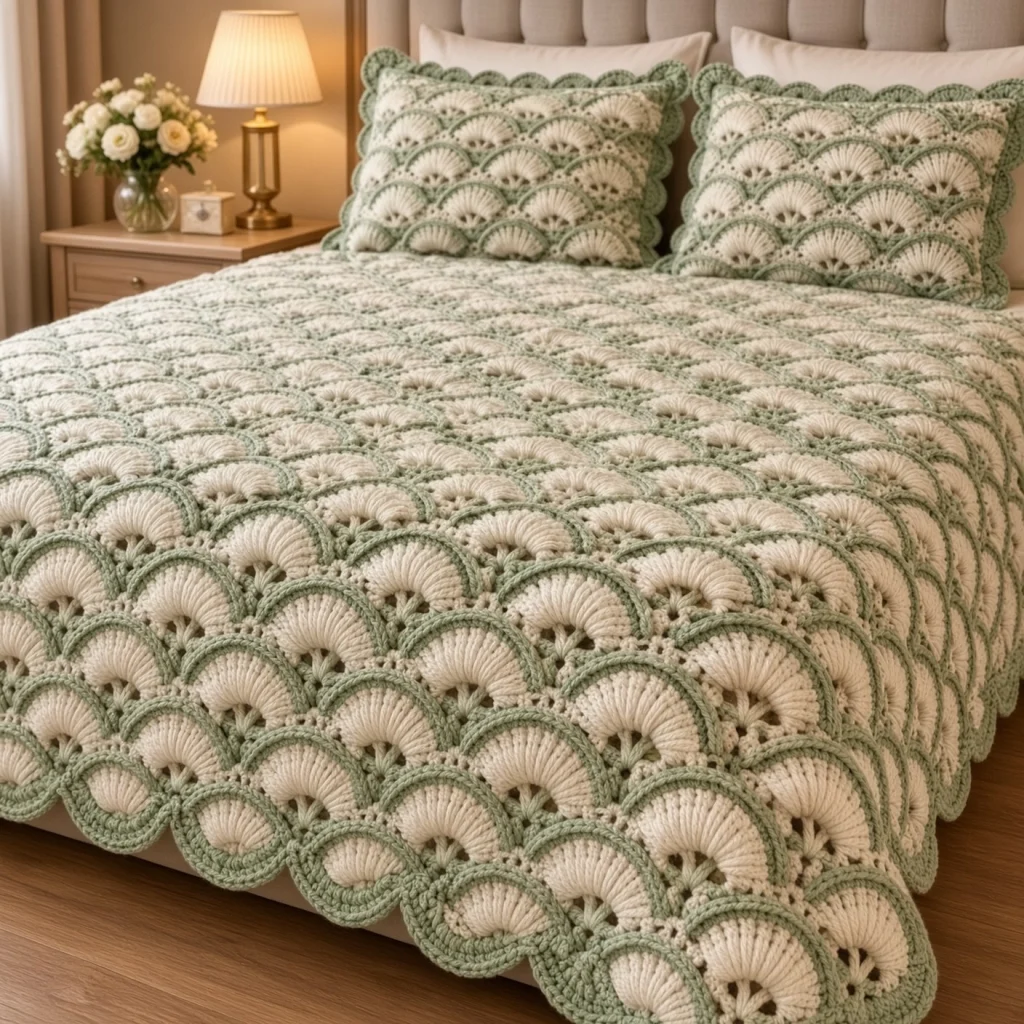
This sage shell bedspread crochet pattern turns two colours and one eight-stitch repeat into a full double-bed coverlet that looks like it came out of a linen cupboard forty years ago. Cream seven-double-crochet fans stack in neat columns, and every fan is cradled by a soft sage arch worked on the row between, so the two colours never sit side by side in the same row — they frame each other. The effect reads as a fish-scale or feather pattern from across the room, and as a crisp, structured texture up close.
It is an advanced make, but not because the stitches are hard. The challenge is in the scale and the discipline: 80 rows of a strict two-row repeat, a colour change at the end of every single row, and a three-round border with 928 foundation stitches that has to be counted exactly if the scallops are going to meet evenly at the corners. The fan row and the arch row depend on each other completely — put a fan on the wrong anchor stitch and the columns drift, and you will see it from the doorway. Count every fan.
Plan on 55 to 75 hours spread over several weeks, and roughly 2.2 kg of worsted cotton. It suits a confident crocheter who already has a blanket or two behind them and wants a project with a real finish line — something to work on in the evenings that ends up on a bed rather than in a basket. If you have never carried a second colour up the side edge for 80 rows, this pattern will teach you to do it tidily.
Materials
- Worsted / aran weight cotton or cotton blend in cream approx. 2,600 m / 1,500 g
- Worsted / aran weight cotton or cotton blend in soft sage green approx. 1,100 m / 650 g
- 4.5 mm crochet hook or size needed for gauge
- Blunt tapestry needle for weaving in ends
- Stitch markers at least 10, for marking fan columns
- Flexible tape measure 1.5 m or longer
- Rust-proof pins and large towels for wet blocking
- Scissors
Abbreviations
chchainsl stslip stitchscsingle crochethdchalf double crochetdcdouble crochetst(s)stitch(es)spspacefan7 dc worked into one stitchreprepeatRSright sideWSwrong sideGauge and Finished Size
- Gauge: 1 pattern repeat (one 7-dc fan plus one sc) measures 7.5 cm wide, measured across a blocked swatch.
- Height gauge: 8 rows (4 cream fan rows and 4 sage arch rows) measure 20 cm, so each cream/sage pair measures 5 cm.
- Swatch: ch 42 (5 repeats) and work Rows 1-9 of the Main Panel, then block it. Five repeats should measure 37.5 cm wide and 4 pairs should measure 20 cm tall.
- If your swatch is wider than 37.5 cm, go down to a 4 mm hook; if narrower, go up to a 5 mm hook. Width matters more than height here, because height is adjusted by adding or removing row pairs.
- Finished size as written: 21 repeats wide, 80 rows tall, plus a 5 cm border on all sides = approximately 168 cm x 210 cm, which covers a standard double bed with a drop on three sides.
Pattern Notes and Stitch Repeat
- The body is a strict two-row repeat: a cream fan row (RS) and a sage arch row (WS). The cream rows always carry the fans, the sage rows always carry the ch-3 arches.
- Fans are always worked into the sc that sits at the centre of the fan below, so the columns stack directly on top of one another. The plain sc between fans is always worked into the sc that sits between two fans below.
- Change colour by working the last yarn-over of the final stitch of each row with the new colour, then ch 1 and turn. This keeps the colour join invisible on the right side.
- Do not cut the yarn at every colour change. Carry the resting colour loosely up the side edge, catching it in the turning chain every row — 80 rows of cutting would leave you 160 ends to weave in.
- The turning ch 1 at the start of each row never counts as a stitch.
- Place a stitch marker in fan 1, 6, 11, 16 and 21 of Row 1 and move them up every few rows. If a marker ever sits off a fan centre, you have lost a stitch and should fix it immediately rather than three rows later.
Main Panel
- With cream, ch 170.
- Row 1 (RS, cream): sc in 2nd ch from hook, *skip 3 ch, 7 dc in next ch, skip 3 ch, sc in next ch; rep from * across — 21 fans, 22 sc, 169 sts.
- Row 2 (WS, sage): change to sage, ch 1, turn. Sc in first sc, *ch 3, skip 3 dc, sc in next dc (the 4th or centre dc of the fan), ch 3, skip 3 dc, sc in next sc; rep from * across — 43 sc and 42 ch-3 sps.
- Row 3 (RS, cream): change to cream, ch 1, turn. Sc in first sc, *skip ch-3 sp, 7 dc in next sc (a fan-centre sc), skip ch-3 sp, sc in next sc; rep from * across — 21 fans, 22 sc, 169 sts.
- Rows 4-79: rep Rows 2 and 3 thirty-eight more times, ending with a cream fan row — 40 cream fan rows and 39 sage arch rows worked, 169 sts on the last row.
- Row 80 (WS, sage): change to sage, ch 1, turn. Rep Row 2 — 43 sc and 42 ch-3 sps. This sage row closes the top edge so both long edges match.
- Fasten off cream and weave in the carried strand along the side edge. Do not fasten off sage; the border begins with it.
- The panel should now measure approximately 157.5 cm wide and 200 cm long, unblocked. Lay it out flat and check that all 21 fan columns run straight before you start the border.
Border Round 1 — Foundation Round
- Rnd 1 (sage): with RS facing, ch 1 and work sc around the whole panel as follows, placing 3 sc in each of the four corners.
- Top edge (Row 80): sc in each sc and 3 sc in each ch-3 sp across, but work 4 sc into the 11th, 21st, 31st and 41st ch-3 sp — 173 sc across the top edge.
- 3 sc in the corner.
- First side edge: work 4 sc along the end of each cream fan row and 3 sc along the end of each sage arch row (280 sc), plus 5 extra sc spaced evenly down the edge — 285 sc.
- 3 sc in the corner.
- Bottom edge: working into the free loops of the foundation chain, work 1 sc in each of the 170 chains plus 3 extra sc spaced evenly — 173 sc.
- 3 sc in the corner.
- Second side edge: work 285 sc to match the first side edge exactly.
- 3 sc in the final corner, sl st to the first sc to join — 928 sc total (173 + 285 + 173 + 285, plus 12 corner sts).
- Fasten off sage. Check the count now: every stitch in the next two rounds depends on this number being exact.
Border Round 2 — Fan Round
- Rnd 2 (cream): join cream with a sl st in the centre sc of any corner 3-sc group. Ch 3 (counts as the first dc of the corner fan), 3 dc in the same corner sc.
- *Skip 3 sc, sc in next sc, skip 3 sc, 7 dc in next sc; rep from * around the whole edge, working the 7-dc fan of each remaining corner into the centre sc of that corner’s 3-sc group.
- Each short edge takes 22 repeats from corner fan to corner fan and each long edge takes 36 repeats, so the pattern lands exactly on every corner centre.
- End the round with: skip 3 sc, sc in next sc, skip 3 sc, 3 dc in the same corner sc as the beginning ch-3, sl st to the top of the beginning ch-3 — 116 fans and 116 sc, 928 sts.
- Fasten off cream and weave in both ends on the wrong side.
Border Round 3 — Scalloped Edge
- Rnd 3 (sage): join sage with a sl st in any sc between two fans, ch 1.
- Over every ordinary fan work: sc in the sc, sc in the next dc, hdc in the next dc, 2 hdc in the next dc, (hdc, ch 1, hdc) in the next dc (the centre dc), 2 hdc in the next dc, hdc in the next dc, sc in the last dc of the fan — 11 sts per repeat.
- Over each of the four corner fans work: sc in the sc, sc in the next dc, 2 hdc in each of the next 2 dc, (2 dc, ch 2, 2 dc) in the next dc (the centre dc), 2 hdc in each of the next 2 dc, sc in the last dc of the fan — 15 sts per corner repeat. The extra height and the ch-2 give the corner room to lie flat.
- Continue around: 112 ordinary fan repeats and 4 corner repeats, sl st to the first sc to join — approximately 1,292 sts.
- Fasten off sage, leaving a 15 cm tail.
Finishing
Weave every end along the back of a fan rather than through an arch; the arches are open and a woven end shows through them. Work each tail through at least 8 cm of stitches, split the ply where you can, then trim. Go around the whole border once more with the blanket in your lap and check for any skipped join — on a piece this big it is easy to miss one.
Block it wet. Fill a bath with cool water and a little gentle wool wash, press the bedspread down until it is fully soaked, drain, press out the water against the side of the bath, then roll it in large towels to squeeze out more. Do not wring it and do not lift it by one corner when it is heavy with water — gather it into a bundle and carry it from underneath. Lay it out on a clean sheet on the floor, square it to 168 cm by 210 cm with a tape measure, and pin each scallop of the border out into a round arc. Cotton holds blocking well; let it dry fully, which may take two days. Once dry, the fans sit plump and the sage arches pull into clean curves, and the bedspread will keep that shape until the next wash.
Tips for Success
- Count the dc in every fan as you work it. Six dc instead of seven shortens that row by one stitch and throws every later count off — catching it inside the same fan costs ten seconds, catching it four rows later costs an hour.
- Carry the resting colour up the side edge instead of cutting, and catch it under the turning chain each row so it runs as a neat vertical line. Keep the carry loose or the side edge will draw in and the border will not lie flat.
- Work the ch-3 arches with a relaxed hand. They have to arc over the width of a seven-stitch fan; if you pull them tight the fabric buckles into ridges and no amount of blocking fixes it.
- Work the long rows in two sittings rather than rushing them — each cream row is 169 stitches, and tension drifts when you get tired. Stop at a row end, never mid-row.
- Once the piece gets heavy, rest its weight on your lap or a table instead of letting it hang from the hook. The drag of three kilos of damp-free cotton will loosen your stitches without you noticing.
Common Mistakes to Avoid
- Chaining the wrong multiple. The foundation must be a multiple of 8 plus 2. If Row 1 ends with a half fan or a stray chain, you have miscounted — pull back and recount rather than fudging the last repeat.
- Putting the fan on the wrong anchor stitch. On a cream row, the fan always goes into the sc that sat at the fan centre below, and the single sc always goes into the sc that sat between two fans. Swap them and the columns shift sideways by half a repeat and stay crooked forever.
- Skipping the sc along with the ch-3 space. On cream rows you skip the ch-3 space only — the sc on the far side of it is a working stitch. This is the single most common way crocheters lose stitches in this pattern; the marked fan columns will catch it.
- Treating the ch 1 as a stitch. The turning chain never counts here. Working into it adds a stitch at every row end and slowly flares both side edges.
- Guessing the border foundation count. If Border Round 1 does not come out at 173 / 285 / 173 / 285, the fan round will not land on the corners. Add or remove the evenly spaced extra sc along the straight edges until the counts are exact before moving on.
Ways to Customize This Pattern
- Resize it to any bed. Chain any multiple of 8 plus 2: 15 repeats (ch 122) gives a single-bed cover about 120 cm wide, 26 repeats (ch 210) gives a king-sized cover about 205 cm wide. Each repeat adds 7.5 cm of width and each row pair adds 5 cm of length. Adjust the border foundation counts so each straight edge is 5 more than a multiple of 8.
- Make the matching shams. Work two panels 6 repeats wide (ch 50) and 16 rows tall for the front and back of a 50 x 40 cm sham, hold them wrong sides together, join with sc through both layers around three sides in sage, slide the pillow in, and close the fourth side. Finish with Border Rounds 2 and 3 around the outside for the same scalloped frame.
- Flip the colours. Sage fans with cream arches reads much cooler and more modern; the pattern maths is identical, you simply swap which yarn starts Row 1. You will need about 2,600 m of sage and 1,100 m of cream.
- Work it tonal. Two shades of the same cream, or cream with oatmeal, gives an all-ivory heirloom coverlet where only the texture shows — the fans still read clearly because of the difference in stitch height.
- Sharpen the edging. Replace the ch 1 at the centre of each scallop in Border Round 3 with (ch 3, sl st in the 3rd ch from hook) for a picot point, which gives the edge a lacier, more antique finish.
Frequently asked questions
Yes, and a worsted acrylic will make the bedspread noticeably lighter and quicker to dry, which matters at this size. The trade-off is drape and definition: cotton holds the fans plump and keeps the scalloped border crisp, while acrylic softens the edges and tends to grow with weight once it is on the bed. If you use acrylic, go down half a hook size and steam-block rather than wet-block.
Yes. Work three strips of 7 repeats each (ch 58 per strip) to the full 80 rows, then join them with the right sides facing and a sc seam in sage worked through both edges, matching row for row. The seam disappears into the sage arch columns. Do the strip joins before Border Round 1, then work the border around the assembled piece using the same counts given in the pattern.
Almost always because the single sc at each end of the cream rows is being worked into the wrong place, or because the ch-3 arches are tightening as your tension changes. Lay the piece flat and count the fans in your current row — it must be 21. If it is 20, you lost a repeat; if it is 21 and the piece is still narrowing, your arches are too tight, so loosen the ch-3 and block generously at the end.
Machine wash cool on a gentle cycle with a mild detergent, no fabric softener, and let it spin out on a low speed. Do not tumble dry it — the weight of the wet fabric stretches the fans. Dry it flat on a sheet, nudging it back to 168 x 210 cm while it is still damp, exactly as you blocked it the first time. Washed this way it keeps its shape for years.
You can, but the panel edges will look unfinished because the side edges show row ends and the top and bottom show open arches. If you want something faster, work Border Round 1 only and then one more round of sc with 3 sc in each corner for a plain, tailored edge. Keep Round 1’s counts even if you skip Rounds 2 and 3 — it is what squares the piece up.
The finished Sage Shell Heirloom Bedspread

