Sage Spiral Mandala Doily Crochet Pattern
Advanced
For experienced crocheters who enjoy complex shaping, fine detail, and ambitious construction
Single-Day Project
A satisfying project you can complete in a single afternoon or evening.
Handmade Gift
A beautiful keepsake — free forever. Read online or print at home.
About This Sage Spiral Mandala Doily Crochet Pattern
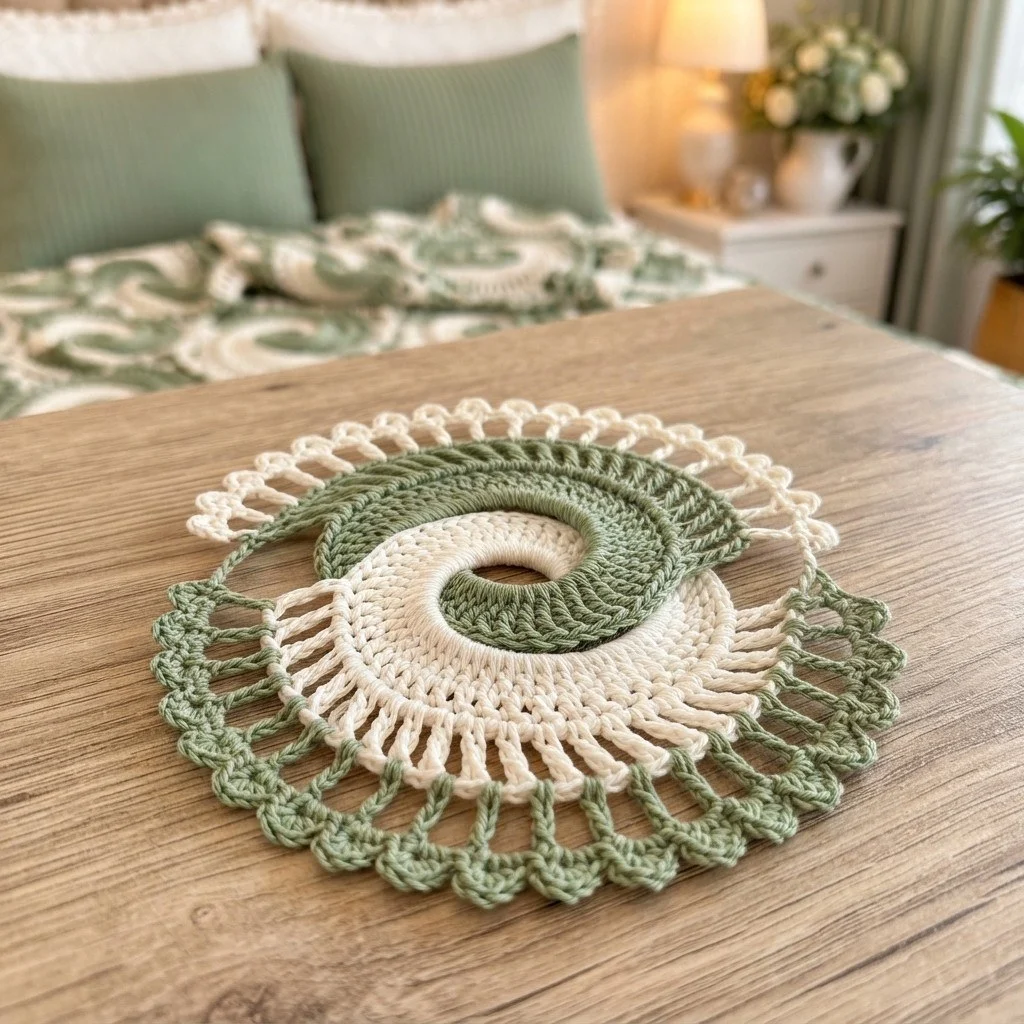
This spiral mandala doily crochet pattern turns two colours of cotton into a round mat that looks like it is slowly turning. The base disc is worked in a two-colour spiral, where the sage wedge is always exactly half the round but starts a little further along each time, so the colour division creeps around instead of running straight out from the centre. On top of that sits a separate coiled band, worked as a long curved strip and sewn down along its inner edge only, which lifts the outer edge into a soft shell-like ridge.
It is not a quick project. Expect seven to nine hours spread over a few sessions: around three for the disc, two to three for the coil, and the rest for blocking, pinning and sewing. None of the individual stitches are difficult, but the pattern asks you to manage two working yarns at once, read your stitch counts carefully across three colour segments per round, and shape a curved band with paired increases and decreases. If you have made flat circles and simple appliqué before, this is the natural next step up.
The finished doily measures about 27 cm across in worsted cotton and sits flat once blocked. It suits a bedside table, a dresser, a plant stand or the middle of a dining table, and the sage-and-cream palette reads as calm rather than decorative. Work it in a single colour if you want the texture to carry the piece on its own.
Materials
- Worsted weight cotton yarn in cream approx. 90 g
- Worsted weight cotton yarn in sage green approx. 70 g
- 4 mm crochet hook or size needed for a firm, flat fabric
- Blunt tapestry needle for sewing and surface detail
- Stitch markers at least 4, one as the round marker
- Rust-proof pins and a blocking mat essential for the coil
- Spray bottle or steam iron for wet or steam blocking
- Scissors
Abbreviations
MRmagic ringchchainsl stslip stitchscsingle crochethdchalf double crochetdcdouble crochettrtreble crochetinc2 stitches in the same stitchhdc2toghalf double crochet 2 togetherst(s)stitch(es)skskipspspacereprepeatRSright sideBase Disc
- Each round below gives the stitch pattern first, then the colour order. Colour segments are counted in finished stitches, left to right from the round marker, and a colour change may fall in the middle of an increase pair — count stitches, not increases.
- Round 1 (sage): 8 hdc in MR. Pull the ring closed. (8 sts)
- Round 2: inc in each st around. (16 sts) Colour: 8 sage, then join cream and work 8 cream.
- Round 3: (hdc in next st, inc in next st) rep 8 times. (24 sts) Colour: 1 cream, 12 sage, 11 cream.
- Round 4: (hdc in next 2 sts, inc) rep 8 times. (32 sts) Colour: 3 cream, 16 sage, 13 cream.
- Round 5: (hdc in next 3 sts, inc) rep 8 times. (40 sts) Colour: 5 cream, 20 sage, 15 cream.
- Round 6: (hdc in next 4 sts, inc) rep 8 times. (48 sts) Colour: 9 cream, 24 sage, 15 cream.
- Round 7: (hdc in next 5 sts, inc) rep 8 times. (56 sts) Colour: 13 cream, 28 sage, 15 cream.
- Round 8: (hdc in next 6 sts, inc) rep 8 times. (64 sts) Colour: 17 cream, 32 sage, 15 cream.
- Round 9: (hdc in next 7 sts, inc) rep 8 times. (72 sts) Colour: 23 cream, 36 sage, 13 cream.
- Round 10: (hdc in next 8 sts, inc) rep 8 times. (80 sts) Colour: 29 cream, 40 sage, 11 cream.
- Round 11: (hdc in next 9 sts, inc) rep 8 times. (88 sts) Colour: 36 cream, 44 sage, 8 cream.
- Round 12: (hdc in next 10 sts, inc) rep 8 times. (96 sts) Colour: 43 cream, 48 sage, 5 cream. The disc should now measure about 17 cm across and lie flat.
- Do not fasten off either colour. Mark the last stitch of Round 12 so you can find the start of Round 13.
Openwork Spoke Round
- Round 13: with cream, (tr in next st, ch 1, sk next st) rep 48 times. (48 tr and 48 ch-1 sps, using all 96 sts) Colour: work the first 24 tr and their ch-1 sps in cream, then change to sage and work the last 24 tr and their ch-1 sps in sage.
- Keep the treble stitches an even height. Make the ch-1 firm, not loose, or the spokes will lean.
- Round 14: sc in each tr and sc in each ch-1 sp around. (96 sts) Colour: 4 sage, 48 cream, 44 sage.
- Check the disc still lies flat. If the spoke round ruffles, your trebles are too tall or your ch-1 too loose; if it cups, the ch-1 spaces are too tight.
Picot Scallop Border
- Round 15 is worked as 24 scallops over the 96 sc of Round 14. Each scallop uses 4 stitches.
- Scallop repeat: sk 1 st, in next st work 2 dc, ch 3, sl st in the top of the last dc made (picot), 3 dc; sk 1 st, sl st in next st.
- Work the scallop repeat 24 times total. (24 scallops, 96 sts used)
- Colour: scallops 1-2 in sage, scallops 3-14 in cream, scallops 15-24 in sage. Carry the resting colour behind the sl st joins.
- Join the final sl st to the base of the first scallop. Fasten off both colours and weave in all ends on the wrong side.
Spiral Coil Band
- The band is worked flat in rows. The first stitch of each odd-numbered row is the OUTER edge of the coil; the first stitch of each even-numbered row is the INNER edge. Mark the outer edge with a stitch marker and move it up as you go.
- Curve row A (odd rows): ch 1, turn, 2 hdc in first st, hdc in each st to last 2 sts, hdc2tog. Stitch count unchanged.
- Curve row B (even rows): ch 1, turn, hdc2tog over first 2 sts, hdc in each st to last st, 2 hdc in last st. Stitch count unchanged.
- Grow row: worked exactly as the curve row for that side, but omit the hdc2tog at the inner edge. Stitch count increases by 1.
- With sage, ch 4. Row 1: hdc in 2nd ch from hook and in each ch across. (3 sts)
- Rows 2-12: work curve rows A and B in turn. (3 sts)
- Row 13: grow row. (4 sts) Rows 14-26: curve rows. (4 sts)
- Row 27: grow row. (5 sts) Rows 28-42: curve rows. (5 sts)
- Row 43: change to cream and work a grow row. (6 sts) Rows 44-58: curve rows. (6 sts)
- Row 59: grow row. (7 sts) Rows 60-74: curve rows. (7 sts)
- Row 75: grow row. (8 sts) Rows 76-84: curve rows. (8 sts)
- Row 85: change to sage, curve row. (8 sts) Rows 86-90: curve rows. (8 sts)
- Row 91: grow row. (9 sts) Rows 92-106: curve rows. (9 sts)
- Row 107: grow row. (10 sts) Rows 108-120: curve rows. (10 sts)
- Fasten off, leaving a 60 cm tail for sewing. The band should now be about 60 cm long, curving steadily toward the decrease edge, and widening from 3 to 10 stitches.
- Lay the band on the blocked disc as a spiral: the narrow sage tip goes at the centre and the wide sage end finishes at the outer edge of the solid disc, making roughly 2½ turns. Add or remove 6-row pairs at the outer end to fit your own gauge before sewing.
Centre Ring
- With sage, ch 8 and sl st in the first ch to form a ring.
- Round 1: ch 1, 20 sc into the ring, keeping the centre hole about 1 cm across. Sl st to the first sc. (20 sts)
- Round 2: ch 1, sc in each st around. Sl st to the first sc. (20 sts)
- Fasten off, leaving a 30 cm tail. Press the ring flat; it should sit upright like a short collar, not flop.
Blocking
- Wet the disc, squeeze out the water in a towel, and pin it face up on a blocking mat. Pin each of the 24 scallops individually and pull the picots outward so they stand clear of the edge.
- Measure across the disc in three directions as you pin; aim for 26-28 cm and the same measurement every way.
- Pin the coil band separately in its finished spiral shape, pressing the decrease edge into a tight curve with your fingers before pinning.
- Let both pieces dry fully, at least 12 hours, before sewing. Do not sew an unblocked coil; it will not hold the spiral.
Surface Detail
- Once the coil is sewn down (see Finishing), work a surface slip stitch chain in cream along the whole sewn inner edge of the coil, pushing the hook through the disc from below and drawing up a loop with each stitch.
- Work one surface sl st per row-end of the coil, about 120 stitches in total, keeping an even tension so the line does not pull the disc into a dome.
- Work a second short line of surface slip stitch in sage around the base of the centre ring, 20 stitches, to seat the ring against the disc.
- Fasten off both lines by drawing the tail through to the back and weaving it in under the hdc stitches of the disc.
Finishing
Lay the blocked disc right side up and set the coil band on top in its spiral, with the decrease edge facing inward. Pin the narrow sage tip around the centre ring first, then work outward, pinning every few centimetres and checking that each turn of the spiral clears the one before it by about 1 cm. The wide sage end should stop at the last solid round of the disc, just before the openwork spokes, so the spokes stay clear.
Sew the coil down along its inner edge only, using matching yarn and small whip stitches into the disc. Leave the outer edge completely free; that is what lifts the band into the raised shell ridge. Sew the centre ring down last, standing upright around the inner tip of the coil, then add the surface slip stitch lines described above.
Weave in every remaining end on the back, running each tail under at least 5 cm of stitches and splitting the yarn once as you go so nothing works loose in the wash. Give the finished doily a light steam from the back, hovering the iron rather than touching it, and let it cool flat.
Tips for Success
- Place a marker at the first stitch of every colour segment as you work each round of the disc, not just at the round start. Three markers per round makes the drifting spiral easy to check against the written counts.
- Carry the resting colour by laying it across the tops of the previous round’s stitches and working over it. Carried loosely it disappears; pulled tight it drags the colour boundary into a visible pucker.
- Keep the treble spoke round at a deliberate, even height by counting your yarn-overs out loud for the first few stitches. Uneven trebles are the one thing blocking cannot fully fix.
- Pin the coil band to the finished disc before you sew a single stitch, and adjust its length there. It is far easier to add six rows than to unpick a sewn spiral.
- Use cotton, not acrylic. The crisp stitch definition in the spokes and picots and the ability to hold a blocked shape both depend on it.
Common Mistakes to Avoid
- Counting increases instead of stitches at a colour change. The sage segment is always exactly half the round, so if a change lands mid-increase, change colour there anyway and keep the increase sequence running.
- A ruffled outer edge. This means the hdc rounds grew faster than a flat circle needs. Go down a hook size, or check that you worked exactly 8 increases per round and no accidental ninth.
- A coil band that will not curve. If you worked the increase and decrease on the same physical edge, the band drifts nowhere. Re-read the odd/even row note and keep a marker on the outer edge at all times.
- Sewing the coil down along both edges. That flattens the band into a stripe and loses the raised shell look entirely. Only the inner edge is attached.
- Skipping the block before assembly. An unblocked disc shrinks and shifts as it dries, which drags a sewn-on coil out of its spiral.
Ways to Customize This Pattern
- Work the whole piece in one colour and let the openwork spokes, picot scallops and raised coil carry the design through texture alone.
- Make it bigger by continuing the flat circle pattern: Round 13 would be (hdc in next 11 sts, inc) rep 8 times for 104 sts, Round 14 (hdc in next 12 sts, inc) rep 8 times for 112 sts, then move on to the spoke round with 52 or 56 trebles and adjust the border to 26 or 28 scallops.
- Swap the treble spoke round for double crochet to make a smaller, denser mat with a tighter openwork band, finishing at about 23 cm.
- Reverse the colour roles so the disc is mostly sage with a cream spiral, and work the coil in cream with a single sage turn in the middle.
- Drop the coil band and centre ring entirely to make a flat spiral placemat, then make four of them as a set.
Frequently asked questions
Because the starting point of the sage wedge moves. Each round, the cream segment that comes before the sage wedge gets a few stitches longer, so the half-round of sage begins further along than it did in the previous round. Over twelve rounds this adds up to roughly half a turn, which reads as a slow swirl rather than a straight two-tone split.
Carrying is strongly recommended. There are three colour segments in most rounds, so cutting and rejoining would leave around sixty ends to weave in, and each rejoin creates a small bump at the boundary. Carried yarn worked over is invisible from the front and keeps the colour line smooth.
Unpick from the outer end back to the nearest row count given in the pattern and fasten off early, or tighten the spiral by letting each turn sit closer to the one before. The band is written at 120 rows for a 27 cm disc, but hdc row height varies a lot between crocheters, so treat the row count as a starting point and fit it by pinning.
Yes, in cotton. Hand wash in cool water or use a delicate machine cycle inside a mesh bag, then reshape and re-pin it damp exactly as you did for the first block. The picots and the spiral will need re-pinning after every wash to stay crisp.
Work the coil band in a hook size smaller than the disc so the fabric is stiffer, and sew the inner edge with slightly tighter whip stitches. You can also run a single line of surface slip stitch along the free outer edge of the band in matching yarn, which firms that edge and helps it hold its lift.
The finished Sage Spiral Mandala Doily Crochet Pattern

