Sage Vine Leaf Crochet Bedspread Pattern
Beginner Friendly
Perfect for those just starting their crochet journey, with clear instructions and simple techniques
Single-Day Project
A satisfying project you can complete in a single afternoon or evening.
Handmade Gift
A beautiful keepsake — free forever. Read online or print at home.
About This Sage Vine Leaf Crochet Bedspread Pattern
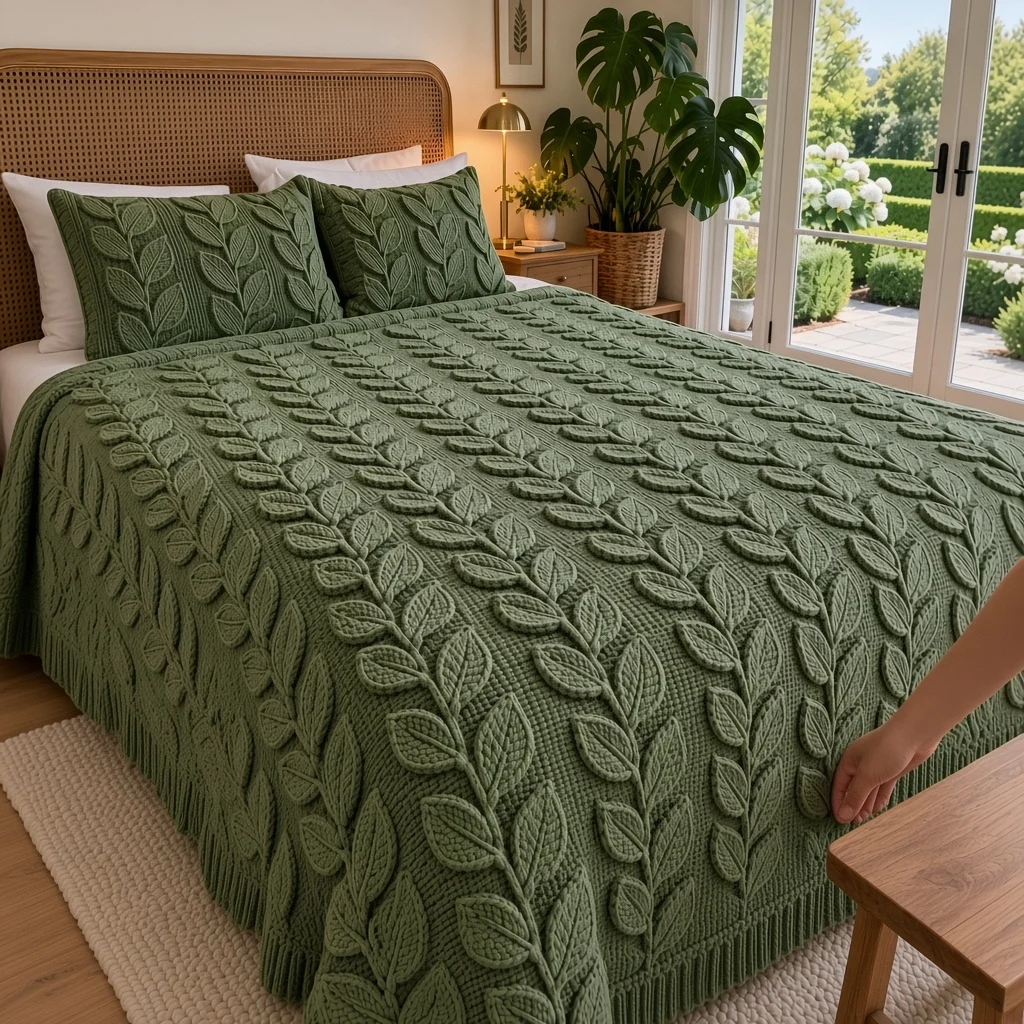
This crochet leaf blanket pattern runs seven climbing vines of raised leaves down a soft sage bedspread. The background is worked in linen stitch, a dense, woven-looking texture that gives the leaves a calm, even surface to sit on. The leaves are crocheted separately, each with an outlined edge and a raised center vein, and sewn in pairs along slip-stitched stems so they form soft chevrons from the head of the bed to the foot.
The bedspread is built from seven long panels, one vine per panel. Each panel is decorated before the panels are joined, so you never have to wrestle the full bedspread while sewing on leaves. Once the panels are joined, a deep post-stitch ribbing is worked around all four edges, which gives the bedspread weight and a neat, finished drape over the sides of the bed. Two pillow covers repeat the vines in a smaller format.
This is a long project, roughly 190 to 220 hours, with the 315 leaves taking a large share of that time. It suits an experienced crocheter who enjoys repetitive, portable work and careful finishing. The leaves are small and quick, so they are easy to make in odd moments. The result is a bedspread with real texture and a quiet, botanical look that works in almost any bedroom.
Materials
- Worsted weight (#4) yarn in sage green about 6,700 m / 7,330 yd in total: roughly 38 skeins of 100 g / 180 m (about 30 for the bedspread, 8 for the pillows)
- 5 mm (H-8) crochet hook
- 2 pillows 50 x 70 cm (20 x 28 in)
- Tapestry needle
- Contrasting basting thread to mark the stem lines
- Rust-proof pins, at least 50
- Stitch markers
- Tape measure
- Blocking mats and a spray bottle
Abbreviations
chchainsl stslip stitchsurface sl stslip stitch worked on top of finished fabric: hold the yarn behind the work, insert the hook from front to back and pull a loop up through the fabric and through the loop on the hookscsingle crochethdchalf double crochetdcdouble crochettrtreble crochetfpdcfront post double crochetbpdcback post double crochetBLOback loop onlyskskipspspacest(s)stitch(es)Background Panels (make 7)
- Ch 46.
- Row 1: Sc in 2nd ch from hook, *ch 1, sk next ch, sc in next ch* across. Turn. (23 sc and 22 ch-1 sps: 45 sts)
- Row 2: Ch 1 (does not count), sc in first sc, sc in first ch-1 sp, *ch 1, sk next sc, sc in next ch-1 sp* 21 times, sc in last sc. Turn. (24 sc and 21 ch-1 sps: 45 sts)
- Row 3: Ch 1 (does not count), sc in first sc, *ch 1, sk next sc, sc in next ch-1 sp* 21 times, ch 1, sk next sc, sc in last sc. Turn. (23 sc and 22 ch-1 sps: 45 sts)
- Repeat Rows 2-3 until the panel measures 240 cm (94.5 in), about 432 rows, ending with a Row 3. Fasten off.
- Write down your exact row count and work every panel to that same number, so the panel edges match row for row when you join them.
- Block each panel to 28 x 240 cm (11 x 94.5 in) and let it dry fully.
Leaves (make 369: 315 for the bedspread, 54 for the pillows)
- Ch 14.
- Rnd 1: Working into the back bumps of the chain, sl st in 2nd ch from hook, sc in next ch, hdc in next ch, dc in next 2 ch, tr in next 3 ch, dc in next 2 ch, hdc in next ch, sc in next ch, 3 sc in last ch for the leaf base. Rotate and work along the free loops of the other side of the chain: sc in next ch, hdc in next ch, dc in next 2 ch, tr in next 3 ch, dc in next 2 ch, hdc in next ch, sc in next ch, sl st in next ch. Ch 2 for the tip and sl st to the first sl st. (27 sts and a ch-2 tip sp)
- Rnd 2 (outline ridge): Ch 1. Working in BLO, sc in each of the 12 sts along the first side, 2 sc in each of the 3 base sts, and sc in each of the 12 sts along the second side. Work (sc, ch 2, sc) in the tip ch-2 sp. Sl st to first sc. (32 sc and a ch-2 tip)
- Center vein: Turn the leaf so the side with the front-loop ridge faces you. This is the right side. With a 30 cm length of yarn, work surface sl st along the foundation chain from the base to the tip. Fasten off and pull both vein ends to the wrong side.
- Fasten off the leaf, leaving a 30 cm tail for sewing. Each leaf should measure about 9.5 x 5 cm.
Vine Stems
- On each blocked panel, mark the stem with basting thread along the center column of stitches. Start 10 cm above the foot edge and stop 10 cm below the head edge, so the stem is 220 cm long.
- Holding 2 strands of yarn together, start at the foot end of the stem. Work surface sl st along the basting line, making 1 sl st in each row. Keep each loop about as tall as a single row so the stem lies flat and does not pull the panel in.
- At the head end, pull the yarn through to the wrong side, fasten off, and weave the ends in along the back of the stem. Remove the basting thread.
- Lay a tape measure along the stem and mark positions for the leaf pairs every 10 cm, starting 5 cm from the foot end. (22 pairs per stem, plus 1 tip leaf at the head end)
Attaching the Leaves
- At each marked position, pin one leaf on each side of the stem, with the leaf bases touching the stem at the same height.
- Angle both leaves about 40 degrees away from the stem, with their tips pointing toward the head of the bed. Each pair should form a V, and the pairs together should form a neat chevron line.
- Pin the single tip leaf straight up at the head end of the stem, with its base covering the end of the stem.
- Using the leaf tail, whipstitch each leaf down along the outside edge of Rnd 2, passing through the back half of the edge stitches only. That leaves the front-loop ridge raised. Space your stitches about 1 cm apart, pull them just snug, and fasten off on the wrong side.
- Check the whole panel before moving to the next. All leaves should sit at the same angle, and the pairs should be evenly spaced.
Joining the Panels
- Lay the 7 decorated panels side by side with the head ends aligned and all the leaves pointing the same way.
- Thread a tapestry needle with a long length of yarn. Join two panels with mattress stitch, catching the edge sc of one row on one panel and then the matching row on the next. Work row by row from the foot to the head.
- Pull the seam closed every few centimeters so it becomes invisible, but not so tight that it puckers. Join all 6 seams the same way.
Ribbed Border
- Rnd 1: With the right side facing, join yarn at one corner. Ch 1, then sc around all four edges as follows. Along the foot and head edges, work sc in each st of every panel, plus 1 sc at every seam (321 sc per edge). Along the long sides, work 9 sc for every 10 rows (about 389 sc per side). Work (sc, ch 2, sc) in each corner st. Sl st to first sc. The count on each side must be odd, so add or skip one sc on a side if needed.
- Rnd 2: Sl st into corner ch-2 sp. Ch 3 (counts as dc), (dc, ch 2, 2 dc) in same sp. *Fpdc around next st, then [bpdc around next st, fpdc around next st] across to the next corner, (2 dc, ch 2, 2 dc) in corner sp* around. Sl st to top of ch-3. Each side starts and ends with fpdc.
- Rnds 3-7: Sl st in next dc and into corner ch-2 sp. Ch 3, (dc, ch 2, 2 dc) in same sp. *Starting with fpdc, alternate fpdc and bpdc across all sts to the next corner, including the new corner dc, (2 dc, ch 2, 2 dc) in corner sp* around. Sl st to top of ch-3. The ribs line up with the round below because each side keeps an odd count.
- Rnd 8: Sl st in next dc and into corner ch-2 sp. Ch 1, 3 sc in corner sp. Sc in each st around, with 3 sc in each corner sp. Sl st to first sc. Fasten off and weave in ends.
Pillow Front (make 2)
- Ch 112.
- Row 1: Work as Panel Row 1. (56 sc and 55 ch-1 sps: 111 sts)
- Row 2: Ch 1, sc in first sc, sc in first ch-1 sp, *ch 1, sk next sc, sc in next ch-1 sp* 54 times, sc in last sc. Turn.
- Row 3: Ch 1, sc in first sc, *ch 1, sk next sc, sc in next ch-1 sp* 54 times, ch 1, sk next sc, sc in last sc. Turn.
- Repeat Rows 2-3 until the piece measures 50 cm (20 in), about 90 rows. Fasten off and block to 70 x 50 cm.
- Mark 3 stems running from the bottom edge to the top edge, spaced about 17.5 cm apart and starting 17.5 cm from each side. Each stem starts 4 cm above the bottom edge and ends 4 cm below the top. Work the stems in surface sl st as for the bedspread.
- On each stem, sew 4 pairs of leaves every 10 cm, starting 5 cm from the bottom of the stem, then add 1 tip leaf at the top. (27 leaves per pillow front)
Pillow Back (make 2)
- Work as Pillow Front Rows 1-3, then repeat Rows 2-3 until the piece measures 50 cm (20 in), using the same row count as the front.
- Fasten off and block to 70 x 50 cm. Leave the back plain.
Pillow Assembly (make 2)
- Hold one front and one back with wrong sides together, edges matched.
- Join yarn at one corner. Sc through both layers along three sides: 1 sc in each st along the top and bottom edges, and 9 sc for every 10 rows along the side edges. Work 3 sc in each corner.
- Slide the pillow in through the open side.
- Sc the fourth side closed, keeping the pillow away from your hook. Sl st to the first sc, fasten off, and hide the tail inside.
Finishing
When the border is done, lay the bedspread out flat and walk along each vine. Re-tack any leaf whose tip has lifted, and weave in any loose tails along the backs of the stems. Mist the background lightly and smooth the ribbing so it lies straight along every edge. Do not steam or press the leaves, or you will flatten their raised outline and center vein.
Because the bedspread is heavy, wash it by hand or on a gentle cycle in a large machine, and dry it flat. Support its weight when it is wet, so the ribbing and the linen stitch keep their shape.
Tips for Success
- Keep a running tally of finished leaves in batches of 45, one per panel. It is much easier to keep going when you can see each vine’s worth of leaves completed.
- Make a cardboard angle guide cut at 40 degrees and lay it against the stem when pinning each leaf. All 630 leaf angles across the bedspread will then match.
- Linen stitch is easy to miscount at the row ends. Place a marker in the first and last stitch of each row until the rhythm is automatic.
- Decorate each panel completely before joining. A 28 cm panel fits on your lap, while the full bedspread does not.
- Work the ribbing with relaxed tension. Post stitches pull in, and a tight border will make the edges of the bedspread curl.
Common Mistakes to Avoid
- Panels of different lengths: this happens when the row counts drift. Count your rows instead of only measuring, because blocked linen stitch stretches.
- Stems that pucker the panel: the surface slip stitches are too short or too tight. Work them looser, or go up to a 5.5 mm hook for the stems.
- Flat-looking leaves: the leaves were sewn through the front-loop ridge. Sew through the outer edge only so the outline stays raised.
- Leaves pointing different ways: mark the head end of every panel with a stitch marker before you start attaching leaves, and keep all tips toward it.
- A wavy or flared border: the sc count in Rnd 1 is too high along the long sides. Rework it at fewer sc per 10 rows until the edge lies flat.
Ways to Customize This Pattern
- Make the leaves one shade darker or lighter than the background so the vines stand out more.
- Work a throw with 4 panels at 150 cm long instead of 240 cm, which needs about 100 leaves and is a much shorter project.
- Replace the ribbing with three rounds of sc and a crab stitch edge for a quicker, slimmer border.
- Leave the outer two panels without vines for a framed, minimalist version that saves 90 leaves.
- Make a single leaf panel as a bed runner across the foot of a plain bed.
Frequently asked questions
Yes, as long as you chain a multiple of 2 plus 1 for the width. Sewing 315 leaves onto a single large piece is much harder to manage, though, and you lose the ability to work on one vine at a time. Panels are strongly recommended.
About 12 minutes to crochet the leaf and add the vein, plus around 5 minutes to sew it on. That totals about 90 hours for the bedspread leaves alone, so most people make leaves in small batches alongside other work.
Not if they are sewn all the way around the outline. Unlike leaves attached only at the base, fully stitched leaves cannot fold back or snag. Wash the bedspread on a gentle cycle and they will stay flat and secure.
Linen stitch is dense and almost woven, so it does not stretch out under the weight of the leaves. Its small, even texture also contrasts with the smooth, raised leaves, which is what makes the vines stand out without a second color.
The finished Sage Vine Leaf Crochet Bedspread Pattern

