Scalloped Loop Border Oval Placemat Crochet Pattern
Beginner Friendly
Perfect for those just starting their crochet journey, with clear instructions and simple techniques
Single-Day Project
A satisfying project you can complete in a single afternoon or evening.
Handmade Gift
A beautiful keepsake — free forever. Read online or print at home.
About This Scalloped Loop Border Oval Placemat Crochet Pattern
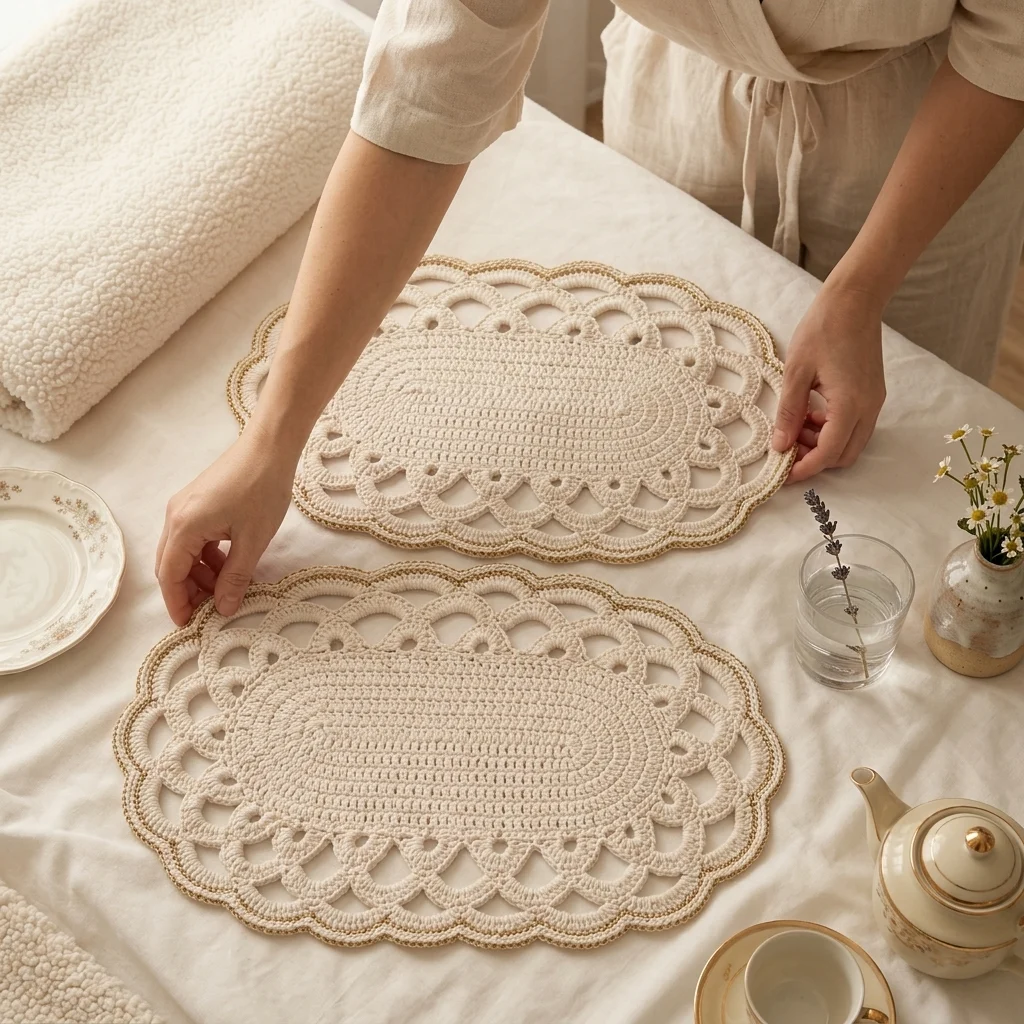
This crochet oval placemat pattern builds a solid, ribbed oval center in natural cream cotton, then frames it with a wide border of open double-row loops that catch the light and give the mat real dimension at the edge. A fine metallic gold thread worked around the very outer edge picks up a subtle shimmer against the plain cream, tying the whole mat together without overpowering it.
What makes this design distinctive is the contrast between the dense, practical center, worked in tight single crochet rounds for a sturdy surface that actually protects the table, and the airy, almost lace-like loop border that surrounds it. Building the border as two full rows of long loops, rather than a single row, is what gives it the deep, layered scallop look in the photo instead of a thin decorative edge. Expect to spend 6-8 hours per placemat, so plan accordingly for a full set.
This is an advanced pattern, best suited to someone comfortable maintaining even oval shaping through a solid center and working consistent long loop stitches for the border, rather than someone wanting a plain single-technique project.
Materials
- Worsted weight cotton yarn, cream ~90g per placemat
- Fine metallic gold thread ~5g per placemat, for the trim edge
- Crochet hook 4.5 mm (US 7)
- Smaller steel hook for the metallic trim round, optional
- Tapestry/yarn needle
- Steam iron and pressing cloth, or blocking mat and pins
- Sharp scissors
Abbreviations
chchainsl stslip stitchscsingle crochethdchalf double crochetdcdouble crochetincincrease (2 sc in one st)ch-spchain spacest(s)stitch(es)reprepeatFOfasten offOval Center (make 1 per placemat)
- Ch 16. Round 1: starting in 2nd ch from hook, sc in each ch across to the last ch, work 3 sc in the last ch to turn the corner, then sc back down the other side of the foundation chain, working 2 sc in the first ch to close the round. (34 sts)
- Round 2: inc in each of the 3 end-cap sts at both rounded ends, sc even along both straight sides. (40 sts)
- Round 3: sc even along the straight sides, inc every other st around both rounded ends. (46 sts)
- Round 4: sc even along the straight sides, inc every third st around both rounded ends. (50 sts)
- Rounds 5-9: continue sc even along the straight sides, adding an increase at each rounded end only as needed to keep the oval lying flat, checking after every round. (approx. 54-58 sts by Round 9)
- FO after Round 9, leaving a long tail for the border join.
First Loop Border Round
- Join cream in any st along the oval’s edge. Round 1: *sc in next st, ch 6, skip 2 sts; rep from * evenly around the entire oval, adjusting the skip count slightly at the rounded ends so loops stay evenly sized all the way around.
- Join with sl st to first sc. Do not FO; continue to the second loop round.
Second Loop Border Round
- Round 2: *sc in the ch-sp of the previous round’s loop, ch 6, sl st in the top of that same loop, ch 6; rep from * evenly around, working each new loop to hang slightly lower than and between the loops of Round 1, creating the layered double-loop scallop shown in the photo.
- Join with sl st to first st, FO leaving a short tail. Weave in ends from both loop rounds.
Metallic Gold Trim Edge
- With fine metallic gold thread and a smaller hook if needed, join at any point along the outer tips of the Round 2 loops.
- Work a single row of sc evenly around the outer tip of every loop, connecting them with a fine continuous gold line that traces the whole scalloped edge.
- Join with sl st to the first st and FO, weaving in the metallic tail carefully so it doesn’t show on the front.
Finishing
Steam-block the whole placemat, pinning the solid oval center flat and pinning each loop of the border open into an even, symmetrical scallop. Let it dry completely before stacking or using. Because the center is worked densely, these placemats hold up well to regular use; hand wash or gentle machine wash and reshape the loops while damp if the border flattens over time.
Tips for Success
- Check the oval center for flatness every 2 rounds during the increase rounds; catching a ripple or cupping early saves far more time than fixing it after the border is attached.
- Keep chain-6 loops in both border rounds a consistent length throughout; even small variations become very visible once loops are pinned open side by side.
- Work the metallic trim round with relaxed tension; metallic thread has little stretch and can pull the loops out of shape if worked too tightly.
- Make a full test placemat before committing to a full set, since small oval-shaping adjustments are much easier to make on a single piece.
- Block loops open individually with pins rather than just steaming and hoping they settle; this is what gives the border its crisp, even scallop look.
Common Mistakes to Avoid
- Adding increases at an even rate all the way around instead of concentrating them at the rounded ends distorts the oval into a circle. Fix: increase only at the curved ends, keeping the straight sides even.
- Working the second loop round directly on top of the first instead of offset between loops loses the layered scallop effect. Fix: center each Round 2 loop between two Round 1 loops as instructed.
- Skipping the metallic trim’s relaxed tension pulls the whole border in and flattens the loops. Fix: work this round noticeably looser than your normal sc tension.
- Not blocking the loops open individually leaves an uneven, collapsed-looking border. Fix: pin each loop into its open scallop shape while blocking.
- Using a heavier metallic thread than fine weight overwhelms the delicate trim look shown in the photo. Fix: stick to a fine metallic thread, thinner than your main cotton yarn.
Ways to Customize This Pattern
- Skip the metallic trim entirely for an all-cream, more understated version of the same placemat.
- Work the oval center in a soft color instead of cream for a different table palette.
- Add a third, smaller loop round between the first and second for an even fuller, deeper border.
- Scale the oval center down for a matching coaster set using the same loop border technique.
- Swap gold metallic thread for silver or copper to match different table settings.
Frequently asked questions
This pattern is written for one placemat at a time; repeat the full center and border for each additional mat in your set, matching increase counts each time for a consistent size.
Yes, the placemat is complete and functional without it. The gold trim is a decorative final touch, not a structural part of the border.
The loops are decorative rather than load-bearing, but they’re sturdy enough for normal handling and light use. Avoid setting hot dishware directly on the loop border itself; the solid center is the durable, functional part of the mat.
This usually means increases were added unevenly between the two rounded ends. Count your increase stitches at each end separately every round and keep them matched to correct this.
The finished Scalloped Loop Border Oval Placemat Crochet Pattern

